
Owner's Manual


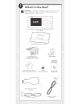
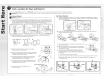
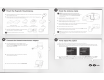
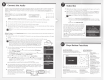
Table Of Contents

Find a Location for Onyx and Mount it
Select
either
the
Dash Mount
method
or
the
Vent Mount
method
for
your
Onyx. You will need a
phillips-head
screwdriver
to
complete
the
installation.
• IMPORTANT!
To
make the cable connections easier,
wait
until after you have connected all the cables
to
the
dock
before you attach the
dock
to
the dash
or
to
a vent.
Dash Mount Method:
•
IMPORTANT: The air temperature needs to be at least
60°F
to install the Dash Mount. If needed, turn
on
the
heater
in
your vehicle.
A.
Select a
flat
surface
for
the
Dash
Mount
with
ample
room
for
Onyx
. Avoid
mounting
on
leather
surfaces. Choose a location that doesn't interfere
with
the driver's vision
or
access
to
driving controls,
one
that
won't
interfere with the
deployment
of
airbags
or
other
safety equipment, and makes Onyx
easily accessible
for
operation.
(Airbag
locations are typically marked
with
"SRS" logos.)
B.
Orient
the
adhesive
foot
so
that
Onyx
is
easily accessible. Loosen
the
knob
and
adjust
the
adhesive
foot
to
position
1 or
2,
and
then
tighten
it.
Knob Adhesive Foot
~)
1~~
~~
C.
Attach
the
Dash
Mount
to
the
PowerConnect
Vehicle
Dock
using
the
4
provided
screws.
D. Before you
attach
the
Dash
Mount
to
the
dash, skip ahead
and finish
the
remainder
of
the
vehicle installation so
that
the
cables are
attached
to
the
dock.
E. Once
the
cables have been
attached
to
the
dock, clean
the
mounting
surface in
the
vehicle
with
the
alcohol
preparation
pad
and
let
it
dry
thoroughly.
F.
Once
the
surface
is
dry, remove
the
adhesive liner. Press
and
hold
the
Dash
Mount
in
place
for
30
seconds.
Allow
the
adhesive cure
for
2-4
hours.
G. You can
tilt
the
dock
mounting
plate
in
your
preferred
direction.
Vent Mount Method:
A.
Select a
vent
with
ample
room
for
Onyx.
one
that
won't
interfere
with
the
deployment
of
airbags
or
other
safety equipment, and makes Onyx easily accessible
for
operation. (Airbag locations are typically
marked
with
"SRS" logos.)
F
11
'
B.
Some
vents
have recessed louvers.
If
yours are recessed, remove
the
regular
vent
clamps
and
install
the
extended
vent
clamps
.
C.
Attach
the
Vent
Mount
to
the
PowerConnect Vehicle
Dock
using
the
4
prov
i
ded
screws.
D. Before
you
attach
the
Vent
Mount
to
the
vent,
skip
ahead and
finish
the
remainder
of
the
vehicle installation so
that
the
cables
are
attached
to
the
dock
.
E.
Once
the
cables have been
attached
to
the
dock,
install
the
Vent
Mount
onto
the
vehicle vent.
(Note
that
for
clarity
the
illustrations
below
do
not
show
the Vehicle
Dock
attached
to
the
Vent
Mount.)
1.
Insert
the
vent
mount
into
the
vent
opening.
II. Push
until
hooked
on
the
rear
of
the
vent
louver. Rest
the
foot
against
the
bottom
of
the
vent.
Ill.
If
necessary,
adjust
the
tilt
of
the Vent
Mount
by
repositioning
the
foot
to
a
different
tilt
adjustment
hole.
II
PUSH
••••
Vent
"
Louver
/HOOKED
Vent
Ill
TILT/
ADJUSTMENT
HOLES
Vent