GSA Operations Document Number: 401-364 GSA Operations Model 1500 Action Systems, a division of V&A Incorporated Las Cruces, New Mexico
GSA Operations Document Number: 401-364 GSA Operations Action Systems, a division of V&A Incorporated 480 North 17th Street Las Cruces, New Mexico 88005 (505) 526-6606 http://www.goaction.com January 13, 2000 The Action Systems’ “A” case concept and design is protected under the following United States patents: 5,212,628 , 5,226,540 , 5,442,512 , 5,590,022 . Copyright © 1998 Action Systems, a division of V&A Incorporated.
GSA Operations Document Number: 401-364 Table of Contents Preface..................................................................................................................................... 7 Component Overview ........................................................................................................... 8 Case Power Sources............................................................................................................. 9 External A/C Power ................................
GSA Operations Document Number: 401-364 Retrieving an Existing Document .........................................................................23 Printing .................................................................................................................................. 24 Printer Setup.........................................................................................................24 Printing a Document.................................................................................
GSA Operations Document Number: 401-364 Table of Figures Figure 1 "A" Case .........................................................................................................8 Figure 2 "B" Case .........................................................................................................8 Figure 3 External A/C Power Input .............................................................................10 Figure 4 External D/C Power Input .........................................................
GSA Operations Document Number: 401-364 Figure 28 ProComm Plus – Send Fax ........................................................................41 Figure 29 ProComm Plus Fax Status .........................................................................
GSA Operations Document Number: 401-364 Preface The GSA Unit is an integrated computer system in a ruggedized transportable carrying case. It contains a comprehensive power storage and management system, a laptop computer (with its own power management capabilities), a printer, and a page scanner. Software is included to operate and integrate all of this equipment as well as several models of digital camera.
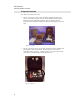
GSA Operations Document Number: 401-364 Component Overview The GSA Unit consists of two cases: • The “A” case (Figure 1) may contain the laptop computer, the printer, the scanner, the camera, the power inverter, a STU-III and internally mounted batteries and power management systems. This case contains the most frequently used components of the GSA UNIT and will probably be the most used.
GSA Operations Document Number: 401-364 Case Power Sources The GSA Unit can operate from a variety of power sources: external A/C power, external D/C power, and from internal batteries. When connecting to or disconnecting from an external power source, you may hear a click from inside the case. This is caused by relays within the unit and is normal.
GSA Operations Document Number: 401-364 External A/C Power The Alternating Current (A/C) connection to the GSA Unit accepts input voltages from 90 to 250 VAC at 50 to 60 Hz, as stated on the External A/C Power panel. Depending on the components in use, the state of the various batteries in the system, and the current operating conditions, the system will draw up to one ampere from the source. The system has circuitry to ensure overloads do not cause damage to the GSA Unit or to the installed components.
GSA Operations Document Number: 401-364 External D/C Power The Direct Current (D/C) Power Supply connector is the small, translucent plastic, arrow shaped connector on the back panel below the A/C power input (as shown in Figure 4). The acceptable input voltages are 10 to 14 VDC. Nonetheless, precautions must be taken to ensure the power connections are correct.
GSA Operations Document Number: 401-364 Internal Battery System Using internal batteries, no external power connections are required. When the GSA Unit is connected to an external power source, the internal batteries will automatically charge with power on or off. Fully discharged batteries may require five to ten minutes of charge prior to laptop and peripheral operation, if the case is being used at the same time that it is charging (connected to external power).
GSA Operations Document Number: 401-364 Computer Power Sources Case Supplied Power Since the GSA Unit is a fully integrated system, this is the preferred operating method. To operate in this mode, dock the computer, insert the power cable on the docking bar to the computer’s power input, and flip the CPU switch to the ON position. Computer Battery If you do not wish to power the computer through the case’s power supply, then you can use the computer’s internal battery to power it.
GSA Operations Document Number: 401-364 Power Management Because the GSA Unit is a sophisticated system with multiple potential power sources and several battery-powered components, optimal Power Management requires operator actions. When external power, either A/C or D/C, is available, that should be the preferred operating mode since it will generally provide the longest uninterrupted operation.
GSA Operations Document Number: 401-364 Controls and Indicators The GSA Unit control panel holds two lights and four operator accessible switches, all with internal lights (see Figure 6). Figure 6 Controls and Indicators External Power Light This light, labeled EXT PWR and located between the STORE/POWER switch and the CPU switch, is illuminated red whenever the GSA Unit is connected to external power. The case batteries will be recharging when this light is on.
GSA Operations Document Number: 401-364 STORE / POWER Switch In the STORE position, the computer and peripherals are disconnected from A/C and D/C power. This should be the position of the switch when the unit is to be stored for more than one day.
GSA Operations Document Number: 401-364 CAMERA / COM 1 Switch NOTE: In either position, the CAMERA/COM1 switch only works when the NONSECURE/STU switch is in the NONSECURE position. When the NONSECURE/STU switch is in the STU position, both COM1 and CAMERA ports are disabled. In the CAMERA position, the serial port of the computer is connected to the orange serial port on the inside panel of the case.
GSA Operations Document Number: 401-364 Turning on the System CAUTION: Before beginning a computer session, running a full Disk Recovery is highly recommended to reset the entire system, especially if this is the first session of a new series of operating sessions (see page 50). To power up the case • Locate the switch labeled STORE/POWER. • Position the switch to the POWER position. Power will now be provided to all devices in the case except the computer.
GSA Operations Document Number: 401-364 Operating System Logging In When Windows98 first starts up, a login dialog will appear. If the computer is hooked up to a network, then the first login dialog in (Figure 9) will appear. If not, then the second dialog will appear. Either way, enter your User name and Password. Click OK. After this, Windows will finish the boot process and you can begin work on the computer.
GSA Operations Document Number: 401-364 Shutting Down NOTE: Before any shutdown procedure, be sure to MOVE all data files off of the hard drive and onto removable storage media. The hard drive should be devoid of ANY classified data. Then do a DISK RECOVERY with either the CD for the 780 laptop or the CD and floppy for the 740. This will reset the entire system and "erase” any data on the hard drive and reset the system.
GSA Operations Document Number: 401-364 Removing PCMCIA Cards To remove PCMCIA cards from the computer: CAUTION: There exists a potential to damage a PCMCIA card if you do not first stop the card before removing it. • Left click on the PCMCIA card icon located on the lower right hand side of the computer screen (near the clock). • A list of cards that are currently inserted in the computer will appear. • Select the one you want to remove and click on it.
GSA Operations Document Number: 401-364 Software Creating a Document To create a document: • From the Desktop, double-click on the Microsoft Office folder. This will open a window similar to that in (Figure 11). Figure 11 Creating a New Document. • Double-click on one of the icons as appropriate for the document to be created. For example, to create a new spreadsheet, double-click on the Microsoft Excel icon. This will start the application and load an empty document ready for you to start working.
GSA Operations Document Number: 401-364 Retrieving an Existing Document To retrieve an existing document: NOTE: Unless specified otherwise, during a SAVE or SAVE AS operation of a file, the system defaults to saving all data files in the My Documents folder. • From the Desktop, double-click on the My Documents folder or whatever folder you specified, to open a window similar to that in (Figure 12). Figure 12 Retrieving an Existing Document • Double-click on the document you want to edit.
GSA Operations Document Number: 401-364 Printing Printer Setup To print from the computer, first setup the printer following these instructions: • If the computer is not connected to the docking tray, then connect it. • Connect the printer’s power and signal cable (wrapped together in white) as shown in Figure 13. Figure 13 Printer connection • Turn the printer’s power on. • Open the printer’s cover as shown in Figure 14.
GSA Operations Document Number: 401-364 • If the cartridge is centered and empty (a beeping should be heard warning that no ink cartridge is installed), insert an ink cartridge, close the cover, and press the cartridge button to reset the printer. Figure 15 Printer cartridge • If no warning beeps are heard and the carriage is stationed on the right side of the printer, then it should be ready to print.
GSA Operations Document Number: 401-364 Printing a Document To print a document: NOTE: All of the following actions will print the document to the default printer. If this is not what you want, then open the associated program (if not already open) and from the menu bar click on the File menu and select Print. This will bring up a dialog in which you can select the printer desired. 26 • Make sure the printer is connected (See the previous section on how to do this). • Turn the printer’s power on.
GSA Operations Document Number: 401-364 Imaging Scanning an Image or a Text Document using the PageScan Scanner To scan a picture using the page scanner: CAUTION: The scanner is self-propelled. Do not force paper through the scanner and do not force the scanner across a page. Damage to the scanner may result. CAUTION: You must lift up a crawling scanner to stop it. Please do not let it fall off the table! NOTE: If there is more than one scanning program open, then you will not be able to scan.
GSA Operations Document Number: 401-364 Figure 16 PageScan Scanner 28
GSA Operations Document Number: 401-364 To scan a picture: • Click on the Picture icon as shown in Figure 16. This brings up a window similar to that shown in Figure 17. Figure 17 Foto Touch • Select a Destination for the picture. • Click on the Scan Now button to begin scanning the picture. You will get the highest resolution scan using Black and White Picture as the Document Type. • From here, the program will exhibit one of two behaviors.
GSA Operations Document Number: 401-364 To scan (OCR) a text document: • Click on the ABC icon as shown in Figure 16. This brings up a window similar to that in Figure 18. Figure 18 OCR Scan 30 • Select the Destination of the document. • Click on the Scan Now button to begin scanning the text. • From here, the program will exhibit one of two behaviors.
GSA Operations Document Number: 401-364 Non-Secure Communication Connections Connecting to a Phone Line for Non-Secure Connections To connect the computer to a phone line: • Flip the NONSECURE/STU switch to the NONSECURE position. • Connect an RJ11 phone cable (a regular phone line) from the phone connection in the back of the case (shown in Figure 19) to the phone connection desired.
GSA Operations Document Number: 401-364 • The modem is ready for use. Connecting to a Local Area Network (LAN) to Access the Internet To connect the computer to a LAN: • Flip the NONSECURE/STU switch to the NONSECURE position. • Connect an RJ45 LAN cable (looks like the RJ11 phone line except a little thicker) from the LAN connection in the back of the case (shown in Figure 19) to the LAN connection desired.
GSA Operations Document Number: 401-364 Connecting to the Internet over a Phone Line To connect the computer to the Internet over a phone line: • Connect the computer to a phone line as detailed in the subsection titled Connecting to a Phone Line on page 31. • Double-click the Comms folder located on the Desktop. • Double-click Dial-Up Networking. NOTE: The first time you do this a dialog box stating Welcome to Dial-Up Networking might appear.
GSA Operations Document Number: 401-364 Figure 22 New Connection Setup • Enter in a phone number to the machine you are trying to connect to. NOTE: If using an INMARSAT as your transmission source, you must insert 01# (13 commas) (country code, e.g. USA is 001) (phone number to be dialed) #. For example if you wanted to call someone in the USA, then you would dial 01#,,,,,,,,,,,,,0015555555555# . This allows the satellite connection to be made.
GSA Operations Document Number: 401-364 Figure 23 Phone Number • Click Next (see Figure 23). • Click Finish. • Using the right mouse button, click on the connection made. While holding down the mouse button, drag the icon onto the desktop. Let go of the button. • Click on Create Shortcut. • This will put a shortcut on the Desktop to the connection. • Double-click on the shortcut. A Connect To window will appear with the information provided. • Click Connect.
GSA Operations Document Number: 401-364 Non-Secure Data: Sending and Receiving CAUTION: When in this mode, only Non-Secure data can be transmitted. Sending Non-Secure Data To transfer non-secure data using ProComm and the PCMCIA Modem: 36 • Insert the Xircom PCMCIA card as outlined in the Non-Secure Communication Connections section on Page 31. • Flip the NONSECURE/STU switch to the NONSECURE position.
GSA Operations Document Number: 401-364 • There are three indicators in ProComm Plus that let you know you are connected. They are the phone icon on the toolbar will be off the hook, the cd and cts lights will be red, and the word Connected will appear at the lower right. See Figure 24.
GSA Operations Document Number: 401-364 • Once the connection is established, click on the send folder (this is the folder with the arrow pointing up and out of the folder). This will open the Send File window as shown in Figure 25. Figure 25 ProComm Send File • To start the transmission, click on the file to be transferred and click OK. • When the transmission is complete, exit ProComm by clicking on File and then Exit.
GSA Operations Document Number: 401-364 • There are two ways to answer a data call: • • To automatically answer incoming calls, set the Xircom to answer data calls under the Options->System Options->Modem Connection. • To manually answer incoming calls, click on CmdMode (located at the bottom left of the ProComm screen). A message will appear stating “This modem is no longer accessible to other applications.” Type ATA when you see RING on the screen.
GSA Operations Document Number: 401-364 Non-Secure Faxes: Sending and Receiving CAUTION: When in this mode, only Non-Secure data can be transmitted. Sending a Non-Secure FAX To send a non-secure FAX: • Insert the Xircom PCMCIA card as outlined in the Non-Secure Communication Connections section on page 31. • Flip the NONSECURE/STU switch to the NONSECURE position. • Ensure that the receiving party has ProComm Plus Fax Status open and ready to receive the fax, if faxing to another GSA unit.
GSA Operations Document Number: 401-364 Figure 28 ProComm Plus – Send Fax • Fill in the Send to box and the FAX number box, then click Send. This will bring up a screen similar to that shown in Figure 29.
GSA Operations Document Number: 401-364 Figure 29 ProComm Plus Fax Status • 42 Click on Xircom card in the list shown in Figure 29 to view the sending status of the fax.
GSA Operations Document Number: 401-364 Receiving a Non-Secure FAX To receive a non-secure FAX document: • Insert the Xircom PCMCIA card as outlined in the Non-Secure Communication Connections section on page 31. • Flip the NONSECURE/STU switch to the NONSECURE position. • Double-click the Comms folder located on the Desktop. • Double-click the ProComm Fax Status icon to open a window similar to that shown in Figure 29. The system is ready to automatically receive a FAX.
GSA Operations Document Number: 401-364 Troubleshooting Case and Power System Nothing works • • 44 If running from an external power source, is the red External Power light on the GSA Unit control panel lit? If not, the GSA Unit is not actually connected to external power. Possible causes of this problem: • The A/C power cord is plugged into a power strip or plug that is not turned on. • The D/C power cord is connected to a source, e.g.
GSA Operations Document Number: 401-364 Computer I can’t find my files • Ensure the folder is the one in which the files were originally stored. • If it was a recent file, then click on the Start button and go to Documents. A list of the most current files modified is there. • Click on the Recycle Bin located on the Desktop. • Click on the Start button. From there go to Files and select Files or Folders. Type in the file you are looking for and click the Find Now button.
GSA Operations Document Number: 401-364 Printer Nothing prints • Ensure the printer is turned on and that the paper is properly inserted. • Check the cable from the GSA Unit to the printer. One or more colors are missing • Check or replace the ink cartridge. The printer seems to be printing, but nothing shows up on the paper • 46 Check or replace the ink cartridge.
GSA Operations Document Number: 401-364 Scanner Nothing scans • Ensure the scanner connector is properly inserted into the GSA Unit – especially check that the connector is straight when it is inserted into the GSA Unit case. • Close all scanning programs. Afterwards start the scanning program you want to use. The paper jams • Remove creases before inserting the paper. • Ensure the bottom to the scanner is properly attached.
GSA Operations Document Number: 401-364 Modem/FAX Cards General • Make sure that the modem is properly inserted into the PCMCIA card slot. If it is properly inserted then a card icon should appear in the system tray (the area next to the clock). • Try reinserting the communications card. • Make sure that only one communications card is in the PCMCIA slots. I cannot connect to the network • Go to the Start Menu and select Run. Type in winipcfg. Click Renew All. Click OK. • Restart the computer.
GSA Operations Document Number: 401-364 PCMCIA Cards Computer does not recognize the card • Remove the card from the PCMCIA slot. Firmly reinsert the card. An acknowledgement beep should sound and a PCMCIA card icon in the system tray at the lower right of the screen should appear. • Every time you remove the card, make sure you stop it first. To do this, left click on the card icon in the tray to bring up the list of cards currently active. Select the card you want to stop and click Stop.
GSA Operations Document Number: 401-364 Disk Recovery Procedures The following procedures may be used to restore the GSA Unit software to its original configuration. The entire process will take about 10 minutes to complete. CAUTION: These procedures will destroy all existing data on your hard disk! • 50 There are three ways to perform the recovery of a GSA Unit system. • If the computer’s power is on, open the CD-ROM drive and insert the ASD System Image Recovery CD-ROM. Close the CD-ROM drive.
GSA Operations Document Number: 401-364 Appendix A: Panel Color Coding Color Orange Green Red Black White Purpose Camera / Scanner Inverter STU-III Power COM/ Printer Cables 3 1 3 3 5 Location Front Front Back Back Back Type DB9 Female Input(s)/Output(s) Scanner Signal / Power Connector DB9 Male Camera Data/Serial 2.1mm Camera Power 2.
GSA Operations Document Number: 401-364 Appendix B: Secure Switch Matrix Switch/Connections STU Connected Not Connected STU COM (Phone) LAN (Docking Bar) STU PWR Phone (Docking Bar) STU Data COM1 (White) CAMERA (Orange) Non Secure LAN (Docking Bar) STU COM (Phone) Phone (Docking Bar) STU PWR COM1 (White) STU Data CAMERA (Orange) 52
GSA Operations Document Number: 401-364 Appendix E: Components Hardware Manufacturer 1500 Integrator Case A w/STU-III mounting Action Systems Accessory Case B Action Systems Shipping Case Action Systems Tecra 780CDM Toshiba Toshiba External Floppy Drive Toshiba 8.1 GB Hard Drive (Installed) Toshiba Li-Ion Battery (Installed) Toshiba 5.
GSA Operations Document Number: 401-364 54 Printer Signal Cable, 6 feet Action Systems Phone Cable, 10 feet Action Systems LAN Cable, 10 feet Action Systems LAN/Modem Y cable Action Systems Video Capture Cable, composite Nogatech Video Capture Cable, s-video (2 parts) Nogatech STU-III Phone Cable Action Systems STU-III Power Cable Action Systems STU-III Data Cable Action Systems SCSI cable Adaptec SCSI cable extension Action Systems CoolScan Power Cable, 25 inches Action Systems Zi
GSA Operations Document Number: 401-364 Plus! 98 Microsoft Office 97 Pro Microsoft Photoshop v5.0 Adobe Acrobat Reader 4.0 Adobe Navigator 4.51 (Free Download) Netscape QuickSolve 2.0 Kodak Pkzip v2.50 Pkware Procomm Plus v4.7 Quarterdeck VirusScan v4.0, McAfee Network Associates HiJaak Pro v4.5 IMSI WinZip v7.
GSA Operations Document Number: 401-364 Warranty Information Warranty of Supplies of a Noncomplex Nature ONE-YEAR LIMITED WARRANTY Action Systems, a Division of V&A Incorporated (hereafter referred to as Action Systems) warrants that the hardware (but not the software) included in the product sold by Action Systems will be free from defects in materials and workmanship for one (1) year from the date of shipment by Action Systems.
GSA Operations Document Number: 401-364 RETURN PROCEDURES You are responsible for returning products to Action Systems at your expense. Prior to returning product(s) to Action Systems for warranty service, you must obtain a Return Merchandise Authorization (RMA) number from Action Systems by calling 505 526-6606 (domestic and international customers).
GSA Operations Document Number: 401-364 TECHNICAL SUPPORT PROCEDURE AND SERVICE (FOR DOMESTIC CUSTOMERS ONLY) If you need technical support for your Integrator, and are a domestic customer, please call 505 526-6606 to speak with an Integrator technician. The technician will troubleshoot the reported problem and determine if the product should be returned for further diagnosis.
GSA Operations Document Number: 401-364 Components missing or subjected to failures resulting from: misuse, abuse, neglect, alteration, problems with electrical power, usage not in accordance with product instructions, acts of nature, unusual temperatures or humidity, improper installation or damage to the LCD display screens determined by Action Systems to have been caused by the customer, with respect to notebook computers, or repairs made by anyone other than Action Systems, Action Systemsqualified third
GSA Operations Document Number: 401-364 NOT INCLUDE SHIPPING COSTS, INSURANCE, AND, IF APPLICABLE, IMPORT AND EXPORT DUTIES, AND ANY OTHER FEES AND CHARGES IMPOSED BY GOVERNMENT OR QUASI-GOVERNMENTAL AGENCIES, ALL OF WHICH MUST BE PAID BY YOU. GOVERNING LAW, JURISDICTION AND COSTS THESE LIMITED WARRANTIES ARE INCORPORATED INTO AND ARE ESSENTIAL AND MATERIAL PROVISIONS OF THE TERMS AND CONDITIONS OF SALE OF ACTION SYSTEMS PRODUCTS TO YOU (SALE TERMS).