
Installation Instructions

Installation and pairing of remote control
1.Remote control installation
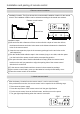
Installation location: The figure shows the recommended installation location for the remote
control. The installation location can be selected according to the actual use at home.
2. Match remote control
After the battery is loaded into the remote control, it can be used normally.
About 90 cm
Remote control bracket
STOP gear light
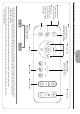
Installation steps:
ʒDrill two holes with a diameter of 6mm on the wall with a depth of more than 45mm,
the distance between two holes is the same as the distance between the installation
holes of the remote control
ʓ Insert the two expansion pipes in the accessory package into the two holes on the
wall respectively
ʔTear the double-sided adhesive tape in the accessory bag on one side, and then paste
it on the back of the remote control bracket corresponding position
ʕTear open the other side of double-sided adhesive tape, paste the remote control
bracket on the wall, pay attention to align the opening hole of the remote control
with the hole on the wall
ʖFix the remote control bracket with two screws in the accessories package
ʗOpen remote control battery cover, put the batteries in and put back battery cover
ʘPlace the remote control on the bracket
If the product has no action, the remote control can be repaired in the following ways:
①Disconnect the power supply
②Press the stop button of the remote control until the gear light flashes
③Put the remote control close to the flush button, and then turn on the power
④The gear light stops flashing when the match is successful