
User Manual

Page 9
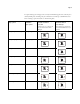
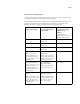
Punch options for landscape jobs
Certain punch settings for Landscape jobs punch in the opposite side that you specify when
printing to the digital press from a FreeFlow client application.
To apply punch on landscape jobs of all paper sizes correctly from FreeFlow applications, send
the job to the Fiery Hold queue and change the job’s Orientation to Landscape at the
EX Print Server before releasing to print. For details see the following table:
FreeFlow Print Manager
Finishing punch settings
Command WorkStation Job
Properties Finishing tab
punch settings
Final output Punch Position
for Landscape jobs with
Orientation set to
Landscape
(Select Landscape for
Orientation from Command
WorkStation Job Properties)
Punch - Left Portrait Punch Position: Left
2 Hole punch
Left 2 Hole punch
Punch - Right Portrait Punch Position: Right
2 Hole punch
Right 2 Hole punch
Punch - Top Portrait Punch Position: Top
2 Hole punch
Top 2 Hole punch
Punch - Bottom Portrait
NOTE: To print a job as
Punch-Bottom Portrait, you
must send the job from the
FreeFlow Print Manger to the
Fiery Hold queue.
Punch Position: Top
2 Hole punch
NOTE: Change the Punch
Position setting from None to
Top. In the Layout tab, select
the Rotate 180 check box.
Bottom 2 Hole punch
Coil Punch - Top Landscape
NOTE: To print a job as Coil
Punch-Top Landscape, you
must send the job from the
FreeFlow Print Manger to the
Fiery Hold queue.
Punch Position: Top
Advanced-LTR Punch
NOTE: Change the Punch
Position from Left to Top.
Top Coil Punch
Coil Punch - Bottom
Landscape
NOTE: To print a job as Coil
Punch-Bottom Landscape, you
must send the job from the
FreeFlow Print Manger to the
Fiery Hold queue.
Punch Position: Top
Advanced-LTR Punch
NOTE: Change the Punch
Position from Left to Top. In
the Layout tab, select the
Rotate 180 check box.
Bottom Coil Punch