Customer Release Notes FreeFlow Express to Print, Makeready, Process Manager, Web Services, Print Manager, and Output Manager version 7.0 SP3 for the Xerox EX Print Server, Powered by Fiery, for the Xerox 700 Digital Color Press version 1.5 This document contains information about the installation and use of FreeFlow Express to Print, Makeready, Process Manager, Web Services, Print Manager, and Output Manager version 7.
Page 2 Before printing Before printing to the EX Print Server, verify the following: • The FreeFlow IPP enablement file is installed on the EX Print Server. To verify enablement, print a Configuration page and verify that the Update Information section includes the file name: 1-12RHJ1. For information about printing a Configuration page, see Configuration and Setup. For instructions on downloading and installing the FreeFlow enablement file, see “Installation” on page 3.
Page 3 Installation Obtaining the FreeFlow enablement file The FreeFlow enablement file is available from System Updates, WebTools, or www.xerox.com. The enablement file applies to the entire suite of FreeFlow applications, which includes Xerox FreeFlow Express to Print, Makeready, Process Manager, Web Services, Print Manager, and Output Manager v. 7.0 SP3. Installing the Fiery FreeFlow enablement file You can apply the enablement file directly through System Updates.
Page 4 5 Type the EX Print Server IP address or EX Print Server server name for the Hostname. 6 Click Connect. The Server Information window appears. 7 Click Download. The file 1-12RHJ1.exe is extracted and downloaded. 8 Click Next. 9 Select Restart Fiery Service. Allow the EX Print Server to restart without interruption. 10 When the EX Print Server displays Idle, print a Configuration page, and verify that the Update Information section includes the file name: 1-12RHJ1.
Page 5 Contrast, Saturation and Color Cast The FreeFlow enablement supports Contrast, Saturation, and Color Cast. N OTE : In order for these features to work, you must install the Fiery patch 1-12S4R5, which can be downloaded to the EX Print Server from System Updates or WebTools. To view how Saturation, Contrast, and Color Cast map on the EX Print Server, perform the following steps: 1 Submit a color job to the EX Print Server Hold queue. 2 In Command WorkStation, select the job and right click on it.
Page 6 Virtual Printers The FreeFlow enablement supports Fiery Virtual Printers, which allow you to print to the EX Print Server using predefined settings saved as a special print queue. The Fiery administrator can create virtual printers and publish them so that users can access them on the network. For information about using virtual printers, see Command WorkStation Additional Information in Utilities, which is part of the user documentation set.
Page 7 When you send an RDO (raster data object) file to the EX Print Server and insert tabs in Command WorkStation, the tab text does not print correctly on the right-hand side. To avoid this, insert tabs in FreeFlow Makeready or send the job to Command WorkStation as a PDF (not RDO) file. N OTE : The file must be saved with the .RDO extension. If you override the job name found in Job Notes, make sure that the job name ends with the .RDO extension.
Page 8 To staple landscape jobs of all paper sizes correctly from FreeFlow applications, send the job to the Fiery Hold queue and change the job’s Orientation to Landscape at the EX Print Server before releasing to print. For details, see the following table.
Page 9 Punch options for landscape jobs Certain punch settings for Landscape jobs punch in the opposite side that you specify when printing to the digital press from a FreeFlow client application. To apply punch on landscape jobs of all paper sizes correctly from FreeFlow applications, send the job to the Fiery Hold queue and change the job’s Orientation to Landscape at the EX Print Server before releasing to print.
Page 10 Output Tray names FreeFlow output locations correspond to different output tray names in the EX Print Server user interface. The following table lists these equivalents: FreeFlow Print Manager EX Print Server Printer’s Default Automatic AutoSelect Top Tray Offset Catch Tray (OCT), HCS Top Tray, or D4 Finisher Top Tray Stacker D4 Finisher Stacker Tray or HCS Stacker Stacker 2 D4 Finisher Stacker Jobs without finishing are delivered to the HCS Top Tray or HCS Stacker Tray, if attached.
Page 11 Printing to EX Print Server using the FreeFlow Job Submission option If you are using FreeFlow Job Submission options, select the EX Print Server’s Print queue in order to receive the expected result. The following table describes the result when FreeFlow is connected to different EX Print Server queues. EX Print Server queue Setting Outcome Print queue Print Job is printed and saved in Printed queue. Save Job is processed and held in raster format in the EX Print Server, but not printed.
Page 12 Coated paper and Media weight Coated paper is limited to 106-128 gsm, 129-150 gsm, 151-176 gsm, and 177-220 gsm. If you specify Coated paper with a media weight that is outside this range (for example, 64-80 gsm or 221-256 gsm), the digital press will request Uncoated paper at the specified media weight. To specify Coated paper, you must select a media weight within the 106-220 gsm range.
Notes de mise à jour client FreeFlow Express to Print, Makeready, Process Manager, Web Services, Print Manager et Output Manager version 7.0 SP3 pour le Xerox EX Print Server, piloté par Fiery, pour la Xerox 700 Digital Color Press version 1.5 Ce document contient des informations concernant l’installation et l’utilisation de FreeFlow Express to Print, Makeready, Process Manager, Web Services, Print Manager et Output Manager version 7.
Page 14 Avant d’imprimer Avant d’imprimer sur l’EX Print Server, vérifiez ce qui suit : • Le fichier d’activation FreeFlow IPP est installé sur l’EX Print Server. Pour le vérifier, imprimez une page de configuration et assurez-vous que la section de mise à jour des informations contient le nom de fichier suivant : 1-12RHJ1. Pour plus d’informations sur l’impression d’une page de configuration, voir Configuration et installation.
Page 15 Installation Obtention du fichier d’activation FreeFlow Le fichier d’activation FreeFlow est disponible depuis Mises à jour système, les WebTools ou sur le site www.xerox.com. Ce fichier s’applique à l’intégralité des applications FreeFlow, c’est-à-dire Xerox FreeFlow Express to Print, Makeready, Process Manager, Web Services, Print Manager et Output Manager version 7.0 SP3.
Page 16 5 Entrez l’adresse IP de l’EX Print Server ou le nom du serveur EX Print Server pour le nom d’hôte. 6 Cliquez sur Connect (Connexion). La fenêtre Server Information (Informations sur le serveur) s’affiche. 7 Cliquez sur Download (Télécharger). Le fichier 1-12RHJ1.exe est extrait et téléchargé. 8 Cliquez sur Next (Suivant). 9 Sélectionnez Restart Fiery Service (Redémarrer le service Fiery). Laissez l’EX Print Server redémarrer sans l’interrompre.
Page 17 Contraste, saturation et dominante L’activation de FreeFlow permet la prise en charge les options de contraste, de saturation et de dominante. R EMARQUE : Pour que ces fonctionnalités soient disponibles, il faut installer le correctif Fiery 1-12S4R5, qui peut être téléchargé sur l’EX Print Server à partir de Mises à jour système ou des WebTools.
Page 18 Imprimantes virtuelles L’activation FreeFlow prend en charge les imprimantes virtuelles Fiery, qui permettent d’imprimer sur l’EX Print Server avec des paramètres prédéfinis enregistrés en tant que file d’impression spécifique. L’administrateur Fiery peut créer des imprimantes virtuelles et les publier pour que les utilisateurs puissent y avoir accès sur le réseau.
Page 19 Lorsque vous envoyez un fichier RDO (raster data object) vers l’EX Print Server et que vous insérez des onglets dans la Command WorkStation, le texte de l’onglet ne s’imprime pas correctement à droite. Pour éviter ce problème, insérez les onglets dans FreeFlow Makeready ou envoyez la tâche au format PDF (et non RDO) à la Command WorkStation. R EMARQUE : Le fichier doit être enregistré avec l’extension .RDO.
Page 20 Pour agrafer correctement les tâches en orientation paysage de tous les formats papier à partir des applications FreeFlow, envoyez la tâche vers la queue Attente du Fiery et modifiez son orientation sur l’EX Print Server (sélectionnez le mode Paysage) avant de lancer l’impression. Pour plus de détails, reportez-vous au tableau ci-dessous.
Page 21 Options de perforation des tâches en orientation paysage Avec certains paramètres de perforation des tâches en orientation paysage, les perforations sont effectuées du mauvais côté lorsque l’on imprime sur la presse numérique depuis une application cliente FreeFlow.
Page 22 Noms des bacs Les emplacements de sortie de FreeFlow correspondent à des noms de réceptacles différents sur l’interface utilisateur de l’EX Print Server.
Page 23 Annulation des tâches FreeFlow Si vous sélectionnez l’annulation depuis FreeFlow Status (Statut FreeFlow) à l’aide du chemin d’impression EX Print Server, la tâche ne s’annule pas sur l’EX Print Server même si FreeFlow indique qu’elle a été correctement annulée. Impression sur l’EX Print Server à l’aide des options de soumission de FreeFlow Si vous utilisez les options de soumission de FreeFlow, sélectionnez la queue Impression de l’EX Print Server pour obtenir le résultat souhaité.
Page 24 Chemin d’impression de production Le chemin d’impression de production de FreeFlow prend en charge les options de formatage suivantes pour les fichiers TIFF, RDO et JPEG : • Orientation • Mise en page • Réduction/Agrandissement • Rotation Pour obtenir des résultats semblables avec les fichiers PDF et PostScript, envoyez la tâche à la queue Attente de l’EX Print Server et sélectionnez les options équivalentes dans les propriétés de la tâche de la Command WorkStation.
Note di release per l’utente FreeFlow Express to Print, Makeready, Process Manager, Web Services, Print Manager e Output Manager versione 7.0 SP3 per Xerox EX Print Server, Powered by Fiery, per Xerox 700 Digital Color Press versione 1.5 Questo documento contiene informazioni relative all’installazione e all’uso di FreeFlow Express to Print, Makeready, Process Manager, Web Services, Print Manager e Output Manager, versione 7.
Pagina 26 Prima della stampa Prima di stampare su EX Print Server, verificare quanto segue: • Il file di attivazione IPP di FreeFlow deve essere installato su EX Print Server. Per verificare l’attivazione, stampare una pagina di configurazione e controllare che nella sezione delle informazioni di aggiornamento sia indicato il nome del file: 1-12RHJ1. Per informazioni sulla stampa della pagina di configurazione, vedere il manuale Configurazione e impostazione.
Pagina 27 Installazione File di attivazione di FreeFlow Il file di attivazione di FreeFlow è disponibile da Aggiornamenti Sistema, da WebTools o dal sito www.xerox.com. Il file di attivazione è applicabile all’intera suite di applicazioni FreeFlow che comprende: Xerox FreeFlow Express to Print, Makeready, Process Manager, Web Services, Print Manager e Output Manager v. 7.0 SP3.
Pagina 28 5 Immettere l’indirizzo IP di EX Print Server o il nome server di EX Print Server nel campo Hostname (Nome host). 6 Fare clic su Connect (Collega). Appare la finestra Server Information (Informazioni server). 7 Fare clic su Download (Scarica). Il file 1-12RHJ1.exe viene estratto e scaricato. 8 Fare clic su Next (Avanti). 9 Selezionare Restart Fiery Service (Riavvia servizio Fiery). Attendere che EX Print Server si riavvii senza interruzioni.
Pagina 29 Contrasto, saturazione e dominante di colore L’attivazione di FreeFlow supporta l’impostazione di contrasto, saturazione e dominante di colore. N OTA : Per poter utilizzare queste funzioni, è necessario installare la patch Fiery 1-12S4R5, che può essere scaricata su EX Print Server da Aggiornamenti Sistema o WebTools.
Pagina 30 Stampanti virtuali L’abilitazione FreeFlow ora supporta le stampanti virtuali Fiery, che consentono di stampare su EX Print Server con impostazioni predefinite salvate in una coda di stampa speciale. L’amministratore di Fiery può creare le stampanti virtuali e pubblicarle in modo da consentire agli utenti di accedervi in rete.
Pagina 31 Quando si invia un file RDO (Raster Data Object) su EX Print Server e si inseriscono separatori da Command WorkStation, il testo dei separatori non viene stampato correttamente sul lato destro. Per ovviare al problema, inserire i separatori in FreeFlow Makeready o inviare il lavoro su Command WorkStation come file PDF (non in formato RDO). N OTA : Il file deve essere salvato con l’estensione .RDO.
Pagina 32 Per eseguire correttamente la graffatura dei lavori con orientamento orizzontale di qualsiasi formato dalle applicazioni FreeFlow, inviare il lavoro alla coda di attesa di Fiery e cambiare l’orientamento in Orizzontale su EX Print Server prima di rilasciarlo per la stampa. Per i dettagli, vedere la seguente tabella.
Pagina 33 Opzioni di perforatura per i lavori con orientamento orizzontale Alcune impostazioni di perforatura per i lavori con orientamento orizzontale praticano i fori sul lato opposto a quello specificato quando si stampa sulla macchina da stampa digitale da un’applicazione FreeFlow client.
Pagina 34 Nomi dei vassoi di uscita Alcune destinazioni di uscita in FreeFlow sono indicate con nomi diversi nell’interfaccia utente di EX Print Server.
Pagina 35 Stampa su EX Print Server con l’opzione Job Submission di FreeFlow Se si usano le opzioni Job Submission di FreeFlow, selezionare la coda di stampa di EX Print Server per ottenere il risultato desiderato. La tabella seguente descrive il risultato che si ottiene quando FreeFlow è collegato a code diverse di EX Print Server. Coda di EX Print Server Impostazione Risultato Coda di stampa Stampa Il lavoro viene stampato e salvato nella coda dei lavori stampati.
Pagina 36 Carta patinata e grammatura La carta patinata può avere solo le seguenti grammature: 106-128 g/m2, 129-150 g/m2, 151-176 g/m2 e 177-220 g/m2. Se si specifica la carta patinata con una grammatura diversa da quella indicata sopra (ad esempio, 64-80 g/m2 o 221-256 g/m2), la macchina da stampa digitale richiederà carta non patinata con la grammatura specificata. Per specificare carta patinata, è necessario selezionare una grammatura compresa tra 106-220 g/m2.
Release-Informationen FreeFlow Express to Print, Makeready, Process Manager, Web Services, Print Manager und Output Manager, Version 7.0 SP3 für den Xerox EX Print Server, Powered by Fiery, für die Digitaldruckmaschine Xerox 700 Digital Color Press, Version 1.5 Dieses Dokument enthält Informationen über das Installieren der FreeFlow Komponenten Express to Print, Makeready, Process Manager, Web Services, Print Manager und Output Manager, Version 7.
Seite 38 Vorbereitung für den Druckbetrieb Vergewissern Sie sich, dass die folgenden Schritte ausgeführt wurden, bevor Sie Aufträge zum Drucken an den EX Print Server senden: • Auf dem EX Print Server wurde die IPP-Aktivierungsdatei für FreeFlow installiert. Drucken Sie zu diesem Zweck eine Konfigurationsseite; die Software wurde aktiviert, wenn im Abschnitt mit den Update-Informationen der folgende Name aufgelistet ist: 1-12RHJ1.
Seite 39 Installation Abrufen der Aktivierungsdatei für FreeFlow Die Aktivierungsdatei für FreeFlow kann mit dem Dienstprogramm System-Update, mithilfe der WebTools oder von der Website www.xerox.com abgerufen werden. Diese Aktivierungsdatei gilt für die gesamte Suite der FreeFlow Anwendungen (Xerox FreeFlow Express to Print, Makeready, Process Manager, Web Services, Print Manager und Output Manager, Version 7.0 SP3).
Seite 40 5 Geben Sie als Hostnamen entweder die IP-Adresse des EX Print Servers oder den für den EX Print Server konfigurierten Servernamen ein. 6 Klicken Sie auf „Connect“ (Verbinden). Daraufhin wird das Fenster „Server Information“ angezeigt. 7 Klicken Sie auf „Download“ (Herunterladen). Der Inhalt der Datei „1-12RHJ1.exe“ wird extrahiert und auf den EX Print Server heruntergeladen. 8 Klicken Sie auf „Next“ (Weiter). 9 Wählen Sie „Restart Fiery Service“, um einen Neustart zu initiieren.
Seite 41 Kontrast, Sättigung und Farbton Mit der FreeFlow Aktivierung werden nun auch die Einstellungen für den Kontrast, die Sättigung und den Farbton unterstützt und übernommen. H INWEIS : Für die ordnungsgemäße Funktionsweise muss die Fiery Patchsoftware „1-12S4R5“ installiert werden. Sie können diese Datei mit dem Dienstprogramm System-Update oder mithilfe der WebTools auf den EX Print Server herunterladen.
Seite 42 Virtuelle Drucker Die FreeFlow Anwendungen unterstützen nun auch in der Fiery Umgebung definierte virtuelle Drucker. Virtuelle Drucker bieten Anwendern die Möglichkeit, Aufträge unter Verwendung vordefinierter Druckoptionseinstellungen an eine vorgegebene Druckverbindung des EX Print Servers zu senden. Virtuelle Drucker können von einem für den EX Print Server verantwortlichen Administrator definiert und freigegeben werden, sodass Anwender über das Netzwerk auf sie zugreifen können.
Seite 43 Wenn Sie eine RDO-Datei (Raster Data Object) an den EX Print Server senden und in der Anwendung Command WorkStation Registerseiten einfügen, wird der Registertext nicht korrekt rechts gedruckt. Um dies zu vermeiden, müssen Sie die Registerseiten in FreeFlow Makeready einfügen oder aber den Auftrag im Format PDF (anstelle des Formats RDO) an die Anwendung Command WorkStation senden. H INWEIS : Die Datei muss mit der Dateierweiterung „.RDO“ gespeichert werden.
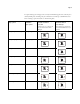
Seite 44 Hefteinstellungen in FreeFlow Print Manager Hefteinstellungen in Anwendung Command WorkStation 1 Staple - Top Left Landscape (Einfach, links oben // Querformat) Einfach, links oben 1 Staple - Top Right Landscape (Einfach, rechts oben // Querformat) Einfach, rechts oben 2 Staples - Left Portrait (Doppelt, links // Hochformat) Doppelt, links 2 Staples - Top Portrait (Doppelt, oben // Hochformat) Doppelt, oben 2 Staples - Bottom Portrait (Doppelt, unten // Hochformat) Doppelt, unten Cente
Seite 45 Einstellungen für Lochung bei querformatigen Aufträgen Bei bestimmten Einstellungen für das Lochen werden querformatige Aufträge nicht entlang der Kante gelocht, die bei der Ausgabe auf der Digitaldruckmaschine aus einer FreeFlow Client-Anwendung verwendet wird, sondern entlang der gegenüber liegenden Kante.
Seite 46 Locheinstellungen in FreeFlow Print Manager Locheinstellungen in Anwendung Command WorkStation (Auftragseigenschaften > Finishing) Endgültige Lochposition bei querformatigem Auftrag bei Festlegung „Ausrichtung = Querformat“ („Ausrichtung = Querformat“ kann im Fenster „Auftragseigenschaften“ der Anwendung Command WorkStation festgelegt werden.
Seite 47 Bezeichnungen für Ausgabe-/Ablagefächer Für bestimmte Ausgabeziele bzw. Ausgabe-/Ablagefächer werden in der FreeFlow Umgebung andere Bezeichnungen verwendet als in der Umgebung des EX Print Servers. In der folgenden Tabelle sind die Entsprechungen einander gegenüber gestellt.
Seite 48 Verwenden auf EX Print Server residenter FreeForm Master-Dateien in FreeFlow Hintergrundformulare (Background Forms) der FreeFlow Umgebung werden in Einstellungen der für den variablen Datendruck verwendeten Option „Master-Datei verwenden“ des EX Print Servers umgesetzt. FREEFORM MASTER-DATEI AUS FREEFLOW VERWENDEN 1 Wählen Sie „Background Form“ (Hintergrundformular) auf der FreeFlow Registerkarte „Image Adjustment“ (Bildanpassung).
Seite 49 Drucken auf dem EX Print Server mithilfe der FreeFlow Optionen für die Auftragsfreigabe Wenn Sie die FreeFlow Optionen für die Auftragsfreigabe (Job Submission) verwenden, müssen Sie die Warteschlange „Drucken“ des EX Print Servers als Ziel wählen, damit Sie die gewünschten Ergebnisse erzielen. Der folgenden Tabelle können Sie entnehmen, welche Ergebnisse Sie jeweils erzielen, wenn Sie in FreeFlow die Verbindung zu einer der Warteschlangen des EX Print Servers herstellen.
Seite 50 Druckpfad für Produktion Der Druckpfad für die FreeFlow Produktion unterstützt die folgenden Formatieroptionen für Aufträge in den Formaten TIFF, RDO und JPEG: • Orientation (Ausrichtung) • Page Layout (Seitenlayout) • Reduce/Enlarge (Verkleinern/Vergrößern) • Rotation (Drehung) Für Dateien in den Formaten PDF und PostScript können Sie vergleichbare Ergebnisse erzielen, wenn Sie sie an die Warteschlange „Halten“ des EX Print Servers senden und im Fenster „Auftragseigenschaften“ der Anwendung Comma
Notas de la versión para el cliente FreeFlow Express to Print, Makeready, Process Manager, Web Services, Print Manager y Output Manager versión 7.0 SP3 para el Xerox EX Print Server, con tecnología Fiery, para la Xerox 700 Digital Color Press versión 1.5 Este documento contiene información acerca de la instalación y uso de FreeFlow Express to Print, Makeready, Process Manager, Web Services, Print Manager y Output Manager versión 7.
Página 52 Antes de imprimir Antes de imprimir al EX Print Server, compruebe lo siguiente: • Que el archivo de activación IPP de FreeFlow esté instalado en el EX Print Server. Para verificar si está instalado el archivo de activación, imprima una página Configuración y compruebe que la sección Información de actualización incluya el nombre de archivo: 1-12RHJ1. Para obtener información para la impresión de la página Configuración, consulte Instalación y configuración.
Página 53 Instalación Obtención del archivo de activación de FreeFlow El archivo de activación de FreeFlow está disponible desde Actualizaciones del sistema, WebTools o www.xerox.com. El archivo de activación se aplica a todo el conjunto de aplicaciones FreeFlow, que incluye Xerox FreeFlow Express to Print, Makeready, Process Manager, Web Services, Print Manager y Output Manager v. 7.0 SP3.
Página 54 5 Introduzca la dirección IP del EX Print Server o el nombre de servidor del EX Print Server en Hostname (Nombre de host). 6 Haga clic en Connect (Conectar). Aparece la ventana Server Information (Información del servidor). 7 Haga clic en Download (Descargar). El archivo 1-12RHJ1.exe se extrae y se descarga. 8 Haga clic en Next (Siguiente). 9 Seleccione Restart Fiery Service (Reiniciar servicio Fiery). Deje que el EX Print Server se reinicie sin interrumpir el proceso.
Página 55 Contraste, saturación y tono de color La activación de FreeFlow admite las características Contraste, Saturación y Tono de color. N OTA : Para que estas características funcionen, debe instalar el módulo 1-12S4R5 del Fiery, que puede descargarse en el EX Print Server desde Actualizaciones del sistema o WebTools.
Página 56 Impresoras virtuales La activación de FreeFlow admite las Impresoras virtuales del Fiery, que permiten imprimir al EX Print Server utilizando las configuraciones predefinidas guardadas como una cola de impresión especial. El administrador del Fiery puede crear impresoras virtuales y publicarlas de forma que los usuarios pueden usarlas en la red.
Página 57 Cuando se envía un archivo RDO (raster data object - objeto de datos de trama) al EX Print Server y se insertan pestañas en Command WorkStation, el texto de la pestaña no se imprime correctamente en el lado derecho. Para evitar esto, inserte las pestañas en FreeFlow Makeready o envíe el trabajo a Command WorkStation como un archivo PDF (no RDO). N OTA : El archivo debe guardarse con la extensión .RDO.
Página 58 Para engrapar correctamente los trabajos horizontales de todos los tamaños de papel desde las aplicaciones FreeFlow, envíe el trabajo a la cola En espera del Fiery y cambie la orientación del trabajo a Horizontal en el EX Print Server antes de enviarlo a imprimir. Para obtener más detalles, consulte la siguiente tabla.
Página 59 Opciones de perforación de trabajos horizontales Algunos valores de perforación en los trabajos horizontales se engrapan en el lado contrario al que se especifica al imprimir en la digital press desde una aplicación cliente FreeFlow.
Página 60 Valores de perforación de terminación de FreeFlow Print Manager Valores de perforación de la pestaña Terminación en Propiedades del trabajo de Command WorkStation Posición de perforación de la salida final para trabajos Horizontales con el valor Horizontal en Orientación (Seleccione Horizontal en la opción Orientación desde Propiedades del trabajo de Command WorkStation) Coil Punch - Top Landscape (Perforación Espiral - Superior horizontal) Posición de perforación: Superior Perforación avanza
Página 61 Nombres de bandejas de salida Algunas ubicaciones de salida de FreeFlow se corresponden con nombres de bandeja de salida diferentes en la interfaz de usuario del EX Print Server. En la tabla siguiente se enumeran las equivalencias: FreeFlow Print Manager EX Print Server Por omisión de la impresora Automatic (Automático) Sel. auto.
Página 62 Utilización de archivos maestros del EX Print Server FreeForm desde FreeFlow Los formularios de fondo (Background Forms) de FreeFlow se correlacionan con la función Usar archivo maestro de la impresión de datos variables del EX Print Server. PARA UTILIZAR UN ARCHIVO MAESTRO DE FREEFORM DESDE FREEFLOW 1 Seleccione Background Form (Formulario de fondo) en la pestaña Image Adjustment (Ajuste de imagen) de Freeflow.
Página 63 Impresión al EX Print Server usando la opción Job Submission (Envío de trabajos) de FreeFlow Si utiliza las opciones de Job Submission (Envío de trabajos) de FreeFlow, seleccione la cola Impresión del EX Print Server para obtener el resultado previsto. En la siguiente tabla se describe el resultado cuando FreeFlow está conectado a las diferentes colas del EX Print Server. Cola del EX Print Server Valor Resultado Cola Impresión Imprimir El trabajo se imprime y se guarda en la cola Impresos.
Página 64 Papel estucado y gramaje de papel El papel estucado está limitado a 106-128 g/m2, 129-150 g/m2, 151-176 g/m2 y 177-220 g/m2. Si especifica el papel Estucado con un gramaje de papel que está fuera de este rango (por ejemplo, 64-80 g/m2 o 221-256 g/m2), la digital press solicitará papel No estucado con el gramaje de papel especificado. Para especificar papel estucado, debe seleccionar un gramaje de papel dentro del rango 106-220 g/m2.
Versienotities voor de klant FreeFlow Express to Print, Makeready, Process Manager, Web Services, Print Manager en Output Manager versie 7.0 SP3 voor de Xerox EX Print Server, ondersteund door Fiery, voor de Xerox 700 Digital Color Press versie 1.5 Dit document bevat informatie over de installatie en het gebruik van FreeFlow Express to Print, Makeready, Process Manager, Web Services, Print Manager en Output Manager versie 7.
Pagina 66 Voor het afdrukken Voordat u afdrukt naar de EX Print Server moet u het volgende controleren: • Het FreeFlow IPP-activeringsbestand is op de EX Print Server geïnstalleerd. Om dit te controleren, drukt u een configuratiepagina af en kijkt u of het gedeelte Update-informatie de volgende bestandsnaam vermeldt: 1-12RHJ1. Raadpleeg Configuratie en instellingen voor informatie over het afdrukken van een configuratiepagina.
Pagina 67 Installatie Het FreeFlow-activeringsbestand verkrijgen Het FreeFlow-activeringsbestand is verkrijgbaar via System Updates, WebTools of www.xerox.com. Het activeringsbestand geldt voor de volledige reeks FreeFlow-toepassingen, waaronder Xerox FreeFlow Express to Print, Makeready, Process Manager, Web Services, Print Manager en Output Manager versie 7.0 SP3. Het Fiery FreeFlow-activeringsbestand installeren U kunt het activeringsbestand direct via System Updates toepassen.
Pagina 68 5 Typ het IP-adres van de EX Print Server of de servernaam van de EX Print Server als hostnaam. 6 Klik op Connect (Verbinding maken). Het venster Server Information (Serverinformatie) wordt weergegeven. 7 Klik op Download (Downloaden). Het bestand 1-12RHJ1.exe wordt uitgepakt en gedownload. 8 Klik op Next (Volgende). 9 Selecteer Restart Fiery Service (Fiery-service opnieuw starten). Laat de EX Print Server opnieuw starten zonder onderbreking.
Pagina 69 Contrast, verzadiging en kleurzweem De FreeFlow-activering ondersteunt contrast, verzadiging en kleurzweem. O PMERKING : Voordat u deze functies kunt gebruiken, moet u de Fiery-patch 1-12S4R5 installeren, die u naar de EX Print Server kunt downloaden vanuit System Updates of WebTools. Voer de volgende stappen uit als u wilt bekijken hoe verzadiging, contrast en kleurzweem worden omgezet op de EX Print Server: 1 Verzend een kleurentaak naar de blokkeringswachtrij van de EX Print Server.
Pagina 70 Virtuele printers Het FreeFlow-activeringsbestand ondersteunt Fiery Virtuele printers, waarmee u kunt afdrukken naar de EX Print Server met vooraf gedefinieerde instellingen die zijn opgeslagen als een speciale afdrukwachtrij. De beheerder van de Fiery kan virtuele printers maken en publiceren zodat gebruikers deze via het netwerk kunnen openen.
Pagina 71 Als de afdruktaak wordt verzonden als een RDO-bestand (rasterdocumentobject) of wordt verwerkt via Xerox PostScript-conversie, wordt het formaat niet vooraf gedefinieerd, maar wordt de taak correct afgedrukt. O PMERKING : Tabbladen moeten worden geprogrammeerd als voorgesneden tabbladen van 9x11 inch, niet 8,5x11 inch.
Pagina 72 Nietopties van FreeFlow Print Manager Nietopties van Command WorkStation 1 nietje - boven links liggend Links boven enkel 1 nietje - boven rechts liggend Rechts boven enkel 2 nietjes - links staand Links dubbel 2 nietjes - boven staand Boven dubbel 2 nietjes - onder staand Onder dubbel Nieten in het midden boven staand Boven midden Nieten in het midden onder staand Onder midden Nietpositie voor liggende afdruktaken met Afdrukstand ingesteld op Uit Nietpositie voor liggende afdruk
Pagina 73 Perforatieopties voor liggende taken Bij bepaalde perforatie-instellingen voor taken met liggende afdrukstand wordt aan de tegenovergestelde zijde van de opgegeven zijde geperforeerd wanneer naar de digitale pers wordt afgedrukt vanuit een FreeFlow-clienttoepassing.
Pagina 74 Namen van opvangbakken FreeFlow-uitvoerlocaties komen overeen met verschillende namen van opvangbakken in de gebruikersinterface van de EX Print Server.
Pagina 75 Afdrukken naar EX Print Server via de FreeFlow-taakverzendingsoptie Als u FreeFlow-taakverzendingsopties gebruikt, moet u de afdrukwachtrij van de EX Print Server selecteren om het verwachte resultaat te ontvangen. In de volgende tabel wordt het resultaat beschreven wanneer FreeFlow wordt verbonden met de verschillende wachtrijen van de EX Print Server. Wachtrij van EX Print Server Instelling Resultaat Afdrukwachtrij Afdrukken Taak wordt afgedrukt en opgeslagen in wachtrij Afgedrukt.
Pagina 76 Production Print Path FreeFlow Production Print Path ondersteunt de volgende taakopmaakopties voor TIFF-, RDO- en JPEG-bestandsindelingen: • Afdrukstand • Paginaopmaak • Verkleinen/vergroten • Rotatie Als u vergelijkbare resultaten wilt bereiken voor PDF- en PostScript-bestanden, verzendt u de taak naar de blokkeringswachtrij van de EX Print Server en gebruikt u Taakeigenschappen in Command WorkStation om vergelijkbare opties te selecteren.
Notas de versão do cliente FreeFlow Express to Print, Makeready, Process Manager, Web Services, Print Manager e Output Manager versão 7.0 SP3 para o Xerox EX Print Server, otimizado pelo Fiery, para a Xerox 700 Digital Color Press versão 1.5 Este documento contém informações sobre a instalação e a utilização do FreeFlow Express to Print, Makeready, Process Manager, Web Services, Print Manager e Output Manager versão 7.
Página 78 Antes de imprimir Antes de imprimir no EX Print Server, verifique o seguinte: • O arquivo de ativação de IPP do FreeFlow é instalado no EX Print Server. Para verificar a ativação, imprima uma página de configuração e assegure-se de que a seção de atualizações de informações inclua o nome do arquivo: 1-12RHJ1. Para obter informações sobre como imprimir uma página de configuração, consulte Configuração e instalação.
Página 79 Instalação Obtenção do arquivo de ativação do FreeFlow O arquivo de ativação do FreeFlow está disponível em Atualizações do sistema, no WebTools ou em www.xerox.com. O arquivo de ativação aplica-se ao pacote completo de aplicativos do FreeFlow, que inclui o Xerox FreeFlow Express to Print, Makeready, Process Manager, Web Services, Print Manager e Output Manager v. 7.0 SP3.
Página 80 5 Digite o endereço IP do EX Print Server ou o nome do servidor do EX Print Server para o nome do host. 6 Clique em Connect (Conectar). A janela Server Information (Informações do servidor) é exibida. 7 Clique em Download (Descarregar). O arquivo 1-12RHJ1.exe é extraído e descarregado. 8 Clique em Next (Avançar). 9 Selecione Restart Fiery Service (Reiniciar o serviço Fiery). Não interrompa o EX Print Server enquanto ele estiver sendo reiniciado.
Página 81 Contraste, saturação e tom da cor A ativação do FreeFlow suporta constraste, saturação e tom da cor. N OTA : Para que esses recursos funcionem, é necessário instalar o Fiery patch 1-12S4R5, que pode ser descarregado no EX Print Server a partir de Atualizações do sistema ou do WebTools. Para visualizar como a saturação, o contraste e o tom da cor são mapeados no EX Print Server, execute as seguintes etapas: 1 Envie uma tarefa colorida para a fila Em espera do EX Print Server.
Página 82 Impressoras virtuais A ativação do FreeFlow suporta as Impressoras virtuais do Fiery, que permitem imprimir no EX Print Server utilizando configurações predefinidas salvas como uma fila de impressão especial. O administrador do Fiery pode criar impressoras virtuais e publicá-las para que os usuários possam acessá-las na rede.
Página 83 Ao enviar um arquivo RDO (Raster Document Object) para o EX Print Server e inserir separadores na Command WorkStation, o texto do separador não será impresso corretamente no lado direito. Para evitar isso, insira os separadores no FreeFlow Makeready ou envie a tarefa para a Command WorkStation como um arquivo PDF (não RDO). N OTA : O arquivo deve ser salvo com uma extensão .RDO.
Página 84 Opções de grampeamento da FreeFlow Print Manager Opções de grampeamento da Command WorkStation 1 grampo - paisagem - topo esquerdo Simples - topo esquerdo 1 grampo - paisagem - topo direito Simples - topo direito 2 grampos - retrato esquerdo Duplo à esquerda 2 grampos - retrato topo Topo duplo 2 grampos - retrato inferior Inferior duplo Grampo no centro - retrato topo Topo centro Grampo no centro retrato inferior Inferior centro Posição do grampo para tarefas em Paisagem com a Ori
Página 85 Opções de perfuração para tarefas de paisagem Determinadas configurações de perfuração para tarefas de Paisagem perfuram no lado oposto especificado ao imprimir na impressora digital a partir de um aplicativo cliente do FreeFlow. Para aplicar a perfuração em tarefas de paisagem de todos os tamanhos de papel corretamente nos aplicativos do FreeFlow, envie a tarefa para a fila Em espera do Fiery e altere a Orientação da tarefa para Paisagem no EX Print Server antes de liberar para impressão.
Página 86 Nomes das bandejas de saída Os locais de saída do FreeFlow correspondem a diferentes nomes de bandejas de saída na interface de usuário do EX Print Server. A tabela a seguir lista essas equivalências: FreeFlow Print Manager EX Print Server Padrão da impressora Automático Seleção automática Bandeja superior Bandeja saída desloc.
Página 87 Cancelamento de tarefa do FreeFlow Se você selecionar Cancel (Cancelar) em FreeFlow Status (Status do FreeFlow) utilizando o caminho de impressão do EX Print Server, a tarefa não será cancelada no EX Print Server, mesmo que o FreeFlow exiba que essa tarefa foi cancelada com êxito.
Página 88 Caminho de impressão da produção O caminho de impressão da produção do FreeFlow suporta as seguintes opções de formatação da tarefa para os formatos de arquivo TIFF, RDO e JPEG: • Orientação • Layout de página • Redução/ampliação • Rotação Para atingir resultados semelhantes para arquivos PDF e PostScript, envie a tarefa para a fila Em espera do EX Print Server e utilize as Propriedades da tarefa da Command WorkStation para selecionar opções semelhantes.