
User Guide


152
Chapter 5 Setup Using the Printer Control Panel
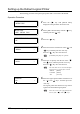
Setting up the Default Logical Printer
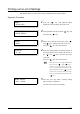
The following procedure sets up the logical printer that is to be used as the default.
Operation Procedure
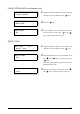
1 Press the < > key with [SETUP FILE]
displayed on the parameter selection screen.
2 Select [DEF. SETUP FILE] with the < > key,
and then press the < > key.
3 Press the < > key.
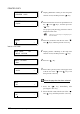
4 Select the interface with the use of the < > and
< > keys, and then press the <Set> key.
Press the < > key once it has been set.
5 Select the set priority with the use of the < >
and < > keys, and then press the <Set> key.
Press the < > key once it has been set.
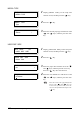
6 Select the logical printer number with the use of
the < > and < > keys, and then press the
<Set> key.
The logical printer that has been set up will be
registered as the default logical printer.
[CENTRO] and [VPI] are optional.
The items that can be selected will differ
based on the type of interface selected.
xSERIAL :[HPGL]
xCENTRO :[HPGL]
xVPI :[Versatec]
Move the cursor to the right and left with
the use of the < > and < > keys.
MENU
SETUP FILE
SETUP FILE
DEF. SETUP FILE
DEF. SETUP FILE
I/F
I/F
SERIAL *
Format
HPGL *
Printer No.
06 *