WorkCentre® C2424 Copier-Printer Copying This chapter includes: ■ ■ ■ "Basic Copying" on page 3-2 "Adjusting Copying Options" on page 3-3 ■ "Basic Settings" on page 3-4 ■ "Image Adjustments" on page 3-8 ■ "Image Placement Adjustments" on page 3-12 ■ "Output Adjustments" on page 3-14 ■ "Advanced Copying" on page 3-16 "Managing Copy Functions" on page 3-18 Copyright © 2005 Xerox Corporation. All Rights Reserved.
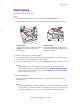
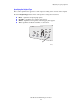
Basic Copying Basic Copying Follow these steps to make copies. Note To clear the settings from the previous job, press the Clear All button twice. 1. Load the originals to be copied. Use either the document glass or the document feeder. 2424-076 2424-065 Document Glass Lift the document feeder, then place the original facedown on the back, left corner of the document glass. Document Feeder Insert originals faceup with the top entering the feeder first.
Adjusting Copying Options Adjusting Copying Options This section includes: Basic Settings ■ ■ ■ ■ ■ ■ "Setting the Copy Default Tray" on page 3-4 “Specifying a Different Tray to Use” on page 3-4 "Selecting Color or Black and White Copies" on page 3-5 "Specifying 2-Sided Originals or Copies" on page 3-5 "Selecting the Quality of the Copies" on page 3-6 "Specifying the Original Type" on page 3-7 Image Adjustments ■ ■ ■ ■ ■ ■ ■ "Setting the Original Size" on page 3-8 "Reducing or Enlarging the Image" on pa
Adjusting Copying Options Basic Settings This section includes: ■ ■ ■ ■ ■ ■ "Setting the Copy Default Tray" on page 3-4 "Specifying a Different Tray to Use" on page 3-4 "Selecting Color or Black and White Copies" on page 3-5 "Specifying 2-Sided Originals or Copies" on page 3-5 "Selecting the Quality of the Copies" on page 3-6 "Specifying the Original Type" on page 3-7 Setting the Copy Default Tray To set the default paper supply tray for copy jobs: 1. 2. 3. 4. 5. 6.
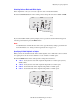
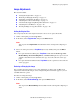
Adjusting Copying Options Selecting Color or Black and White Copies If the original has color, you can create copies in color or in black and white. Press the Color Mode button on the control panel to change the selection to Color or B/W. 2 1 2 1 1 2 2 1 2424-166 If you select Color and the system prompts you for a password, use the numeric keypad to enter the password, then press the Enter button. Note An administrator can limit the use of the color copy function by setting a password.
Adjusting Copying Options Selecting the Quality of the Copies Press the Output Quality button on the control panel to select one of the following outputquality modes: Output-Quality Mode Type of Copy Job Hi-Res Highest-quality mode for color copies. Provides the best detail and smoothness for photographic images. Produces highest-quality color copies, with the best text resolution and smoothest light colors. This mode takes longer to process and print than the other modes.
Adjusting Copying Options Specifying the Original Type The scanner optimizes the appearance of the output according to the contents of the original. Press the Original Type button on the control panel to change the selection to: ■ ■ ■ ■ Photo – Optimizes for photograph prints. Graphics – Optimizes for constant-colored areas. Mixed – Optimizes for magazines and newspaper photographs. Text – Optimizes for black and white or colored text.
Adjusting Copying Options Image Adjustments This section includes: ■ ■ ■ ■ ■ ■ ■ "Setting the Original Size" on page 3-8 "Reducing or Enlarging the Image" on page 3-8 "Lightening or Darkening the Image" on page 3-9 "Adjusting the Contrast of the Image" on page 3-9 "Automatically Suppressing Background Variations" on page 3-9 "Adjusting the Color Balance" on page 3-10 “Erasing the Edges of Copy Documents” on page 3-10 Setting the Original Size You can specify the size of the original so that the correct a
Adjusting Copying Options 3. Select one of the following, then press the Enter button: ■ 100% – Keeps the copy image the same size as the original. (Factory default value). ■ Auto – Reduces or enlarges the image as needed to fit the full size of the copy paper. ■ Preset – Reduces or enlarges the image as needed to fit a selected copy paper size. ■ 25%-400% – Reduces or enlarges the image by a selected percentage.
Adjusting Copying Options Adjusting the Color Balance Sometimes the colors on the original are not optimal. You can adjust the levels of each primary color: cyan, magenta, yellow, and black. To adjust these color levels: 1. On the control panel, press the Copy button. 2. In the menu, select Color Balance, then press the Enter button. 3. To adjust the level of cyan: a. Select Cyan Color Balance, then press the Enter button. b.
Adjusting Copying Options 5. To erase the top edge of the original page: a. Select Top, then press the Enter button. b. Scroll to a number from 0.0 through 1.0 inches (in 0.1 inch increments) or from 0 through 25 mm (in 1 mm increments), then press the Enter button. 6. To erase the bottom edge of the original page: a. Select Bottom, then press the Enter button. b. Scroll to a number from 0.0 through 1.0 inches (in 0.
Adjusting Copying Options Image Placement Adjustments This section includes: ■ ■ ■ ■ "Printing Multiple Images on a Sheet (N-Up)" on page 3-12 "Repeating Images on a Sheet" on page 3-12 "Centering the Image" on page 3-13 "Shifting the Image" on page 3-13 Printing Multiple Images on a Sheet (N-Up) You can have two or four original page images copied onto one side of a sheet of paper. The size of the images are reduced proportionally to fit on the selected paper. To select an N-Up option: 1.
Adjusting Copying Options 3. To have the image repeated in several rows: a. Select Rows, then press the Enter button. b. Press the Up Arrow or Down Arrow button to scroll to a number from 1 to 10, then press the Enter button. 4. To have the image repeated in several columns: a. Select Columns, then press the Enter button. b. Press the Up Arrow or Down Arrow button to scroll to a number from 1 to 10, then press the Enter button. The factory default is Off; (1 row and 1 column).
Adjusting Copying Options Output Adjustments This section includes: ■ ■ ■ "Collating Copies" on page 3-14 "Making Copy Documents with Covers" on page 3-15 "Using Blank Separators" on page 3-15 Collating Copies When you are making several copies of a multi-page original, you can automatically collate the output.
Adjusting Copying Options Making Copy Documents with Covers You can have the first and/or last pages of your copy job printed on paper from another tray. That tray could contain colored paper or card stock. To select the type of covers and the tray to use for the cover paper: 1. On the control panel, press the Copy button. 2. In the menu, select Covers, then press the Enter button. 3. Select one of the following, then press the Enter button. ■ Off – Prints all pages of your copy job on the same paper.
Adjusting Copying Options Advanced Copying This section includes: ■ ■ "Copying Books" on page 3-16 "Creating Booklets" on page 3-17 Copying Books When copying from a book, you have many choices. You can copy the left and/or right pages from an open book as separate images or you can copy just the left page or just the right page. Note You must use the document glass to make copies from books. To select special book copying: 1. On the control panel, press the Copy button. 2.
Adjusting Copying Options Creating Booklets You can have two original pages copied onto each side of a sheet of paper in the correct order so that you can fold the copy pages into a booklet. The size of the images are reduced proportionally to fit on the selected paper. You can combine this feature with the Book Copy option to reproduce bound documents. To select booklet copies: 1. On the control panel, press the Copy button. 2. In the menu, select Create Booklet, then press the Enter button. 3.
Managing Copy Functions Managing Copy Functions This section includes: ■ ■ "Setting Whether a Copy Job Interrupts a Print Job" on page 3-18 "Using a Color Copy Password" on page 3-19 Setting Whether a Copy Job Interrupts a Print Job Normally, the system interrupts print jobs when users make copies. Printing continues while the system scans the originals. When the copies are ready to print, the print job pauses, the copies print, then the print job resumes.
Managing Copy Functions Using a Color Copy Password You can set a password to limit access to the color copy function. The system prompts users to enter the password when they press the Color Mode button to select color copies. Use the control panel to enable, disable, or change the color copy password. 1. 2. 3. 4. 5. On the control panel, press the System Setup button. In the menu, select General Setup, then press the Enter button. Select System Controls, then press the Enter button.