
User guide


Custom Settings
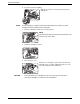
Xerox WorkCentre C226 User Guide 1-37
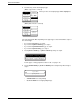
5. Touch the type of envelope, and go to step 7.
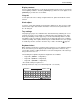
6. If you inserted a non-standard size of paper in the Bypass Tray, remove the
checkmark from "ENABLE AUTO SIZE DETECTION" and then touch the [EXTRA
SIZE] tab. When the screen opens, the X key will be highlighted. Use the and
touch keys to enter the X dimension. If you inserted a standard size of paper in
the Bypass Tray, make sure that a checkmark appears in the [ENABLE AUTO
SIZE DETECTION] checkbox.
Next touch the key to highlight it and enter the
dimensions for Y.
The permitted range for the X dimension is 139 to 432
mm (5-1/2 to 17 inches), and the permitted range for the
Y dimension is 100 to 297 mm (4 to 11-3/4 inches).
7. Touch the [OK] key to complete the setting.
Custom Settings
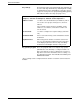
The items that can be set with the custom settings are shown below.
Total count The number of pages processed by the machine and
optional equipment can be displayed. (See page 1-40.)
Display contrast Used to adjust the contrast of the operation panel display.
(See page 1-41.)
List print Used to print a list of machine settings. (See page 1-41)
Clock adjust Used to set the date and time of the built-in clock of the
machine. (See page 1-39.)
Com-10
Monarch
OK
DL
C5
Enable Auto Size Detection
Extra Size
Basic Setting
X
Y
139
100
(100 297)
mm
(139 432)
mm
Basic Setting
Extra Size
OK