
Installation Guide

Installation
Xerox® Smart Card
Installation Guide
14
Configuring Smart Card
Once the Xerox Smart Card feature has been enabled on the device it can be configured using Internet
Services.
Follow the instructions below to enable and configure the Smart Card:
1. Access Internet Services and select Properties. Refer to Access Internet Services on page 12 for
instructions.
2. Configure the Date & Time to update automatically
a. Select the General Setup link, then Date & Time.
b. Select Automatic Using NTP.
c. Check the Time Zone is set to the correct option for your region.
d. Select Apply. The device will reboot to apply the changes.
Notes:
• The sign in front of the number is important. Most of Europe is plus of Greenwich Mean
Time, while North America is minus. Please consider the implications of Daylight Savings
Time when selecting the Offset of Local Time Zone option.
• If Network Time Protocol is not available, check that the time set on the device matches
the network time on the Domain Controller Authentication Server. Refer to the System
Administrator guide for instructions. If using Network Time Protocol (NTP) do not
change the time on the device.
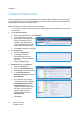
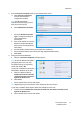
3. Access the Smart Card settings
a. Select the Authentication link.
b. Select Setup in the directory tree.
c. Select Smart Card Inactivity
Timer from the Authentication
Configuration window.
d. Enter the Smart Card Inactivity
Timeout required between 1
and 120 minutes. The default
setting is 5 minutes.
If the machine is inactive for the
period of time specified, it will
end the session automatically.
e. Select Save
Note: At the completion of
configuration of Smart Card, you can
return to this screen and Configure the Device Access permissions if required. Refer to the System
Administrator guide for your product.