
User guide


Troubleshooting
WorkCentre 7425/7428/7435
User Guide
196
Clearing Paper Jams
This section includes:
• Clearing Paper Jams in Tray 1, Tray 2, Tray 3 or Tray 4 on page 196
• Clearing Paper Jams in Tray 5 (Bypass) on page 197
• Clearing Jams in Top Left Cover A on page 198
• Clearing Paper Jams in Bottom Left Cover C on page 199
• Clearing Paper Jams in Bottom Left Cover D on page 200
• Clearing Paper Jams in Duplex Unit B on page 202
• Clearing Jams in the Document Feeder on page 203
• Clearing Paper Jams in the Integrated Finisher on page 205
• Clearing Paper Jams in the Office LX Finisher on page 206
• Clearing Paper Jams in the Professional Finisher on page 207
• Solving Problems with Paper Jams on page 219
To avoid damage, always remove misfed media carefully, without tearing it. Try to remove the paper in
the direction that the paper would normally feed. Any piece of media left in the printer, whether large
or small, can obstruct the media path and cause further misfeeds. Do not reload media that has
misfed.
Note: The printed side of jammed pages may smudge, and the toner may stick to your hands. Do
not touch the printed side of the media when removing it. Make sure not to spill any toner inside
the printer.
Warning: If you accidentally get toner on your clothes, lightly dust them off as best as you can. If
some toner remains on your clothes, use cool, not hot water, to rinse the toner off. If toner gets on
your skin, wash it off with cool water and a mild soap. If you get toner in your eyes, wash it out
immediately with cool water and consult a doctor.
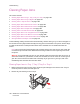
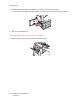
Clearing Paper Jams in Tray 1, Tray 2, Tray 3 or Tray 4
1. Before removing the tray from the printer, check the jam message on the touch screen. If a jam
inside the printer is shown, clear that jam first.
2. Pull the tray out toward you until it stops.
wc74xx
-
015