Xerox WorkCentre 7328 Quick Use Guide
Microsoft, MS-DOS, Windows, Windows NT, Microsoft Network, and Windows Server are either trademarks or registered trademarks of Microsoft Corporation in the United States and/or other countries. Novell, NetWare, IntranetWare and NDS are registered trademarks of Novell, Inc. in the United States and other countries. Adobe, Acrobat, PostScript, PostScript3, and PostScript Logo are trademarks of Adobe Systems Incorporated.
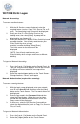
Control Panel Copy Quantity All Services Image Quality Layout Adjustment Copy Output Color Paper Supply Output Format 2 Sided Copying Job Assembly Copy Output Auto Detect Color Black and White Reduce / Enlarge Auto Paper Select Plain Paper Plain Paper Auto 100 More... Plain Paper 1 > 1 Sided Collated 1 > 2 Sided 1 Staple 2 > 2 Sided 2 Staples 2 > 1 Sided Folding... Rotate Side 2 Hole Punching More... 1.
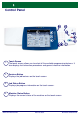
Control Panel 5. Dial Pause Enters a pause in a telephone number when transmitting a fax. 6. Clear Deletes numeric values or the last digit entered. 7. # (Pound) Indicates the dialing character or designates a group dial number. 8. Start Starts the job. 9. Stop Temporarily stops the current job. Follow the message to cancel or resume your job. 10. Interrupt Temporarily stops the current copy job to allow a priority job to be run. 11.
WC7328/35/45: Logon Network Accounting: To access machine features: 1. 2. 3. With the All Services screen displayed, select the required feature (such as Copy, Fax, Scan to File, or Email). The Accounting Login screen will be displayed. Enter your User ID = Blue Valley ID minus the leading zeros, then select [Next]. A prompt will be displayed for your Account ID . Enter your Account ID,= default Clicks Quick Key based on copier location.
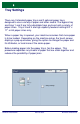
Tray Settings There are 3 standard paper trays and 2 optional paper trays, designed to use a variety of paper and other media. The bypass tray and trays 1 and 2 are fully adjustable trays and can hold a variety of paper sizes. Trays 3 and 4 are high capacity feeders holding 8.5" x 11" or A4 paper sizes only. When a paper tray is opened, your machine assumes that more paper is to be loaded.
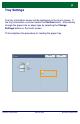
Tray Settings The tray information screen will be displayed on the touch screen. If the tray information is correct select the Confirm button. Alternatively change the paper size or paper type by selecting the Change Settings button on the touch screen. That completes the procedure for loading the paper tray.
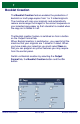
Booklet Creation The Booklet Creation feature enables the production of booklets or multi-page copies from 1 or 2-sided originals. The machine will scan your originals and automatically reduce and arrange the images in the correct sequence on your selected copy paper so that a booklet is created when the copy set is folded in half. The Booklet creation feature is switched on from a button on the Output Format tab.
Booklet Creation Cancel Booklet Creation Booklet Options Save Original Input Off 1 Sided Originals On 2 Sided Originals 2 Sided/Rotated Binding Shift Off Divide Output Off Covers No Covers There are 2 simple rules that must be followed when making booklets: 1. First select the tray that contains the paper you want to use. 2. Always load your documents with the long edge to the left.
Simple LAN Faxing 1. Open the Print Driver 2. Select Fax as Job Type Xerox WorkCentre 7345 Paper/Output Layout/Watermark Image Options Advanced Job Type 2 Sided Printing Fax 1 Sided Paper Stapling 8.5x11", White, Printer Default Type 1 Staple Output Color Color Output Destination Auto OK Defaults Retrieve Saved Settings Retrieve Saved Settings OK 3.
Simple LAN Faxing 4. Set the Fax Options Xerox WorkCentre 7345 Paper/Output Layout/Watermark Image Options Advanced Lighten / Darken Margin Erase Off Invert Image Mirror Image Background Suppression: Auto Suppression Image Quality Normal OK Defaults Retrieve Saved Settings Retrieve Saved Settings OK 5. Cancel Send the Fax When you have selected all the options you require, select OK. Select OK on the print driver screen and OK on the Print Screen.
Scan to Home Scan to Home is an optional feature which allows a user to scan hard copy originals at the device and send them to a destination on the network which is specified as their "Home" destination.
Scan to Home Network Scanning must be installed before using this feature, but it is not necessary for the repositories and templates to be configured.
Replacing the Toner Cartridges This procedure shows you how to remove a used toner cartridge and replace it with a new toner cartridge. The machine will tell you when you will need to order a new cartridge and when to install it. Follow the disposal instructions for the old cartridge when 1. Open the Front Door. 2. Turn the toner cartridge counter clockwise to the unlocked position.
Replacing the Toner Cartridges 3. Remove the toner cartridge by pulling it straight out. Be careful to not get toner on clothing. 4. Dispose the toner cartridge as normal office waste or recycle the cartridge.
Replacing the Toner Cartridges 5. Remove the new toner cartridge from its packaging. 6. Shake the new toner cartridge several times in an up and down twisting motion to redistribute the toner.
Replacing the Toner Cartridges 7. Install the toner cartridge by aligning the arrows on the cartridge with unlock symbol on the printer. Make sure the cartridge is fully installed then turn the cartridge clockwise to the locked position. 8. Close the Front Door. If the door will not close completely, make sure the cartridge is in the lock position and the toner cartridge is installed into the appropriate toner location. That completes the procedure for replacing the toner cartridge.
WC7328/35/45: Call for Service or Phone Support 1-800-821-2797 Have your serial number ready. If you do not know your serial number, follow the steps below: 1. 2. Lower the Bypass Tray located on the left side of the machine. Open the Top Left Cover. Push up on the unlock lever, located on the top of the cover, to access the inside of the machine. The serial number is located on a colored sticker on the inside back frame of the machine. 3. Close the cover and raise the Bypass Tray back into position.