
Operation Manual


General Care and Troubleshooting WorkCentre
®
5945/5955
682 User Guide
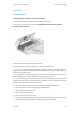
When you use the document feeder, your documents will also pass over the stationary scanner and
the Constant Velocity Transport glass. Any dirt or marks on either piece of glass will cause lines or
streaks on your copies, faxes or scanned images. Also, any marks or dirt on the document feeder
pad may show through the document and appear on your scanned images.
1. Open the document feeder (as if you were about to copy a document using the document
glass).
2. Lightly dampen a lint-free cloth with water, Xerox cleaning fluid or Xerox film remover.
3. Clean the under side of the document feeder pad on the underside of the document handler).
4. Clean the large glass area. Do not pour the cleaning liquid directly on to the glass.
5. Clean the thin strip of glass to the left of the large glass area (this is the scanner responsible for
scanning side 1 of your documents).
6. Locate the green latch underneath the front of the section you just raised. Lower the green
latch.
7. Clean the thin strip of glass located to the right of the white strip (this is the Constant Velocity
Transport glass responsible for scanning side 2 of your documents). The glass is clear and
difficult to see, insert the cloth as far as it will go to the right of the white strip and you’ll feel
that the glass is there.
Note: To remove any particles that stick to the glass, use a folded up sheet of paper or run the
edge of a plastic card across the glass.
8. Wipe away any residue with a clean cloth or paper towel.
!
WARNING
When cleaning the device do NOT use organic or strong chemical solvents or aerosol cleaners. Do
NOT pour fluids directly onto any area. Use supplies and cleaning materials only as directed in this
documentation. Keep all cleaning materials out of the reach of children.
!
WARNING
Do not use pressurized air-spray cleaning aids on or in this equipment. Some pressurized air-spray
containers contain explosive mixtures and are not suitable for use in electrical applications. Use of
such cleaners can result in a risk of explosion and fire.
Cleaning the Print Head
Regularly clean the print head to maintain print quality. The print head can be cleaned at any time,
but if you clean it every time you replace the toner you will be cleaning it at the right interval to keep
the quality high enough for most users.
!
WARNING
When replacing consumables do NOT remove the covers or guards that are fastened with screws.
You cannot maintain or service any of the parts that are behind these covers and guards. Do NOT
attempt any maintenance procedure that is NOT specifically described in the documentation sup-
plied with your device.
1. Open the front door on the device.
2. Rotate the orange print cartridge locking lever anti-clockwise until it clicks. The lever is to the
right of the print cartridge unit, which is labelled R2.