WorkCentre® 4260 Series Quick Use Guide Version 0.3 29.07.
WorkCentre® 4260 Series Quick Use Guide
Xerox WorkCentre 4260 Series Quick Use Guide Thank you for choosing the WorkCentre 4260 Series. If you work through the procedures in this book in the order they are presented, you will successfully: Connect the WorkCentre 4260 Series Printer to a network Set-up the WorkCentre 4260 Series Printer Install optional features Operate the WorkCentre 4260 Series Printer Contents Install the WorkCentre 4260 Series ....................................................................3 Switch On the Machine ........
For information about Safety, Regulatory Information, Environmental Compliance, Illegal Copies, and Product Recycling and Disposal, please refer to the relevant sections in the User Guide. If you require more detailed information about any of the features available on your device, please refer to the User Guide and the System Administration CD. For product support and information about ordering consumables and print media go to the Xerox website www.xerox.com/support.
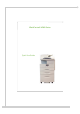
Install the WorkCentre 4260 Series 1 2 3 Unpack the machine and any hardware options Locate the Installation Instructions. Follow the Installation Instructions to assemble the machine and hardware options. The result will be one of the following configurations.
Features Additional Memory (256MB) WorkCentre 4260C WorkCentre 4260S WorkCentre 4260X WorkCentre 4260XF - Optional Optional Optional NOTE: A low stand is available for the Tray 4 configuration, a high stand is available for the Tray 1 and 2 configuration.
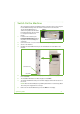
Switch On the Machine Once the machine has been assembled it must be configured. This is done using the Product Enablement Key when the machine is switched on for the first time. 1 2 3 4 The Product Enablement Key is delivered in a plastic tube inside the box with the machine. The procedure to configure the machine is as follows: Locate the tube containing the Product Enablement Key. Remove Product Enablement Key the plastic card and carefully press out the key.
9 10 The Default Paper Size screen is displayed. Select either A4 or 8.5 x 11 inches and select Next. The Customer Support and Supplies Numbers screen is displayed. Enter the Customer Support Telephone Number and the Supplies Telephone Number and select Next. NOTE: This is for reference only. You may leave these fields blank if you do not have the information. 11 12 The next 4 screens will allow you to set the Date Format, Date, Clock Format and Time.
Your WorkCentre 4260 2 1 Document Feeder: Control Panel: Touch Screen and Numeric Keypad Used for scanning multiple documents. The Document Glass underneath is used for scanning single documents, bound documents etc. 2 3 1 3 Output Tray: Collects output 4 5 5 Paper Trays: Tray 2, 3, 4 and HCF are standard on the WorkCentre 4260XF and are optional. on the WorkCentre 4260C/ S/X.
Control Panel Overview Interrupt Printing Job Status Services Machine Status Language Item 8 Help Services Home Clear All Log In/Out Power Stop Display and Touch Screen Numeric Keypad Start Cancel Entry Description Services Home Displays the Services screen to enable selection of features. Services Use to access the feature options. Job Status Use to view the current job status and other job queues.
Item Description Clear All Press once to clear a current entry. Press twice to return to default settings. Interrupt Printing Use to interrupt the current job to run a more urgent job. Stop Stops the job in progress. Start Use to activate a job. Load Paper into the Paper Trays 1 2 3 Open the paper tray and load paper into the tray. Do NOT fill above the Max line. Adjust the guides to hold the paper against the right side of the tray.
Connecting to the Network Follow these instructions to connect the machine to an Ethernet TCP/IP network. If you are connecting your machine to a different type of network, or you wish to use other protocols, refer to the System Administration CD. Test the device 1 2 Before connecting the machine to your network, make sure that it is operating correctly as a copier. Place a document in the Document Feeder and make 3 copies.
Press the Machine Status button then select Tools > Connectivity and Network Setup > Advanced > Network Setting > Network Setup > TCP/IP Options > TCP/IP Settings. • The allocated TCP/IP address is in the Name/Address field. Confirm that an IP address has been allocated and that it is an appropriate IP address for your network. • 2 NOTE: If the IP address starts with 169.xxx.xxx.xxx, the DHCP server has not properly allocated an address or DHCP is not enabled on your network.
Install Print Drivers This procedure describes how to install Print Drivers using the Print Driver CD. NOTE: If you wish to install different print drivers or are using a different operating system refer to the System Administration CD for full details. The Print Drivers are on the Print Driver CD that was delivered with your machine.
E-mail Setup If you wish to setup the E-mail service follow this procedure. If you do not want to setup this service at this time continue on to Fax Setup on page 15. NOTE: If you do not see the E-mail button on the Services Home screen, enable E-mail in the Tools Pathway. (Press Log In/Out > Password [1111] > Enter > Machine Status > Tools > User Interface > Service Enablements > E-mail > Enable).
9 10 11 12 13 Enter the Login Name and Password. Click Apply to confirm your settings. From the Properties menu, click Services > E-mail Settings > Default. To amend the settings on the E-mail Setup screen, click Edit for each options group. When you have made your selections click Apply. NOTE: For more information on all of the E-mail features including setting up address books, please refer to the System Administration CD.
Fax Setup The WorkCentre 4260 X and XF Series configuration has Fax installed as standard. The Fax Kit will require setup when the machine is installed. Setting up the Fax Kit 1 2 3 4 5 6 7 8 9 10 Set up the Fax Kit using the instructions in the Kit. Connect the telephone line to the Line connector on the device. If you wish to attach a handset to the device, connect the handset to the Ext. connector. Handset (Ext.
Installing Option Kits This section provides instructions on how to install and configure optional features: • Network Accounting • Server Fax NOTE: For more instructions on installing and configuring Server Fax and Network Accounting, refer to the System Administration CD. Installing Option Kits 1 2 All the Option Kits are installed in the same way. Each kit will contain a Feature Enablement Key and instructions.
Server Fax The Server Fax feature enables Users to send documents to one or more fax machines via the telephone network without having a dedicated telephone line connected to the machine This is achieved by connecting the machine to a network Fax Server which can manage fax transmissions throughout an organisation. Installing the kit 1 Install the kit. Refer to Installing Option Kits on page 16.
Making Copies 1 Load the documents to be copied either face up in the Document Feeder or face down to the rear left corner of the Document Glass. Press the Services Home button and then Copy. The Copy screen will be displayed. Select the required features using the Touch Screen. 2 3 The features are shown in the table below.
Additional Copy Features Reduce / Enlarge Originals can be reduced or enlarged between 25% and 400%. To use this option, select the Copy tab. Select any one of the preset reduce/enlarge ratios or select More to access custom settings. Image quality adjustment You can enhance the copy quality of the output based on the type and quality of the original being scanned. To use this option, select the Image Quality tab.
Printing a Document 1 2 3 Ensure that the correct Xerox WorkCentre 4260 Series printer driver has been installed on your PC. To install the print drivers refer to Install Print Drivers on page 12. You can also access the Print Drivers by referring to the CentreWare Print and Fax Services CD or you can download the latest versions from the Xerox website at www.xerox.com/support. Open the document to be printed.
Additional Print Features Rotate image This feature enables you to rotate the page through 180 degrees. To use this option, click the Advanced tab and click on Image Options. Select Enabled to rotate page images 180 degrees from their current orientation. Select Disable to turn the feature off. Saved settings Frequently (or rarely) used features of a print job can be saved with the Saved Settings option. This enables you to name, save, and recall almost all selectable features of a print job.
Sending a Fax NOTE: This feature is only available on the WorkCentre 4260 X/XF configuration. 1 Load the documents to be faxed either face down on the Document Glass or face up into the Document Feeder. Press the Services Home button and choose the Fax option. This displays the Fax screen. Enter the recipient’s fax number by: • Keypad Dial - select the Enter Number area on the touch screen and enter the number using the numeric keypad.
NOTE: To confirm the Fax job, press the Job Status button on the Control Panel to display the Job Status screen. The queued job will be displayed.
Additional Fax Features Delayed send This feature enables you to specify the time the fax is transmitted. This option can be used to delay transmission of a fax job to an offpeak period to reduce the cost of the call. To use this option, select the Fax Options tab. Select Fax Options > Delayed Send. Change the resolution The Resolution affects the appearance of the fax at the receiving fax terminal. To use this option, select the Fax tab and choose from the available options under Resolution.
Network Scanning 1 2 3 4 Network Scanning enables you to scan your hard copy documents and store them as electronic files. Load the documents to be scanned either face down on the Document Glass or face up into the Document Feeder. Press the Services Home button on the Control Panel. Select the Network Scanning option. This displays the Network Scanning screen. Select the Scanning Template you require from the list.
Network Scanning Advanced Settings Layout Adjustment Filing Options Update Templates Use a recently created or updated template before the system automatically adds it to the template list 5 Press Start to scan your documents. NOTE: To confirm the scan job, press the Job Status button on the Control Panel to display the Job Status screen. The queued job will be displayed.
Additional Network Scanning Features Creating Scanning Templates Templates are used in network scanning to define the destination and scan settings for your scan job. Your workflow will be more efficient if you create specific templates for your most frequent scanning jobs. 1 2 3 New templates are based on the settings configured for the Default Template or you can copy and modify existing templates. Up to 250 templates can be displayed.
Sending an E-mail 1 Load the documents to be E-mailed either face down on the Document Glass or face up into the Document Feeder. Press the Services Home button on the Control Panel. Select E-mail. Select From and enter the address you want to appear in the From field of the E-mail. 2 3 4 NOTE: This field may have been preset by the Administrator and may not be editable. 5 Select New Recipient and enter the E-mail address of the recipient.
Additional E-mail Features Color Attachments When the Color scan option is selected you will also be able to attach a full color image to your email in a JPEG format. This format is a better compression format for color bitmaps. To enable Color scan to E-mail select the E-mail tab and choose the Output Color option. Select Full Color. NOTE: The maximum image resolution for color images is 300x300 dpi.
Enhance your WorkCentre’s productivity The WorkCentre 4260 Series is a powerful multi function device with many digital functions integrated into one sleek system. It is designed to support large workgroups in different production environments. You can do more with less and streamline your workflow with these productivity enhancing features.
Customize your device The machine can be setup to reflect your office’s workflow. For example, the initial screen you see when you walk up to the machine can be either the Machine Status, Job Status or one of the Services. Default settings for each of the Services can be set to your own requirements such as the default paper tray, customized reduction ratios and 2-sided copying to save on paper. To explore the options, access Tools and explore the Feature Defaults and Copy Service Settings.
Send paper documents as E-mail Scanned documents can be sent as E-mail attachments to a specified E-mail recipient or recipients. Access to the E-mail features is gained using the Services Home button on the Control Panel and the E-mail option on the display. This is an excellent feature for scanning documents for your own use. Simply select the Email feature, enter your own E-mail address and scan the document. Moments later it will be in your E-mail Inbox.
Troubleshooting A variety of situations can effect the quality of your output. For optimal performance, ensure the guidelines in the User Guide are followed. The documentation and the fault messages on the machine help you to locate and resolve a problem easily. Some problems can be resolved by switching off and switching on your device. Wait approximately 20 seconds before switching the machine ON.
Paper jams Side Cover Area Jam The screen will indicate the location of the jam. • Follow the instructions on the display to clear the paper from the paper path. Paper Jam Area p Fuser Area • Ensure that all jam clearance doors and covers are returned to their correct positions. Finisher Area Jam NOTE: Jam Clearance areas may vary depending on your machine model and configuration. Document jams 1b 1a 1c The display will indicate when a document jam has occurred.
Help When using your device, detailed and timely help is available at your fingertips. You can access Help information and tips from a variety of sources. On the device Press Help at any time to access the on-line help screens. Messages, screen instructions and graphics provide additional information. Documentation • • Most answers to your questions will be provided by the documentation that is supplied on CDs with the WorkCentre 4260 Series. Alternatively you can access the documents from www.xerox.
On CentreWare Internet Services Click Index to view the contents of the Internet Services site. Click Help to take you to the Xerox on-line support web site.
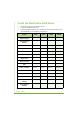
Greenwich Mean Time Offset http://wwp.greenwichmeantime.com/. City/Region/ Country GMT Offset City/ Region/ Country GMT Offset City/Region/ Country GMT Offset International Date Line West -12.0 Switzerland +1.0 Chennai +5.5 Midway Island -11.0 Luxembourg +1.0 Kolkata +5.5 Samoa -11.0 Austria +1.0 Mumbai +5.5 Hawaii -10.0 Croatia +1.0 New Delhi +5.5 Alaska -9.0 Czech Republic +1.0 Almaty +6.0 Pacific Time (US, Canada) -8.0 Finland +1.0 Novosibirsk +6.0 Tijuana -8.
38 quick use guide