390ug.
390ug.bk Page 2 Friday, April 28, 2000 12:13 PM Prepared by: Xerox Industrial Design Human Interface Graphic Design Jefferson Road Henrietta New York ©2000 by Xerox Limited. All rights reserved.
90ug.bk Page iii Friday, April 28, 2000 12:13 PM Table of Contents USER GUIDE Where Do I Find It v 1. GETTING STARTED 1-1 Introduction Front View Rear View / Inside View Using the Control Panel Using the Number Keypad Entering Alphanumeric Characters Using the Automatic Paper Feeder Using the Manual Paper Feeder 1-1 1-2 1-3 1-4 1-7 1-8 1-10 1-14 2. MAKING A COPY 2-1 Making a Copy To Make A Quick Copy To Make Copies Using The Copy Menu Features 3.
390ug.bk Page iv Friday, April 28, 2000 12:13 PM Cancelling Transmission Confirming Transmission 4. RECEIVING A FAX Reception Modes Determining the Reception Mode Receiving Automatically in FAX Mode Receiving Manually in TEL Mode Receiving Automatically in ANS/FAX Mode Distinctive Ring Pattern Detection (DRPD) 5. HOW TO PRINT AND SCAN Printing A Document Printing A Document Scanning A Document 6.
390ug.bk Page v Friday, April 28, 2000 12:13 PM WHERE DO I FIND IT Where Do I Find It In addition to this User Guide, your WorkCentre 390 comes complete with an Install Guide, CD-ROM with electronic User Guide, and a Warranty Card. If you do not see what you are looking for in this User Guide, check below to find where you can locate the information.
390ug.
390ug.bk Page 1 Friday, April 28, 2000 12:13 PM C h a p t e r O n e 1 GETTING STARTED Introduction 1 This guide provides reference material for installations where the WorkCentre 390 is used as a stand-alone machine. If questions arise that are not addressed in this guide, more detailed information is provided in the Xerox Workcentre 390 electronic User Guide. The electronic User Guide is located on the WorkCentre 390 CD-ROM.
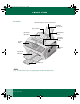
390ug.bk Page 2 Friday, April 28, 2000 12:13 PM FRONT VIEW Front View Automatic Paper Feeder Extension Tray Automatic Paper Feeder Paper Guides Manual Paper Feeder Document Input Tray Automatic Document Feeder Control Panel Document Guides Document Exit Tray Paper Exit Tray Note: Your machine may look slightly different than the illustration. 1.
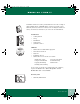
390ug.bk Page 3 Friday, April 28, 2000 12:13 PM REAR VIEW / INSIDE VIEW Rear View / Inside View Rear View Power Cord Connector USB Connector TEL LINE Jack EXT. LINE Jack PC Cable Connector 1 Inside View Front Cover Laser Printer Cartridge Cover Release Buttons (right and left sides) User Guide 1.
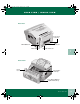
390ug.bk Page 4 Friday, April 28, 2000 12:13 PM USING THE CONTROL PANEL Using the Control Panel Fax Resolution Use to choose the resolution of transmitted documents. Collate When you make a copy, use this button to sort the copies. Reduce/Enlarge When you make a copy, use this button to reduce or enlarge the image size. Receive Mode Use to choose the receive mode you want to use. The selected mode is displayed. 1.
390ug.bk Page 5 Friday, April 28, 2000 12:13 PM USING THE CONTROL PANEL Menu Use to choose or set up special functions. Contrast Use to choose the contrast of copied or transmitted documents. Exit Use to exit the current mode or status and return to previous. 1 Copy Mode Use to copy a document. Up and Down Use to display the next or previous menu item. Also use to adjust machine settings. Left and Right Use to move cursor left or right across the display.
390ug.bk Page 6 Friday, April 28, 2000 12:13 PM USING THE CONTROL PANEL Search Use to search for numbers in memory. Also use to delete digits in the edit mode or to delete entries in the phone book memory. Pause/Redial Use to redial the last phone number called. Also use it to add a pause when entering a number in memory. Speed/Dial Use to dial calls and send fax documents by entering a 2-digit number. Also use to switch the LCD display between tasks while performing dual jobs.
390ug.bk Page 7 Friday, April 28, 2000 12:13 PM USING THE NUMBER KEYPAD Using the Number Keypad As you perform various tasks, you will need to enter names and numbers using the Number Keypad. For example, when you set up your machine, you enter your name (or your company’s name) and telephone number. When setting up Speed Dial numbers, you will also need to enter telephone numbers and names. When prompting you to enter a name, the LCD display will appear as shown.
390ug.bk Page 8 Friday, April 28, 2000 12:13 PM ENTERING ALPHANUMERIC CHARACTERS Entering Alphanumeric Characters 1 Number Keypad Using the Number Keypad, locate the button labeled with the character you want. Press that button repeatedly until the correct character appears in the display. Caution: For example, to enter the letter O, press the key (3 times). The character appears in the display. Note: You can enter special characters (space, plus sign, etc.) in the name by using the 0 key.
390ug.bk Page 9 Friday, April 28, 2000 12:13 PM ENTERING ALPHANUMERIC CHARACTERS To enter another letter, locate the Number Keypad button labeled with the letter you want. Press the button repeatedly until the letter appears in the display. 2 If the next letter is printed on the same Number keypad button, move the cursor by pressing the Right button, then press the Number Keypad button labeled with the letter you want. The blinking cursor moves right and the next letter appears in the display.
390ug.bk Page 10 Friday, April 28, 2000 12:13 PM USING THE AUTOMATIC PAPER FEEDER Using the Automatic Paper Feeder Note: If you experience problems feeding paper, place the media into the Manual Paper Feeder one sheet at a time. Automatic Paper Feeder Extension Tray 1.10 User Guide You can stack paper, envelopes, card stocks, labels, or transparencies in the Automatic Paper Feeder to feed automatically.
390ug.bk Page 11 Friday, April 28, 2000 12:13 PM USING THE AUTOMATIC PAPER FEEDER Prepare the print material for loading. • For paper and envelopes, flex paper or fan envelopes back and forth. Do not fold or crease the paper. • Straighten the edges on a level surface. • For transparencies, refer to the packaging for the transparency stock to determine the print side. Hold the transparencies by the edges and avoid touching the print side.
390ug.bk Page 12 Friday, April 28, 2000 12:13 PM USING THE AUTOMATIC PAPER FEEDER 3 The WorkCentre 390 will print on the side facing you. Load the print material in the Automatic Paper Feeder. Do not exceed the rated capacity for each type of print material. Do not mix different types of print media. Refer to the following instructions for loading material. • Load paper, letterhead, or transparencies with the print side facing you. • Load envelopes with the flap side facing away from you.
390ug.bk Page 13 Friday, April 28, 2000 12:13 PM USING THE AUTOMATIC PAPER FEEDER • Load letterhead paper with the design facing you. The top edge of the sheet with the logo should enter the printer first. Adjust the paper guides to the width of the print media. Slide the paper guides until they lightly touch both sides of the print media. Do not tightly press the paper guides to the print media edges, as the guides may bend the media or provide too much resistance when feeding.
390ug.bk Page 14 Friday, April 28, 2000 12:13 PM USING THE MANUAL PAPER FEEDER Using the Manual Paper Feeder Use the Manual Paper Feeder to feed paper one sheet at a time into your machine. Manual Paper Feeder 1 1.14 User Guide Place the paper in the Manual Paper Feeder and adjust the paper guides to the width of the print material. Slide the paper guides until they lightly touch the stack of print media.
390ug.bk Page 15 Friday, April 28, 2000 12:13 PM USING THE MANUAL PAPER FEEDER Ensure that the media is fed into the machine as far as it will go. Press the Start button to start manual feeding of the media. If you have more than one page to print, press the Start 2 Note: When you print a file from your PC using the Manual Paper Feeder, make sure that you select the correct paper source and paper size from your software application before starting your print job. 3 button for each page.
390ug.bk Page 16 Friday, April 28, 2000 12:13 PM 1.
390ug.bk Page 1 Friday, April 28, 2000 12:13 PM C h a p t e r T w o 2 MAKING A COPY Making a Copy Your machine is a high quality copier which offers the following features: • Adjustable Contrast - The contrast setting can be changed to obtain the best copy quality for documents containing faint markings, dark images, photographs or other halftone images. • Multiple copies - 1 to 99 copies of the document can be made.
390ug.bk Page 2 Friday, April 28, 2000 12:13 PM TO MAKE A QUICK COPY • Collation - When the Copy Collate menu option is set to On, the machine sorts the copies. For example, if you print two copies of a three-page document, the machine prints one complete document (page 1, page 2, page 3) before printing a second copy (page 1, page 2, and page 3). To Make A Quick Copy 1 Adjust the document guides to match the width of the document.
390ug.bk Page 3 Friday, April 28, 2000 12:13 PM TO MAKE COPIES USING THE COPY MENU FEATURES Using the Number keypad, enter the number of copies you wish to make. The default setting is 01 copy. Press the Start button. 5 6 The machine copies the document. Note: When making copies, resolution is automatically set to Super Fine and cannot be changed. The Copy Collate menu is not available if you reduce or enlarge the image size.
390ug.bk Page 4 Friday, April 28, 2000 12:13 PM TO MAKE COPIES USING THE COPY MENU FEATURES 4 5 Press the Copy Mode button to display the COPY menu. For two or more copies (2 to 99), enter the desired number using the Number Keypad. Press the Reduce/Enlarge button to reduce or enlarge the original document. • Selecting 1. AUTO, will cause the WorkCentre 390 to automatically reduce the copy size of each page to fit on a single page. • Selecting 2.
390ug.bk Page 5 Friday, April 28, 2000 12:13 PM TO MAKE COPIES USING THE COPY MENU FEATURES Press Collate if you wish to collate copies. When making multiple copies there are two collate options: ON and OFF. • Selecting 1:ON will make 1 copy of page 1, 2, and 3 in order, then a second copy of 1, 2, and 3 until a total of n copies has been made. • Selecting 2:OFF will make n copies of page one, n copies of page two, and so on. These copy sets will all be stacked atop one another.
390ug.bk Page 6 Friday, April 28, 2000 12:13 PM 2.
390ug.bk Page 1 Friday, April 28, 2000 12:13 PM C h a p t e r T h r e e 3 SENDING A FAX Preparing Documents for Faxing You can fax documents that are printed on standard letter, legal or A4 size paper. Follow these guidelines to prepare your documents. • Remove all staples and paper clips before inserting the documents into the machine. • Make sure any glue, ink or correction fluid on the paper is completely dry before loading the document.
390ug.bk Page 2 Friday, April 28, 2000 12:13 PM SENDING A FAX MANUALLY Sending a Fax Manually 1 2 DOCUMENT READY JAN-20-2000 <100%> 3 Adjust the document guides to match the width of the document. Slide the document face down into the Automatic Document Feeder until it is grasped and pulled into the machine. The display alternately reads DOCUMENT READY and shows the remaining memory capacity. Up to 30 sheets may be inserted at a time.
390ug.bk Page 3 Friday, April 28, 2000 12:13 PM CANCELLING TRANSMISSION Using the Number keypad, enter the number of the fax machine to which you wish to send the document. If you make a mistake while entering a number, move the cursor under the incorrect digit by using the Right or Left buttons, and correct the number. Press the Start button when the number appears correctly in the display. The machine begins dialing.
390ug.bk Page 4 Friday, April 28, 2000 12:13 PM CONFIRMING TRANSMISSION Confirming Transmission A Message Confirmation report shows whether the transmission was successful and how many pages were sent. When the last page of your document has been sent successfully, the machine beeps and returns to Standby mode. To print a Message Confirmation report: 1 Press the Reports button repeatedly until you find the MESSAGE CONFIRM item. REPORTS (MSG.CONFIRM) 2 3.
390ug.bk Page 1 Friday, April 28, 2000 12:13 PM C h a p t e r F o u r 4 RECEIVING A FAX Reception Modes When used as a Stand Alone fax machine, your multi-function machine has five reception modes as described below: • FAX The machine answers an incoming call and immediately goes into fax receive mode. • TEL/FAX The machine answers the incoming call. If a fax signal is not detected, the WorkCentre 390 sounds a ringing tone to indicate a voice phone call.
390ug.bk Page 2 Friday, April 28, 2000 12:13 PM DETERMINING THE RECEPTION MODE • ANS/FAX If the WorkCentre 390 senses a fax tone, it automatically switches to fax reception mode. However, if a fax is not sensed, the WorkCentre 390 routes the call to the answering machine. • TEL In TEL mode, automatic fax reception is turned off. You can receive a fax only by manually picking up the external phone to accept the call and pressing Start to receive the fax.
390ug.bk Page 3 Friday, April 28, 2000 12:13 PM RECEIVING AUTOMATICALLY IN FAX MODE Receiving Automatically in FAX Mode Press the Receive Mode display indicates FAX. button until the When a fax call comes in, the machine answers on the selected ring count and receives it automatically. 1 Note: If Distinctive Ring Pattern Detection (DRPD) Mode is selected, you must first set DRPD Mode to OFF in the SYSTEM DATA menu (Menu 01). 2 4 User Guide 4.
390ug.bk Page 4 Friday, April 28, 2000 12:13 PM RECEIVING MANUALLY IN TEL MODE Receiving Manually in TEL Mode If you have a regular phone connected to the EXT. LINE jack on the back of the machine, you can answer voice phone calls and receive faxes manually. 1 Press the Receive Mode display indicates TEL. 2 Answer an incoming call by picking up the receiver.
390ug.bk Page 5 Friday, April 28, 2000 12:13 PM RECEIVING AUTOMATICALLY IN ANS/FAX MODE Receiving Automatically in ANS/FAX Mode To use this mode, you must attach an answering machine to the EXT. LINE jack on the back of your machine. Press the Receive Mode button until the display indicates ANS/FAX. Any incoming voice calls will be answered by the answering machine. The caller can then leave a message on the answering machine.
390ug.bk Page 6 Friday, April 28, 2000 12:13 PM DISTINCTIVE RING PATTERN DETECTION (DRPD) Distinctive Ring Pattern Detection (DRPD) Distinctive Ring is a telephone company service which enables the use of a single telephone line to answer several different telephone numbers. The number used to call a phone with this feature is identified by a distinctive ringing pattern consisting of various combinations of long and short ringing tones.
0ug.bk Page 1 Friday, April 28, 2000 12:13 PM C h a p t e r F i v e 5 Printing A Document HOW TO PRINT AND SCAN The following procedure describes the general steps required for printing from various Windows applications. The exact steps for printing a document may vary depending on the application program you are using. Refer to your software application documentation for the exact printing procedure. 5 User Guide 5.
390ug.bk Page 2 Friday, April 28, 2000 12:13 PM PRINTING A DOCUMENT Printing A Document Note: These steps describe the typical process to print from a Windows environment. 1 2 3 4 5 5.2 User Guide Make sure that your machine is properly connected to the computer. Verify that you have installed the print driver software for your machine. See Installing Software in the electronic User Guide. Create or open the document that you want to print. Choose Print or Print Setup from the File menu.
390ug.bk Page 3 Friday, April 28, 2000 12:13 PM PRINTING A DOCUMENT Click on OK to close the Properties dialog box. 6 After making any necessary changes to the printing parameters, click on OK to start the print job. 7 5 User Guide 5.
390ug.bk Page 4 Friday, April 28, 2000 12:13 PM SCANNING A DOCUMENT Scanning A Document To use the WC 390 as a scanner, the following are required: Note: To install the WorkCentre 390 TWAIN Scanner application, refer to Installing Software in the Getting Started section of the electronic User Guide. 2 3 User Guide WorkCentre 390 TWAIN Scanner application installed on the workstation connected to the WC 390.
390ug.bk Page 1 Friday, April 28, 2000 12:13 PM C h a p t e r S i x 6 TROUBLESHOOTING This section describes Troubleshooting for the following areas: • Clearing Jams • LCD Display Error Messages • Print Quality Problems Refer to the specific subsection for a description of the problem and associated solutions. 6 User Guide 6.
390ug.bk Page 2 Friday, April 28, 2000 12:13 PM CLEARING JAMS Clearing Jams If a document jams while you are sending it, DOCUMENT JAM appears in the display. Do not pull the document out of the slot or you may damage your machine. 1 Open the control panel by pulling lightly on the Control Panel cover. 2 Carefully remove the jammed document. Close the control panel firmly until it clicks into place.
390ug.bk Page 3 Friday, April 28, 2000 12:13 PM PAPER JAMS IN THE PAPER FEED AREA Paper Jams in the Paper Feed Area If a paper jam occurs while you are making a copy or receiving a FAX, PAPER JAM appears in the LCD display. Remove the stack of copy paper (if necessary). Remove the jammed paper by carefully pulling it straight up using both hands. 1 2 3 6 User Guide 6.
390ug.bk Page 4 Friday, April 28, 2000 12:13 PM PAPER JAMS IN THE PAPER FEED AREA 4 6.4 User Guide After you remove the jammed paper, reload the stack of copy paper back into the Automatic Paper Feeder with the print side facing you. Adjust the paper guides to match the width of the paper.
390ug.bk Page 5 Friday, April 28, 2000 12:13 PM PAPER JAMS IN THE PRINTER OUTPUT AREA Paper Jams in the Printer Output Area If the paper jams as it exits to the printer exit tray and most of the paper is visible, pull the paper straight out using both hands. Caution: If there is resistance when you pull the paper, and it does not move easily when you pull, stop pulling. Continue with the next section, Paper Jams Inside the Machine. 6 User Guide 6.
390ug.bk Page 6 Friday, April 28, 2000 12:13 PM PAPER JAMS INSIDE THE MACHINE Paper Jams Inside the Machine 1 Pull the cover release buttons toward you to open the cover. 2 Remove the Laser Printer Cartridge by lifting it carefully by the handle. Warning: The Fuser is hot. Use caution when removing the jammed paper. 6.
390ug.bk Page 7 Friday, April 28, 2000 12:13 PM PAPER JAMS INSIDE THE MACHINE Using both hands, gently pull the paper toward you. 3 Check that there is no other paper jammed inside the printer. 4 Reinstall the Laser Printer Cartridge. Close the front cover. 5 6 6 User Guide 6.
390ug.bk Page 8 Friday, April 28, 2000 12:13 PM TIPS FOR AVOIDING PAPER JAMS Tips for Avoiding Paper Jams 6.8 User Guide • By carefully selecting print materials and loading them properly, you should be able to avoid most paper jams. If jams do occur, follow the steps outlined in Clearing Jams in the electronic User Guide. If jams occur frequently, make sure that you are following these tips to avoid jams. • Follow the procedures in Loading Paper in the electronic User Guide to load paper properly.
390ug.bk Page 9 Friday, April 28, 2000 12:13 PM LCD DISPLAY ERROR MESSAGES LCD Display Error Messages LCD Display Meaning Solution RETRY REDIAL? The machine is waiting for the programmed interval to automatically redial a previously busy station. You can press Start to immediately redial, or Stop to cancel the redial operation. COMM. ERROR There is a fax communications problem. Try faxing again. INCOMPATIBLE Remote machine did not have the requested feature, such as Polling.
390ug.bk Page 10 Friday, April 28, 2000 12:13 PM LCD DISPLAY ERROR MESSAGES 6.10 LCD Display Meaning Solution GROUP NOT AVAILABLE You have tried to select a group location where only a single location number can be used. Group Location Feature is not available. LINE ERROR Your machine cannot connect with the remote site, or it has lost contact because of a problem on the phone line. Try again. If the failure persists, wait an hour or so for the line to clear, then try again. Turn on ECM mode.
390ug.bk Page 11 Friday, April 28, 2000 12:13 PM LCD DISPLAY ERROR MESSAGES LCD Display Meaning Solution NO. NOT ASSIGNED The Speed Dial location you tried to use has no number assigned to it. Assign the number to a Speed Dial button and try again. Refer to the Install Guide or electronic User Guide for more information NO PAPER The paper feed tray is empty. Ensure that at least 10 sheets are loaded unless using the manual paper feeder.
390ug.bk Page 12 Friday, April 28, 2000 12:13 PM LCD DISPLAY ERROR MESSAGES 6.12 LCD Display Meaning Solution PAPER JAM 2 The jammed paper is still inside the unit. Clear the jam. Make sure that the paper edges are not damaged. Ensure that the exit guides are latched on both sides. Refer to Clearing Jams on page 6.2. POLLING ERROR The remote fax machine you want to poll is not ready to respond to your poll. When setting up to poll another fax machine, you have used an incorrect poll code.
390ug.bk Page 13 Friday, April 28, 2000 12:13 PM PRINT QUALITY PROBLEMS Print Quality Problems Symptom Cause and Solution The page is white or the printout is too light to read. Toner is low or empty. Refer to Replacing the Laser Printer Cartridge in the electronic User Guide. Ensure that the sealing tape is removed from the cartridge. Refer to the Install Guide. Irregular faded patches of print appear. There is a paper quality problem.
390ug.bk Page 14 Friday, April 28, 2000 12:13 PM PRINT QUALITY PROBLEMS 6.14 Symptom Cause and Solution Background scatter on printed pages. The paper may be too damp. Try printing with a different batch of paper. Always store paper in its original sealed package. Do not open packages of paper until necessary so that the paper does not absorb too much moisture from the air. You may be printing on uneven surfaces.
390ug.bk Page 1 Friday, April 28, 2000 12:13 PM C h a p t e r S e v e n 7 MAINTENANCE Clearing Memory You can selectively clear information stored in your machine’s memory. Press the Menu . and button. Then press The MEMORY CLEAR ITEM appears on the display. Use the Up and Down buttons to scroll through the list of options. 1 7 User Guide 7.
390ug.bk Page 2 Friday, April 28, 2000 12:13 PM MEMORY CLEAR ITEMS Memory Clear Items SYSTEM ID The System ID number and name are cleared from the machine’s memory. SYSTEM DATA Restores user-selectable options to the default value. PHONEBK/ MEMORY Clears the Speed Dial, or Group Dial numbers stored in memory. All the Scheduled Job operations you have reserved are also canceled. TX-RX JOURNAL Clears all records of transmissions and receptions.
390ug.bk Page 3 Friday, April 28, 2000 12:13 PM CLEANING THE DOCUMENT SCANNER Cleaning the Document Scanner To keep your machine working properly, occasionally clean the white roller, Automatic Document Feeder (ADF) rubber, and the scanning glass. If they are dirty, documents sent to another fax machine may not be clear. Open the Control Panel by pulling lightly on the Control Panel Cover assembly.
390ug.bk Page 4 Friday, April 28, 2000 12:13 PM CLEANING THE DOCUMENT SCANNER 4 5 6 7.4 User Guide Using a cotton swab or a soft dry cloth, clean the ADF rubber piece. Carefully wipe the scanning glass with a soft, dry cloth. If the glass is very dirty, first wipe it with a slightly dampened cloth, then with a dry cloth. Be very careful not to scratch the glass surface. Replace the roller by performing steps one and two in reverse order.
390ug.bk Page 5 Friday, April 28, 2000 12:13 PM CLEANING THE DOCUMENT SCANNER Close the control panel firmly until it clicks into place. 7 Perform shading adjustment. See Adjust Shading in the electronic User Guide. 8 7 User Guide 7.
390ug.bk Page 6 Friday, April 28, 2000 12:13 PM REPLACING THE LASER PRINTER CARTRIDGE Replacing the Laser Printer Cartridge 1 2 7.6 User Guide Pull the cover release buttons toward you to open the cover. Remove the empty Laser Printer Cartridge by lifting it carefully by the handle. Follow the instructions printed on the cartridge box to recycle the used cartridge.
390ug.bk Page 7 Friday, April 28, 2000 12:13 PM REPLACING THE LASER PRINTER CARTRIDGE Unwrap a new Laser Printer Cartridge. Carefully remove the sealing tape. Shake the Laser Print Cartridge as shown five or six times, then from side to side, to distribute the toner evenly. 3 4 5 7 User Guide 7.
390ug.bk Page 8 Friday, April 28, 2000 12:13 PM REPLACING THE LASER PRINTER CARTRIDGE 6 7 7.8 User Guide Locate the cartridge slots inside the printer, one on each side. Grasp the handle; slide the Laser Printer Cartridge down between the cartridge slots until it drops into place. Close the cover firmly. Ensure that both side buttons have clicked into place.
390ug.bk Page 9 Friday, April 28, 2000 12:13 PM CLEANING THE DRUM Cleaning the Drum If print output quality decreases due to the presence of black streaks or ghost images appearing on printouts, drum cleaning should be performed as an attempt to rectify the problem. Press the Menu Enter button. 1 2 CLEAN DRUM ? appears in the LCD display. Press the START button. The LCD display shows drum cleaning is underway.
390ug.bk Page 10 Friday, April 28, 2000 12:13 PM 7.
Chap8.fm Page 1 Tuesday, May 2, 2000 8:39 AM INDEX Index USER GUIDE 8 This is a comprehensive index that incorporates all three manuals -- the UG, the EUG, and the IG. Each entry lists the manual in which you will find the required information. The EUG was provided to you on your WorkCentre 390 CD-ROM.
Chap8.fm Page 2 Tuesday, May 2, 2000 8:39 AM INDEX 256 Colors, EUG B A Basic Tab, EUG 256 Colors, EUG Descreen, EUG Gray 256 Scales, EUG Halftone B/W, EUG Image Type, EUG Lineart BIW, EUG Reduce/Enlarge, EUG Resolution, EUG True Color RGB, EUG Being Polled By a Remote Machine, EUG Blinking Cursor, UG 1.9 Blur, EUG Blur More, EUG Buttons, EUG Attach..., EUG Collate, EUG Contrast, EUG Copy Mode, EUG Exit, EUG Fax Resolution, EUG Go, EUG Information, EUG Keep, EUG Keep...
Chap8.fm Page 3 Tuesday, May 2, 2000 8:39 AM INDEX Reports, EUG Route, EUG Scan, EUG Search, EUG Select, EUG Send Options, EUG Start, EUG Stop, EUG Stop/Hold, EUG Up, Down, Left, Right, EUG Viewer, EUG Waste, EUG C Canadian Certification, EUG Canceling, EUG A Job Already in Memory Which is Waiting to be Polled, EUG A Standby Operation, EUG Transmission, EUG Cartridge, IG 1.2, 1.5 How to Install Laser Printer Cartridge, IG 1.5 CD-ROM (CD), IG iv, 1.1 Contents of, IG 1.11 Software Installation, IG 1.
Chap8.fm Page 4 Tuesday, May 2, 2000 8:39 AM INDEX Search Button, EUG Select Button, EUG Speed Dial Button, EUG Start Button, EUG Stop Button, EUG Up, Down, Left, Right Buttons, EUG Copy Button, UG 1.5 Copy Menu Features, EUG Copy Mode Button, EUG Copy Resolution, UG 2.3 Copying, IG 2.2-3 Collating and Sorting Copies, IG 2.3 How to make a copy, IG 2.2-3 Using Contrast, IG 2.3 Using Number Keypad, IG 1.8, 1.10, 2.3 Using the Automatic Feeder, IG 2.2 Copying, EUG Cover, IG 1.5, 1.
Chap8.fm Page 5 Tuesday, May 2, 2000 8:39 AM INDEX Entering Alphanumeric Characters, UG 1.8-9 Entering Alphanumeric Characters, EUG Entering Numbers, EUG Erasing Last Fax Data, EUG Error Messages, UG 6.9-12 Exit, EUG Exit Button, UG 1.5 Exit Button, EUG EXT. LINE, EUG Extension Phone, EUG Extension Tray, UG 1.10 F Fax Conversion Dialog Advanced Features, EUG Fax Mode, EUG Fax Resolution, EUG Fax Resolution Button, EUG Faxing, IG 2.4-5 Canceling a Fax Transmission, IG 2.
Chap8.fm Page 6 Tuesday, May 2, 2000 8:39 AM INDEX Home Resolution, EUG Home Resolution and Home Contrast, EUG Invert Image, EUG ips, EUG I J IC, EUG IEEE Standard 1284 Specifications, IG 1.
Chap8.fm Page 7 Tuesday, May 2, 2000 8:39 AM INDEX Level Adjustment, EUG Lineart B/W, EUG Loading Envelopes, UG 1.11-12 Loading Paper, EUG Using the Automatic Paper Feeder, EUG Using the Manual Paper Feeder, EUG Loading Transparencies, UG 1.10-12 Local ID, EUG Location, EUG LPTl, EUG Multiple Copies, EUG M On/Off Line, EUG On-Hook Dial, EUG On-Hook Dial Button, UG 1.6 On-Hook Dial Button, EUG OS, EUG Maintenance, IG 1.1 Maintenance, EUG Making a Copy, UG 2.
Chap8.fm Page 8 Tuesday, May 2, 2000 8:39 AM INDEX PC Parallel Cable (Parallel Cable), IG 1.2, 1.4 How to Connect to Computer, IG 1.4 USB Cable, IG 1.4 Phonebook Button, EUG Polling, EUG Polling One or More Remote Machines, EUG Portrait, EUG Power Save, EUG Power Saving, EUG Preparing Documents for Faxing, EUG Prescan Button, EUG Preview Window, EUG Image Control Tools, EUG Print, EUG Print Button, EUG Print Density, EUG Print Media Specifications, EUG Print Quality Problems, UG 6.
Chap8.fm Page 9 Tuesday, May 2, 2000 8:39 AM INDEX Reduce/Enlarge, EUG Copying, EUG Scanning, EUG Reduce/Enlarge Button, EUG Remote Code, EUG REN, EUG Report, UG 1.6 Reports, EUG Help List, EUG Journal, EUG Multi-Communication, EUG Phone Book, EUG Schedule Job, EUG System List, EUG TX Confirm, EUG Reports Button, EUG Reprint, EUG Resolution, EUG Resolution Button, UG 1.
Chap8.fm Page 10 Tuesday, May 2, 2000 8:39 AM INDEX TWAIN Scanner Help, EUG TWAIN Scanner Program, EUG TWAIN Scanner Window, EUG ScanSoft Pagis Pro, IG iv Installation of, IG 1.11 Scanning, IG 2.7 Specific Information on, IG 2.8 ScanSoft Textbridge Pro, IG iv Installation of, IG 1.11 Scanning, IG 2.7 Specific Information on, IG 2.8 Search Button, UG 1.
Chap8.fm Page 11 Tuesday, May 2, 2000 8:39 AM INDEX Stop Button, UG 1.6 Stop Button, EUG Stop/Hold Button, EUG Storing a Number for Speed Dialing, EUG Storing Speed Dial Numbers for Group Dialing, EUG Subject, EUG Supplies, EUG System ID, IG 1.10 System Number, IG 1.10 System Name, IG 1.10 System ID, EUG System Reports, EUG System Setup, EUG T TEL LINE, EUG TEL Mode, EUG Receiving Manually, EUG TEL/FAX Mode, EUG Receiving Automatically, EUG Telephone Line, EUG Telephone Line Cord, IG 1.2, 1.
Chap8.fm Page 12 Tuesday, May 2, 2000 8:39 AM INDEX Width and Height Indicators, EUG Windows 2000, IG 1.4, 1.11 Windows 98, IG 1.4, 1.