
Printer User Guide


Table Of Contents
- Contents
- Introduction
- Getting Started
- Unpacking
- Installing the Toner Cartridge
- Loading Paper
- Connecting Telephone Line
- Connecting a Printer Cable
- Turning the Machine On
- Changing the Display Language
- Setting the Machine ID
- Setting the Time and Date
- Setting the Paper Size and Type
- Setting Sounds
- Using the Save Modes
- Installing Xerox drivers in Windows
- System Requirements
- Installing Xerox Drivers in Microsoft Windows XP or Windows 2000 using the USB port
- Installing Xerox Drivers in Microsoft Windows XP, 2000 or Windows 98/ME using the Parallel port
- Installing Xerox Drivers in Microsoft Windows 98 or Windows Millennium using the USB port
- Printer Driver Features
- Using ControlCentre
- Paper Handling
- Printing Tasks
- Copying
- Scanning
- Faxing
- Changing the Fax Setup options
- Available Fax Setup Options
- Loading a Document
- Selecting the Paper Tray
- Adjusting the Document Resolution
- Sending a Fax Automatically
- Sending a Fax Manually
- Redialing the Last Number
- Confirming Transmission
- Automatic Redialing
- About Receiving Modes
- Loading Paper for Receiving Faxes
- Receiving Automatically in Fax Mode
- Receiving Manually in Tel Mode
- Receiving Automatically in Ans/Fax Mode
- Receiving Manually Using an Extension Telephone
- Receiving Faxes Using the DRPD Mode
- Receiving Faxes in the Memory
- One-touch Dialing
- Speed Dialing
- Group Dialing
- Searching for a Number in Memory
- Printing a Phonebook List
- Sending Broadcast Faxes
- Sending a Delayed Fax
- Sending a Priority Fax
- Adding Documents To a Scheduled Fax
- Canceling a Scheduled Fax
- Using Secure Receiving Mode
- Printing Reports
- Using Advanced Fax Settings
- Maintenance
- Troubleshooting
- Using USB Flash Drive
- Using Your Machine In Linux
- Using Windows PostScript Driver (WorkCentre PE120i Only)
- Printing From a Macintosh (WorkCentre PE120i Only)
- Installing Machine Options
- Specifications
- Index
Specifications
E.7
E
N
OTE
: You may experience jams when using print materials with a length of less than
127 mm (5 in.). For optimum performance, ensure that you are storing and handling the
paper correctly. Please refer to “Paper Storage Environment” on page E.8.
Guidelines for Using Paper
For the best result, use conventional 75 g/m
2
(20 lb) paper. Ensure that the paper is
of good quality, and free of cuts, nicks, tears, spots, loose particles, dust, wrinkles,
voids, and curled or bent edges.
If you are unsure of what type of paper you are loading, such as bond or recycled
paper, check the label on the package.
The following problems may cause print quality deviations, jamming or even damage
to the machine:
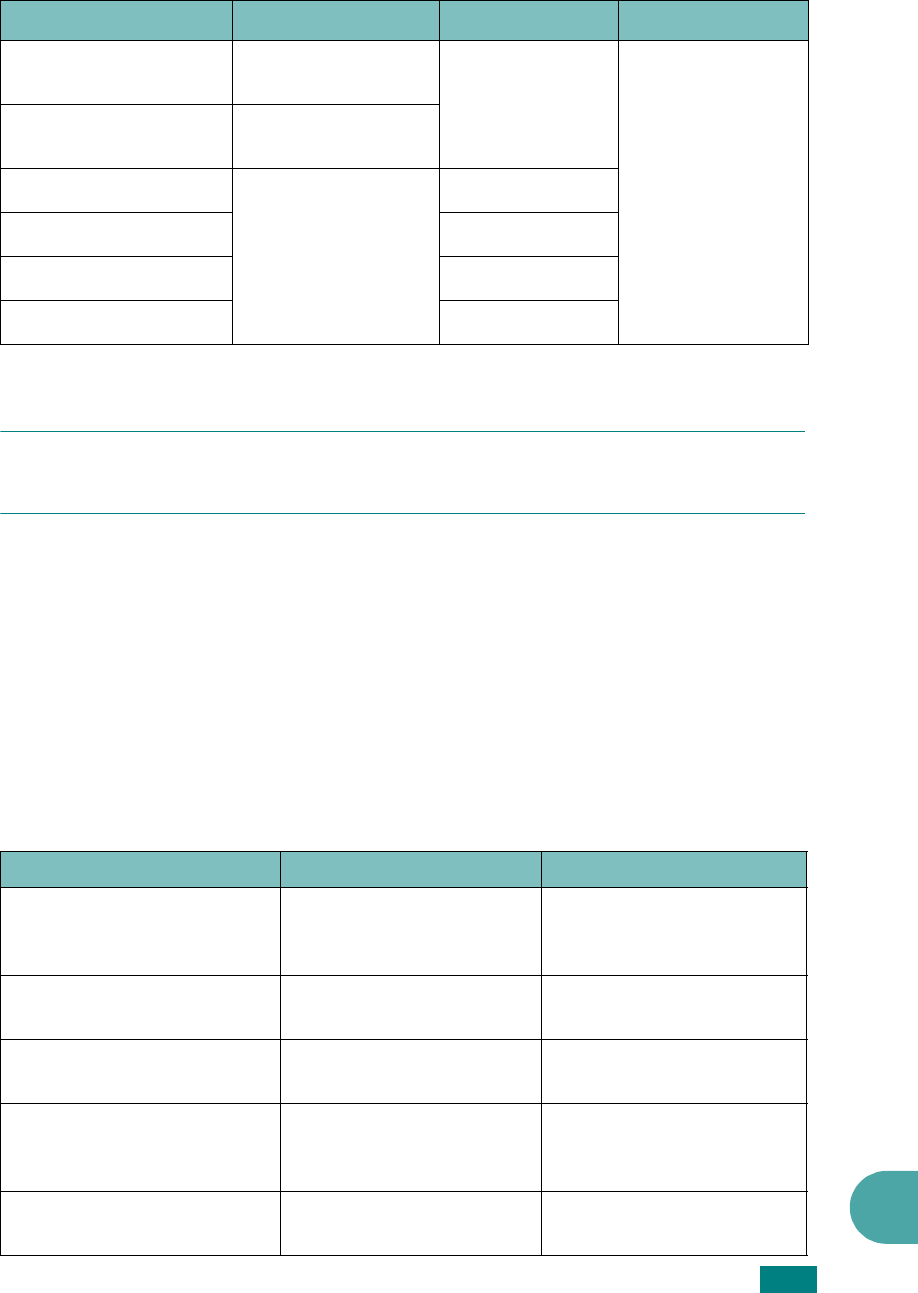
Minimum size (custom)
76 x 127 mm
(3 x 5 in)
60 to 120 g/m
2
bond (16 to
32 lb)
5 sheets of paper
for the Bypass
tray
Maximum size (Legal)
216 x 356 mm
(8.5 x 14 in)
Transparency
Same minimum and
maximum paper
sizes as listed
above.
138 to 146 g/m
2
Labels
120 to 150 g/m
2
Cards
90 to 163 g/m
2
Envelopes
75 to 90 g/m
2
*The machine supports a wide range of media sizes. See “Paper Type, Input Sources, and Capacities” on
page 3.2.
**Capacity may differ depending on media weight, thickness, and environmental conditions.
Symptom Problem with Paper Solution
Poor print quality or toner
adhesion, problems with
feeding
Too moist, too rough, too
smooth or embossed;
faulty paper lot
Try another kind of paper,
4 ~ 5 % moisture content.
Dropout, jamming, curl Stored improperly
Store paper flat in its
moisture-proof wrapping.
Increased gray background
shading/printer wear
Too heavy
Use lighter paper, use the
rear output slot.
Excessive curl problems with
feeding
Too moist, wrong grain
direction or short-grain
construction
• Use the rear output slot.
• Use long-grain paper.
Jamming, damage to
machine
Cutouts or perforations
Do not use paper with
cutouts or perforations.
Paper
Dimensions
*
Weight
Capacity
**