User Guide
About the User’s Guide This Laser MFP User’s Guide provides information you need for setting up your machine and installing the supplied software. It also provides all of the detailed instructions for using your machine as a printer, a scanner, a copier, and a facsimile, and information for maintaining and troubleshooting the machine. The User’s Guide shows you how to use a USB flash drive with your machine for scanning and saving documents, and printing documents stored on the USB flash drive.
CONTENTS Chapter 1: INTRODUCTION Special Features ........................................................... Understanding Component Locations ............................... Front View .............................................................. Rear View ............................................................... Control Panel Functions ............................................ Chapter 2: 1.2 1.5 1.5 1.6 1.7 GETTING STARTED Unpacking ..........................................................
Chapter 3: PAPER HANDLING Selecting Print Materials ................................................. 3.2 Paper Type, Input Sources, and Capacities .................. 3.2 Guidelines for Paper and Special Materials .................. 3.3 Loading Paper .............................................................. 3.4 In the Standard Tray ............................................... 3.4 In the Bypass Tray .................................................. 3.6 Using the Manual Feed Mode ...................
Using Special Copy Features ........................................... 5.9 Clone Copying ....................................................... 5.10 Collation Copying .................................................. 5.10 Auto Fit Copying .................................................... 5.11 2 Sides on 1 Page Copying ...................................... 5.11 2 Up or 4 Up Copying ............................................. 5.12 Poster Copying ......................................................
Printing a Phonebook List ............................................. Sending Broadcast Faxes ............................................. Sending a Delayed Fax ................................................ Sending a Priority Fax ................................................. Adding Documents To a Scheduled Fax .......................... Canceling a Scheduled Fax ........................................... Using Secure Receiving Mode ....................................... Printing Reports ........
Chapter 10: USING USB FLASH DRIVE About USB Flash Drives ............................................... 10.2 Installing a USB Flash Drive ......................................... 10.2 Scanning to USB Flash Drive ........................................ 10.3 Scanning With Default Settings ............................... 10.3 Scanning With Your Own Settings ............................ 10.4 Managing the USB Flash Drive ...................................... 10.6 Changing the Default Settings .............
Printing a Document ...................................................... Canceling a Print Job ................................................ Using Advanced Printing Features ................................... Printing Multiple Pages on One Sheet of Paper ............. Scheduling a Print Job .............................................. Appendix D: INSTALLING MACHINE OPTIONS Installing Memory DIMM ................................................ Removing a Memory DIMM ..............................
Important Precautions and Safety Information Safety Your Xerox product and supplies have been designed and tested to meet strict safety requirements. These include Safety Agency approval, and compliance to established environmental standards. Please read the following instructions carefully before operating the product and refer to them as needed to ensure the continued safe operation of your product. The safety testing and performance of this product have been verified using XEROX materials only.
Unplug this product from the wall outlet before cleaning. Always use materials specifically designated for this product. Use of other materials may result in poor performance and could create a hazardous situation. Do not use aerosol cleaners. Follow the instructions in the User Guide for proper cleaning methods. Never use supplies or cleaning materials for purposes other than those for which they were intended. Keep all supplies and materials out of reach of children.
Laser Safety Statement WARNING:Use of controls or adjustments or performance of procedures other than those specified herein may result in hazardous radiation exposure. With specific regard to lasers, the equipment complies with laser product performance standards set by governmental, national and international agencies as a Class 1 Laser Product. It does not emit hazardous radiation as the beam is totally enclosed during all phases of customer operation and maintenance.
If you are managing the disposal of your Xerox product, please note that the product contains Lead, and other materials whose disposal may be regulated due to environmental considerations. The presence of Lead is fully consistent with global regulations applicable at the time that the product was placed on the market. For recycling and disposal information, contact your local authorities. In the United States, you may also refer to the Electronic Industries Alliance web site: www.eiae.org.
Regulations - Europe Certification to 1999/5/EC Radio Equipment & Telecommunications Terminal Equipment Directive This Xerox product has been self-certified by Xerox for pan-European single terminal connection to the analogue public switched telephone network (PSTN) in accordance with Directive 1999/5/EC.
Regulations - USA Fax Send Header Requirements The Telephone Consumer Protection Act of 1991 makes it unlawful for any person to use a computer or other electronic device, including FAX machines, to send any message unless such message clearly contains in a margin at the top or bottom of each transmitted page or on the first page of the transmission, the date and time it is sent and an identification of the business or other entity, or other individual sending the message and the telephone number of the sen
The Telephone Company may make changes in its facilities, equipment, operations or procedures that could affect the operation of the equipment. If this happens the Telephone Company will provide advance notice in order for you to make necessary modifications to maintain uninterrupted service.
Declaration of Conformity (European Countries) Approvals and Certifications The CE marking applied to this product symbolizes Xerox Limited Declaration of Conformity with the following applicable Directives of the European Union as of the dates indicated: January 1, 1995: Council Directive 73/23/EEC amended by Council Directive 93/68/ EEC, approximation of the laws of the member states related to low voltage equipment.
MEMO xvi
1 INTRODUCTION Thank you for purchasing this Xerox multifunctional product.
Special Features Your new machine is equipped with special features that improve the print quality. You can: Print with excellent quality and speed • You can print up to 1200 dpi [Best]. See page 4.8. • Your machine prints A4-sized paper at up to 20 ppm and letter-sized paper at up to 22 ppm (pages per minute). Handle paper flexibly • Bypass tray supports letterhead, envelopes, labels, transparencies, custom-sized materials, postcards, and heavy paper.
Expand the machine capacity • This machine has 32 MB of memory which can be expanded to 160 MB. • You can install an optional 250-sheet tray in your machine. This tray reduces how often you have to add paper to the machine. • The WorkCentre PE120i comes with a built-in PostScript 3 Emulation*. • A Network interface enables network printing. The WorkCentre PE120i comes with a built-in network interface, 10/100 Base TX. * PostScript 3 Emulation © Copyright 1995-2003, Zoran Corporation. All rights reserved.
Use a USB flash drive If you have a USB flash drive, you can use it in various ways with your machine. • You can scan documents and save them on the USB flash drive. • You can directly print data stored on the USB flash drive. • You can manage the USB flash drive. • You can back up data and restore backup files to the machine’s memory. Machine Features The table below lists a general overview of features supported by your machine. (S: Standard) Features 1.
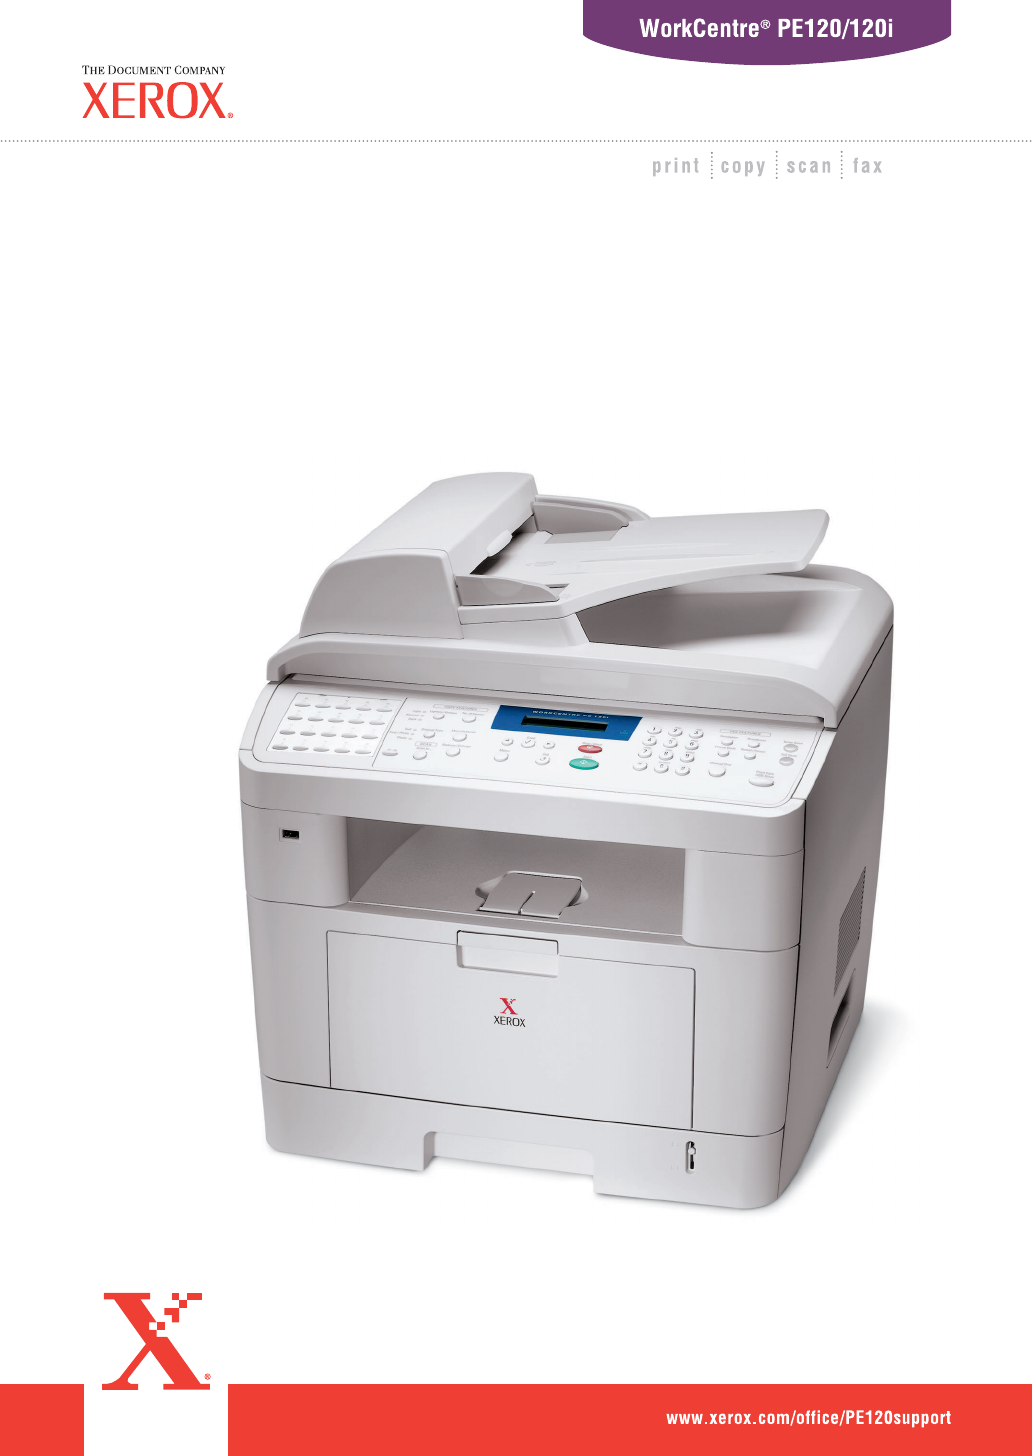
1 Understanding Component Locations These are the main components of your machine: Front View Document Guides Automatic Document Feeder Document Cover Document Input Tray Document Output Tray USB Flash Drive Port Document Glass Control Panel (See page 1.7.) Front Output Tray (Face Down) Front Door Toner Cartridge Paper Output Extension Paper Level Indicator Paper Tray (Tray 1) Bypass Tray Optional Paper Tray (Tray 2) The figure above shows an WorkCentre PE120i. Introduction 1.
Rear View Rear Door Control Board Cover Network Port (WorkCentre PE120i Only) Rear Output Slot (Face Up) Parallel Connector Power Switch USB Connector AC Power Cord Connector Line Jack EXT Jack* Tray 2 Cable Connector The figure above shows an WorkCentre PE120i. * If your country has a different telephone connection system, this socket may be blocked. 1.
1 Control Panel Functions WorkCentre PE120/120i 1 Allows you to store frequently-dialed fax numbers and dial them with the touch of a few buttons. Allows you to shift the one-touch buttons to the numbers 21 through 40. 2 S C A N Allows you to access a list of your PC software programs that an image can be scanned to. You must create the scan list using the Xerox software (ControlCentre) provided with this machine.
Confirms the selection on the display. Enters Menu mode and scrolls through the menus available. Sends you back to the upper menu level. 5 Stops an operation at any time. In Standby mode, clears/cancels the copy options, such as the darkness, the document type setting, the copy size, and the number of copies. Starts a job. 6 Dials a number or enters alphanumeric characters. Adjusts the resolution of the documents for the current fax job. Allows you to send a fax to multiple destinations.
2 GETTING STARTED This chapter gives you step-by-step instructions for setting up your machine.
Setting Up Your Machine Unpacking 1 Remove the machine and all accessories from the packing carton. Make sure that the machine has been packed with the following items: NOTES: • The appearance of the power cord and the telephone line cord may differ depending on your country’s specifications. • The CD-ROMs contains the Xerox printer driver, Scan drivers, ControlCentre, the User’s Guide, and the Adobe Acrobat Reader program. • For the WorkCentre PE120i, the PS Driver CD-ROM is supplied with your machine.
2 Remove the packing tape from the front, back, and sides of the machine. 2 Tape 3 Gently pull the scan lock label until it comes away from the machine. This will pull the scanner locking switch into the FORWARD (Unlocked) position automatically. Scan Lock Label NOTE: When you are moving the machine or do not intend to use it for a long period of time, move the scanner locking switch BACKWARD to the lock position, as shown. To scan or copy a document, the switch must be unlocked. Getting Started 2.
Selecting a Location Select a level, stable place with adequate space for air circulation. Allow extra space for opening doors and trays. The area should be well-ventilated and away from direct sunlight or sources of heat, cold, and humidity. Do not set the machine close to the edge of your desk or table. Clearance Space • Front: 482.6 mm (enough space so that the paper tray can be removed) • Back: 100 mm (enough space for ventilation) • Right: 100 mm • Left: 100 mm (enough space for ventilation) 2.
Installing the Toner Cartridge 2 1 Open the front door. 2 Remove the starter toner cartridge from its bag. Gently shake the cartridge 5 or 6 times to distribute the toner. Thoroughly shaking the cartridge will assure maximum copies per cartridge. NOTE: If toner gets on your clothing, wipe it off with a dry cloth and wash clothing in cold water. Hot water sets toner into fabric. CAUTIONS: • To prevent damage, do not expose the toner cartridge to light for more than a few minutes.
3 Hold the toner cartridge by the handle. Slowly insert the cartridge into the opening in the machine. Tabs on the sides of the cartridge and corresponding grooves within the machine will guide the cartridge into the correct position until it locks into place completely. Groove Tab 4 Close the front door. Make sure that the door is securely closed.
Loading Paper The paper tray can hold a maximum of 250 sheets of 20 lb (75 g/m2) plain paper. To load a stack of Letter-sized paper: 1 Pull open the paper tray and remove it from the machine. NOTE: If you want to load a different sized paper, you need to adjust the paper guides. For details, see page 2.9. 2 Fan the edges of the paper stack to separate the pages. Then tap the stack on a flat surface to even it up. 3 Insert the paper stack into the paper tray with the side to be printed on facing down.
4 Pay attention to the paper limit mark on both inside walls of the tray. Paper overloading may cause paper jams. 5 Insert and slide the paper tray back into the machine. NOTE: After you load paper, you need to set up your machine for the paper type and size you loaded. See page 2.21 for copying and faxing, or page 4.6 for PC-printing. The settings made from the printer driver override the settings on the control panel. 2.
Changing the Size of the Paper in the Paper Tray To load longer sizes of paper, such as Legal-sized paper, you need to adjust the paper guides to extend the paper tray. 1 After pressing and unlatching the guide lock, slide the paper length guide out completely to extend the paper tray to its full length. 2 After inserting paper into the tray, squeeze the length guide and slide it until it lightly touches the end of the paper stack.
3 Squeeze the width guide, as shown and slide it to the stack of paper until it lightly touches the side of the stack. NOTES: • Do not push the paper width guide far enough to cause the materials to warp. • If you do not adjust the paper width guide, it may cause paper jams. 2.
Connecting Telephone Line Plug one end of the supplied telephone line cord into the LINE jack on the machine and the other end into the wall jack. To the wall jack If you want to use your machine to receive both faxes and voice calls, you will need to connect a telephone and/or answering machine to your machine. Plug your phone or answering machine cord into the EXT jack, as shown below. To a phone or answering machine Getting Started 2.
Connecting a Printer Cable For Local Printing To print from your computer in a local environment, you need to connect your machine to a computer with either a Universal Serial Bus (USB) cable or a parallel cable. NOTE: You only need to connect one of the cables mentioned above. Do not use the parallel and the USB cables at the same time. Using a USB Cable NOTE: If you are using a USB cable, you must be running Windows 98/Me/2000/XP, or Machintosh with OS 10.1~10.3 (WorkCentre PE120i only).
Using a Parallel Cable NOTE: Connecting the machine to the parallel port of the computer requires a certified parallel cable. You need to buy an IEEE-1284 compliant parallel cable that is 3 m or less in length. 1 Make sure that both the machine and the computer are turned off. 2 Connect the parallel cable to the parallel connector on your machine. Push the metal clips down to fit inside the notches on the cable plug.
For Network Printing (WorkCentre PE120i only) You can attach your machine to a network using an Ethernet cable (UTP cable with RJ.45 connector). The WorkCentre PE120i has a built-in network interface card. 1 Make sure that both the machine and the computer are turned off. 2 Plug one end of the Ethernet cable into the Ethernet network port on your machine. 3 Plug the other end of the cable into a network LAN connection.
2 Press the power switch to turn the machine on. “Warming Up Please Wait” appears on the display indicating that the machine is now on. To the AC wall jack To view your display text in another language, see page 2.16. CAUTIONS: • The fuser area inside the rear door of your machine becomes very hot when in use. Take care not to burn your fingers when you access this area. • Do not disassemble the machine with power on. If you do, you may receive an electric shock. Getting Started 2.
Setting Up the Machine System Changing the Display Language To change the language that displays on the control panel, follow these steps: 1 Press Menu until “Machine Setup” appears on the top line of the display. 2 When “Language” appears on the bottom line of the display, press Enter. The current setting appears on the bottom line of the display. 3 Press the scroll button (W or X) until the language you want appears on the display. 4 Press Enter to save the selection.
If there is a number already set, the number appears. 3 Enter your fax number using the number keypad. NOTE: If you make a mistake while entering numbers, press the W button to delete the last digit. 4 Press Enter when the number on the display is correct. The display asks you to enter an ID. 5 Enter your name or the company name using the number keypad. You can enter alphanumeric characters using the number keypad, and include special symbols by pressing the 0 button.
1 When you are prompted to enter a letter, locate the button labeled with the character you want. Press the button until the correct letter appears on the display. For example, to enter the letter O, press 6, labeled with “MNO.” Each time you press 6, the display shows a different letter, M, N, O, and finally 6. You can enter special characters, such as space, plus sign, and etc.. For details, see “Keypad Letters and Numbers” on page 2.19. 2 To enter additional letters, repeat step 1.
Keypad Letters and Numbers Key Assigned numbers, letters, or characters 1 1 Space 2 A B C 2 3 D E F 3 4 G H I 4 5 J K L 5 6 M N O 6 7 P Q R S 8 T U V 8 9 W X Y Z 9 0 + - , . ‘ 7 / * # & 0 Changing Numbers or Names If you make a mistake while entering a number or name, press the W button to delete the last digit or character. Then enter the correct number or character.
Setting the Time and Date The current time and date are shown on the display when your machine is on and ready to work. All of your faxes will have the time and date printed on them. NOTE: If power to the machine is cut off, you may need to reset the correct time and date once the power has been restored. 1 Press Menu until “Machine Setup” appears on the top line of the display. 2 Press the scroll button (W or X) to display “Date & Time” on the bottom line and press Enter.
5 Press Enter when the time and date on the display is correct. When you enter a wrong number, the machine beeps and does not proceed to the next step. If this happens, just reenter the correct number. Changing the Clock Mode You can set your machine to display the current time using either a 12-hour or 24-hour format. 1 Press Menu until “Machine Setup” appears on the top line of the display. 2 Press the scroll button (W or X) until you see “Clock Mode” on the bottom line and press Enter.
If the optional Tray 2 is installed, “Tray1 Size” displays on the bottom line. 3 If ther is no optional Tray 2 installed, press Enter. If the optional second tray is installed, use the scroll button (W or X) to select the paper tray you want to use and press Enter. 4 Use the scroll button (W or X) to select the correct paper size and press Enter. 5 Press Exit. 6 Press the X button to scroll to “Paper Type” and press Enter to access the menu item.
Speaker, Ringer, Key Sound, and Alarm Sound 1 Press Menu until “Sound/Volume” appears on the top line of the display. 2 Press the scroll button (W or X) to scroll through the options. Press Enter when you see the desired sound option. 3 Press the scroll button (W or X) to display the desired status or volume for the option you have selected. You will see the selection on the bottom line of the display. For the ringer volume, you can select “Off,” “Low,” “Med,” and “High.
Setting the Dial Mode You can select the type of the telephone dial system where your machine is connected. NOTE: The Dial Mode setting may be unavailable depending on your country. 1 Press Menu until “Fax Setup” appears on the top line of the display. 2 Press the scroll button (W or X) until “Dial Mode” appears on the bottom line of the display. 3 Press Enter. 4 Press the scroll button (W or X) to select the desired dial mode. Select “Tone” if your machine is connected to a tone dial line.
NOTE: When PC-printing, you can also turn on or off the toner save mode in printer properties. See page 4.8. Toll Save Mode Using the Toll Save button on the control panel, you can quickly set your machine to send the document(s) stored in memory during a preset time slot, when the call charge is lower. Toll Save mode helps you to take advantage of lower long distance rates at night, for example. NOTE: The toll-saving time slot may vary depending on your contract with your long distance phone company.
To turn the toll save mode off, press Toll Save again. The button backlight turns off and the mode is deactivated. NOTE: Once the toll-saving time is set, the Toll Save button allows you only to enable or disable the toll save mode. To change the time setting, use the Toll Save item in the Advanced Fax menu. See page 7.38. Power Save Mode Power Save mode allows your machine to reduce power consumption when it is not in actual use.
You can set the length of time for which the scan lamp waits after a scan job is completed before it switches to the power save mode. 1 Press Menu until “Machine Setup” appears on top line of the display. 2 Press the scroll button (W or X) until “Scan PWR Save” appears on the bottom line. Press Enter. 3 Press the scroll button (W or X) until the time setting you want appears on the bottom line. The available time options are 0.5, 1, 4, 8, and 12 (hours). 4 Press Enter to save the selection.
Installing Xerox Drivers You must install the printer driver using the supplied Xerox driver CD after you have set up your machine and connected it to your computer. Xerox Driver CD contains: • PCL Printer driver- Use this driver to take full advantage of your printer's features. Use in the Windows environment. • PC Scan- TWAIN and Windows Image Acquisition (WIA) driver are available for scanning documents on your machine.
Installing Xerox drivers in Windows 2 System Requirements Before you begin, ensure that your system meets the minimum requirements. Item Operating system CPU RAM Free disk space Internet Explorer Requirements Windows 98/Me/NT 4.0/2000/XP Windows 98/Me/NT 4.0/ 2000 Pentium II 400 or higher Windows XP Pentium III 933 or higher Windows 98/Me/NT 4.0/ 2000 64 MB Windows XP 128 MB Windows 98/Me/NT 4.0/ 2000 300 MBr Windows XP 1 GB 5.
3 The "Found New Hardware Wizard" will display. Confirm that the radio button "Install the software automatically" is chosen. Click Next. 4 The Wizard will begin to install the scan driver for the PE120. 5 When the "Completing the Found New Hardware Wizard" screen displays click Finish. The scan driver for the PE120 is now loaded. 6 The "Found New Hardware Wizard" will display. Confirm that the radio button "Install the software automatically" is chosen. Click Next.
9 When the "Completing the Found New Hardware Wizard" screen displays click Finish. The PCL print driver for the PE120 is now loaded. 10 From within Microsoft Windows click Start and then Settings and then Printers and Faxes. Click on the "Xerox WC PE120 series PCL6" printer object and then select File and then Properties. When the screen appears click Print Test Page. The PE120 will now print a test page. If the PE120 does not print then click Troubleshoot... and follow the instructions on screen.
3 When the language selection window appears, select the appropriate language and then click Continue. 4 Choose the components you want to install and then click Continue. 5 Click Continue. 6 Click Finish. The driver installation is now complete. Installing Xerox Drivers in Microsoft Windows 98 or Windows Millennium using the USB port 1 Plug the USB cable into the PE120 and connect to your Personal Computer (PC). Start your PC and turn on the PE120. 2.
2 Insert the Xerox Drivers CD into the CD-ROM drive. 3 The "Add New Hardware Wizard" will display. Click Next. 4 Confirm that the radio button "Search for the best driver for your device" is chosen. Click Next. i) In Windows Millennium (ME) the add Hardware Wizard will search and find the scan driver. Click Finish when this process is complete. Windows ME will then display the "Add New Hardware Wizard" for the print driver, Click Next. Click Finish when this process is complete.
9 From within Microsoft Windows click Start and then Settings and then Printers. Double-click the Add Printer icon. 10 The Add Printer Wizard will begin. Click Next. Choose "Local Printer" and click Next. 11 At the next screen click Have Disk, and browse to your CDROM drive. Open the "driver" directory, then open the "Print" directory, then open the "AddPrint" directory and then choose "Win98x" directory and click OK. 12 The next screen will display the "Xerox WC PE120 series PCL6" driver, click Next.
13 Click the port that the printer cable is attached to, in this case USB and click Next. 2 14 You can type in a name for your new printer or accept the default then click Next. 15 Choose "Yes" to print a test page and click Finish. The PE120 driver will now be installed and a test page should print. Getting Started 2.
Printer Driver Features Your printer drivers support the following standard features: • Paper source selection • Paper size, orientation, and media type • number of copies The following table lists a general overview of features supported by your printer drivers. PCL 6 Printer Driver PostScript (WorkCentre PE120i only) Win 98/Me/ 2000/XP/NT4.0 Win 98/Me/ 2000/XP/NT4.
Using ControlCentre Using ControlCentre, you can create and edit Phonebook entries from your computer and set up print and scan system data options. You can also configure the destination launches when you use the Scan-to... button on the control panel (see page 2.38), and update the firmware of the machine (see page 2.40). 1 To install the Xerox Control Centre, insert the supplied Xerox Drivers CD. 2 From within Windows click Start and then Run. Type E: Xinstall.
3 From Programs, select Xerox WC PE120 Series and then ControlCentre. The ControlCentre window opens. 4 The ControlCentre window provides the following tabs: Scan Settings, Phonebook (only for the WorkCentre PE120/120i), Printer, and Firmware Update. To exit, click the Exit button at the bottom of each tab. For further details, click the Help button at the bottom of each tab.
The Phonebook Tab Click the Phonebook tab to create and edit Phonebook entries. Reads the Phonebook entries from the machine to the ControlCentre. Downloads the Phonebook entries from the ControlCentre to the machine. Phonebook entries Allows you to edit a selected Phonebook entry in a separate Edit window. Allows you to set up group dial numbers. See page 2.39. Deletes a selected Phonebook entry. Deletes all Phonebook entries. When you click Group dial, the following window opens.
The Printer Tab Click the Printer tab to configure print system settings. Allows you to select the default orientation of print image on the page. Allows you to set the margin of print materials. Allows you to set the PCL emulation configuration. Downloads the settings made in the ControlCentre to your machine. The Firmware Update Tab Click the Firmware Update tab to update the firmware of your machine. This feature should be used by an authorized technician. Please consult with the purchase point. 2.
3 PAPER HANDLING This chapter introduces you to the basics of selecting print materials and loading them into your machine.
Selecting Print Materials You can print on a variety of print materials, such as plain paper, envelopes, labels, transparencies, and etc.. Always use print materials that meet the guidelines for use with this machine. See “Paper Specifications” on page E.6. To get the best possible print quality, use only high-quality copier-grade paper. When you choose print materials, consider the following: • Size: You can use any size paper that fits easily within the paper adjusters of the paper tray.
Guidelines for Paper and Special Materials When selecting or loading paper, envelopes, or other special material, keep these guidelines in mind: • Always use paper and other materials that conform with the specifications listed under “Paper Specifications” on page E.6. • Attempting to print on damp, curled, wrinkled, or torn paper can cause paper jams and poor print quality. • Use only high quality copier grade paper for the best print quality.
- To avoid smudging caused by fingerprints, handle them carefully. - To avoid fading, do not expose printed transparencies to prolonged sunlight. • For labels: - Verify that their adhesive material can tolerate a fusing temperature of 200 oC (392 o F) for 0.1 second. - Make sure that there is no exposed adhesive material between them. Exposed areas can cause labels to peel off during printing, which can cause paper jams. Exposed adhesive can also cause damage to machine components.
The paper level indicator on the front of the paper tray shows the amount of paper currently left in the tray. When the tray is empty, the indicator of the bar is completely lowered. 3 Paper full Paper empty To load paper, pull open the paper tray and load paper with the side to be printed on face down. You can load letterhead paper with the design side face down. The top edge of the sheet with the logo should be placed at the front of the tray.
In the Bypass Tray The Bypass tray can hold several sizes and types of print material, such as transparencies, postcards, note cards, and envelopes. It is useful for single page printing on letterhead or colored paper. You can load approximately 50 sheets of plain paper, 5 envelopes, 5 transparencies, 5 sheets of card stock, or 5 labels at a time. To load print material in the Bypass tray: 1 Lower the Bypass tray and unfold the paper support extension, as shown.
3 Load the print material with the side to be printed on facing up. 3 For envelopes, load them with the flap side down and with the stamp area on the top left side. NOTES: • If envelopes jam while printing, try reducing the number of envelopes in the Bypass tray. • If you want to print on previously printed paper from the Bypass tray, the printed side should be facing down. 4 Squeeze the width guide and adjust it to the width of the print material without bending it.
6 If you want the machine to stack the printed pages on the rear output slot, open the rear door to use the rear output slot. CAUTION: Make sure to open the rear output slot when you print on transparencies. If not, they may tear while exiting the machine. 7 After printing, fold away the paper support extension and close the Bypass tray.
3 Squeeze the width guide and adjust it to the width of the print material without bending it. 3 4 If you want the machine to stack the printed pages on the rear output slot, open the rear door to use the rear output slot. CAUTION: Make sure to open the rear output slot when you print on transparencies. If not, they may tear while exiting the machine. 5 After printing, fold away the paper support extension and close the Bypass tray.
Selecting an Output Location The machine has two output locations: the rear output slot (face up) and the front output tray (face down). Front output tray Rear output slot To use the front output tray, make sure that the rear door is closed. To use the rear output slot, open the rear door. NOTES: • If paper coming out of the front output tray has problems, such as excessive curl, try printing to the rear output slot. • To avoid paper jams, do not open or close the rear door while the machine is printing.
Printing to the Rear Output Slot (Face up) Using the rear output slot, paper comes out of the machine face up. 3 Printing from the Bypass tray to the rear output slot provides a straight paper path. Using the rear output slot might improve the output quality with the following: • envelopes • labels • small custom-sized paper • postcards • transparencies To use the rear output slot: 1 Open the rear door by pulling it upward.
MEMO 3.
4 PRINTING TASKS This chapter explains how to print your documents in Windows and how to use the print settings.
Printing a Document in Windows The following procedure describes the general steps required for printing from various Windows applications. The exact steps for printing a document may vary depending on the application program you are using. Refer to the User’s Guide of your software application for the exact printing procedure. NOTE: For detailed information about printing from a Macintosh computer or a Linux system, see Appendix C and Appendix A .
Canceling a Print Job There are two ways to cancel a print job: To stop a print job from the control panel: Press the Stop/Clear button. Your machine finishes printing the page that is moving through the machine and deletes the rest of the print job. Pressing the button cancels only the current job. If more than one print job is in the machine’s memory, you need to press the button once for each job.
Printer Settings You can use the Xerox WC PE120 Series printer properties window, which allows you to access all of the printer options you need when using your machine. When the printer properties are displayed, you can review and change whatever settings are needed for your print job. The printer’s properties window may differ, depending on your operating system. This User’s Guide shows the Printing Preferences window for Windows XP.
Layout tab The Layout tab provides options to adjust how the document appears on the printed page. The More Layout Options includes Multiple Pages per Side, Poster, Fit to Page, and Reduce/Enlarge. See page 4.2 for more information on accessing printer properties. 4 1 The preview image shows the sample page with the settings you specified. 2 Property 1 Orientation Description Orientation allows you to select the direction in which information is printed on a page.
Paper Tab Use the following options for paper handling. See page 4.2 for more information about accessing printer properties. Click the Paper tab to access many paper properties. 1 2 3 4 5 Property 1 Print Quantity 2 Size Description Print Quantity allows you to choose the number of copies to be printed. You can enter up to 999. Size allows you to choose the size of the paper loaded in the tray. If the required size is not listed in the Size box, click Custom.
Property 3 Type Description Make sure that Type is set to Printer Default. If you load a different type of print material, select the corresponding paper type. For more information about print materials, see Chapter 3, Paper Handling. If you use cotton paper, set the paper type to Thick for the best printing. To use recycled paper, which weighs from 75 g/m2 to 90 g/m2 (20 lb to 24 lb), or colored paper, select Colored Paper. 4 Source Make sure that Source is set to the appropriate paper tray.
Image Options Tab Use the following options to adjust the print quality for your specific printing needs. See page 4.2 for more information about accessing printer properties. Click the Image Options tab to display the properties shown below. 1 2 3 4 Property 1 Print- Quality Mode 2 Image Quality 4.8 Printing Tasks Description You can select the printing resolution by choosing from 1200 dpi Image Quality, 600 dpi, or 300 dpi.
Property Description 3 Toner Save Selecting this option extends the life of your toner cartridge and reduces your cost per page without a significant reduction in the print quality. • Use Printer’s Setting: When you select this option, the Toner Save feature is determined by the setting you’ve made on the control panel of the machine affecting print quality accordingly. • On: Select this option to allow the machine to use less toner on each page.
Property 4 Graphic Options (continued) Description • Print Page as Bitmap: When this option is selected, the driver downloads any fonts as graphics. When printing documents with high graphic content and relatively few TrueType fonts, printing performance (speed) may be enhanced in this setting. Print All Text Black When the Print All Text Black option is checked, all text in your document prints in solid black, regardless of the color it appears on the screen.
Output Options Tab See page 4.2 for more information about accessing printer properties. Click the Output Options tab to access the following features: 1 2 4 3 Option 1 Print Order 2 Use Printer Fonts Description Print Order: You can set the sequence for the pages to print. Select the print order from the drop-down list. • Normal: Your machine prints all pages from the first page to the last page. • Reverse All Pages: Your machine prints all pages from the last page to the first page.
Option 3 Collate Description When this option is selected, the machine automatically sorts the copies. For example, if you make 2 copies of a 3 page document, one complete 3 page document will print followed by the second complete document. If this option is not selected, the machine prints 2 copies of page 1, then 2 copies of page 2, then 2 copies of page 3 so you must sort the document yourself after printing. Watermark Tab See page 4.2 for more information about accessing printer properties.
About Tab Use the About tab to display the copyright notice and the version number of the driver. If you have an Internet browser, you can connect to the Internet by clicking on anywhere on the screen. See page 4.2 for more information about accessing printer properties. Printer Configuration Tab If you access printer properties through the Printers folder, you can view the Printer Configuration tab.
3 Click Save. To use a saved setting, select it from the Favorites drop-down list. To delete a favorite setting item, select it from the list and click Delete. You can also restore the printer driver’s default settings by selecting Printer Default from the list. Using Help Your machine has a help screen that can be activated using the Help button in the printer properties window. The help screen gives detailed information about the printer features provided by the printer driver.
Printing Multiple Pages on One Sheet of Paper 1 2 3 4 You can select the number of pages to print on a single sheet of paper. To print more than one page per sheet, the pages are reduced in size and arranged in the order you specify. You can print up to 16 pages on one sheet. 1 To change the print settings from your software application, access printer properties. See page 4.2. 2 From the Layout tab, click the More Layout Options button. 3 Select Multiple Pages per Side from the Type option.
6 Click OK. 7 Click the Paper tab and select the paper source, size, and type. 8 Click OK and print the document. Printing Posters You can print a single-page document onto 4, 9, or 16 sheets of paper, for the purpose of pasting the sheets together to form one poster-sized document. 1 To change the print settings from your software application, access printer properties. See page 4.2. 2 From the Layout tab, click the More Layout Options button. 3 Select Poster from the Type option.
stretched to cover 4 physical pages. S 2x2 4 S 3x3 If you select Custom, you can manually set the scale rate of the image in the Scale Factor input box. Specify an overlap in millimeters or inches to make it easier to reconstruct the resulting poster. 0.15 inches 0.15 inches 5 Click OK. 6 Click the Paper tab and select the paper source, size, and type. 7 Click OK and print the document. You can complete the poster by pasting the sheets together. Printing Tasks 4.
Fitting Your Document to a Selected Paper Size A You can scale your print job to any paper size regardless of the original document size. This can be useful when you want to check the fine details on a small document. 1 To change the print settings from your software application, access printer properties. See page 4.2. 2 From the Layout tab, click the More Layout Options button. 3 Select Fit to Page from the Type option. 4 Select the correct size from the Target Page drop-down list. 5 Click OK.
Printing a Reduced or Enlarged Document You can change the size of a page’s content to appear larger or smaller on the printed page. 1 To change the print settings from your software application, access printer properties. See page 4.2. 2 From the Layout tab, click the More Layout Options button. 3 Select Reduce/Enlarge from the Type option. 4 Enter the scaling rate in the Percentage input box. You can also click the S or T button. 5 Click OK.
Using Watermarks The Watermark option allows you to print text over an existing document. For example, you may want to have large gray letters reading “DRAFT” or “CONFIDENTIAL” printed diagonally across the first page or all of the pages of a document. There are several predefined watermarks that come with your machine, and they can be modified or you can add new ones to the list. Using an Existing Watermark 1 To change the print settings from your software application, access printer properties.
Creating a Watermark 1 To change the print settings from your software application, access printer properties. See page 4.2. 2 Click the Watermark tab. 3 Select [No Watermark] on the Current Watermarks section. 4 4 Enter the text message you want to print in the Watermark Message box. The message displays in the preview image window. When the First Page Only box is checked, the watermark prints on the first page only. 5 Select the watermark options.
Editing a Watermark 1 To change the print settings from your software application, access printer properties. See page 4.2. 2 Click the Watermark tab. 3 Select the watermark you want to edit on the Current Watermarks section. You can change the watermark message and the options. Refer to page 4.21. 4 Click Update to save the changes. Deleting a Watermark 1 To change the print settings from your software application, access printer properties. See page 4.2. 2 Click the Watermark tab.
About Sharing the Machine on a Network If you work in a networked environment, you can connect your machine to the network. Locally-Shared Machine You can connect the machine directly to a selected computer, which is called the “host computer” on the network. The machine can then be shared by other users on the network through a Windows 98/Me/NT 4.0/2000/XP network printer connection.
Setting Up a Locally-Shared Machine In Windows 98/Me Setting Up the Host Computer 1 Start Windows. 2 From the Start menu, select Control Panel from Settings and double-click on the Network icon. 3 Check the File and Print Sharing box, and click OK. Close the window. 4 From the Start menu, select Printers from Settings and double-click your machine name. 5 Select Properties in the Printer menu. 6 Click the Sharing tab and check the Shared As box. Fill in the Shared Name field and click OK.
In Windows NT 4.0/2000/XP Setting Up the Host Computer 1 Start Windows. 2 For Windows NT 4.0/2000, from the Start menu, select Settings and then Printers. For Windows XP, from the Start menu, select Printers and Faxes. 3 Double-click your machine icon. 4 From the Printer menu, select Sharing. 5 For Windows NT 4.0, check the Shared box. For Windows 2000, check the Shared As box. For Windows XP, check the Share this printer box. 6 Fill in the Shared Name field and click OK.
9 In the Enter a port name field, enter the shared name. 10 Click OK and click Close. 11 For Windows NT 4.0, click OK. For Windows 2000/XP, click Apply and click OK. 4.
5 COPYING This chapter gives you step-by-step instructions for copying documents.
Loading Paper for Copying The instructions for loading print materials are the same whether you are printing, faxing, or copying. For further details, see page 2.7 for loading in the paper tray and page 3.6 for loading in the Bypass tray. NOTE: For copying, you can only use Letter-, A4-, Legal-, Folio-, Executive-, B5-, A5-, or A6-sized print materials. Selecting the Paper Tray After loading the print media for copy output, you have to select the paper tray you will use for the copy job.
Preparing a Document You can use the document glass or the Automatic Document Feeder (ADF) to load an original document for copying, scanning, and sending a fax. Using the ADF, you can load up to 50 documents (47~ 105 g/m2, 12.5 ~ 28 lb) for one job. You can, of course, place only one sheet at a time on the document glass. When you use the ADF: • Do not load documents smaller than 142 x 127 mm or larger than 216 x 356 mm.
Making Copies on the Document Glass 1 Lift and open the document cover. 2 Place the document face down on the document glass and align it with the registration guide at the top left corner of the glass. NOTE: Make sure that no documents are in the ADF (Automatic Document Feeder). If a document is detected in the ADF, the machine gives it priority over the document on the document glass. 3 Close the document cover.
4 Customize the copy settings including number of copies, copy size, darkness, and original type, by using the control panel buttons. See “Setting Copy Options” on page 5.7. To clear the settings, use the Stop/Clear button. 5 If necessary, you can use special copy features, such as Poster, Auto Fit, Clone, and 2 Sides on 1 page copying. 6 Press Start to begin copying. The display shows the copy processing. NOTES: • You can cancel the copy job during an operation.
2 Adjust the document guides to the document size. 3 Customize the copy settings including number of copies, copy size, darkness, and original type, by using the control panel buttons. See “Setting Copy Options” on page 5.7. To clear the settings, use the Stop/Clear button. 4 If necessary, you can use special copy features, such as Collation and 2 or 4 Up-copying. 5 Press Start to begin copying. The display shows the copy processing. NOTE: Dust on the ADF glass may cause black lines on the printout.
Setting Copy Options The buttons on the control panel let you select all basic copy options: darkness, document type, copy size, and number of copies. Set the following options for the current copy job before pressing Start to make copies. NOTE: If you press Stop/Clear while setting the copy options, all of the options you have set for the current copy job will be canceled and returned to their default status.
Reduced/Enlarged Copy Using the Reduce/Enlarge button, you can reduce or enlarge the size of a copied image from 25% to 400% when you copy original documents from the document glass or from 25% to 100% from the ADF. Note that the zoom rate available is different depending on the document loading method. To select from the predefined copy sizes: 1 Press Reduce/Enlarge. The default setting appears on the bottom line of the display.
Number of Copies Using the No. of Copies button, you can select the number of copies from 1 to 99. 1 Press No. of Copies. 2 Press the scroll button (W or X) until the number you want appears on the display. Pressing and holding the button allows you to quickly scroll to the number you want. You can also enter the value using the number keypad. 5 3 Press Enter to save the selection.
Clone Copying This special copy feature can be applied only when you place a document on the document glass. If a document is detected in the ADF, Clone copying feature does not work. 1 Place the document to be copied on the document glass, and close the cover. 2 Press More Features. 3 Press More Features or the scroll button (W or X) until “Clone” displays on the bottom line. 4 Press Enter to make your selection.
Auto Fit Copying A This special copy feature can be applied only when you place a document on the document glass. If a document is detected in the ADF, Auto Fit copying does not work. 1 Place the document to be copied on the document glass, and close the cover. 2 Press More Features. 3 Press More Features or the scroll button (W or X) until “Auto Fit” appears on the bottom line. 5 4 Press Enter to make your selection.
3 Press More Features or the scroll button (W or X) until “2 sides in 1pg” displays on the bottom line. 4 Press Enter to make your selection. 5 If necessary, customize the copy settings, including number of copies, darkness, and original type, by using the control panel buttons. See “Setting Copy Options” on page 5.7. 6 Press Start to begin copying. Your machine begins scanning the front side. 7 When “Set Backside” displays on the bottom line, open the document cover and flip the document over.
Poster Copying This special copy feature can be applied only when you place a document on the document glass. If a document is detected in the ADF, the Poster copying feature does not work. 1 Place the document to be copied on the document glass and close the cover. 2 Press More Features. 3 Press More Features or the scroll button (W or X) until “Poster” displays on the bottom line. 5 4 Press Enter to make your selection.
Changing the Default Settings The copy options, including darkness, original type, copy size, and number of copies, can be set to the most frequently used modes. When you copy a document, the default settings are used unless they are changed by using the corresponding buttons on the control panel. To create your own default settings: 1 Press Menu on the control panel until “Copy Setup” appears on the top line of the display. The first menu item, “Default-Change,” appears on the bottom line.
Setting the Time Out Option You can set the time the machine waits before it restores the default copy settings, if you do not start copying after changing them on the control panel. 1 Press Menu on the control panel until “Copy Setup” appears on the top line of the display. 2 Press the scroll button (W or X) to display “Timeout” on the bottom line. 5 3 Press Enter to access the menu item. 4 Press the scroll button (W or X) until the status you want appears on the display.
MEMO 5.
6 SCANNING Scanning with your machine lets you turn pictures and text into digital files on your computer. Then you can fax or E-mail the files, display them on your web site, or use them to create projects that you can print using the WIA driver.
Scanning Basics Your Xerox WC PE120 Series offers three ways to scan. These are: • From the control panel on your machine to an application: Use the Scan-to... button on the control panel to initiate scanning. Assign the TWAIN-compliant software, such as Adobe PhotoDeluxe or Adobe Photoshop, to the machine by selecting it from the list of available applications via the Scan-to... button. Before assigning the software program, you must configure the scan list using the ControlCentre. For details, see page 2.
Scanning From the Control Panel to an Application 1 Make sure that your machine and computer are turned on and properly connected to each other. 2 Load the document(s) face up into the ADF. OR Place a single document face down on the document glass. For details about loading a document, see page 7.6. 3 Press Scan-to.... on the control panel. The first available menu item, "USB Memory" appears on the bottom line of the display.
Scanning Using the WIA Driver Your machine also supports the Windows Image Acquisition (WIA) driver for scanning images. WIA is one of the standard components provided by Microsoft Windows XP and works with digital cameras and scanners. Unlike the TWAIN driver, the WIA driver allows you to scan and easily manipulate images without using additional software. NOTE: The WIA driver works only with Windows XP and via the USB port. 1 Load the document(s) face up into the ADF.
5 Click Next. 6 Enter a picture name, and select a file format and destination to save the picture. 7 Follow the on-screen instructions to edit the picture after it is copied to your computer. NOTE: If you want to cancel the scan job, press the Stop/Clear button on the control panel. 6 Scanning to USB Flash Drive Using a USB flash drive, you can scan and save documents in the USB flash drive by pressing Scan-to... on the control panel.
MEMO 6.
7 FAXING This chapter gives you information about using your machine as a fax machine.
Setting Up the Fax System Changing the Fax Setup options 1 Press Menu until “Fax Setup” appears on the top line of the display. The first available menu item, “Receive Mode,” displays on the bottom line. 2 Press the scroll button (W or X) until you see the desired menu item on the bottom line and press Enter. 3 Use the scroll button (W or X) to find the desired status or use the number keypad to enter the value for the option you have selected. 4 Press Enter to make your selection.
Available Fax Setup Options Option Description Receive Mode You can select the default fax receiving mode. • In Tel mode, you can receive a fax by picking up the handset of the extension phone and then pressing the remote receive code (see page 7.4). Alternatively, you can press Manual Dial (you can hear a fax tone from the remote machine) and then press Start on the control panel of your machine. • In the Fax mode, the machine answers an incoming call and immediately goes into fax reception mode.
Option Description MSG Confirm You can set your machine to print a report showing whether a transmission was successful, how many pages were sent, and more. The available options are On, Off, and On-Err, which prints only when a transmission is not successful. Auto Report This produces a report with detailed information about the previous 50 communications operations, including time and dates. The available options are On or Off.
Option Description DRPD Mode You can receive a call using the Distinctive Ring Pattern Detection (DRPD) feature, which enables a user to use a single telephone line to answer several different telephone numbers. In this menu, you can set the machine to recognize which ring patterns to answer. For details about this feature, see page 7.17. Dial Mode You can select the type of the telephone dial system where your machine is connected. For details about this feature, see page 2.24. 7 Faxing 7.
Sending a Fax Loading a Document You can use the Automatic Document Feeder (ADF) or the document glass to load an original document for faxing. Using the ADF, you can load up to 50 sheets of 75 g/m2 (20 lb) paper at a time. You can, of course, place only one sheet at a time on the document glass. For details about preparing a document, see page 5.3. To fax a document using the Automatic Document Feeder (ADF): 1 Load the document face up into the ADF. You can insert up to 50 sheets at a time.
2 Adjust the document guide on the ADF to match the width of the document. NOTE: Dust on the ADF glass may cause black lines on the printout. Keep it always clean. 7 To fax a document from the document glass: 1 Lift and open the document cover. Faxing 7.
2 Place the document face down on the document glass and align it with the registration guide at the top left corner of the glass. NOTE: Make sure that no other documents are in the ADF (Automatic Document Feeder). If a document is detected in the ADF, the machine gives it priority over the document on the document glass. 3 Close the document cover. NOTES: • If you are copying a page from a book or magazine, lift the cover until its hinges are caught by the stopper and then close the cover.
Selecting the Paper Tray After loading the print material for fax output, you have to select the paper tray you will use for the fax job. 1 Press Menu on the control panel. The first available menu item, “Paper Setting,” appears on the top line of the display. 2 Press the scroll button (W or X) until “Fax Tray” appears on the bottom line of the display. 3 Press Enter. 4 Press the scroll button (W or X) until the paper tray you want appears on the display. You can select Tray1, Tray2, Tray1/2, or Auto.
2 By pressing Resolution or the scroll button (W or X), you can choose from Standard, Fine, Super Fine, Photo Fax, and Color Fax. 3 When the mode you want to use displays, press Enter to make your selection. The document types recommended for the resolution settings are described in the table below: Mode Recommended for: Standard Documents with normal sized characters. Fine Documents containing small characters or thin lines or documents printed using a dot-matrix printer.
Sending a Fax Automatically 1 Load the document(s) face up into the ADF. OR Place a single document face down on the document glass. For details about loading a document, see page 7.6. 2 Adjust the document resolution to suit your fax needs (see page 7.9). If you need to change the darkness, see page 7.3. 3 Enter the remote fax phone number using the number keypad. You can use one-touch keypad, speed dial, or group dial numbers. For details about storing a number, see “Automatic Dialing” on page 7.19.
Sending a Fax Manually 1 Load the document(s) face up into the ADF. OR Place a single document face down on the document glass. For details about loading a document, see page 7.6. 2 Adjust the document resolution to suit your fax needs (see page 7.9). If you need to change the darkness, see page 7.3. 3 Press Manual Dial. You hear a dial tone. 4 Enter the receiving fax machine’s number using the number keypad. You can use one-touch keypad. For details about storing a number, see page 7.19.
Confirming Transmission When the last page of your document has been sent successfully, the machine beeps and returns to Standby mode. When something goes wrong while sending your fax, an error message appears on the display. For a list of error messages and their meanings, see page 9.13. If you receive an error message, press Stop/Clear to clear the message and try to send the document again. You can set your machine to print a confirmation report automatically each time sending a fax is completed.
Receiving a Fax About Receiving Modes • In Fax mode, the machine answers an incoming fax call and immediately goes into the fax reception mode. • In Tel mode, you can receive a fax by pressing Manual Dial (you can hear a fax tone from the sending machine) and then pressing Start on the control panel of your machine. You can also pick up the handset of the extension phone and then press the remote receive code (see page 7.4).
Loading Paper for Receiving Faxes The instructions for loading paper in the paper tray are the same whether you are printing, faxing, or copying, except that faxes can only be printed on Letter-, A4-, or Legal-sized paper. For details about loading paper and setting the paper size in the tray, see page 2.7 and page 2.21. Receiving Automatically in Fax Mode 7 Your machine is preset to Fax mode at the factory.
Receiving Automatically in Ans/Fax Mode To use this mode, you must attach an answering machine to the EXT jack on the back of your machine. See page 2.11. If the caller leaves a message, the answering machine stores the message as it would normally. If your machine detects a fax tone on the line, it automatically starts to receive the fax.
Receiving Faxes Using the DRPD Mode “Distinctive Ring” is a telephone company service which enables a user to use a single telephone line to answer several different telephone numbers. The particular number someone uses to call you is identified by different ringing patterns, which consist of various combinations of long and short ringing sounds.
5 When your machine begins to ring, do not answer the call. The machine requires several rings to learn the pattern. When the machine completes learning, the LCD displays “End DRPD [Setup]”. If the DRPD setup fails, “DRPD Ring Error” appears. Press Enter when “DRPD Mode” displays and retry from step 3. 6 To return to Standby mode, press Stop/Clear. When the DRPD feature is set up, the DRPD option is available in the Receive Mode menu.
Automatic Dialing One-touch Dialing The 20 one-touch buttons on the control panel lets you store frequently-used fax numbers and dial a number automatically with the touch of a button. Using the 21 - 40 button, you can store up to 40 fax numbers on the one-touch buttons. Storing a Number for One-touch Dialing 1 Press and hold one of the one-touch dial buttons for about 2 seconds.
4 Press Enter when the name appears correctly or without entering a name. 5 To store more numbers, press a one-touch button and repeat steps 2 through 4. OR To return to Standby mode, press Stop/Clear. Sending a Fax using a One-touch Number 1 Load the document(s) face up into the ADF. OR Place a single document face down on the document glass. For details about loading a document, see page 7.6. 2 Adjust the document resolution to suit your fax needs (see page 7.9).
Speed Dialing You can store up to 200 frequently dialed numbers in one, two, or three-digit speed dial locations (0-199). Storing a Number for Speed Dialing 1 Press Phone Book on the control panel. 2 Press Phone Book or the scroll button (W or X) to display “Store&Edit” on the bottom line of the display. Press Enter. 3 Press Enter when “Speed Dials” appears on the display. The display prompts you to enter a location number, showing the first available number.
Sending a Fax using a Speed Dial Number 1 Feed the document(s) face up into the ADF. Or Place a single document face down on the document glass. For details about loading a document, see page 7.6. 2 Adjust the document resolution to suit your fax needs (see page 7.9). If you need to change the darkness, see page 7.3. 3 Enter the speed dial number. • For a one-digit speed dial number, press and hold the appropriate digit button.
Group Dialing If you frequently send the same document to several destinations, you can create a group of these destinations and set them under a group dial location. This enables you to use a group dial number setting to send the same document to all the destinations in the group. Setting a Group Dial Number 1 Press Phone Book on the control panel. 2 Press Phone Book or the scroll button (W or X) to display “Store&Edit” on the bottom line of the display. Press Enter.
10 To assign a name to the group, enter the name you want. For details about entering characters, see page 2.17. OR If you do not want to assign a name, skip this step. 11 Press Enter when the name appears correctly or without entering a name. 12 If you want to assign another group, press Enter and repeat from step 5. OR To return to Standby mode, press Stop/Clear. NOTE: You cannot include one group dial number in another group dial number.
7 Press Enter. 8 When you enter the specific number in the group, the display shows “Delete?.” When you enter a new number, the display shows “Add?.” 9 Press Enter to add or delete the number. 10 To change the group name, press Exit. 11 Enter a new group name and press Enter. 12 If you want to edit another group, press Enter and repeat from step 5. Or To return to Standby mode, press Stop/Clear.
Searching for a Number in Memory There are two ways to search for a number in the machine’s memory. You can either scan from A to Z sequentially, or you can search using the first letter of the name associated with the number. Searching Sequentially through the Memory 1 Press Phone Book. 2 Press Enter when “Search&Dial” appears on the display. 3 Press the scroll button (W or X) to scroll through the machine’s memory until the name and number you want to dial display.
Printing a Phonebook List You can check your automatic dial setting by printing a Phonebook list. 1 Press Phone Book. 2 Press Phone Book or the scroll button (W or X) until “Print” appears on the bottom line and press Enter. A list showing your one-touch dial, speed dial, and group dial entries prints out. 7 Faxing 7.
Other Ways to Fax Sending Broadcast Faxes Using the Broadcast button on the control panel, you can use the broadcast fax feature, which allows you to send a document to multiple locations. Documents are automatically stored in memory and sent to a remote station. After transmission, the documents are automatically erased from memory. 1 Load the document(s) face up into the ADF. OR Place a single document face down on the document glass. For details about loading a document, see page 7.6.
7 When you finish entering fax numbers, press 2 to select “No” at the Another No. prompt. The document is scanned into memory before transmission. The display shows memory capacity and the number of pages being stored in memory. For a document placed on the document glass, the display asks if you want to load another page. Select “1.Yes” to add. Otherwise, select “2.No.” 8 The machine begins sending the document to the numbers you entered in the order in which you entered them.
6 Press Enter to confirm the number on the display. The display asks you to enter another fax number to which to send the document. NOTE: The Another No. prompt does not appear if you have added numbers for another broadcast or delay fax job. You must wait until the job is completed. 7 To enter more fax numbers, press 1 to select “Yes” and repeat steps 5 and 6. You can add up to 10 destinations. Note that you cannot use more than one group dial number in any one broadcast.
14 The machine returns to Standby mode. The display reminds you that you are in Standby mode and that a delayed fax is set. NOTE: If you want to cancel the delayed transmission, see “Canceling a Scheduled Fax” on page 7.34. Sending a Priority Fax Using the Priority Fax feature, a high priority document can be sent ahead of reserved operations. The document is scanned into memory and transmitted when the current operation is finished.
6 Press Enter to confirm the number. The display asks you to enter a name. 7 To assign a name to the transmission, enter the name you want. For details about entering characters, see page 2.17. If you do not want to assign a name, skip this step. 8 Press Enter. The document is scanned into memory before transmission. The display shows memory capacity and the number of pages being stored in memory. For a document placed on the document glass, the display asks if you want to load another page. Select “1.
Adding Documents To a Scheduled Fax You can add documents to a delayed transmission previously reserved in your machine’s memory. 1 Load the document(s) face up into the ADF. OR Place a single document face down on the document glass. For details about loading a document, see page 7.6. 2 Adjust the document resolution to suit your fax needs (see page 7.9). If you need to change the darkness, see page 7.3. 3 Press Menu until “Fax Feature” appears on the top line of the display.
Canceling a Scheduled Fax 1 Press Menu until “Fax Feature” appears on the top line of the display. 2 Press the scroll button (W or X) to display “Cancel Job” on the bottom line and press Enter. The display shows the last job reserved in memory. 3 Press the scroll button (W or X) until you see the fax job you want to cancel, and press Enter. 4 When the display confirms your selection, press 1 to select “Yes.” The selected job is canceled and the machine returns to Standby mode.
Additional Features Using Secure Receiving Mode You may need to prevent your received faxes from being accessed by unauthorized people. You can turn on Secure Receiving mode to restrict printing of received faxes when the machine is unattended. In Secure Receiving mode, all incoming faxes go into memory. When the mode is deactivated, any stored faxes are printed. To turn Secure Receiving mode on: 1 Press Menu until “Advanced Fax” appears on the top line of the display.
To print received documents: 1 Access the Secure Receive menu by following steps 1 and 2 on page 7.35. 2 Press the scroll button (W or X) to display “Print” on the bottom line and press Enter. 3 Enter the four-digit passcode and press Enter. The machine prints all of the faxes stored in memory. To turn Secure Receiving mode off: 1 Access the Secure Receive menu by following steps 1 and 2 on page 7.35. 2 Press the scroll button (W or X) to display “Off” on the bottom line and press Enter.
Received Fax Report This report shows information on the faxes you have recently received. System Data List This list shows the status of the user-selectable copy or fax options. You may print this list to confirm your changes after changing any settings. Scheduled Job Information This list shows the document(s) currently stored for Delayed faxes or Toll Save faxes. The list shows the starting time(s) and type(s) of operation(s).
Printing a Report 1 Press Menu until “Report” appears on the top line of the display. 2 Press the scroll button (W or X) to display the report or list you want to print on the bottom line. • Phone Book: Phonebook list • Sent Report: Sent fax report • RCV Report: Received fax report • System Data: System data list • Scheduled Jobs: Scheduled job information • MSG Confirm: Message confirmation • Junk Fax List: Junk fax number list 3 Press Enter. The selected information prints out.
5 You can exit from Setup mode at any time by pressing Stop/Clear. Advanced Fax Setting Options Option Send Forward Description You can set the machine to send a copy of all outgoing faxes to a specified destination, in addition to the fax numbers you entered. Select Off to turn this feature off. Select On to turn this feature on. You can set the number of the fax machine to which faxes are to be sent.
Option Secure Receive Description You can keep your received faxes from being accessed by unauthorized people. For further details about setting this mode, see page 7.35. Prefix Dial Stamp RCV Name You can set a prefix dial number of up to five digits. This number dials before any automatic dial number is started. It is useful for accessing a PABX exchange.
8 MAINTENANCE This chapter provides information for maintaining your machine and the toner cartridge.
Clearing the Memory You can selectively clear information stored in your machine’s memory. CAUTION: Before clearing the memory, make sure that all fax jobs have been completed. 1 Press Menu on the control panel until “Maintenance” appears on the top line of the display. 2 Press the scroll button (W or X) until you see “Clear Settings” on the bottom line and press Enter. The first available menu item, “All Settings,” displays on the bottom line.
Cleaning Your Machine To maintain print quality, follow the cleaning procedures below each time the toner cartridge is replaced or if print quality problems occur. CAUTIONS: • Cleaning the cabinet of the machine with cleaning materials containing large amounts of alcohol, solvent, or other strong substances can discolor or crack the cabinet. • While cleaning the inside of the machine, be careful not to touch the transfer roller, located underneath the toner cartridge.
CAUTIONS: • To prevent damage to the toner cartridge, do not expose it to light for more than a few minutes. Cover it with a piece of paper, if necessary. • Do not touch the green underside of the toner cartridge. Use the handle on the cartridge to avoid touching this area. 3 With a dry lint-free cloth, wipe away any dust and spilled toner from the toner cartridge area and the toner cartridge cavity. CAUTION: Do not touch the black transfer roller inside the machine.
Cleaning the Scan Unit Keeping the scan unit clean helps ensure the best possible copies. We suggest that you clean the scan unit at the start of each day and during the day, as needed. 1 Slightly dampen a soft lint-free cloth or paper towel with water. 2 Open the document cover. 3 Wipe the surface of the document glass and ADF glass until it is clean and dry.
Maintaining the Toner Cartridge Toner cartridge storage To get the most from the toner cartridge, keep the following guidelines in mind: • Do not remove the toner cartridge from its package until ready for use. • Do not refill the toner cartridge. The machine warranty does not cover damage caused by using a refilled cartridge. • Store toner cartridges in the same environment as your machine. • To prevent damage to the toner cartridge, do not expose it to light for more than a few minutes.
Redistributing Toner When the toner cartridge is near the end of its life, white streaks or light printing occurs. The LCD displays the warning message, “Toner Low.” You can temporarily reestablish print quality by redistributing the remaining toner in the cartridge. 1 Open the front door. 2 Pull the toner cartridge out and gently shake the cartridge 5 or 6 times to distribute the toner evenly inside the cartridge.
Replacing the Toner Cartridge When the display on the control panel shows the warning message, “[Toner Empty],” the machine stops printing. At this stage, the toner cartridge needs to be replaced. 1 Open the front door. 2 Lightly pushing the used cartridge down, pull it out. 3 Unpack the new toner cartridge and gently shake it horizontally 5 or 6 times to distribute the toner evenly inside the cartridge. Save the box and the plastic bag for shipping. 8.
NOTE: If toner gets on your clothing, wipe it off with a dry cloth and wash clothing in cold water. Hot water sets toner into fabric. CAUTION: Do not touch the green underside of the toner cartridge. Use the handle on the cartridge to avoid touching this area. 4 Hold the toner cartridge by the handle. Slowly insert the cartridge into the opening in the machine.
Setting the Notify Toner Option If you set the Notify Toner menu option to “On,” your machine automatically sends a fax to your service company or the dealer to notify them that your machine requires a new toner cartridge when the toner cartridge needs to be replaced. The fax number is preset by your dealer when you bought your machine. If machine was purchased directly from XEROX, then there will NOT be a preset fax number.
You can set your machine to clean the OPC drum automatically every 500 print pages. You should use this feature if you use inferior quality paper, because such paper may lower print quality. 1 Press Menu on the control panel until “Maintenance” appears on the top line of the display. 2 Press the scroll button (W or X) until “Auto Cleaning” appears on the bottom line and press Enter. 3 Press the scroll button (W or X) until “On” appears on the display.
Consumables and Replacement Parts From time to time, you needs to replace the toner cartridge, roller, and fuser unit to maintain top performance and to avoid print quality problems and paper feed problems resulting from worn parts. The following items should be replaced after you have printed the specified number of pages: Items Yield (Average) ADF rubber pad Approx. 20,000 feeds Transfer roller Approx. 60,000 feeds Fuser unit Approx.
Replacing the ADF Rubber Pad You can purchase an ADF rubber pad from your Xerox dealer or the retailer where you bought your machine. 1 Open the ADF cover. 2 Rotate the bushing on the right end of the ADF roller toward the ADF(c) and remove the roller from the slot(d). Maintenance 8.
3 Remove the ADF rubber pad from the ADF, as shown. 4 Insert a new ADF rubber pad into place. 5 Align the left end of the ADF roller with the slot and push the right end of the ADF roller into the right slot (c). Rotate the bushing on the right end of the roller toward the document input tray (d). 6 Close the ADF cover 8.
9 TROUBLESHOOTING This chapter gives helpful information for what to do if you encounter an error.
Clearing Document Jams When a document jams while passing through the ADF (Automatic Document Feeder), “Document Jam” appears on the display. Input Misfeed 1 Remove any remaining page(s) from the ADF. 2 Open the ADF cover. 3 Rotate the bushing on the right end of the ADF roller toward the ADF (c) and remove the roller from the slot (d). Pull the document gently to the left and out of the ADF. 9.
4 Align the left end of the ADF roller with the slot and push the right end of the ADF roller into the right slot (c). Rotate the bushing on the right end of the roller toward the document input tray (d). 5 Close the ADF cover. Then load the removed page(s), if any, back into the ADF. NOTE: To prevent document jams, use the document glass for thick, thin, or mixed paper-type documents. Exit Misfeed 1 Remove any remaining page(s) from the ADF.
Roller Misfeed 1 Remove any remaining page(s) from the ADF. 2 Open the document cover. 3 Turn the release knob so that you can easily seize the misfed page, and remove the page from the roller or the feed area by carefully pulling it to the right using both hands. 4 Close the document cover. Then load the removed page(s), if any, back into the ADF. 9.
Clearing Paper Jams When a paper jam occurs, “Paper Jam” appears on the display. Refer to the table below to locate and clear the paper jam. Message Location of Jam Go to [Paper Jam 0] Open/Close Door In the paper tray (Tray 1 or Tray 2) below and page 9.7 [Paper Jam 1] Open/Close Door In the fuser area or around the toner cartridge. page 9.8 [Paper Jam 2] Check Inside In the paper exit area page 9.9 Bypass Jam In the Bypass tray page 9.
3 Remove the jammed paper by gently pulling it straight out. If there is any resistance and the paper does not move when you pull, or if you cannot see the paper in this area, check the fuser area around the toner cartridge. See page 9.8. 4 Insert the paper tray into the machine until it snaps into place. 5 Open and close the front door to resume printing. 9.
In Optional Tray 2 1 Pull the optional Tray 2 open. 2 Remove the jammed paper from the machine. If there is any resistance and the paper does not move when you pull, or if you cannot see the paper in this area, go to step 3. 3 Pull the standard Tray 1 open. 4 Pull the paper straight up and out. 9 5 Insert Tray 1 into the machine until it snaps into place. 6 Open and close the front door to resume printing. Troubleshooting 9.
In the Fuser Area or Around the Toner Cartridge NOTE: The fuser area is hot. Take care when removing paper from the machine. 1 Remove paper from back by opening the back door cover and pulling it out of the fuser. 2 Open the front door and pull the toner cartridge out, lightly pushing it down. 3 Remove the jammed paper by gently pulling it straight out. 9.
4 Replace the toner cartridge and close the front door. Printing automatically resumes. In the Paper Exit Area 1 Open and close the front door. The jammed paper automatically exits the machine. If the paper does not exit, continue to step 2. 2 Gently pull the paper out of the front output tray. Skip to step 6. Troubleshooting 9.
3 If there is any resistance and the paper does not move when you pull, or if you cannot see the paper in the front output tray, open the rear door. 4 Remove the jammed paper by gently pulling it straight out. 5 Close the rear door. 6 Open and close the front door to resume printing. 9.
In the Bypass Tray “Bypass Jam” appears on the display when you try to print using the Bypass tray and the machine does not detect paper. This may be a lack of paper or improper paper loading. If the paper is not feeding properly, pull the paper out of the machine. To resume printing, open and close the front door. 9 Troubleshooting 9.
Tips for Avoiding Paper Jams By selecting the correct paper types, most paper jams can be avoided. When a paper jam occurs, follow the steps outlined in “Clearing Paper Jams” on page 9.5. • Follow the procedures in “Loading Paper” on page 2.7. Ensure that the adjustable guides are positioned correctly. • Do not overload the paper tray. Ensure that the paper is below the paper capacity mark on the inside wall of the paper tray. • Do not remove paper from the tray while your machine is printing.
Clearing LCD Error Messages Display Meaning Suggested solutions Bypass Jam A paper jam has occurred in the Bypass tray. Or, the machine detects improper feeding from the Bypass tray. Clear the jam. See page 9.11. Or, load paper in the Bypass tray correctly. See page 3.6. Cancel ? 1:Yes 2:No Your machine’s memory has become full while trying to store a document into memory. To cancel the fax job, press the 1 button to accept “Yes.
Display Meaning Suggested solutions Group Not Available You have tried to select a group location number where only a single location number can be used, such as when adding locations for a broadcast operation. Use a speed dial number or dial a number manually using the number keypad. [Incompatible] The remote machine did not have the requested feature, such as a delayed transmission. Reconfirm the remote machine’s features.
Display Meaning Suggested solutions Memory Dial Full You have tried to add a fax job to the memory when 15 fax jobs have already been saved and the memory for saving memory transmission is full. Wait until some of the job in memory are sent. Or delete low priority delayed jobs. Memory Full The memory is full. Delete unnecessary documents and retransmit after more memory becomes available. Alternatively, split the transmission into more than one operation.
Display Meaning Suggested solutions [Paper Jam 2] Check Inside Paper has jammed in the paper exit area. Clear the jam. See page 9.9. [Power Failure] Power has turned off then on and the machine’s memory has not been saved. The job which you were trying to do before the power failure must be completely re-done. Priority Fax Function Full The priority fax jobs queue is full. Cancel unnecessary priority fax jobs.
Solving Other Problems The following chart lists some conditions that may occur and the recommended solutions. Follow the suggested solutions until the problem is corrected. If the problem persists, please call for service. Paper Feeding Problems Condition Suggested solutions Paper is jammed during printing. Clear the paper jam. See page 9.5. Paper sticks together. • Ensure that there is not too much paper in the paper tray.
Condition Suggested solutions Envelopes skew or fail to feed correctly. Ensure that the paper guides are against both sides of the envelopes. Printing Problems Condition The machine does not print. Possible cause Suggested solutions The machine is not receiving power. Check the power cord connections. Check the power switch and the power source. The machine is not selected as the default printer. Select Xerox WC PE120 Series PCL 6 as your default printer in your Windows.
Condition Possible cause Suggested solutions The machine selects print materials from the wrong paper source. The paper source selection in the printer properties may be incorrect. For many software applications, the paper source selection is found under the Paper tab within the printer properties. Select the correct paper source. See page 4.6. A print job is extremely slow. The job may be very complex. Reduce the complexity of the page or try adjusting the print quality settings.
Condition Pages print, but are blank. Possible cause Suggested solutions The toner cartridge is defective or out of toner. Redistribute the toner, if necessary. See page 8.7. If necessary, replace the toner cartridge. The file may have blank pages. Check the file to ensure that it does not contain blank pages. Some parts, such as the controller or the board, may be defective. Contact a service representative. The illustrations print incorrectly in Adobe Illustrator.
Printing Quality Problems If the inside of the machine is dirty or paper has been loaded improperly, you may notice a reduction in print quality. See the table below to clear the problem. Condition Suggested solutions Light or faded print If a vertical white streak or faded area appears on the page: • The toner supply is low. You may be able to temporarily extend the toner cartridge life. See “Redistributing Toner” on page 8.7. If this does not improve the print quality, install a new toner cartridge.
Condition Vertical lines AaBbCc AaBbCc AaBbCc AaBbCc AaBbCc Suggested solutions If black vertical streaks appear on the page: • The drum inside the toner cartridge has probably been scratched. Remove the toner cartridge and install a new one. See “Replacing the Toner Cartridge” on page 8.8. If white vertical streaks appear on the page: • The surface of the LSU part inside the machine may be dirty. Clean the LSU (see page 8.4). The scan glass can be dirty: • Clean glass with a dampended cloth.
Condition Vertical repetitive defects AaBbCc AaBbCc AaBbCc AaBbCc AaBbCc Background scatter A Misformed characters Suggested solutions If marks repeatedly appear on the printed side of the page at even intervals: • The toner cartridge may be damaged. If a repetitive mark occurs on the page at intervals of 75.4 mm, print a cleaning sheet several times to clean the cartridge; see “Cleaning the Drum” on page 8.10.
Condition Page skew AaBbCc AaBbC AaBbCcc AaBbCc AaBbCc Suggested solutions • Ensure that the paper is loaded properly. • Check the paper type and quality. See “Paper Specifications” on page E.6. • Ensure that the paper or other material is loaded correctly and the guides are not too tight or too loose against the paper stack. • Try feeding paper through a different paper supply. Curl or wave • Ensure that the paper is loaded properly. • Check the paper type and quality.
Condition Suggested solutions Loose toner • Clean the inside of the machine. See “Cleaning the Inside” on page 8.3. • Check the paper type and quality. See “Paper Specifications” on page E.6. • Remove the toner cartridge and install a new one. See “Replacing the Toner Cartridge” on page 8.8. • If the problem persists, the machine may require repair. Contact a service representative. • Fuser may be defective.
Copying Problems Condition Suggested solutions Copies are too light or too dark. Use the Lighten/Darken button to darken or lighten the background of the copies. Smears, lines, marks, or spots appears on copies. • If defects are on the original, press the Lighten/ Darken button to lighten the background of your copies. • If no defects are on the original, clean the scan unit. See page 8.5. Copy image is skewed.
Scanning Problems Condition Suggested solutions The scanner does not work but the copy function is ok. • Make sure that you place the document to be scanned face down on the document glass, or face up in the Automatic Document Feeder. • There may not be enough available memory to hold the document you want to scan. Try the Prescan function to see if that works. Try lowering the scan resolution rate. • Check that the USB or parallel cable is connected properly.
Condition Suggested solutions Message appears on your computer screen: • “Device can't be set to the H/W mode you want.” • “Port is being used by another program.” • “Port is Disabled. • “Scanner is busy receiving or printing data. When the current job is completed, try again.” • “Invalid handle.” • “Scanning has failed.” • There may be a copying or printing job in progress. When that job is complete, try your job again. • The Selected port is currently being used. Restart your computer and try again.
Condition Suggested solutions The machine does not send. • Make sure that the document is loaded in the ADF or on the document glass. • “Sending” should show up on the display. • Check the fax machine you are sending to, to see if it can receive your fax. The incoming fax has blank spaces or is of poorquality. • • • • Some of the words on an incoming fax are stretched. The fax machine sending you the fax had a temporary document jam. There are lines on the documents you send.
Common Linux Problems Problem Possible Cause and Solution The machine doesn’t print • Check if the printer driver is installed in your system. Open MFP configurator and switch to the Printers tab in Printers configuration window to look at the list of available printers. Make sure that your machine is displayed on the list. If not, please, invoke Add new printer wizard to set up your device. • Check if the printer is started. Open Printers configuration and select your machine on the printers list.
Problem Possible Cause and Solution The machine does not appear on the scanners list (continued) • Check if the MFP port is not busy. Since functional components of MFP (printer and scanner) share the same I/O interface (MFP port), the situation of simultaneous access of different “consumer” application to the same MFP port is possible. To avoid possible conflicts, only one of them at a time is allowed to gain control over the device. The other “consumer” will encounter “device busy” response.
Problem Possible Cause and Solution I can’t print when I installed both Linux Print Package (LPP) and MFP driver on the same machine simultaneously. • Since both Linux Printer Package and MFP driver make a symbolic link to “lpr” printing command, which is commonly used on Unix clones, it is not recommended to use both package on the same machine. • If you still want to use both packages simultaneously, please install the LPP first.
Troubleshooting PS Errors (WorkCentre PE120i Only) The following situations are PS language specific and may occur when several printer languages are being used. NOTE: To receive a printed or screen-displayed message when PostScript errors occur, open the Print Options window and click the desired selection next to the PostScript errors section. Problem Possible Cause Solution PostScript file can not be printed. The PostScript driver may not be installed correctly.
Common Macintosh Problems (WorkCentre PE120i Only) Problems in the Chooser Problem Possible Cause and Solution The printer driver icon does not appear in Chooser. Software is not installed correctly. • The LaserWriter driver should be present as part of the Macintosh OS. Make sure that the LaserWriter driver is in the Extensions folder within the Systems folder. If not, install the LaserWriter driver component from the Macintosh OS CD. • Make sure that you are using a high-quality cable.
10 USING USB FLASH DRIVE This chapter explains how to use a USB flash drive with your machine.
About USB Flash Drives USB flash drives are available with various memory capacities to give you enough room to store documents, presentations, downloaded music and videos, high resolution photographs, or whatever other files you want to take with you. Simply insert a USB flash drive into the USB port in the front of your machine and your machine will automatically detect it as a removable disk drive. Then you can do the following: • Scan documents and save them on the USB flash drive.
To install a USB flash drive, insert it into the USB port in the front of your machine. Once you have installed the USB flash drive, you can immediately print files stored on it. Scanning to USB Flash Drive You can scan a document and save the scanned image on the USB flash drive. There are two ways of doing this: you can scan to the USB flash drive using the default settings, or you can manually select your own settings.
2 Make sure that the USB flash drive is inserted into the USB port in the front of the machine. If necessary, insert the flash drive. See page 10.2. 3 Press Scan-to... on the control panel. The first available menu item, “USB Memory,” appears on the bottom line of the display. 4 Press Enter. The display shows the available memory space for about 2 seconds and the first available menu item, “Auto Scan,” appears on the bottom line of the display. 5 Press Enter to start scanning.
4 Press Enter. The display shows the available memory space for about 2 seconds and the first available menu item, “Auto Scan,” appears on the bottom line of the display. 5 Press the scroll button (W or X) until “Manual Scan” appears on the bottom line of the display. Press Enter. 6 Press the scroll button (W or X) and select the size of the image to be scanned. Press Enter. 7 Press the scroll button (W or X) and select the file format in which the document is to be scanned. 8 Press Enter.
Managing the USB Flash Drive Changing the Default Settings When you scan a document to the USB flash drive, the default scan options, including scan size and scan format, can be set to the most frequently used modes. These settings are only available when you scan to the USB flash drive. 1 Make sure that the USB flash drive is inserted into the USB port in the front of the machine. If necessary, insert the USB flash drive. See page 10.2. 2 Press Scan-to... on the control panel.
12 If you selected “BMP” in step 10, you are asked to select a color format, Color, Gray, or Mono, by pressing the scroll button (W or X). If you selected “TIFF” or “PDF” in step 10, you can save a multiple-page document as a single file. After you select “TIFF” or “PDF”, the machine displays “Multi-Page Scan” and offers you the choice of “On” or “Off.” If you select “On” you can save multiple pages as a single file, but this feature is only activated when you load your document into the ADF.
7 If you selected a file in step 6, and the display shows the size of the file for about 2 seconds. Go to the next step. If you selected a folder, the first file contained in that folder appears on the bottom line of the display. You can view the other files in the folder by pressing the scroll button (W or X). When you find the file you want to delete, press Enter. The display shows the size of the file for about 2 seconds.
Viewing the USB Memory Status You can check the amount of memory space available for scanning and saving documents. 1 Make sure that the USB flash drive is inserted into the USB port in the front of the machine. If necessary, insert the USB flash drive. See page 10.2. 2 Press Scan-to... on the control panel. The first available menu item, “USB Memory,” appears on the bottom line of the display. 3 Press Enter.
Printing From the USB Flash Drive You can directly print files stored on the USB flash drive. You can print TIFF, BMP, TXT, and PRN files. Direct Print option supports: • PRN : PCL6(Version 2.1) Compatible • TXT : PCL5e Compatible • TIFF : MFP generated TIF files are supported with Direct Print.
4 To print the selected file, press Enter, Start, or Print from USB Drive to print the file. If you selected a TIFF, BMP, or TXT file in step 2, you can select the number of copies to be printed by pressing the scroll button (W or X) or entering the number using the numeric keys. Then press Enter to print the file. 5 After printing the file, the display asks if you want to print another job. Select “Yes” to print anther jobs, and repeat from step 2. Otherwise, select “No”.
Otherwise, select “No” by pressing the scroll button (W or X). 6 To return to Standby mode, press Stop/Clear. To restore the data: 1 Insert the USB flash drive. For details, see page 10.2. 2 Press Menu until “Machine Setup” appears on the top line of the display. 3 Press the scroll button (W or X) until you see “Import Setting” on the bottom line and press Enter. 4 Select the data type you want to restore, either “Phonebook” or “All Settings” and press Enter.
A USING YOUR MACHINE IN LINUX You can use your machine in a Linux environment.
Getting Started The supplied CD-ROM provides you with Xerox’s MFP driver package for using your machine with a Linux computer. Xerox’s MFP driver package contains printer and scanner drivers, providing the ability to print documents and scan images. The package also delivers powerful applications for configuring your machine and further processing of the scanned documents.
Installing the MFP Driver System Requirements Supported OS • Redhat 7.1 and above • Linux Mandrake 8.0 and above • SuSE 7.1 and above • Caldera OpenLinux 3.1 and above • Turbo Linux 7.0 and above • Slackware 8.1 and above Recommended Hardware Requirements • Pentium IV 1 GHz or higher • RAM 256 MB or higher • HDD 1 GB or higher NOTES: • It’s also necessary to claim swap partition of 300 MB or larger for working with large scanned images. • The Linux scanner driver supports the optical resolution at maximum.
Installing the MFP Driver 1 Make sure that you connect your machine to your computer. Turn both the computer and the machine on. 2 When the Administrator Login window appears, type in root in the Login field and enter the system password. NOTE: You must log in as a super user (root) to install the printer software. If you are not a super user, ask your system administrator. 3 Insert the printer software CD-ROM. The CD-ROM will automatically run.
5 When the welcome screen appears, click Next. 6 When the installation is complete, click Finish. The installation program has added the MFP Configurator desktop icon and Xerox MFP group to the system menu for your convenience. If you have any difficulties, consult the onscreen help that is available through your system menu or can otherwise be called from the driver package windows applications, such as MFP Configurator or Image Editor. Using Your Machine In Linux A.
Uninstalling the MFP Driver 1 When the Administrator Login window appears, type in root in the Login field and enter the system password. NOTE: You must log in as a super user (root) to install the printer software. If you are not a super user, ask your system administrator. 2 Insert the printer software CD-ROM. The CD-ROM will automatically run. If the CD-ROM does not automatically run, click the icon at the bottom of the desktop.
Using the MFP Configurator MFP Configurator is a tool primarily intended for configuring MFP devices. Since an MFP device combines the printer and scanner, the MFP Configurator provides options logically grouped for printer and scanner functions. There is also a special MFP port option responsible for the regulation of access to an MFP printer and scanner via a single I/O channel. After installing the MFP driver (see page A.3), the MFP Configurator icon will automatically be created on your desktop.
Printers Configuration Printers configuration has the two tabs; Printers and Classes. Printers Tab You can see the current system’s printer configuration by clicking on the printer icon button on the left side of the MFP Configurator window. Switches to Printer configuration. Shows all of the installed printer. Printer control buttons. See below. Shows the status, model name and URI of your printer. You can use the following printer control buttons: • Refresh: renews the available printers list.
Classes Tab The Classes tab shows a list of available printer classes. Renews the classes list. Allows you to add a new printer class. Shows all of the printer classes. Removes the selected printer class. Shows the status of the class and the number of printers in the class. Scanners Configuration In this window, you can monitor the activity of scanner devices, view a list of installed Xerox MFP devices, change device properties, and scan images.
MFP Ports Configuration In this window, you can view the list of available MFP ports, check the status of each port and release a port that is stalled in busy state when its owner is terminated for any reason. Renews the available ports list. Releases the selected port. Switches to MPF ports configuration. Shows all of the available ports.
Configuring Printer Properties Using the properties window provided by the Printers configuration, you can change the various properties for your machine as a printer. 1 Open the MFP Configurator. If necessary, switch to Printers configuration. 2 Select your machine on the available printers list and click Properties. 3 The Printer Properties window opens. The following five tabs display at the top of the window: • General: allows you to change the printer location and name.
Printing a Document Printing from Applications There are a lot of Linux applications that you are allowed to print from using Common UNIX Printing System (CUPS). You can print on your machine from any such application. 1 From the application you are using, select Print from the File menu. 2 Select Print directly using lpr. 3 In the Xerox LPR window, select the model name of your machine from the Printer list and click Properties. Click. 4 Change the printer and print job properties. A.
The following four tabs display at the top of the window. • General - allows you to change the paper size, the paper type, and the orientation of the documents, enables the duplex feature, adds start and end banners, and changes the number of pages per sheet. • Text - allows you to specify the page margins and set the text options, such as spacing or columns. • Graphics - allows you to set image options that are used when printing images/files, such as color options, image size, or image position.
Scanning a Document You can scan a document using the MFP Configurator window. 1 Double-click the MFP Configurator on your desktop. 2 Click the button to switch to Scanners Configuration. 3 Select the scanner on the list. Click your scanner. When you have only one MFP device and it is connected to the computer and turned on, your scanner appears on the list and is automatically selected. If you have two or more scanners attached to your computer, you can select any scanner to work at any time.
5 Load the document to be scanned face up into the ADF (Automatic Document Feeder) or face down on the document glass. For details, see page 7.6. For detailed guidelines for preparing an original document, see page 5.3. 6 Click Preview in the Scanner Properties window. The document is scanned and the image preview appears in the Preview Pane. Drag the pointer to set the image area to be scanned. 7 Change the scan options in the Image Quality and Scan Area sections.
9 The scanned image appears in the new Image Editor window. If you want to edit the scanned image, use the toolbar. For further details about editing an image, see page A.17. 10 When you are finished, click Save on the toolbar. 11 Select the file directory where you want to save the image and enter the file name. 12 Click Save. Adding Job Type Settings You can save your scan option settings to retrieve for a later scanning.
To save a Job Type setting for the next scan job: 1 Select the setting you want to use from the Job Type dropdown list. 2 Click Save. The next time you open the Scanner Properties window, the saved setting is automatically selected for the scan job. To delete a Job Type setting: 1 Select the setting you want to delete from the Job Type drop-down list. 2 Click Delete.
Tools Function Cancels your last action. Restores the action you canceled. Allows you to scroll through the image. Crops the selected image area. Zooms the image out. Zooms the image in. Allows you to scale the image size; you can enter the size manually, or set the rate to scale proportionally, vertically, or horizontally. Allows you to rotate the image; you can select the number of degrees from the drop-down list. Allows you to flip the image vertically or horizontally.
B USING WINDOWS POSTSCRIPT DRIVER (WorkCentre PE120i Only) If you want to use the PostScript driver provided with your machine to print a document, use the information in this Appendix. This feature is available only on the WorkCentre PE120i.
Installing PostScript Drivers PPDs, in combination with the PostScript driver, access printer features and allow the computer to communicate with the printer. An installation programme for the PPDs is provided on the supplied PS Driver CD. Before installing, make sure that the machine and the PC are properly connected with parallel, USB, or network interface. For information about: • connecting with a parallel interface, see page 2.13. • connecting with a USB interface, see page 2.12.
2 When the language selection window appears, select the appropriate language and then click Continue. 3 Choose the components you want to install and then click Continue. 4 Click Continue. B 5 Click Finish. The driver installation is now complete. USING WINDOWS POSTSCRIPT DRIVER (WorkCentre PE120i Only) B.
Using PostScript Printer Driver Features The machine automatically switches between PostScript and PCL printer languages, depending on the driver you have selected. Accessing Printer Properties The properties window for the Windows PostScript printer driver can be opened from the Printers folder or from an application. To open the properties window from the Printers folder: 1 Click the Windows Start button. 2 For Windows 98/Me/NT 4.0/2000, select Settings and then Printers to open the Printers window.
Printer Settings The printer properties window may differ, depending on your operating system. This chapter shows the Printing Preferences window displayed on Windows XP. Your printer’s Printing Preferences window consists of 2 tabs: Layout and Paper/Quality. If you access printer properties through the Printers folder, you can view additional Windows-based tabs; refer to your Windows User’s Guide. Layout tab The Layout tab provides options to adjust how the document appears on the printed page.
Property 2 Page Order Description Page Order: You can set the sequence for the pages to print. • Front to Back: Your machine prints all pages from the first page to the last page. • Back to Front: Your machine prints all pages from the last page to the first page. 3 Pages Per Sheet 4 Advanced... Pages Per Sheet allows you to select the number of pages you want to print per sheet (1, 2, 4, 6, 9, or 16) on the drop-down list. You can use advanced settings by clicking the Advanced button.
Paper/Quality tab The Paper/Quality tab allows you to select the paper tray you will use for the print job. 1 Property Description 1 Tray Selection Make sure that Paper Source is set to the appropriate paper tray. Use the Manual Feed source when printing on special material. You need to load one sheet at a time into the Bypass tray. See page 3.8. If you install an optional Tray 2 and set Tray 2 in printer properties (see page D.8), you can select Tray2.
MEMO B.
C PRINTING FROM MACINTOSH A (WORKCENTRE PE120I ONLY) Your machine supports Macintosh systems with a built-in USB interface or an optional 10/100 Base-TX network interface card. When you print a file from a Macintosh computer, you can use the PostScript driver by installing the PPD file.
Installing Software for Macintosh The PostScript driver CD-ROM that came with your machine provides you with the PPD file to use the PS driver, Apple LaserWriter driver, for printing on a Macintosh computer. Refer to the table below for the driver available for your machine. Your Machine WorkCentre PE120i Available Driver Connection Mac OS 8.6~9.2 Network interface Mac OS 10.1 ~ 10.
7 Click Continue. 8 Click Install. 9 After the installation is finished, click Quit. C Printing From a Macintosh (WORKCENTRE PE120I ONLY) C.
Setting Up the Machine The way to set up your machine is different depending on which cable you use to connect the machine to your computer-the network cable or the USB cable. For a Network-connected Macintosh Mac OS 8.6 ~ 9.2 1 Follow the instructions on page C.2 to install the PPD file on your computer. 2 From the Apple menu, select Chooser. 3 Click LaserWriter 8 (the PostScript driver provided with your Macintosh). The name of your machine appears on the list.
4 Select the AppleTalk tab. The name of your machine appears on the list. Select XEC000xxxxxxxxx from the printer box, where the xxxxxxxxx varies depending on your machine. 5 Click Add. 6 If Auto Select does not work properly, select Xerox in Printer Model and Xerox WC PE120 Series in Model Name. Your machine appears on the Printer List and is set as the default printer. For a USB-connected Macintosh Mac OS 10.1 ~ 10.3 1 Follow the instructions on page C.2 to install the PPD file on your computer.
Printing a Document When you print with a Macintosh computer, you need to check the printer software setting in each application you use. Follow these steps to print from a Macintosh computer: NOTE: The LaserWriter driver’s window may be different depending on the version of your Macintosh system, but the features available are the same. 1 Open a Macintosh application and select the file you want to print. 2 Open the File menu and click Page Setup (Document Setup in some applications).
Canceling a Print Job To cancel a print job, press the Stop/Clear button on the control panel. The machine finishes printing the page that is moving through the machine and deletes the rest of the print job. Using Advanced Printing Features - Printing Multiple Pages on One Sheet of Paper - Scheduling a Print Job Printing Multiple Pages on One Sheet of Paper You can print more than one page on a single sheet of paper. This feature provides a cost-effective way to print draft pages.
4 Select the page order on the Layout Direction option. To print a border around each page on the sheet, select the option you want on the Border drop-down list. 5 Click Print and the machine prints the selected number of pages on one side of each page. Scheduling a Print Job You can set your machine to print a job at a future time. 1 From your Macintosh application, select Print from the File menu. 2 Select Scheduler. S Mac OS 10.3 3 Select the time when you want the print job to be printed.
D INSTALLING MACHINE OPTIONS Your machine is a full-featured laser printer that has been optimized to meet most of your printing needs. Recognizing that each user may have different requirements, however, Xerox makes several options available to enhance your machine’s capabilities.
Installing Memory DIMM Your machine has a dual in-line memory module (DIMM) slot. Use this DIMM slot to install more memory option for the machine. NOTE: Your machine has 32 MB of memory which can be expanded to 160 MB. Use only a Xerox-approved DIMM. Contact your Xerox dealer. CAUTION: Static electricity can damage DIMMs. When handling a DIMM, either wear an antistatic wrist strap, or frequently touch the surface of the DIMM antistatic package and then touch bare metal on the machine.
4 Remove the memory DIMM from its antistatic package. Locate the alignment notches on the bottom edge of each DIMM. Notches Connection points 5 Holding the memory DIMM by the edges, align the notches on the memory DIMM with the grooves at the top of the memory DIMM slot. Groove Notch 6 Push the DIMM straight into the DIMM slot until it snaps into place. Make sure the latches fit over the notches located on either side of the DIMM. Notch Latch D Installing Machine Options D.
7 Replace the control board cover. 8 Reconnect the power cord and printer cable, and turn the machine on. NOTE: After installing the memory DIMM, you need to select it in the printer properties of the PostScript printer driver so that you can use it with your machine (WorkCentre PE120i only): 1. Make sure that the PostScript printer driver is installed in your computer. For details about installing the PS printer driver, see page B.2. 2. Click the Windows Start menu. 3. For Windows 95/98/Me/NT 4.
Removing a Memory DIMM 1 Follow steps 1 through 2 on page D.2 to access the control board. 2 Push the latches at both ends of the DIMM slot away from the DIMM. Pull out the DIMM. 3 Place the DIMM in its original packaging or wrap it with a sheet of thin metal, such as aluminium foil, and store it in a box. 4 Follow from step 7 on page D.4. D Installing Machine Options D.
Installing an Optional Tray You can increase the paper handling capacity of your machine by installing an optional Tray 2. This tray holds 250 sheets of paper. 1 Turn the machine off and unplug all cables from the machine. 2 Remove the packing material from the tray and remove the tape fixing the interface cable to the tray. 3 Find the location of the connector and the optional tray positioners. D.
4 Place the machine over the tray, aligning the feet on the machine with the positioners in the tray. Lifting handles are located at the lower edge of both sides of the machine. 5 Plug the interface cable of the tray into the connector on the back of the machine. 6 Load paper in the tray. The instructions for loading paper in this tray are the same as for loading the standard paper tray. See page 2.7. 7 After loading paper, you need to set the paper type and size for Tray 2. See page 2.21.
Setting Tray 2 in the Printer Properties If you installed Tray 2 with your machine on, the machine does not recognize it. In this case, you need to set the tray in the printer properties window so that you can use it for PC printing. The procedure for setting the tray may differ depending on the selected printer driver. To set the tray in the printer properties of the PCL 6 printer driver: 1 Click the Windows Start menu. 2 For Windows 98/Me/NT 4.0/2000, select Settings and then Printers.
E SPECIFICATIONS This chapter includes: • General Specifications • Scanner and Copier Specifications • Printer Specifications • Facsimile Specifications • Paper Specifications
General Specifications Item Automatic document feeder ADF document size Description Up to 50 sheets (20 lb, 75 g/m2) Width: 142 to 216 mm (5.6 to 8.5 inches) Length: 148 to 356 mm (5.
Item Package weight Description Paper: 2.8 Kg Plastic: 0.7 Kg Print: Up to 15,000 pages Duty cycle (Monthly) Scan: Up to 1,000 pages ADF: Up to 1,000 pages *Sound Pressure Level, ISO7779 **The number of pages may be affected by operating environment, printing interval, media type, and media size.
Item Gray scale Description 128 levels *Copy Speed is based on Single Document Multiple Copy.
Facsimile Specifications Item Description Compatibility ITU-T Group 3 Applicable line Public Switched Telephone Network (PSTN) or behind PABX Data coding MH/MR/MMR (ECM Mode) and JPEG for color fax transmission Modem speed 33.6 Kbps Approx. 3 seconds/page Transmission speed Maximum document length Paper size * Transmission time applies to memory transmission of text data with ECM compression using only ITU-T No.1 Chart.
Paper Specifications Overview Your machine accepts a variety of print materials, such as cut-sheet paper (including up to 100% recycled fiber content paper), envelopes, labels, transparencies and custom-size paper. Properties, such as weight, composition, grain and moisture content, are important factors affecting the machine’s performance and the output quality.
Paper Minimum size (custom) 76 x 127 mm (3 x 5 in) Maximum size (Legal) 216 x 356 mm (8.5 x 14 in) Transparency Cards Envelopes Capacity** 60 to 120 g/m2 bond (16 to 32 lb) 138 to 146 g/m2 Same minimum and maximum paper sizes as listed above. Labels Weight Dimensions* 120 to 150 g/m2 5 sheets of paper for the Bypass tray 90 to 163 g/m2 75 to 90 g/m2 *The machine supports a wide range of media sizes. See “Paper Type, Input Sources, and Capacities” on page 3.2.
Symptom Problems with feeding Problem with Paper Ragged edges Solution Use good quality paper. NOTES: • Do not use letterhead paper printed with low-temperature inks, such as those used in some types of thermography. • Do not use raised or embossed letterhead. • The machine uses heat and pressure to fuse toner to the paper. Insure that any colored paper or preprinted forms use inks that are compatible with this fusing temperature (200 °C or 392 °F for 0.1 second).
Ideally, the machine and paper storage environment should be at or near room temperature, and not too dry or humid. Remember that paper is hygroscopic; it absorbs and loses moisture rapidly. Heat works with humidity to damage paper. Heat causes the moisture in paper to evaporate, while cold causes it to condense on the sheets. Heating systems and air conditioners remove most of the humidity from a room. As paper is opened and used, it loses moisture, causing streaks and smudging.
• Size: You should only use envelopes within the following size ranges. Minimum Bypass tray 76 x 127 mm (3 x 5 in.) Maximum 216 x 356 mm (8.5 x 14 in.) NOTES: • Use only the manual feeder to print envelopes. • You may experience some paper jams when using any media with a length less than 140 mm (5.5 in.). This may be caused by paper that has been affected by environmental conditions. For optimum performance, make sure you are storing and handling the paper correctly.
NOTES: • For the best print quality, position margins no closer than 15 mm (0.6 in.) from the edges of the envelope. • Avoid printing over the area where the envelope’s seams meet. Envelope Storage Proper storage of envelopes helps contribute to print quality. Envelopes should be stored flat. If air is trapped in an envelope, creating an air bubble, then the envelope may wrinkle during printing. Labels CAUTIONS: • To avoid damaging the machine, use only labels recommended for laser printers.
INDEX Numerics 2/4-up, more features 5.12 2-side, more features 5.11 A adding documents 7.33 ADF (Automatic Document Feeder), load 5.5, 7.6 ADF rubber pad, replace 8.13 auto fit, more features 5.11 automatic dialing group 7.23 one-touch 7.19 speed 7.21 automatic redialing 7.13 B broadcasting faxes 7.28 bypass tray, use 3.6 connection AC power 2.14 extension phone 2.11 parallel 2.13 telephone line cord 2.11 USB 2.12 consumables 8.12 control panel 1.7 ControlCentre installing 2.29, B.2 starting 2.
E error messages 9.13 extension phone, connect 2.11 F Favorite setting, use 4.13 fax system, set advanced settings 7.38 basic settings 7.3 fit to page copying 5.11 printing 4.18 front output tray, use 3.10 G group dial dialing 7.25 editing 7.24 setting 7.23 H help, use 4.14 I image quality 4.8 imaging options properties, set 4.8 installing Linux software A.3 Macintosh software C.2 Memory D.2 optional Tray2 D.6 PS driver B.2 toner cartridge 2.5 Windows software 2.29 loading, paper in the bypass tray 3.
paper load capacity 3.2 paper size, set paper tray 2.21 print 4.6, A.13 paper source, set 4.7, A.13 paper type, set paper tray 2.21 print 4.7, A.13 parallel, connect 3.7 poster copying 5.13 printing 4.16 PostScript driver accessing B.4 errors 9.33 installing B.2 power save mode, use 2.26 print order, set 4.11 print quality problems, solve 9.21 print resolution A.13 printer driver, install Linux A.4 Macintosh C.2 Windows PCL 6 printer driver 2.29 PostScript B.2 printer properties Linux A.
system requirements Linux A.3 Macintosh C.2 Windows 2.29 T tel line, connect 2.11 toll save mode, use 2.25 toner cartridge installing 2.5 maintaining 8.6 redistributing 8.7 replacing 8.8 toner save mode, use 2.24 U uninstalling MFP driver Linux A.6 USB connecting 3.7 USB flash drive installing 10.2 managing 10.6 printing 10.10 scanning 10.3 V volume, adjust ringer 2.23 speaker 2.23 W watermarks, use 4.