
Owner manual


XES FEATURE KEY INSTRUCTIONS
701P39462 12/02 Page 17
Enabling a Feature Key (Optional Features)
To enable a Feature perform the following steps.
Note: You must enter a password on the WebPMT Session Setup window to
enable the features.
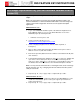
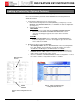
1. Verify that the Optional License(s) is/are present.
a. Print a Printer Configuration Test Print (Minimal) (see Figure 5) or on the
WebPMT click PRINTER DEFAULTS > UTILITIES > Feature Configuration.
(See Figure 6.)
b. Verify that the feature is enabled:
TEST PRINT
• Color license is located under the SCANNER CONFIGURATION.
• Check in the OPTIONAL CONTROLLER FEATURES section.
“Present” should appear opposite the feature license that was
installed.
WebPMT
• Select PRINTER DEFAULTS > UTILITIES > CONFIGURATION >
Feature Configuration. “Present” should appear opposite the feature
license that was installed.
2. Enable the Features using the WebPMT.
• Accounting Feature: Click on ACCOUNTING. In the Accounting Mode
box, click “Enable”. For information on using Accounting, refer to the
AccXES Account Manager Tool Administrator User Guide.
• Copy Enable and Scan To Net Enable: Click PRINTER DEFAULTS >
PRINTER SETUP. “DDS enable” needs to be selected. If not, select it,
wait 1 minute, and reboot the entire system.
• Click on UTILITIES > CONFIGURATION >Feature Configuration. Look at
the “State” column to verify that the Feature is enabled.
Optional Feature
Licenses
COLO
R
LICENSE
Figure 6 . Feature Configuration Page
Listing 9.0 Feature Licenses
Figure 5. Printer Configuration 9.0 Test
Print