
WorkCentre User's Guide Pro 555, Pro 575
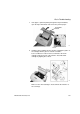
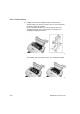

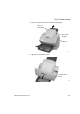
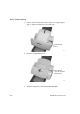
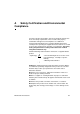
Table Of Contents
- XEROX
- Table of Contents
- 1 How to Use This Manual
- 2 Introduction
- 3 Getting Started
- Printing a Menu Map
- Setting the Date and Time
- 1. Press:
- 2. Using the Numeric Keypad and the arrow keys, enter the date, then press Enter
- 3. Select the Date format.
- 4. Select the Month format.
- 5. Select the Time format:
- 6. Using the Numeric Keypad and arrow keys, enter the time, (if necessary, use the arrow key to s...
- The menu selection screen redisplays. Press Exit or Stop to return to the standby mode.
- Setting your Machine ID*
- Setting the Dial Mode*
- Setting the Send Header
- Setting the Receive Footer
- Loading Paper
- Bypass Tray:
- Paper Tray:
- Setting the paper size
- Document Specifications
- Selecting the Scan Resolution
- Selecting the Scan Contrast
- To Receive
- To Send
- To Copy
- To Print
- 1. Install the print drivers supplied with your WorkCentre following the instructions on the CD.
- 2. To print from your application select Print from you File menu.
- 3. Select the printer name you have given to the WorkCentre print queue.
- 4. Select any printing options you require.
- 5. Select OK to send you documents to the WorkCentre
- Phonebook Reports
- 4 Basic Troubleshooting
- Paper Jam
- 1. Remove any documents from the Document Support and Copy Output Tray.
- 2a. Bypass Tray
- Pull up the Document Output Tray and pull the jammed paper straight out of the machine.
- 2b. Main Paper Tray
- Remove the Bypass Tray and pull the jammed paper straight out of the machine.
- 2c. Optional Paper Cassette
- Remove the Optional Paper Cassette Cover and pull out Paper Cassette. Press down on the stack of ...
- Remove the stack of paper from the Optional Paper Cassette and pull the jammed paper straight out...
- 3. Push the Top Cover Open Button to the Top Cover and open the Top Cover.
- 4. Remove the Toner Cartridge and the Drum Cartridge.
- 5. Pull up the Paper Guide and remove the jammed paper while pressing the Paper Holder to the rea...
- 6. If the paper is jammed partway through the Fuser Unit (black colored housing), remove the jamm...
- 7. If the paper is jammed partway through the Paper Exit Guide, open the Paper Exit Guide and rem...
- 8. Install the drum cartridge into the machine, aligning the guides of the cartridge with the gro...
- Color coordinated “1” labels have been affixed to the drum cartridge and to the inside of the mac...
- Make sure the drum cartridge is inserted inside the machine as far as it will go.
- 9. Holding onto the toner cartridge’s handle, lower it into the machine. Make sure that the four ...
- Color coordinated “2” labels have been affixed to the toner cartridge and to the inside of the ma...
- The cartridge will click into place when it is completely installed.
- 10. Replace the Paper Exit Guide, Paper and Bypass Tray.
- 11. Press down on the Top Cover until a “Click” is heard to ensure the latches engage.
- 12. Verify the display has returned to the Standby Mode.
- Document Jam
- Paper Jam
- A Safety Certification and Environmental Compliance
- Index

A-4 WorkCentre Pro 555/575
manufactured from August 1, 1976. Compliance is mandatory for
products marketed in the United States. The WorkCentre Pro is in
compliance with the CDRH regulation.
The equipment also complies with laser product performance
standards set by governmental, national and international agencies
as a Class 1 Laser Product.
Third Party Certification
The Xerox WorkCentre Pro 555/575 is certified by various bodies in
compliance with national and international safety standards.
120v 60Hz Nominal Markets:
Underwriter Laboratories Inc., UL 1950, Third Party Edition, within
reciprocity agreements which include requirements for Canada.
230v, 50 Hz Nominal Markets:
IEC950: 1991 including A1, A2, A3 and A4.
The Xerox WorkCentre Pro 555/575 is manufactured under an ISO
9002 quality registration scheme.
Radio Frequency Emissions USA
This equipment has been tested and found to comply with the limits
for a Class B digital device, pursuant to Part 15 of the FCC Rules.
These limits are designed to provide reasonable protection against
harmful interference in a residential installation. This equipment
generates, uses, and can radiate radio frequency energy and, if not
installed and used in accordance with the instructions, may cause
harmful interference to radio communications. However, there is no
guarantee that interference will not occur in a particular installation. If
this equipment does cause harmful interference to radio or television
reception, which can be determined by turning the equipment off an
on, the user is encouraged to try to correct the interference by one or
more of the following measures:
• Reorient or relocate the receiving antenna.
• Increase the separation between the equipment and the receiver.
• Connect the equipment into an outlet on a circuit different from
that to which the receiver is connected.
• Consult the dealer or an experienced radio/TV technician for
help.