
WorkCentre User's Guide Pro 555, Pro 575
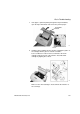
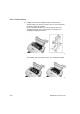

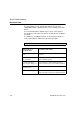
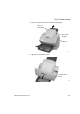
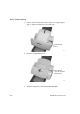
Table Of Contents
- XEROX
- Table of Contents
- 1 How to Use This Manual
- 2 Introduction
- 3 Getting Started
- Printing a Menu Map
- Setting the Date and Time
- 1. Press:
- 2. Using the Numeric Keypad and the arrow keys, enter the date, then press Enter
- 3. Select the Date format.
- 4. Select the Month format.
- 5. Select the Time format:
- 6. Using the Numeric Keypad and arrow keys, enter the time, (if necessary, use the arrow key to s...
- The menu selection screen redisplays. Press Exit or Stop to return to the standby mode.
- Setting your Machine ID*
- Setting the Dial Mode*
- Setting the Send Header
- Setting the Receive Footer
- Loading Paper
- Bypass Tray:
- Paper Tray:
- Setting the paper size
- Document Specifications
- Selecting the Scan Resolution
- Selecting the Scan Contrast
- To Receive
- To Send
- To Copy
- To Print
- 1. Install the print drivers supplied with your WorkCentre following the instructions on the CD.
- 2. To print from your application select Print from you File menu.
- 3. Select the printer name you have given to the WorkCentre print queue.
- 4. Select any printing options you require.
- 5. Select OK to send you documents to the WorkCentre
- Phonebook Reports
- 4 Basic Troubleshooting
- Paper Jam
- 1. Remove any documents from the Document Support and Copy Output Tray.
- 2a. Bypass Tray
- Pull up the Document Output Tray and pull the jammed paper straight out of the machine.
- 2b. Main Paper Tray
- Remove the Bypass Tray and pull the jammed paper straight out of the machine.
- 2c. Optional Paper Cassette
- Remove the Optional Paper Cassette Cover and pull out Paper Cassette. Press down on the stack of ...
- Remove the stack of paper from the Optional Paper Cassette and pull the jammed paper straight out...
- 3. Push the Top Cover Open Button to the Top Cover and open the Top Cover.
- 4. Remove the Toner Cartridge and the Drum Cartridge.
- 5. Pull up the Paper Guide and remove the jammed paper while pressing the Paper Holder to the rea...
- 6. If the paper is jammed partway through the Fuser Unit (black colored housing), remove the jamm...
- 7. If the paper is jammed partway through the Paper Exit Guide, open the Paper Exit Guide and rem...
- 8. Install the drum cartridge into the machine, aligning the guides of the cartridge with the gro...
- Color coordinated “1” labels have been affixed to the drum cartridge and to the inside of the mac...
- Make sure the drum cartridge is inserted inside the machine as far as it will go.
- 9. Holding onto the toner cartridge’s handle, lower it into the machine. Make sure that the four ...
- Color coordinated “2” labels have been affixed to the toner cartridge and to the inside of the ma...
- The cartridge will click into place when it is completely installed.
- 10. Replace the Paper Exit Guide, Paper and Bypass Tray.
- 11. Press down on the Top Cover until a “Click” is heard to ensure the latches engage.
- 12. Verify the display has returned to the Standby Mode.
- Document Jam
- Paper Jam
- A Safety Certification and Environmental Compliance
- Index

Basic Troubleshooting
4-12 WorkCentre Pro 555, 575
Document Jam
If a document jam occurs during a transmission, the message
“DOCUMENT JAM” is displayed. If this occurs, follow the procedure
below.
It is recommended that a duplicate from a copier, of the jammed
document be used to reduce the chance of a jam when resending the
document.
See Chapter 3, “Loading Documents” for document specifications
and recommendations which may help avoid paper jams.
Note: The power can be left ON when clearing a paper jam.
Typical Causes of
Document Jams
Recommended Procedure
The document is fed at an
angle.
Adjust the Document Guides to the edges of the
document.
The document paper is too
thin or too thick.
Make a duplicate using a copier and use the copy
as the sending document.
Document has tape or
pieces of paper taped to it.
Remove the tape or make a duplicate using a
copier and use the copy as the sending document.
The Control Panel Cover is
not fully closed.
Close the Control Panel Cover fully.
The document is stapled. Remove the staple(s), or make a duplicate using a
copier and use the copy as the sending document.