Phaser® 8560MFP/8860MFP multifunction printer Advanced Features Guide Guide des Fonctions Avancées Guida alle Funzioni Avanzate Handbuch zu Erweiterten Funktionen Guía de Características Avanzadas Guia de Recursos Avançados Handleiding voor Geavanceerde Functies Avancerade Funktionsguiden Vejledningen Avancerede funktioner www.xerox.
Copyright © 2007 Xerox Corporation. All Rights Reserved. Unpublished rights reserved under the copyright laws of the United States. Contents of this publication may not be reproduced in any form without permission of Xerox Corporation.
Contents 1 Using Printer Driver Options Printer Driver Features . . . . . . . . . . . . . . . . . . . . . . . . . . . . . . . . . . . . . . . . . . . . . . . . . . . . . 1-2 Selecting Which Paper to Use . . . . . . . . . . . . . . . . . . . . . . . . . . . . . . . . . . . . . . . . . . . . . . . . 1-3 Printing Multiple Pages to a Single Sheet (N-Up) . . . . . . . . . . . . . . . . . . . . . . . . . . . . . . . . 1-4 Printing Booklets . . . . . . . . . . . . . . . . . . . . . . . . . . . . . . . . . . . .
Contents 3 Networking Printer Management Software . . . . . . . . . . . . . . . . . . . . . . . . . . . . . . . . . . . . . . . . . . . . . . . . 3-2 CentreWare Internet Services (IS) . . . . . . . . . . . . . . . . . . . . . . . . . . . . . . . . . . . . . . . 3-2 CentreWare Web. . . . . . . . . . . . . . . . . . . . . . . . . . . . . . . . . . . . . . . . . . . . . . . . . . . . . 3-3 Windows 2000 or Later . . . . . . . . . . . . . . . . . . . . . . . . . . . . . . . . . . . . . . . . . . . . . . . . .
Contents A Printer Specifications B Regulatory Information C Product Recycling and Disposal Index Phaser® 8560MFP/8860MFP Multifunction Printer iii
Using Printer Driver Options This chapter includes: ■ ■ ■ ■ ■ ■ ■ ■ ■ ■ ■ ■ ■ ■ Printer Driver Features on page 1-2 Selecting Which Paper to Use on page 1-3 Printing Multiple Pages to a Single Sheet (N-Up) on page 1-4 Printing Booklets on page 1-5 Using Color Corrections on page 1-7 Printing in Black and White on page 1-11 Printing Separator Pages on page 1-12 Printing Cover Pages on page 1-13 Scaling on page 1-15 Printing Watermarks on page 1-16 Printing Mirror Images on page 1-18 Creating and Saving Cust
Printer Driver Features Printer Driver Features The following table displays many of the Xerox printer driver features that are available with specific operating systems. This section includes more information about these features and information about how to select the feature in the driver. Windows Vista, 2000, XP, Server 2003 Macintosh OS X, Version 10.3 and 10.4 Macintosh OS X, Version 10.
Selecting Which Paper to Use Selecting Which Paper to Use When you send your print job to the printer, you can choose to let the printer automatically select which paper to use based on your document size and the paper type you select, or you can force the printer to use paper from a specific tray. To select which paper to use from a supported driver: Operating System Steps Windows 2000 or later 1. Select the Paper/Output tab. The Paper summary displays the paper to use for the print job. 2.
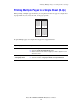
Printing Multiple Pages to a Single Sheet (N-Up) Printing Multiple Pages to a Single Sheet (N-Up) When printing a multiple-page document, you can print more than one page on a single sheet of paper. Print one, two, four, six, nine, or 16 pages per side. 1 2 3 4 To print multiple pages on a single sheet of paper in a supported driver: Operating System Steps Windows 2000 or later 1. Select the Layout/Watermark tab. 2. Select the Pages Per Sheet (N-Up) option. 3.
Printing Booklets Printing Booklets With 2-sided printing, you can print a document in the form of a small book. Create booklets for any paper size that is supported for 2-sided (duplex) printing. The driver automatically reduces each page image and prints four pages per sheet of paper (two on each side). The pages are printed in the correct order so that you can fold and staple the pages to create a booklet. When you print booklets, you can also specify the creep and gutter in supported drivers.
Printing Booklets To select booklet printing in a supported driver: Operating System Steps Windows 2000 or later 1. Select the Layout/Watermark tab. 2. Select the Booklet Layout option. If you are using the PostScript driver, click the Booklet Options button to specify the creep and gutter. 3. If desired, select Draw Page Borders from the drop-down list. Mac OS X (version 10.3 and higher) driver 1. In the Finishing Options dialog box, select Enable Booklet Printing. 2.
Using Color Corrections Using Color Corrections This section includes: ■ ■ Making Additional Color Corrections on page 1-8 Adjusting the Automatic Color Correction on page 1-9 The Color Correction options provide simulations of different color devices. Automatic is the default correction for general image processing. See the following table to determine what option you want to use.
Using Color Corrections To select the color correction in a supported driver: Operating System Steps Windows 2000 or later PostScript Driver 1. Select the Color Options tab. Mac OS X, version 10.3 and higher 1. In the Print dialog box, select Image Quality from the drop-down list. 2. Select the desired color correction. Some of the color corrections are grouped under Office Color, including None, Black and White, and Use Printer Control Panel Settings, or Press Match. 2.
Using Color Corrections To adjust the color in your job through a supported driver: Operating System Steps Windows 2000 or later PostScript Driver 1. Select the Color Options tab. 2. Select the desired color correction. 3. If desired, click the More Color Adjustments button to open the More Color Adjustments dialog box. 4. Make the desired adjustments to the sliders for your job. 5. If desired, select Apply to CMYK. 6. Click the OK button to save your changes in the More Color Adjustments dialog box.
Using Color Corrections If required in specific circumstances, you can make additional color adjustments to the lightness, saturation, contrast, cyan/red color variation, magenta/green color variation, and yellow/blue color variation used for a particular element. To adjust the Automatic color correction in a supported driver. Operating System Steps Windows 2000 or later PostScript Driver 1. Select the Color Options tab. 2. Select the Automatic Color option. 3.
Printing in Black and White Printing in Black and White If you want your output in black, white, and shades of gray, you can select black and white in a supported driver: Operating System Steps Windows 2000 or later PostScript driver 1. Select the Color Options tab. 2. Select the Office Color option. 3. Select Black and White from the drop-down list. Mac OS X (version 10.3 and higher) driver 1. In the Print dialog box, select Image Quality from the drop-down list. 2.
Printing Separator Pages Printing Separator Pages A separator (a divider page or slipsheet) can be inserted after a print job, between copies of a print job, or between individual pages of a print job. Specify the tray to use as the source for the separator pages. To specify separator pages in a supported driver: Operating System Steps Windows 2000 or later 1. Select the Paper/Output tab. 2. Click the button to the right of the Paper summary and select Separators from the drop-down list. 3.
Printing Cover Pages Printing Cover Pages A cover page is the first or last page of a document. The printer enables you to choose a different paper source for the cover page than for the body of a document. For instance, use your company letterhead for the first page of a document, or use card stock for the first and last pages of a report. ■ ■ Use any applicable paper tray as the source for printing cover pages. Verify that the cover page is the same size as the paper used for the rest of your document.
Printing Cover Pages To select cover pages in a supported driver: Operating System Steps Windows 2000 or later 1. Select the Paper/Output tab. 2. Click the button to the right of the Paper summary and select Covers. 3. Select the cover option and tray to use from the Covers dialog box. Mac OS X (version 10.3 and higher) driver 1. In the Print dialog box, select Paper Feed. 2. Select First page from, and then select the tray to use for the covers. 3.
Scaling Scaling You can reduce or enlarge your page images when they are printed by selecting a scaling value between 25 and 400 percent. The default is 100 percent. 50% 100% 200% To select scaling in a supported driver: Operating System Steps Windows 2000 or later 1. Select the Paper/Output tab. 2. Click the button to the right of the Paper summary and select either Other Size or Advanced Paper Selection. 3. Select an option from the Scale Options drop-down list. 4.
Printing Watermarks Printing Watermarks A watermark is additional text that can be printed across one or more pages. For example, terms like Draft and Confidential, which you might stamp on a page before distribution, can be inserted with a watermark. In some Windows drivers you can: ■ ■ ■ ■ ■ ■ Create a watermark. Edit an existing watermark’s text, color, location, and angle. Place a watermark on either the first page or every page in a document.
Printing Watermarks To select, create, and edit watermarks using a supported Windows driver: Operating System Steps Windows 2000 or later 1. Select the Layout/Watermark tab. ■ To use an existing watermark, select it from the Watermarks drop-down list. ■ To modify the watermark, click the Edit button to display the Watermark Editor dialog box. ■ To create a new watermark, select New, and then use the Watermark Editor dialog box. 2.
Printing Mirror Images Printing Mirror Images You can print pages as a mirror image (flips images horizontally on pages when printed). To select mirror images in a supported driver: Operating System Steps Windows 2000 or later PostScript driver 2. Select Yes for Mirrored Output. 1. Select the Advanced tab.
Creating and Saving Custom Sizes Creating and Saving Custom Sizes Phaser 8560MFP/8860MFP printers can print on custom size paper from Tray 1. You can save custom size paper settings in a supported printer driver. Since these custom sizes are saved in your computer’s operating system, they are available for you to select in your applications. Note: For details about loading and printing custom size paper, see Printing Basics in the User Guide at: ■ ■ www.xerox.
Job Completion Notification Job Completion Notification You can select to be notified when your job is done printing. A message appears in the lowerright corner of your computer screen with the name of the job and the name of the printer where it was printed. Note: This feature is only available when your printer is connected to your computer over a network. To select job completion notification in a supported driver: Operating System Steps Windows 2000 or later 1.
Printing Special Job Types Printing Special Job Types This section includes: ■ ■ ■ ■ ■ ■ Sending Personal, Personal Saved, Secure, Proof, or Saved Print Jobs on page 1-22 Sending Print With Jobs on page 1-23 Printing or Deleting Secure Print Jobs on page 1-24 Printing or Deleting Personal Print Jobs on page 1-24 Printing or Deleting Proof and Saved Print Jobs on page 1-24 Printing or Deleting Personal Saved Jobs on page 1-25 You can select one of the following special job types if your printer has a hard
Printing Special Job Types Sending Personal, Personal Saved, Secure, Proof, or Saved Print Jobs Use a supported driver to specify a job as a personal, personal saved, secure, proof, or saved print job. Operating System Steps Windows 2000 or later 1. Select the Paper/Output tab. 2. Select the job type under Job Type. 3. In the dialog box: ■ For a secure job, enter your four-digit passcode. ■ For a proof print or a shared saved print job, enter the name you want to give this job.
Printing Special Job Types Sending Print With Jobs To select jobs to send with your current job in a supported driver: Operating System Steps Windows 2000 or later 1. Select the Paper/Output tab. 2. Select Print With under Job Type. 3. In the Print With dialog box, select a personal saved or shared saved job from the list on the left to be printed with the current job, and then click the Add button to add it to the Final Job list on the right. 4.
Printing Special Job Types Printing or Deleting Secure Print Jobs To print or delete a secure print job, specify the four-digit password on the control panel: 1. 2. 3. 4. Select Walk-Up Features, and then press the OK button. Select Secure Print Jobs, and then press the OK button. Scroll to your User Name, and then press the OK button. Scroll to the correct number for the first digit of the numeric password, and then press the OK button to accept that digit. 5.
Printing Special Job Types Printing or Deleting Personal Saved Jobs To print or delete a personal saved print job, select the job name on the control panel: 1. 2. 3. 4. Select Walk-Up Features, and then press the OK button. Select Personal Saved Jobs, and then press the OK button. Select your job name, and then press the OK button. Scroll to the correct number for the first digit of the numeric password, and then press the OK button to accept that digit. 5.
Using Fonts This chapter includes: ■ ■ ■ Types of Fonts on page 2-2 Downloading Fonts on page 2-3 Printing Font Samples on page 2-4 Phaser® 8560MFP/8860MFP Multifunction Printer 2-1
Types of Fonts Types of Fonts Your printer uses the following types of fonts: ■ ■ ■ ■ Resident fonts Fonts downloaded to the hard drive Fonts downloaded into printer memory Fonts downloaded with your print job from the application Adobe Type Manager (ATM) software enables your computer to display these fonts on your computer screen as they will appear in your prints. If you do not have ATM on your computer: 1. Install it from the Software and Documentation CD-ROM. 2.
Downloading Fonts Downloading Fonts To supplement the resident fonts (which are always available for printing), you can download fonts from your computer to the printer’s memory or to the printer’s hard drive. Downloading fonts to a printer can improve printing performance and reduce network traffic. You can list, print, and download PostScript, PCL, and TrueType fonts to your printer using the CentreWare Font Management Utility.
Printing Font Samples Printing Font Samples This section includes: ■ ■ Using the Control Panel on page 2-4 Using CentreWare IS on page 2-4 Use one of the following options to print a list of available PostScript or PCL fonts: ■ ■ ■ The printer’s control panel CentreWare IS The printer driver Using the Control Panel To print either a PostScript or PCL font list on the control panel: 1. 2. 3. 4. Press the System button. Select Information, and then press the OK button.
Networking This chapter includes: ■ ■ ■ ■ Printer Management Software on page 3-2 Windows 2000 or Later on page 3-4 Macintosh on page 3-11 UNIX (Linux) on page 3-15 This chapter provides detailed information for the system administrator. Additional information about print quality, maintenance, and troubleshooting issues is located in the User Guide. See also: User Guide at: ■ www.xerox.com/office/8560MFPsupport (Phaser 8560MFP Printer) ■ www.xerox.
Printer Management Software Printer Management Software This section includes: ■ ■ CentreWare Internet Services (IS) on page 3-2 CentreWare Web on page 3-3 CentreWare Internet Services (IS) CentreWare IS provides a simple interface that enables you to manage, configure, and monitor networked printers from your desktop using an embedded web server. CentreWare IS gives administrators easy access to printer status, configuration, and diagnostic functions.
Printer Management Software CentreWare Web CentreWare Web is a multi-vendor printer management, installation, and troubleshooting application. Use CentreWare Web to remotely manage, install, and troubleshoot printers on your network using a web browser. Printers are found through network or print server discovery and managed over TCP/IP networks using RFC-1759 SNMP (Simple Network Management Protocol).
Windows 2000 or Later Windows 2000 or Later This section includes: ■ ■ ■ ■ ■ Preliminary Steps on page 3-4 Quick CD-ROM Install Steps on page 3-4 Other Methods of Installation on page 3-5 Windows 64-Bit Server to 32-Bit Client Installation on page 3-8 Windows 2000 or Later Troubleshooting on page 3-9 Preliminary Steps These preliminary steps must be performed for all printers: 1. Verify that the printer is plugged in, turned On, and connected to an active network. 2.
Windows 2000 or Later Other Methods of Installation Your printer can also be installed on a Windows 2000 or later network using one of these methods: ■ ■ Microsoft TCP/IP Protocol Microsoft IPP Port To monitor or configure your printer, use CentreWare IS with a web browser if your printer is connected to a Windows 2000 or later network with the TCP/IP protocol enabled. Note: The CentreWare methods are not discussed in this section.
Windows 2000 or Later 7. Enter the IP Address of the printer you want to use in the Printer Name or IP Address edit box. Click Next. 8. Select one of these options: ■ Click Finish in the Confirmation window if the data is correct. ■ Click the Back button to correct the data if it is incorrect, and then click Finish in the Confirmation window. Configuring the Printer To configure the printer: 1. Insert the Software and Documentation CD-ROM into the computer’s CD-ROM drive and click Have Disk. 2.
Windows 2000 or Later Microsoft IPP Port Follow these steps to obtain the printer’s URL and create an Internet Printing Protocol (IPP) printer. Obtaining the Printer’s URL (Network Path) To obtain the printer’s URL: 1. 2. 3. 4. 5. Launch your web browser. Enter your printer's IP address in the browser’s Address field. Select Properties. Select the Protocols folder on the left navigation panel. Select IPP. The Network Path field on the IPP Settings page displays the printer’s URL.
Windows 2000 or Later Windows 64-Bit Server to 32-Bit Client Installation To install from a 64-Bit Server in Windows XP and Windows Server 2003: 1. Locate and install the 64-bit Windows driver from the Software and Documentation CD-ROM. 2. Right-click on My Computer, and then select Manage. 3. Expand Local Users and Groups, and then double-click the Groups folder. 4. Double-click on Administrators, and then click the Add button. 5. Type the 32-bit client’s login name, and then click OK.
Windows 2000 or Later Windows 2000 or Later Troubleshooting Note: For Windows XP, select Classic Look or the Windows XP procedures will not match the steps below. To select Classic Look, click Start, click Settings, and then Taskbar and Start Menu. Select the Start Menu tab, and then select Classic Start menu. Click OK. This Troubleshooting section assumes you have completed the following tasks: ■ ■ Loaded a Phaser printer PCL or PostScript printer driver.
Windows 2000 or Later Printing a Test Page To print a test page: 1. Select the General tab. 2. Click Print Test Page. If the printer does not print, select PhaserSMART Technical Support on the Troubleshooting tab of your Windows printer driver to access PhaserSMART Technical Support. See also: Online Support Assistant at: ■ www.xerox.com/office/8560MFPsupport (Phaser 8560MFP Printer) ■ www.xerox.
Macintosh Macintosh This section includes: ■ ■ ■ ■ Requirements on page 3-11 Quick CD-ROM Install Steps on page 3-11 Enabling or Using TCP/IP or AppleTalk for Mac OS X, Version 10.3 and Higher on page 3-12 Macintosh Troubleshooting (Mac OS X, Version 10.3 and Higher) on page 3-14 Requirements ■ ■ ■ A workstation with the appropriate printer driver installed. A working knowledge of the operating system (Mac OS X, version 10.3 or higher) being used on the workstation.
Macintosh Enabling or Using TCP/IP or AppleTalk for Mac OS X, Version 10.3 and Higher Verify that you are running Mac OS X, version 10.3 or higher. The previous versions of Mac OS X do not fully support PostScript printing and printer features. Setting Up the Macintosh Ethernet Port for TCP/IP To set up your Macintosh for TCP/IP: 1. Select Network from the System Preferences application. 2. Select Built-In Ethernet from the Show menu. 3.
Macintosh Creating an AppleTalk Printer with Mac OS X, Version 10.3 and Higher To create an AppleTalk printer: 1. Verify that AppleTalk is enabled in System Preferences. 2. Open the Print Center utility. In Mac OS X, version 10.3 or higher, open the Printer Setup Utility. The utility is located in a directory called Utilities in the Applications directory. 3. Select Add Printer, and then select AppleTalk from the pull-down list. 4. Select the appropriate zone. 5. Select your printer from the list provided.
Macintosh Macintosh Troubleshooting (Mac OS X, Version 10.3 and Higher) The following procedure eliminates cabling, communication, and connection problems. Once you complete these steps, print a test page from your software application. Note: If the job prints, no further printer troubleshooting is necessary. If there are print-quality problems, see the User Guide at: ■ ■ www.xerox.com/office/8560MFPsupport (Phaser 8560MFP Printer) www.xerox.
UNIX (Linux) UNIX (Linux) Your printer supports connection to a variety of UNIX platforms through the parallel and network interface. The workstations currently supported by CentreWare for UNIX/Linux to a network-connected printer are: ■ ■ ■ ■ ■ ■ ■ Sun Solaris IBM AIX Hewlett-Packard HP-UX DEC UNIX Linux (i386) Linux (PPC) SGI IRIX The following procedures enable you to connect your printer using any of the supported versions of UNIX or Linux listed above.
UNIX (Linux) From Your Computer To install the printer: 1. Go to www.xerox.com/office/8560MFPdrivers or www.xerox.com/office/ 8860MFPdrivers. 2. Select Unix from the Operating System drop-down menu, and then click Go. 3. From the list of files provided, click the Printer Package for use with CentreWare for Unix link. The File Download screen appears displaying information about the download file. 4. Click the Start button to install the Unix driver. 5.
. Managing Your Printer This chapter includes: ■ ■ ■ Printer Settings on page 4-2 Printer Security on page 4-15 Analyzing Printer Usage on page 4-18 Phaser® 8560MFP/8860MFP Multifunction Printer 4-1
Printer Settings Printer Settings This section includes: ■ ■ Printer Security on page 4-15 Paper Tray Settings on page 4-9 Printer Control Settings This section includes: ■ ■ ■ ■ ■ ■ ■ Setting the Control Panel Language on page 4-2 Setting Control Panel Accessibility Behavior on page 4-3 Setting the Printer Date and Time on page 4-4 Controlling Startup Page Printing on page 4-5 Changing the Power Saver Timeout on page 4-6 Changing Intelligent Ready Mode on page 4-7 Viewing Supply Usage Information on pa
Printer Settings Using CentreWare IS To change the default control panel language using CentreWare IS: 1. 2. 3. 4. 5. Launch your web browser. Enter your printer’s IP address in the browser’s Address field. Click Properties. Select the General folder on the left sidebar, and then select System Defaults. In the User Preferences area, select the language from the Set Control Panel Language drop-down list. 6. Click the Save Changes button at the bottom of the screen.
Printer Settings Setting the Printer Date and Time Some printer features, like Scheduled Warmup mode and Job Accounting, rely on the printer date and time settings to initiate functions and report usage information. To change the printer date and time, use one of the following options: ■ ■ The printer’s control panel CentreWare IS Using the Control Panel To change the printer’s date and time setting on the control panel: 1. 2. 3. 4. Press the System button.
Printer Settings Controlling Startup Page Printing The printer can produce a Startup page each time the printer is turned on or reset. The factory default is On. You can print the Startup page at any time from the Information Pages menu. To turn on/off automatic printing of the Startup page, use one of the following options: ■ ■ The printer’s control panel CentreWare IS Using the Control Panel To turn on/off automatic printing of the Startup page on the control panel: 1. 2. 3. 4. 5.
Printer Settings Changing the Power Saver Timeout To save energy, the printer enters a Power Saver, low-energy consumption mode after a predefined period of time since its last activity. In this mode, most electrical systems are shut down. When a job is sent to the printer, the printer enters Warmup mode. You can also warm up the printer by pressing the OK button on the control panel.
Printer Settings Changing Intelligent Ready Mode Intelligent Ready mode is an automated system that: ■ ■ ■ Monitors the printer’s usage. Warms up the printer when you are most likely to need it based on past usage patterns. Activates the Power Saver mode when the printer times out. To turn on/off the Intelligent Ready mode, use one of the following options: ■ ■ The printer’s control panel CentreWare IS Using the Control Panel To turn Intelligent Ready mode on/off on the control panel: 1. 2. 3. 4. 5.
Printer Settings Viewing Supply Usage Information The printer detects the status of certain supplies and consumables, such as ink, maintenance kit, and the number of pages printed. To view the status of supplies, use one of the following options: ■ ■ The printer’s control panel CentreWare IS Using the Control Panel To view supply status information on the control panel: 1. 2. 3. 4. Press the System button. Select Information, and then press the OK button.
Printer Settings Paper Tray Settings This section includes: ■ ■ ■ ■ ■ ■ Selecting Tray 1 Mode on page 4-9 Setting the Duration for the Tray 1 Prompt on page 4-11 Selecting Tray 2-N Mode on page 4-12 Setting the Duration for the Tray 2–N Prompt on page 4-13 Changing the Load Paper Timeout on page 4-14 Printer Security on page 4-15 Note: For information about selecting options for specific copy, scan, and fax functions, see Copying, Scanning, or Faxing in the User Guide at: ■ ■ www.xerox.
Printer Settings Using the Control Panel To select a Tray 1 mode setting on the control panel: 1. 2. 3. 4. Press the System button. Select Paper Tray Setup, and then press the OK button. Select Tray 1 Mode, and then press the OK button. Select the appropriate setting, and then press the OK button. Using CentreWare IS To select a Tray 1 mode setting using CentreWare IS: 1. 2. 3. 4. 5. 6. Launch your web browser. Enter the printer’s IP address in the browser’s Address field. Click Properties.
Printer Settings Setting the Duration for the Tray 1 Prompt The Tray 1 prompt setting specifies the amount of time the prompt displays on the control panel after paper is loaded in the tray. The Tray 1 prompt requests that the user confirm the current tray setup or specify the correct paper type and size for the print job. Duration Behavior None (Factory default setting) Turns the tray setup prompt off. 30 Seconds Displays the tray setup prompt for 30 seconds after paper is loaded in Tray 1.
Printer Settings Selecting Tray 2-N Mode The Tray 2-N Mode setting specifies: ■ How Tray 2-N paper type and size are determined when you load paper in the tray but do not select the paper type and size on the control panel. Setting Description Dynamic ■ Uses the settings from the next print job that prints from Tray 2-N to determine the paper size and type. ■ The paper size and type already set for Tray 2-N stay in effect.
Printer Settings Setting the Duration for the Tray 2–N Prompt The Tray 2–N prompt setting specifies the amount of time the prompt displays on the control panel after paper is loaded in Trays 2–N. The Tray 2–N prompt requests the user to confirm the current tray setup or to specify the correct paper type for the print job. Setting Behavior None (Default) Turns the tray setup prompt off. 30 seconds Displays the tray setup prompt for 30 seconds after paper is loaded in Trays 2–N.
Printer Settings Changing the Load Paper Timeout When your print job is formatted for a type or size of paper that is not loaded in the printer, the printer’s control panel displays a message requesting you to load the appropriate paper. The Load Paper Timeout value controls the amount of time the printer waits before printing on another type or size of paper.
Printer Security Printer Security This section includes: ■ ■ ■ ■ ■ ■ Selecting Administrative Settings on page 4-15 Selecting Printing Security Settings on page 4-16 Configuring HTTPS on page 4-16 Managing Certificates on page 4-16 Configuring 802.
Printer Security Selecting Printing Security Settings Printing security settings enable you to: ■ ■ ■ Remove unprinted secure, personal, and proof jobs. Overwrite hard drive security options. Select jam recovery options. To set printing security settings: 1. 2. 3. 4. Launch your web browser. Enter your printer’s IP address in the browser’s Address field. Click Properties. Select the Security folder on the left navigation panel, and then select Printing Security Settings. 5.
Printer Security Configuring 802.1X Configure 802.1X authentication settings on the printer web server: 1. 2. 3. 4. 5. Launch your web browser. Enter your printer’s IP address in the browser’s Address field. Click Properties. Select the Security folder on the left navigation panel, and then select 802.1X. Either click the Advanced button to display the 802.1X Advanced Configuration page, or click the Configuration Wizard button to display a series of pages that guide you through 802.1X configuration.
Analyzing Printer Usage Analyzing Printer Usage This section includes: ■ ■ ■ ■ Job Accounting on page 4-18 Usage Profile Reports on page 4-19 MaiLinX Alerts on page 4-20 Xerox Usage Analysis Tool on page 4-20 Note: For information about managing transmission report options, secure faxes, and printing fax reports, see Faxing in the User Guide at: ■ ■ www.xerox.com/office/8560MFPsupport (Phaser 8560MFP Printer) www.xerox.
Analyzing Printer Usage Usage Profile Reports The printer generates reports accessible through CentreWare IS that detail device usage. Usage profile reports track multiple items, including: ■ ■ ■ ■ Printer information, such as printer name, date installed, total pages printed, options installed, and network ID. Supplies usage data, such as toner or ink. By tracking supplies usage, you can order supplies before they reach their end of life.
Analyzing Printer Usage MaiLinX Alerts MaiLinX alerts enable the printer to automatically send email to the system administrator and others under the following conditions: ■ ■ ■ When printer errors, warnings, and alerts occur. When the printer requires attention (for example, when service is required or supplies need to be replenished). When a reply to a CentreWare IS Remote Internet Printing message is desired.
Printer Specifications Physical Specifications Base Unit ■ ■ ■ ■ Width: 532 mm (20.9 in.) Depth: 665 mm (26.2 in.) Height: 620 mm (24.4 in.) Weight: 43 kg (93 lb.) Optional 525-Sheet Feeder Height: 135 mm (5.3 in.) Optional Cart ■ ■ ■ Width: 500 mm (19.7 in.) Depth: 670 mm (27 in.) Height: 360 mm (14.2 in.
Environmental Specifications Temperature ■ Storage: -30o to 60o C / -22o to 140o F ■ Operating: 10o to 32o C / 50o to 90o F Relative Humidity ■ ■ Storage: 10% to 95% (non-condensing) Operating: 10% to 80% (non-condensing) Electrical Specifications: The Phaser 8560MFP has four configurations: 8560MFP/N, 8560MFP/D, 8560MFP/T, and 8560MFP/X. The Phaser 8860MFP has one configuration: 8860MFP. ■ 100-240 VAC, 50-60 Hz ENERGY STAR qualified printer (S configuration).
Controller Specifications 800 MHz processor Memory ■ ■ 512 MB RAM Upgradable to a maximum of 1 GB Page Description Languages (PDL) ■ ■ ■ PCL5c Adobe PostScript 3 Adobe PDF-Direct Residential Fonts ■ ■ 139 PostScript Type 1 81 PCL5c Interfaces ■ ■ Ethernet 10/100 Base Tx Universal Serial Bus (USB 2.
Regulatory Information Xerox has tested this product to electromagnetic emission and immunity standards. These standards are designed to mitigate interference caused or received by this product in a typical office environment. United States (FCC Regulations) This equipment has been tested and found to comply with the limits for a Class A digital device, pursuant to Part 15 of the FCC Rules.
European Union Warning: This is a class A product. In a domestic environment this product may cause radio interference in which case the user may be required to take adequate measures.
Product Recycling and Disposal All Countries If you are managing the disposal of your Xerox product, please note that the product contains lamp(s) with mercury, and may contain lead, perchlorate, and other materials whose disposal may be regulated due to environmental considerations. The presence of these materials is fully consistent with global regulations applicable at the time that the product was placed on the market. For recycling and disposal information, contact your local authorities.
Professional/Business Environment Application of this symbol on your equipment is confirmation that you must dispose of this equipment in compliance with agreed national procedures. In accordance with European legislation, end of life electrical and electronic equipment subject to disposal must be managed within agreed procedures. Prior to disposal, please contact your local dealer or Xerox representative for end of life takeback information.
Index Numerics 2-sided printing booklets, 1-5 64-bit to 32-bit installation Windows XP and Windows Server 2003, 3-8 802.1X configuring, 4-17 A accessing online manuals using CentreWare IS, 3-2 accounting records, 4-18 adding the printer Windows 2000 or later, 3-5 administrative security settings selecting, 4-15 analyzing printer usage, 4-18 AppleTalk creating a printer Mac OS X, version 10.3 and higher, 3-13 enabling and using TCP/IP Mac OS X, version 10.
Index control panel changing Intelligent Ready mode, 4-7 load paper timeout mode, 4-14 power saver timeout setting, 4-6 locking menus, 4-17 printing a font list, 2-4 selecting settings for copy jobs, 4-2, 4-9 selecting settings for fax jobs, 4-2, 4-9 selecting settings for scan jobs, 4-2, 4-9 setting control panel language, 4-2 date and time, 4-4 duration for tray prompts, 4-11 Tray 1 mode, 4-10 Tray 2-n mode, 4-12 controller specifications, A-3 copy function selecting control panel settings, 4-2 selecting
Index I images flip horizontally on the page (mirror image), 1-18 printing mirror images, 1-18 reducing or enlarging, 1-15 reversing the light and dark areas, 1-18 Intelligent Ready mode, 4-7 J job accounting, 4-18 CentreWare IS job accounting, 4-18 characteristics job size, 4-19 completion notification, 1-20 information how often each tray is used, 4-19 how often prints are made on paper compared to transparencies, 4-19 log file, 4-18 records, 4-18 special job types, 1-21 usage profile reports, 4-19 job
Index P paper inserting blank sheets between print jobs, 1-12 selecting a different paper source for cover sheets, 1-13 separation pages, 1-12 paper handling for copy, scan, and fax jobs, 4-9 paper type selecting, 1-3 performance specifications, A-2 personal print jobs, 1-2, 1-21 deleting, 1-24 printing, 1-22 sending, 1-22 personal saved jobs deleting, 1-25 printing, 1-25 sending, 1-22 physical specifications, A-1 power saver changing the timeout setting using CentreWare IS, 4-6 changing the timeout settin
Index selecting cover page printing options, 1-13 separation pages, 1-12 Startup page, 4-5 test pages Windows 2000 or later, 3-10 usage profile reports, 4-19 watermarks, 1-16 proof jobs sending, 1-22 proof print jobs, 1-2, 1-21 deleting, 1-24 printing, 1-24 sending, 1-22 Q quick CD-ROM install steps Macintosh, 3-11 Windows 2000 or later, 3-4 R recycling and disposing product, C-1 reduce images, 1-15 regulatory information Canada, B-1 Europe, B-2 United States, B-1 reports usage profile, 4-19 S saved prin
Index Startup page factory default setting, 4-5 setting the automatic printing option, 4-5 status notification mail alerts, 4-20 printer, 4-20 supplies setting supply life message options, 4-8 supply life messages, 4-8 setting options, 4-8 U Unix networking quick install, 3-15 Usage Analysis Tool, 4-20 usage profile reports, 4-19 using the printer analyzing printer usage, 4-18 V verifying settings Windows 2000 or later, 3-9 T TCP/IP protocol enabling and using Mac OS X, version 10.