Phaser® 7750 Color Laser Printer Basic Printing This topic includes: ■ ■ ■ ■ "Loading Paper in Tray 1 (MPT)" on page 2-11 "Loading Paper in Trays 2-5" on page 2-16 "Using the Stapler" on page 2-24 "Factors Affecting Printer Performance" on page 2-29 Follow these steps to print jobs: 1. Load paper in the tray. 2. Adjust the tray guides. 3. If prompted by the front panel, confirm the paper type and/or size and change it as required. 4. Select File/Print to adjust the printing options in the printer driver.
Basic Printing 1. Lower Tray 1 (MPT). 7750-041 2. Adjust the paper guides to the size of the paper. The arrow on the width guide, displayed in the following graphic, must line up with one of three positions identified on the labeled area next to the width guide. Push firmly to move the width guide so that the arrow points to the correct position for the paper size you are using: ■ ■ ■ SRA3 (displayed in a black field): Do not use this setting for custom size printing.
Basic Printing 3. Fan the paper to release sheets that may stick together. 7750-087 4. Insert the paper or transparencies into the tray either long-edge feed or short-edge feed. If necessary, adjust the paper guides to the size of the paper. Long-Edge Feed MAX 7750-149 ■ ■ ■ ■ Place Letter, A4, A6, B5 JIS, Statement, and Executive paper long-edge feed in Tray 1 (MPT). Do not load paper above the fill line. Place the side to be printed facedown.
Basic Printing Short-Edge Feed MAX 7750-150 ■ ■ ■ ■ Place Legal, Tabloid, Tabloid Extra, A3, A5, US Folio, B4 JIS, and SRA3 paper short-edge feed in Tray 1 (MPT). Do not load paper above the fill line. Place the side to be printed facedown. Place pre-punched paper with the holes toward the back of the printer. Place letterhead (or the top of the page) to enter the printer last. 7750-101 Note Do not load paper above the fill line inside the tray. Selecting Front Panel Settings 1.
Basic Printing Tray 1 (MPT) Paper Path The following graphic displays the printer’s paper path: 7750-121 Phaser® 7750 Color Laser Printer 2-15
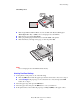
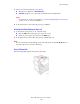
Basic Printing Loading Paper in Trays 2-5 For more information on paper types, weights, and sizes, go to Reference/Printing/Supported Papers on the User Documentation CD-ROM. Caution If you change the type of paper in a tray, you must change the paper type on the front panel to match the paper that you loaded. If you fail to do this, printquality problems can occur and the fuser can be damaged. Phaser 7750 7750-037 1. Pull out the tray. 7750-035 2.
Basic Printing 3. Fan the paper to release sheets that may stick together. 7750-087 M AX 4. Insert paper or transparencies into the tray either long-edge feed or short-edge feed. 7750-044 Long-Edge Feed 7750-151 ■ ■ Place Letter, A4, and B5 JIS paper long-edge feed into the tray. Place the side to be printed faceup.
Basic Printing ■ ■ Place pre-punched paper with the holes toward the right side of the tray. Place letterhead (or the top of the page) toward the front of the tray. 7750-119 Short-Edge Feed ■ ■ ■ ■ Place Legal, Tabloid, A3, A5, B4 JIS, US Folio, and Statement paper short-edge feed into the tray. Place the side to be printed faceup. Place pre-punched paper with the holes toward the front of the tray. Place letterhead (or top of the page) toward the left side of the tray.
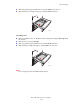
Basic Printing 5. If necessary, adjust the paper guides to the size of the paper. Adjust the paper guides according the paper size and orientation (long-edge feed or shortedge feed). Labels inside the paper tray provide additional information for loading paper according to size and orientation. 7750-092 6. Push the tray completely into the printer. 7750-014 Selecting Front Panel Settings for Tray 2 1.
Basic Printing 3. Select one of the following paper size options: ■ The paper size displayed or Auto-Sensed ■ Custom: Requires you to select custom width and custom height values. Note For information on custom size printing, go to Reference/Printing/Custom Size Paper on the User Documentation CD-ROM. 4. In the printer driver, select either the paper type or Tray 2. Selecting Front Panel Settings for Trays 3-5 1.
Basic Printing Automatic 2-Sided Printing in Trays 2-5 1. Place paper in Trays 2, 3, 4, or 5. Long-Edge Feed ■ ■ ■ ■ Place Letter, A4, and B5 JIS paper long-edge feed into the tray. Place the side to be printed facedown. Place pre-punched paper with the holes toward the left side of the tray. Place letterhead (or the top of the page) toward the front of the tray. 7750-141 Short-Edge Feed ■ ■ ■ ■ Place Legal, Tabloid, A3, A5, B4 JIS, US Folio, and Statement paper short-edge feed into the tray.
Basic Printing 2. If necessary, adjust the paper guides to the size of the paper. 7750-016 3. Push the tray completely into the printer. 7750-014 Selecting Front Panel Settings Tray 2 1. At the printer’s front panel, do one of the following: ■ Press the OK button if both the paper type and size selected are correct. Go to Step 4. ■ Select Change if the paper type or size selected is not correct, then press the OK button. Go to Step 2. 2. Select the paper type, then press the OK button.
Basic Printing 3. Select one of the following paper size options: ■ The paper size displayed or Auto-Sensed ■ Custom: Requires you to select custom width and custom height values. Note For information on custom size printing, go to Reference/Printing/Custom Size Paper on the User Documentation CD-ROM. 4. In the printer driver, select either the paper type or Tray 2. Trays 3-5 1. At the printer’s front panel, do one of the following: ■ Press the OK button if the paper type selected is correct.
Basic Printing Using the Stapler The optional Finisher can staple up to 50 sheets of paper. Once the print job is stapled, it is delivered to the Finisher Output Tray. The stapler holds 5000 staples. Note The printer cannot staple paper fed from Tray 1 (MPT). ■ ■ ■ ■ ■ If output sheets are sent to the stapler unit, but the sheet count exceeds 50, the sheets are sent to the Finisher Output Tray without being stapled.
Basic Printing Use the following table to determine the position of the staples: Stapling Paper Feed Direction Orientation Long-Edge Feed Front Short-Edge Feed Portrait A A Landscape A Rear A Portrait A A Landscape A Dual * A Portrait A A Landscape A * Paper size must be Letter, A4, B4 JIS, B5 JIS, A3, or Tabloid.
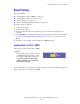
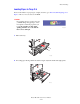
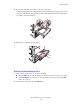
Basic Printing Adding Staples 1. Open Finisher Door J. 7750-067 2. Pull the staple cartridge to the front of the finisher. 7750-068 3. Remove the staple cartridge by lifting the gold handle.
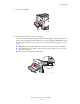
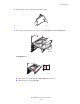
Basic Printing 4. Press the sides of the staple cartridge together where you see the word “Push” then lift the part of the staple cartridge that is released. PU SH PU SH 7750-070 5. Remove the empty cartridge from the staple cartridge. PU SH 7750-112 6. Slide a new set of staples into the cartridge and pull the tab to release the packaging.
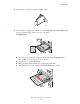
Basic Printing 7. Push down the top of the staple cartridge until it clicks into place. PUS H 7750-072a 8. Replace the staple cartridge in the printer. 7750-073 9. Close Finisher Door J.
Basic Printing Factors Affecting Printer Performance Many factors affect a print job. They include the print speed (stated in number of pages per minute), the media used, download time, and printer processing time.