
User guide


Faxing
Phaser 6121MFP Multifunction Printer
User Guide
117
Sending a Fax from the Document Glass
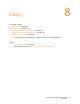
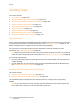
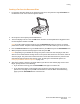
1. Lift the auto document feeder or the document glass cover, then place the original facedown on
the back-left corner of the document glass as shown:
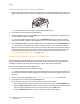
2. On the printer control panel, press the Fax button.
3. The menu displays “Fax To.” Press the OK button and then use the alphanumeric keypad to enter
the fax telephone number. Press OK.
Note: If the fax number requires a pause, press the Redial/Pause button to insert a 2.5-second
pause where needed. The pause entered displays as a “P” in the fax number you see in the menu.
4. Press the Down Arrow button to go to Finish and then press OK, then press the Start/B&W button.
5. When prompted, select the desired page size and then press OK.
Note: Depending on your default fax settings, the printer either first scans the pages, dials, and
waits for a connection before sending the fax, or the printer dials, waits for a connection, and then
scans the pages. The printer then transmits the fax. The fax transmission status is printed on the
confirmation page that prints after the fax is sent. To change fax send default options, see
Changing the Default Fax Send Options on page 123.
6. After the first page is scanned, you will be asked if you want to scan another page. At the “Next
Page?” prompt, do one of the following:
• If you are done scanning, press the Start/B&W button again to send the fax.
• If you have more pages to scan and fax, open the printer cover and turn the page over or
position the next page, then press OK. The document is scanned. When finished scanning
pages, press the Start/B&W button to send the fax.
6121-074