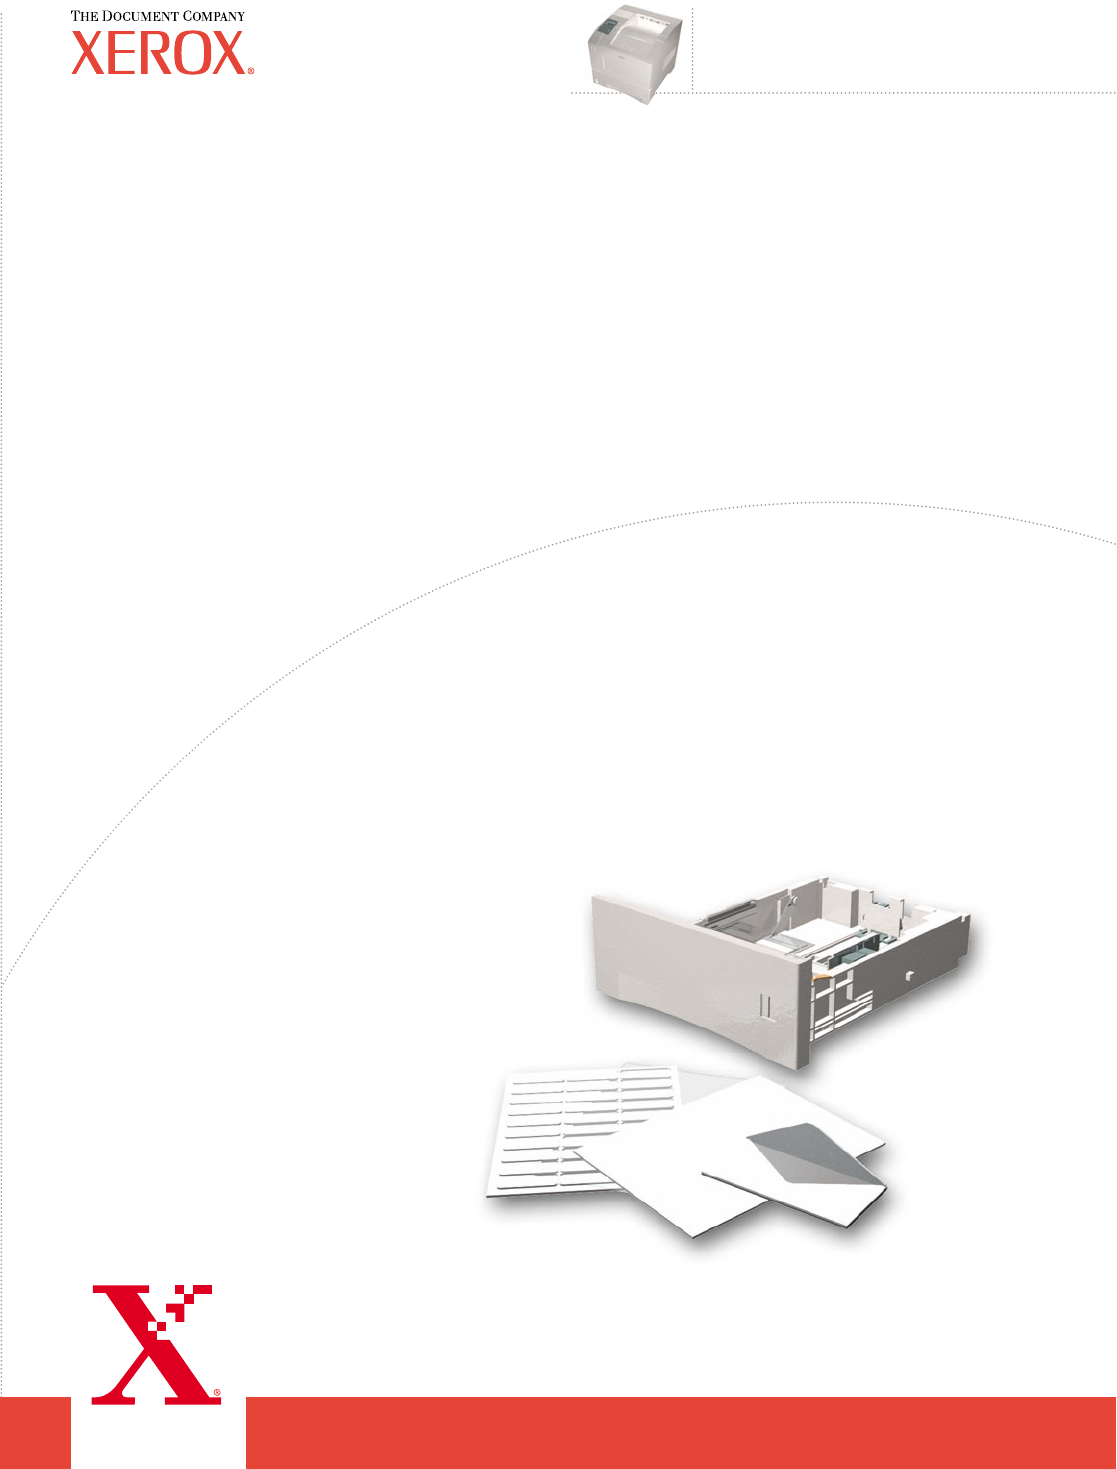
4400 Phaser Laser Printer ™ Trays and Paper Guide
Copyright © 2002, Xerox Corporation. All Rights Reserved. Unpublished rights reserved under the copyright laws of the United States. Contents of this publication may not be reproduced in any form without permission of Xerox Corporation.
Contents Supported Papers . . . . . . . . . . . . . . . . . . . . . . . . . . . . . . . . . . . . . . . . . . . . . 1 Trays. . . . . . . . . . . . . . . . . . . . . . . . . . . . . . . . . . . . . . . . . . . . . . . . . . . . . . . . 2 Loading paper in Tray 1, 2, or 3 . . . . . . . . . . . . . . . . . . . . . . . . . . . . . . . . . . . . . . . . . . . . . 3 Loading paper in the Multi-Purpose Tray. . . . . . . . . . . . . . . . . . . . . . . . . . . . . . . . . . . . . .
Phaser™ 4400 Laser Printer Supported Papers A large amount of information is stored in your printer as printable pages. The following pages show the Paper Tips printable page, which provides information on the supported papers. P4400-77 All the printable pages have this format, with bars at the top and at the bottom of the page. Print these pages at the printer’s front panel. Accessing the Paper Tips page Access the Paper Tips page from the Printable Pages Menu: 1.
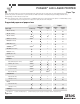
TM PHASER 4400 LASER PRINTER Paper Tips Refer to the following tables to ensure the best print-quality and to avoid paper jams. For best results, use Xerox-branded paper as it is guaranteed to produce excellent results on your Xerox PhaserTM 4400 Laser Printer. Print-quality and paper handling performance may vary depending on vendor and type of paper used. Note: If you change the type of paper or transparencies, you must specify the type on the front panel of the printer.
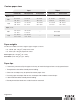
Custom paper sizes Input 550-Sheet Tray Multi-Purpose Tray Output Envelope Feeder Standard Tray 500-Sheet Stacker Simplex (one-sided) Width 98 - 216 mm 3.87 - 8.5 in. 76 - 216 mm 3.0 - 8.5 in. 98 - 178 mm 3.87 - 7.0 in. 76 - 216 mm 3.0 - 8.5 in. 98 - 216 mm 3.87 - 8.5 in. Length 148 - 356 mm 5.83 - 14.0 in. 127 - 356 mm 5.0 - 14.0 in. 148 - 254 mm 5.83 - 10.0 in. 127 - 356 mm 5.0 - 14.0 in. 148 - 356 mm 5.83 - 14.0 in. Width 182 - 216 mm 7.16 - 8.5 in. 182 - 216 mm 7.16 - 8.5 in.
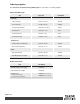
Ordering supplies See www.xerox.com/officeprinting/4400supplies for information on ordering supplies. Xerox Branded Paper Item Paper Size Part Number Xerox Premier 80 A4 (210 x 297 mm) 3R91720 Xerox Premier 80 A5 (148 x 210 mm) 3R91832 Xerox 4024 DP statement Statement (5.5 x 8.5 in.) 3R2072 Xerox 4024 DP Letter (8.5 x 11 in.) 3R721 Xerox 4024 DP folio Folio (8.5 x 13 in.) 3R725 Xerox 4024 DP legal Legal (8.5 x 14 in.
Phaser™ 4400 Laser Printer Trays This section covers: ■ Loading paper in Tray 1, 2, or 3 — see page 3. ■ Loading paper in the Multi-Purpose Tray — see page 7. ■ Loading envelopes in the envelope feeder — see page 10. ■ Loading custom size paper — see page 13. For a list of the acceptable papers, transparencies, envelopes, and labels that can be used in each tray, refer to the Supported Papers section of the Trays and Paper Guide on the Interactive Documentation CD-ROM.
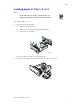
Trays Loading paper in Tray 1, 2, or 3 Note If you change the type of paper or transparencies, you MUST specify the type on the front panel of the printer. To load paper in Tray 1, 2, or 3: 1. Remove the tray from the printer: a. Pull out the tray until it stops. b. Gently remove the tray from the printer while lifting up. c. Place the tray on a flat surface. P4400-011 If you are loading paper of the same size, skip to Step 5. 2.
Trays 3. To load paper longer than 297 mm (11.69 in.), adjust the catch as shown below. There are three settings for the catch. Choose the one that is closest beyond the length of the paper. a. Press the square latch. b. Slide out the back of the tray to fit your paper. a b P4400-14 4. Gently squeeze the side guides and slide them all the way to the sides of the tray. P4400-15 5. To reduce the possibility of misfeeds and jams, fan the stack of paper before inserting it into the tray.
Trays 6. Align the four corners of the paper stack and insert it into the tray, following the simplex and duplex instructions below. P4400-16 Top view of tray: A. Simplex printing, B. Duplex printing B A P4400-17 7. While squeezing the right side of the guides handle, adjust the guides to the paper width. Note To avoid misfeeds and jams, make sure that the stack is placed at the center of the tray and adjust the side guides to the correct size.
Trays 8. When the side guides are aligned, adjust the length guide to the paper length. Note To avoid paper jams or incorrect paper size sensing, make sure the length guide stopper is firmly seated in the floor of the tray. Also, make sure the paper is under the retaining clip on the length guide. P4400-19 9. Insert the tray completely into the printer. Make sure that it is properly seated.
Trays 10. When the front panel prompts you: ■ If you haven’t changed the type of paper, press the OK key to accept the current setting for paper type. ■ If you have changed the type of paper, scroll to the correct paper type and press the OK key to save your selection. P4400-100 Loading paper in the Multi-Purpose Tray Note If you change the type of paper or transparencies, you MUST specify the type on the front panel of the printer. To load paper in the Multi-Purpose Tray: 1.
Trays 2. Extend the Multi-Purpose Tray and adjust the paper guide to fit the media you intend to use. Note To prevent possible jams, be sure to adjust the guides correctly and do not overload the tray. P4400-24 3. To reduce the possibility of misfeeds and jams, fan the stack of paper before inserting it into the tray. 4. Align the four corners of the paper and place it into the tray with the side to be printed facing up.
Trays Top view of Multi-Purpose Tray: A. Simplex printing, B. Duplex printing A B P4400-26 Note If you change the size or type of paper while the front panel displays a Load MPT message, the printer automatically sets the menus to the size and type specified in the message. 5. When the front panel prompts you and you haven’t changed the type or size of paper, press the OK key to accept the current settings for type and size. 6. If you have changed the type or size of paper: a.
Trays Loading envelopes in the envelope feeder The envelope feeder is an optional device for your printer. In addition to feeding envelopes, it can also be used to feed card stock, such as A6 postcards. Note Some envelopes may curl or wrinkle, even with the envelope feeder. For best results, test a few envelopes to determine what works best for you. 1. Pull out the envelope feeder tray, if it is not already extended. P4400-27 2.
Trays 3. Lift the envelope holder and load the envelope feeder with the appropriate size and type of envelopes. ■ Place the side to be printed faceup. ■ The top of the envelopes should be toward the left of the printer. P4400-29 Caution Never use envelopes with windows, metal clasps, or exposed gummed surfaces; they can damage the printer. Damage caused by using unsupported envelopes might not be covered by your printer’s warranty. 4. Lower the envelope holder onto the envelopes.
Trays 6. If the front panel prompts you and you have changed the size or type of envelopes: a. Press the Down Arrow key to scroll to Change Paper Type, then press the OK key. b. Scroll to the correct paper type (usually Envelope) and press the OK key to save your selection. c. Scroll to Change Paper Size, then press the OK key. d. Scroll to the correct envelope size and press the OK key to save your selection.
Trays Loading custom size paper In addition to the wide variety of paper sizes available for this printer, you can use custom size paper. For a list of the acceptable papers, transparencies, envelopes, and labels that can be used in each tray, refer to the Supported Papers section of the Trays and Paper Guide on the Interactive Documentation CD-ROM or print the Paper Tips Page from the front panel of your printer.
Trays g. Press the Down Arrow or Up Arrow key to scroll to the value for X, and then press the OK key. (The X value is the measurement from the left to the right of the paper in the tray.) h. Scroll to Set Custom Y and press the OK key. i. Press the Down Arrow or Up Arrow key to scroll to the value for Y, and then press the OK key. (The Y value is the measurement from the front to the back of the paper in the tray.
Trays Loading custom size paper in the Multi-Purpose Tray 1. Open the Multi-Purpose Tray. 2. Insert the custom size paper and adjust the guides to match the size of the paper. Top view of Multi-Purpose Tray: A. Simplex printing, B. Duplex printing A B P4400-26 3. When the front panel prompts you to confirm the type and size of paper: a. Scroll to Change Paper Type by pressing the Down Arrow key and press the OK key. b. Scroll to the correct paper type and press the OK key to save your selection.
Phaser™ 4400 Laser Printer Specialty Printing This section covers: ■ Automatic 2-sided printing — see page 16. ■ Manual 2-sided printing — see page 19. ■ Transparencies — see page 25. ■ Envelopes — see page 27. ■ Labels — see page 31. For a list of the acceptable papers, transparencies, envelopes, and labels that can be used in each tray, refer to the Supported Papers section of the Trays and Paper Guide on the Interactive Documentation CD-ROM.
Specialty Printing Printing 2-sided pages automatically using Trays 1, 2, or 3 1. Insert a stack of paper into the tray. For more information, refer to the Trays section of the Trays and Paper Guide on the Interactive Documentation CD-ROM. ■ Place the side to be printed with the odd-number pages faceup with the top of the page toward the back of the tray. ■ Prepunched holes should be toward the left of the printer. P4400-80 2. 3. In the printer driver: ■ Select the tray containing the paper.
Specialty Printing 2. 3. In the printer driver: ■ Select the tray containing the paper. ■ Select the orientation. ■ Select 2-sided printing. Refer to the table on page 18 for instructions and the wording used in the printer drivers. Send the job to the printer. Setting the printer driver for 2-sided printing Operating System Driver Macintosh LaserWriter 8.6 or LaserWriter 8.
Specialty Printing Manual 2-sided printing If the printer doesn’t have a duplex unit or if you need to duplex paper sizes or weights outside the duplex unit’s limits, you can still have the printer print on both sides of the paper. However, you must have the printer print all of the odd-numbered pages first, reinsert the printed pages in the tray, then have the printer print the even-numbered pages. You can use Trays 1, 2, or 3 or the Multi-Purpose Tray for manual 2-sided printing.
Specialty Printing 2. In the printer driver: ■ Select the tray containing the paper as the paper source. ■ Do not select the option for 2-sided printing. 3. In the application, select the option to print odd-numbered pages. 4. Send the job to the printer so that the odd-numbered pages are printed. Printing the even-numbered pages 1. Insert the paper printed with the odd-numbered pages into the tray.
Specialty Printing ■ Landscape orientation (short-edge binding): Place the printed side faceup with the top of the page on the left of the tray; (the side to be printed is facedown). P4400-112 2. In the printer driver: ■ Select the tray containing the paper as the paper source. ■ Do not select the option for 2-sided printing. 3. In the application, select the option to print even-numbered pages. 4. Send the job to the printer so that the even-numbered pages are printed.
Specialty Printing Manual 2-sided printing using the Multi-Purpose Tray Printing the odd-numbered pages 1. Insert a stack of paper into the Multi-Purpose Tray. For more information, refer to the Trays section of the Trays and Paper Guide on the Interactive Documentation CD-ROM. The paper can be any size that the Multi-Purpose tray accepts. For more information, refer to the Supported Papers section of the Trays and Paper Guide on the Interactive Documentation CDROM.
Specialty Printing Printing the even-numbered pages 1. Insert the paper printed with the odd-numbered pages into the Multi-Purpose Tray. If the print job has an odd number of pages, do not place the last odd-numbered page back into the Multi-Purpose Tray. ■ Portrait orientation (long-edge binding): Place the printed side facedown with the top of the page entering the printer first; (the side to be printed is faceup). Prepunched holes should be toward the right of the printer.
Specialty Printing ■ Landscape orientation (short-edge binding): Place the printed side facedown with the top of the page on the left; (the side to be printed is faceup). P4400-107 2. 3. 4. In the printer driver: ■ Select Multi-Purpose Tray as the paper source. ■ Do not select the option for 2-sided printing. In the application: ■ Select the option to print even-numbered pages. ■ Select the option to print pages in reverse order.
Specialty Printing Transparencies Transparencies can be printed from Tray 1, 2, or 3 or the Multi-Purpose Tray. Handle transparencies by the edges and with both hands to avoid fingerprints and creases, which can cause poor print quality. Videos are available with instructions for loading transparencies. Videos are located on the Interactive Documentation CD-ROM and on the Xerox web site at: www.xerox.
Specialty Printing Printing transparencies from the Multi-Purpose Tray 1. Insert the transparencies into the Multi-Purpose Tray (maximum capacity is 100 sheets). For more information, refer to the Trays section of the Trays and Paper Guide on the Interactive Documentation CD-ROM. ■ Don’t load transparencies above the indicated mark on the Multi-Purpose Tray. P4400-86 2. 3. When the front panel prompts you to confirm or change the paper type and size: a.
Specialty Printing Envelopes Envelopes can be printed from the optional envelope feeder, the Multi-Purpose Tray, or Tray 1, 2, or 3. Note Some envelopes may curl or wrinkle, even with the envelope feeder. For best results, test a few envelopes to determine what works best for you. Guidelines for envelope printing ■ Use only paper envelopes. ■ Do not print on the back of the envelope. ■ Never use envelopes with windows, metal clasps, or exposed gummed surfaces.
Specialty Printing Printing envelopes from the envelope feeder 1. Insert the envelopes into the envelope feeder. For more information, refer to the Trays section of the Trays and Paper Guide on the Interactive Documentation CD-ROM. ■ Place the side to be printed faceup. ■ The top of the envelopes should be toward the left of the printer. P4400-30 2. When the front panel prompts you to confirm or change the paper type and size: a.
Specialty Printing Printing envelopes from the Tray 1, 2, or 3 1. Insert the envelopes into the tray. For more information, refer to the Trays section of the Trays and Paper Guide on the Interactive Documentation CD-ROM. ■ Place the side to be printed facedown. ■ The top of the envelopes should be toward the left of the printer. x y P4400-82 2. When the front panel prompts you to set the paper type, scroll to Envelope and press the OK key to save your selection. 3.
Specialty Printing Printing envelopes from the Multi-Purpose Tray 1. Insert the envelopes into the Multi-Purpose Tray. For more information, refer to the Trays section of the Trays and Paper Guide on the Interactive Documentation CD-ROM. ■ Place the side to be printed faceup. ■ The top of the envelopes should be toward the left of the printer. P4400-87 2. When the front panel prompts you to confirm or change the paper type and size: a.
Specialty Printing Labels Labels can be printed from Tray 1, 2, or 3 and the Multi-Purpose Tray. Refer to the Supplies section of the Support Guide on the Interactive Documentation CD-ROM for information on part numbers for ordering these items. To order supplies and accessories, contact your local reseller or visit the Xerox web site at: www.xerox.com/officeprinting/4400supplies.
Specialty Printing Printing labels from the Multi-Purpose Tray 1. If your application has a setting for labels, use it as a template. 2. Insert the sheets of labels into the Multi-Purpose Tray. For more information, refer to the Trays section of the Trays and Paper Guide on the Interactive Documentation CD-ROM. ■ Place the side to be printed faceup. ■ The top of the sheet should enter the printer first. 1 2 3 P4400-88 3. 4.
Phaser™ 4400 Laser Printer Output Trays You can send output to the following trays: 500-sheet Stacker (with offset) Standard Output Tray ■ Default output destination. ■ Optional output device for your printer. ■ Holds 500 sheets. ■ Use as an additional 500-sheet capacity output tray to supplement the Standard Output Tray. P4400-79 P4400-78 To change the default output destination on the front panel: 1. With Menus highlighted, press the OK key. 2.
Output Trays Offsetting output When you send output to the 500-sheet stacker, you can also select offsetting. Offsetting separates print jobs or collated sets of a single job by approximately 25 mm (1 in.) in the output tray. Note If you send output to the Standard Output Tray, the printer does not offset the output. The 500-sheet Stacker offsets output, but you must have a hard drive to have the printer offset collated sets. You can switch job offsetting on or off on the front panel: 1.
Index Numerics 2-sided printing automatic 16, 17 driver selections 18 manual 19 500-sheet stacker 33 A automatic 2-sided printing 16 B binding preference for 2-sided printing 16 C changing paper type Tray 1, 2, or 3 7 custom size paper loading in Multi-Purpose Tray 15 loading in tray 13 menu selections 14 range of sizes supported 13 loading envelope feeder 27 Multi-Purpose Tray 7 Tray 1, 2, or 3 3 M manual 2-sided printing 19 Multi-Purpose Tray loading 7 orientation 9 O offsetting output 34 ordering s
Index T transparencies 25 loading in Multi-Purpose Tray 26 loading in Tray 1, 2, or 3 25 Tray 1, 2, or 3 changing paper type 7 loading 3 orientation 5 paper specifics 3 tray sensors turning on 14 tray usage 2 two-sided printing driver selections 18 manual 19 W weight range automatic 2-sided printing 16 manual 2-sided printing 19 Phaser™ 4400 Laser Printer 36