P1210UG-8 6/30/00 3:59 PM Page 1 User Guide (EN) Guide de l’Utilisateur (FR) Guía del Usuario (ES) Guia do Usuário (PT) User Guide (ZH) 721P56290 DocuPrint P1210 LASER LASER LASER LASER LASER PRINTER PRINTER PRINTER PRINTER PRINTER (EN) (FR) (ES) (PT) (ZH)
P1210UG-8 6/30/00 3:59 PM Page 2 Xerox Corporation 1350 Jefferson Road Rochester, NY 14623 United States of America Xerox Europe Bessemer Road Welwyn Garden City Herts AL7 1HE United Kingdom ©2000 Xerox Corporation. Xerox®, The Document Company®, the stylized X, DocuPrint, and the identifying product names and numbers herein are trademarks of Xerox Corporation. Xerox Canada Ltd. and Xerox Europe are licensees of all the trademarks.
P1210UG-8 6/30/00 3:59 PM Page 1.1 TABLE OF CONTENTS English TA B L E O F C O N T E N T S Thank you for purchasing the Xerox DocuPrint P1210. In this guide you will find information essential for setting up and operating your laser printer.
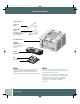
P1210UG-8 6/30/00 3:59 PM Page 1.2 U N PAC K I N G Unpacking AC Power Cord PC Parallel Cable Included in some countries. (meets IEEE 1284 specifications) DocuPrint P1210 Note: Carefully remove any shipping tape from the printer. Print Cartridge OC UP RIN T CD User Guide Note: The DocuPrint P1210 is equipped with a parallel port for use with IBM Compatible computers (with a 100mhz Pentium or higher equivalent processor.) USB cable sold separately.
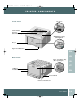
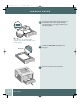
P1210UG-8 6/30/00 3:59 PM Page 1.3 PRINTER COMPONENTS Front View Top Cover Control Panel Top Tray (Face Down Output) Multi-Purpose Tray (Manual Feed) Tray 1 Paper Level Indicator EN FR Rear View Rear Cover/Rear Tray (Face Up Output) ES PT USB Port Parallel Port ZH Power Switch Power Cord Connector User Guide 1.
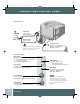
P1210UG-8 6/30/00 3:59 PM Page 1.4 CONNECTIONS/CONTROL PA N E L Connections 1 USB Cable Connect cable. (Sold separately) or Parallel Cable Connect cable. Power Cord 2 AC Connect to your printer to a Caution: Turn off your computer before connecting your printer cable or power cord. properly grounded outlet. Turn the power on.
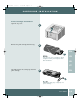
P1210UG-8 6/30/00 3:59 PM Page 1.5 CARTRIDGE INSTALLATION Print Cartridge Installation Open the top cover. 1 Remove the print cartridge from the bag. 2 EN Note: Do not expose cartridge to direct sunlight or strong room light for more than 10 minutes. FR ES PT Carefully remove the sealing tape from the print cartridge. 3 ZH Note: Pull sealing tape completely out of the cartridge. User Guide 1.
P1210UG-8 6/30/00 3:59 PM Page 1.6 CARTRIDGE INSTALLATION 4 5 6 1.6 User Guide Shake the print cartridge from side to side to distribute the toner evenly. Holding the print cartridge by the handle, insert the cartridge into the printer until it clicks into place. Close the top cover securely.
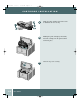
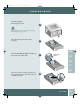
P1210UG-8 6/30/00 3:59 PM Page 1.7 LOADING PA P E R Loading Paper Pull the paper tray out. 1 Caution: Do not remove tray while printing. This may cause paper jams. Press the bottom plate until it locks into place. Pinch the Rear Paper Guide and adjust to the length of the print media. 2 3 EN Rear Paper Guide FR ES PT For legal or folio size paper, press the tab down and pull the rear wall all the way out, to adjust tray length. ZH 4 User Guide 1.
P1210UG-8 6/30/00 3:59 PM Page 1.8 LOADING 5 PA P E R Load paper. Ensure that the paper is placed beneath the metal corner guide. If using pre-printed paper, load paper with the print side facing down. Note: Observe the maximum limit indicator. Tray holds a maximum of 250 sheets of paper. 6 Adjust the Side Guide to lightly touch the paper. 7 Insert the tray back into the printer. Side Guide 1.
P1210UG-8 6/30/00 3:59 PM Page 1.9 INSTALLING SOFTWARE Installing Software The P1210 supports many operating systems Please go to the section which corresponds with your operating system for installation instructions. Installation for Windows 95, 98, NT 4.0, 2000 1 Insert the Xerox DocuPrint P1210 CD into your CD-ROM drive. If Windows runs your CD automatically, skip to step 4. 2 Select Run from the Start menu. 3 Type d:\setup.exe (where “d” is your CDROM drive letter), then click OK.
P1210UG-8 6/30/00 3:59 PM Page 1.10 INSTALLING Note: In order to print from your Macintosh to the DocuPrint P1210, you must be running OS 8.6x or higher operating system and have a USB enabled Macintosh. SOFTWARE Installation for Macintosh 1 Insert the Xerox DocuPrint P1210 CD into your CD-ROM drive. 2 Double click the P1210 CD. 3 Based on the table located in the back of this guide, select your appropriate language code (ie. “EN” for English).
P1210UG-8 6/30/00 3:59 PM Page 1.11 INSTALLING SOFTWARE Linux Installation 1 Log in to Linux as Super User (root) account. 2 Insert the Xerox DocuPrint P1210 CD into the CD-ROM drive. Note: these instructions are a guide to installing the PCL5e driver for Linux. The Linux driver installation script supports RedHat 6.0 or greater. 3 Open a terminal window. For Gnome interface users, (Utilities GNOME terminal.
P1210UG-8 6/30/00 3:59 PM Page 1.12 INSTALLING Note: The P1210 is dependant upon the native driver shipping with your Linux RedHat OS. Therefore, the features and functions listed in the table on the next page may not all be available. SOFTWARE • On Edit Local Printer Entry dialogue box, click OK. 6 At the end of installation, close RedHat’s printtool by clicking “X” in the upper right hand corner of the windows. Your Xerox Printer will be the default printer (lp) for printing.
6/30/00 3:59 PM Page 1.13 PRINT DRIVER FEATURES PCL Print Driver Features Properties Number of Copies Paper Paper Size Paper Source Paper Type Image Quality Image Quality Page Layout P1210UG-8 Usage /Description Windows* Mac Select 1-999 copies ★ ★ Select from supported paper sizes (See “Printer Specifications”). ★ ★ Select Printing from Tray 1, MP Tray or Tray 2 (if installed).
P1210UG-8 6/30/00 3:59 PM Page 1.14 M U LT I - P U R P O S E T R AY P R I N T I N G Multi-Purpose Tray Printing Note: When printing on certain envelopes, heavier weight papers, trnsparencies, or paper labels, manually feed them one at a time through the Multi-Purpose tray. The Multi-Purpose Tray (Manual Feed) is to be used as an alternate paper source for printing onto special print media. 1 Pull open the Multi-Purpose Tray (front panel). 2 Pull out the Multi-Purpose Tray Extension.
P1210UG-8 6/30/00 3:59 PM Page 1.15 M U LT I - P U R P O S E T R AY P R I N T I N G Load envelopes, with the flap down, against the left edge of the tray then slide the width guide on the right against the envelopes. 4 Note: You can stack up to 100 sheets of paper or 10 envelopes for automatic feeding. Caution: Never use envelopes with clasps, snaps, windows, coated linings, or self-stick adhesives. These envelopes may severely damage the printer. Do not feed stamped envelopes through the printer.
P1210UG-8 6/30/00 3:59 PM Page 1.
P1210UG-8 6/30/00 3:59 PM Page 1.17 TROUBLESHOOTING Troubleshooting Problem The printer does not print Faded printing Job did not completely print; received an error sheet Possible Cause Things to try... Data Light is not on. If the Data Light is off, check the power switch and power source. Printer Cable is not connected properly. Check all connections. If using a parallel cable, make sure the clips on the connector are securely fastened. Error Light is on.
P1210UG-8 6/30/00 3:59 PM Page 1.18 TROUBLESHOOTING Clearing Paper Jams Inside the Printer Note: On the rare occasion you encounter a paper jam, the following instructions will assist you in clearing the jam. 1.18 User Guide 1 Open the top cover and remove the print cartridge. Once the print cartridge is removed from the printer, be careful not to expose it to heat or direct sunlight. 2 Carefully lift up the guide feed and gently remove jammed paper.
P1210UG-8 6/30/00 3:59 PM Page 1.19 TROUBLESHOOTING Clearing Paper Jams in the Output Area If the paper is almost completely visible, gently pull paper to remove. If the jammed paper is not visible or there is resistance when you pull the paper, open the rear cover. Detach the vinyl strip and press the rear cover down until the plastic clips of the tray snap out. 1 2 EN FR Note: Please detach the vinyl strap prior to pushing down the rear cover.
P1210UG-8 6/30/00 3:59 PM Page 1.20 TROUBLESHOOTING 4 5 Gently remove the jammed paper. Refer to “Clearing Paper Jams Inside the Printer” if unable to remove the paper. Replace and secure the exit roller and reattach the vinyl strap. Close the rear cover. Open and close the top cover to resume printing. Clearing Paper Jams in the Input Area 1.20 User Guide 1 Pull out the paper tray. 2 Gently remove jammed paper. 3 Slide the tray back into the printer.
P1210UG-8 6/30/00 3:59 PM Page 1.21 INSTALLING OPTIONAL Installing Optional Memory MEMORY Note: For users who plan to run complex print jobs or print a majority of print jobs at 1200dpi, a minumum of 8MB of additional memory is recommended. Memory needs to be purchased separately. (RAM Specifications: 72 pin, EDO, nonparity: 60ns.) Caution: The controller board and internal options are sensitive to static electricity.
P1210UG-8 6/30/00 3:59 PM Page 1.22 INSTALLING OPTIONAL 4 User Guide Push back on the SIMM until it clicks into place. (Make sure the SIMM is secured in place by the metal clips.) 5 Replace the side cover and tighten the two outer screws. 6 Reconnect the power cord and printer cable. Turn the power on. 7 1.22 MEMORY Print a configuration sheet (hold down the print button until all lights blink, then release). Confirm the new memory value on your sheet.
P1210UG-8 6/30/00 3:59 PM Page 1.23 GETTING MORE Detailed information for your DocuPrint P1210 is in the electronic Reference Guide, which is available on the product CD provided with your printer. The Reference Guide is provided in the following languages: English (EN), French (FR), Italian (IT), German (DE), Spanish (ES), Portuguese (PT), Dutch (NL), Russian (RO), and Simplified Chinese (ZH).
P1210UG-8 6/30/00 3:59 PM Page 1.24 PRINTER CERTIFICATIONS Laser Safety The Xerox DocuPrint P1210 complies with safety standards, and is certified as a Class 1 Laser product under the U.S. Department of Health and Human Services (DHHS) Radiation Performance Standard according to the Radiation Control for Health and Safety Act of 1968. The printer does not emit hazardous laser radiation.
P1210UG-8 6/30/00 3:59 PM Page 1.