The Xerox DocuPrint P1202 Personal Laser Printer Reference Guide
Xerox Corporation 800 Phillips Road Webster, NY 14580 United States of America Xerox Europe Channels Group Bessemer Road Welwyn Garden City Herts AL7 1HE United Kingdom © 1999 Xerox Corporation. Xerox®, The Document Company®, the stylized X, DocuPrint, and the identifying product names and numbers herein are trademarks of Xerox Corporation. Xerox Canada Ltd. and Xerox Europe are licensees of all the trademarks.
Contents i Chapter 1 Introduction ........................................................... 1-1 Overview............................................................................ 1-2 Printer Components........................................................... 1-3 Printer Features ................................................................. 1-5 Printer Documentation ....................................................... 1-6 Using the CD-ROM........................................................
Chapter 4 Printing .................................................................. 4-1 Printing in Windows ........................................................... 4-2 Configuring the PCL Drivers .............................................. 4-3 Selecting Your Printer..................................................... 4-3 Setting Properties ........................................................... 4-4 PCL 6 Driver Features....................................................
Appendix A Environmental and Safety Considerations ........ A-1 Introduction ........................................................................A-2 Quality Standards ...........................................................A-2 Laser Safety.......................................................................A-3 Ozone Safety .....................................................................A-4 Operational Safety .............................................................
DocuPrint P1202 Reference Guide
Introduction 1 r e t pahC Overview .......................................................................... 1-2 Printer Components ......................................................... 1-3 Printer Features ............................................................... 1-5 Printer Documentation ..................................................... 1-6 Using the CD-ROM ....................................................... 1-7 Note, Caution and Warning Symbols ...........................
Overview Overview In this chapter, you will become familiar with the features of your printer and learn where to locate specific printer parts. Before you use your printer, make sure that you perform all of the setup steps outlined in the User Guide that came with your printer. For installation options not covered in the User Guide, refer to Chapter 2: Additional Printer Setup Information in this guide.
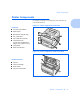
Printer Components Printer Components Use Figures 1.1 through 1.3 to identify the main components of your DocuPrint P1202. Figure 1.1 Printer Components, Front View Front View Face down output stacker Paper support Multi-Purpose Tray (MP Tray) Tray 1 (250 sheet) Tray 2 (250 sheet, optional) Control board cover (provides access to SIMM slots for adding/removing additional memory) Control panel Paper level indicators Figure 1.
Printer Components Figure 1.
Printer Features Printer Features Your Xerox DocuPrint P1202 is a compact, easy to use laser printer designed for the small office environment. It is designed to provide years of high quality, high performance printing. This manual tells you how to set up, operate and maintain your new printer, and contains advice on how you can get the best performance from it. Please use this manual together with the documentation provided with your computer hardware and software.
Printer Documentation Printer Documentation Your DocuPrint P1202 is packaged with the following documentation and information: • User Guide, which shows you how to get your printer up and running, and provides the basic information needed to use your printer. • This Reference Guide, which provides you with all of the detailed information you will need to use, maintain, upgrade and troubleshoot your printer.
Printer Documentation Using the CD-ROM The documentation on the CD-ROM is provided as a PDF file, which is opened in Adobe Acrobat Reader (provided on the CD-ROM if you do not already have it installed). This file contains hypertext links that enable you to jump from the Table of Contents or Index directly to the page where you are looking for information, as well as from page to page where information is cross-referenced. Simply move the cursor over a hypertext link and it changes to a pointing finger.
Printer Documentation Note, Caution and Warning Symbols Throughout this Reference Guide, several symbols are used to emphasize useful, important and critical information. They are as follows: This symbol indicates particularly useful or helpful information about your printer. This symbol indicates a caution against performing any action that may damage your printer or degrade performance. This symbol indicates a warning against performing any action that may lead to physical injury.
Additional Printer Setup Information 2 r e t pahC Connecting to the Computer ............................................ 2-2 Installing Optional Software ............................................. 2-3 Installing the PostScript PPD ........................................ 2-4 Windows 95/98 and NT 4.0 Installation ..................... 2-4 Windows 3.1x Installation .......................................... 2-5 Macintosh Installation ................................................
Connecting to the Computer Connecting to the Computer Your printer can be connected to a Windows-based PC or to an Apple Macintosh computer (see the note, below). Refer to Table 2.1 for your connection options and the appropriate page in this guide for connection instructions. Table 2.1 Interface Interface options Windows PC Macintosh Parallel Yes Not available. USB Yes* Not available. Serial† Yes Not available. LocalTalk† Not available. Yes * Windows † 98 systems only.
Installing Optional Software Installing Optional Software Included with your printer is a CD-ROM containing printer drivers for some of the most popular Windows software applications. To operate your printer, you must install a printer driver, which translates data from your application into data the printer understands. Please refer to the User Guide.
Installing Optional Software Installing the PostScript PPD Your Xerox DocuPrint P1202 CD-ROM contains PostScript printer description (PPD) files for both Windows 95/98/NT 4.0 and Macintosh. Installing the PostScript printer driver may require the use of the operating system files on the original CD-ROM or diskettes that came with your system. Using the PostScript printer driver requires installation of the PostScript option.
Installing Optional Software Windows 3.1x Installation 1 From the Control Panel, select Printers Add. 2 From the list of printers, select “PostScript Printer.” 3 Click Install. 4 You may be asked to insert your Windows operating system disk (CD-ROM or diskette). If so, select the appropriate drive, then select your Win31 folder. Then click OK. Use the standard Windows PostScript driver to print to the DocuPrint P1202. No PPD file is included.
Installing Optional Software Macintosh Installation 1 Make sure that the Macintosh and your printer are connected to each other with the proper cable. Turn on the Macintosh computer and printer. 2 Insert the Xerox DocuPrint P1202 CD-ROM shipped with your printer into your CD-ROM drive. 3 Open the CD-ROM icon. 4 Open the XX folder (where XX indicates the language code*), then open the PS folder, and then the Mac folder. 5 Drag and drop the docu1202.
Additional Print Media Information 3 r e t pahC Selecting Print Media ....................................................... 3-2 Media Sizes and Capacities ......................................... 3-3 Basic Guidelines ...........................................................
Selecting Print Media Selecting Print Media One of the most important things you can do to assure the best possible print quality from your printer is to select the correct paper. Your printer produces letter quality output on most plain bond papers, including cotton bond and photocopying papers; it does not require special papers. However, the print quality varies with different paper types. Be sure to test a small quantity of paper before you purchase a large quantity.
Selecting Print Media Media Sizes and Capacities Table 3.1 shows the DocuPrint P1202 supported media sizes and input capacities. Table 3.1 Supported Media Sizes and Capacities Input Source/Capacity* Size Tray 1 or 2 MP Tray Letter (8.5 x 11 in.) 250 100 Legal (8.5 x 14 in.) 250 100 Executive (7.25 x 10.5 in.) 250 100 Folio (8.5 x 13 in.) 250 100 A4 (210 x 297 mm) 250 100 ISO-B5 (176 x 250 mm) 250 100 -- 100 Com-10 (4.125 x 9.5 in.) -- 10 Monarch (3.875 x 7.5 in.
Selecting Print Media Basic Guidelines 3-4 When selecting or loading paper, envelopes, or other special media, keep these guidelines in mind: • Attempting to print on damp, curled, wrinkled, or torn paper can cause paper jams and poor print quality. • Use cut-sheet paper only. You cannot use multipart paper. • Use only high quality, copier grade paper. Avoid paper with embossed lettering, perforations, or texture that is too smooth or too rough.
Printing 4 r e t pahC Printing in Windows ......................................................... 4-2 Configuring the PCL Drivers ............................................ 4-3 Selecting Your Printer ................................................... 4-3 Setting Properties ......................................................... 4-4 PCL 6 Driver Features .................................................. 4-5 Manual Duplex Printing ....................................................
Printing in Windows Printing in Windows The following procedure describes the general steps required for printing from various Windows applications. The exact steps for printing a document may vary depending on the application program you are using. Refer to your software application’s documentation for the exact printing procedure. To use your DocuPrint P1202, you must install a printer driver, described in the User Guide. The way you access the driver varies depending on the software programs you use.
Configuring the PCL Drivers Configuring the PCL Drivers Selecting Your Printer To use all of the features of your DocuPrint P1202, make sure the PCL 6 driver is selected as the default printer. When you install the printer driver, DocuPrint P1202 is automatically set as the default printer. If you use more than one printer, you can select the DocuPrint P1202 as the default printer as follows: Windows 95/98/NT 4.0 1 Select Start Settings Printers. 2 Double-click DocuPrint P1202 PCL 6.
Configuring the PCL Drivers Setting Properties The DocuPrint P1202 printer driver’s Print Setup dialog box allows you to set various printer properties. Most Windows applications will override settings you specify in the printer driver. Change all print settings available in the software application first, and any remaining settings with the printer driver.
Configuring the PCL Drivers PCL 6 Driver Features Paper/Output Use this tab to change the number of copies, page orientation, paper size, paper source and output format. Source setting identifies the default paper source. Tray 2 source is available if the optional Tray 2 is installed. Manual Feed source is used when printing on special media.
Configuring the PCL Drivers Image Quality Use this tab to change resolution and enhancement, graphic settings, graphic mode, grayscale, and graphic quality. It also includes settings that determine how the printer handles TrueType fonts. Overlays Use this tab to create and use overlays. Please see the on-line help in the PCL 6 driver to obtain more detailed help. Watermarks Use this tab to create, modify and delete watermarks. You can control the font size, font type and placement of watermarks.
Manual Duplex Printing Manual Duplex Printing Your DocuPrint P1202 will print duplex (two-sided) pages by specifying duplex printing from the PCL 6 driver when you print from your applications. This feature will also print an instruction sheet to assist you. To select this option, check Instruction Page. For more detailed information, refer to the on-line help.
Booklet Printing Booklet Printing Your DocuPrint P1202 PCL 6 driver gives you the capability to print your document in a booklet format. To perform booklet printing, follow these steps: 1 Ensure the P1202 PCL 6 driver is the default printer. 2 In the Windows application (for example, MS Word), in File Page Setup, select one of the valid booklet formats available. 3 Create your document using this page setup. 4 Print the document to the P1202 using the PCL 6 driver.
PostScript Driver Features PostScript Driver Features Table 4.1 lists the features that can be set in the PostScript driver under each supported operating system. Table 4.1 PostScript Driver Features Feature Macintosh Win 95/98 Win NT 4.0 Win 3.
Using Printer Utilities Using Printer Utilities Your Xerox DocuPrint P1202 CD contains the following utilities, which can be installed when you install the printer drivers: • Remote Control Panel • Status Monitor • Xerox Font Manager Remote Control Panel and Status Monitor can only be used when the printer is connected via the parallel interface. They are not supported through other connections. To access any of these programs, from Windows 95/98 or NT 4.
Using Printer Utilities The screen includes the following tabs. PRINTING Use this tab to control the following printer features: • Paper Size sets the paper size. • Paper Source sets the default paper source. • Copies sets the number of copies printed for each page. • Quality sets the printer resolution to either 300 or 600 dpi. The higher the setting, the sharper the clarity of printed characters and graphics. • Orientation determines how the output is printed on the page.
Using Printer Utilities CONFIG Use this tab to control the following printer features: 4-12 • Power Save determines the length of time the printer waits after a job is printed before it goes to a reduced power state. If the printer is used frequently, select OFF which keeps the printer ready to print with the minimum warm-up time. This uses more electricity to keep the printer warm and ready to print. • Econo Mode determines the toner quantity the printer should use when printing.
Using Printer Utilities JOB Use this tab to control the following printer features: • Timeout determines the amount of time (in seconds) the printer will wait before printing the last page of a print job that does not end with a command to print the page or a formfeed character. Valid range is 0 to 300 seconds. • Paper Type provides the printer with information about the type of paper to be used for a print job. If you use paper with a weight of more than 42 lb.
Using Printer Utilities INTERFACE Use this tab to control the following printer features (when using the serial port only): • Baud rate (bps) sets the rate at which data is being sent to or from the computer. • Robust XON sets XON/XOFF pacing (if the handshaking protocol uses XON/XOFF pacing). When set to ON, the printer sends a continuous stream of XONs to the host computer to indicate that the serial port is ready to receive more data.
Using Printer Utilities PCL 5e These settings are used by DOS applications. Be aware that Windows applications will override these settings. • Typeface allows you to select the desired typeface. This setting is ignored when the software application specifies a font. • Symbol Set determines the symbol set. A symbol set is a set of alphabetic and numeric characters, punctuation, and special symbols used when printing with a selected font.
Using Printer Utilities PS 2 This will allow printing of the PostScript font list (only available when the PostScript option is installed). • Font List prints the font list showing all the fonts available for PostScript. ABOUT This tab shows the software version and copyright information. Status Monitor Status Monitor is a program that runs in the background and automatically displays a message on your computer screen whenever the printer status changes.
Maintaining the Printer 5 r e t pahC Cleaning the Printer ......................................................... 5-2 Cleaning the Outside .................................................... 5-2 Cleaning the Inside .......................................................
Cleaning the Printer Cleaning the Printer This section contains some general guidelines for keeping your DocuPrint P1202 clean. Do not use ammonia-based sprays or volatile solvents such as thinner to clean the printer, as these can damage the printer surface. Keep the front cover closed when cleaning the outside of the printer. Always unplug the power cord before cleaning the inside of the printer.
Cleaning the Printer Cleaning the Inside When paper jams occur, unfused toner on the paper can fall off the paper and build up inside the printer. 1 Unplug the power cord. 2 Remove the laser print cartridge. 3 Use a soft cloth to wipe away any dust and spilled toner from the cartridge. You can dampen the cloth slightly with water, but be careful not to let any water drip onto the printer or inside it. 4 Reinsert the laser print cartridge.
5-4 DocuPrint P1202 Reference Guide
Troubleshooting 6 r e t pahC Solving Printing Problems ................................................ 6-2 Solving Print Quality Problems ........................................ 6-7 Solving PostScript Problems ......................................... 6-10 Obtaining Service ..........................................................
Solving Printing Problems Solving Printing Problems If you have any problems with the operation of your DocuPrint P1202, refer to Table 6.1 on page 6-3 for suggested remedies. If you cannot solve a problem after carrying out the suggested remedies in this section, call the Xerox Helpline. See the section “Obtaining Service” (page 6-11).
Solving Printing Problems Table 6.1 Printer Operation Problems Problem Possible Cause Remedy The printer does not print. Your printer is not selected as the default printer. Select DocuPrint P1202 PCL 6, P1202 PCL 5e, or P1202 PS as your default printer. See the section “Selecting Your Printer” (page 4-3) The top cover may be open. Make sure that all covers are closed securely. The printer cable is not connected properly. Check all connections. The printer cable is defective.
Solving Printing Problems Table 6.1 Printer Operation Problems (continued) Problem Possible Cause Remedy Paper is not fed into the printer. Paper has not been loaded correctly. Remove the paper tray and reload the paper correctly. There is too much paper in the paper tray. Remove some of the paper from the tray. The printer ejects blank pages. The laser print cartridge is out of toner. Replace the laser print cartridge. See the User Guide. Half of the page is blank.
Solving Printing Problems Table 6.1 Printer Operation Problems (continued) Problem Possible Cause Remedy The printer prints the wrong data, or it prints incorrect characters. The printer cable is not connected properly. Check the connection. There may be a problem with the printer driver software. Exit Windows and reboot the computer. Turn the printer off and then back on again. The printer cable specifications may be incorrect. Parallel connection: Replace with an IEEE-1284 rated cable.
Solving Printing Problems Table 6.1 Printer Operation Problems (continued) Problem Possible Cause Remedy Printing is too slow. If using Windows 3.1x, Print Manager may be disabled. From the Control Panel Printers menu, check the Use Print Manager box. If using Windows 3.1x, the Background Printing item in the Options menu of Print Manager may be set incorrectly. Select Background Printing from the Options menu in the Print Manager.
Solving Print Quality Problems Solving Print Quality Problems If you have any problems with the printed output of your DocuPrint P1202, refer to Table 6.2 on page 6-8 for suggested remedies. The causes listed in Table 6.2 are probable causes only, and may not represent all of the possible cases which may occur under actual operating conditions.
Solving Print Quality Problems Table 6.2 Print Quality Problems Problem Possible Cause Irregular faded patches of print There is a paper quality problem. Use only paper that meets the specifications required by the printer. Toner may be unevenly distributed. Remove the laser print cartridge and shake it gently to evenly distribute the toner. Then replace the cartridge back into the printer. There is a paper quality problem. Use only paper that meets printer specifications.
Solving Print Quality Problems Table 6.2 Print Quality Problems (continued) Problem Possible Cause Remedy Missing characters The paper may be too damp. Try printing with a different batch of paper. Do not open packages of paper until necessary so that the paper does not absorb too much moisture from the air. Back of printout dirty The transfer roller may be dirty. Print a few blank pages to clean the transfer roller. Incorrect fonts TrueType fonts may be disabled.
Solving PostScript Problems Solving PostScript Problems Table 6.3 contains problems that may occur with PostScript printing (available only if the PostScript option is installed). Table 6.3 PostScript Problems Problem Possible Cause PostScript file can not be printed. The PostScript option may not be installed, or the installed memory may be insufficient. Remedy Print a configuration sheet and verify that the PS version is available for printing, and that total system memory is at least 12 MB.
Obtaining Service Obtaining Service If you’re unable to solve your printer problems, you may want to call the Xerox Helpline for service.
6-12 DocuPrint P1202 Reference Guide
Environmental and Safety Considerations A x i dneppA Introduction ...................................................................... A-2 Quality Standards ......................................................... A-2 Laser Safety ..................................................................... A-3 Ozone Safety ................................................................... A-4 Operational Safety ...........................................................
Introduction Introduction The Xerox DocuPrint P1202 and its supplies are designed and tested to meet strict safety requirements. These include safety agency examination and approval, and compliance to established environmental standards. Please read the following instructions carefully before operating the printer and refer to them as needed to ensure the continued safe operation of your Xerox DocuPrint P1202. The safety testing and performance of this product have been verified using Xerox materials only.
Laser Safety Laser Safety The Xerox DocuPrint P1202 complies with laser product performance standards set by governmental, national and international agencies as a Class 1 Laser Product. It does not emit hazardous radiation, as the beam is totally enclosed during all phases of customer operation and maintenance. The use of controls, adjustments, or procedure other than those specified in the documentation might result in hazardous exposure to laser light.
Ozone Safety Ozone Safety During normal operation, the Xerox DocuPrint P1202 produces ozone. The ozone produced does not present a hazard to the operator. However, it is advisable that the machine be operated in a well ventilated area.
Operational Safety Operational Safety The Xerox DocuPrint P1202 and its supplies were designed and tested to meet strict safety requirements. These include safety agency examination, approval, and compliance with established environmental standards. To ensure the continued safe operation of your Xerox DocuPrint P1202, follow these safety guidelines at all times. • Follow warnings and instructions marked on or supplied with the equipment.
Operational Safety A-6 • Use only the power cord supplied with your Xerox DocuPrint P1202. • Do not use a ground adapter plug to connect the Xerox DocuPrint P1202 to a power source receptacle that lacks a ground connection terminal. • Plug the power cable directly into a properly grounded electrical outlet. Do not use an extension cord. If you are not sure whether or not an outlet is properly grounded, consult an electrician. • This product is equipped with a 3-wire grounding type plug (e.g.
Operational Safety • Do not place objects on the power cable. • Do not place the printer on an unstable cart, stand or table. The printer may fall causing personal injury or serious damage to the printer. • Do not override or disable electrical or mechanical interlocks. • Do not obstruct ventilation openings. These openings are provided to prevent overheating of the machine. • Do not push objects into slots and openings on the Xerox DocuPrint P1202.
Operational Safety • Never use supplies or cleaning materials for purposes other than what they were intended. Keep all supplies and materials out of reach of children. • Avoid exposing the drum cartridge to light for extended periods of time. • Do not touch the photoreceptor. Scratches or smudges that appear on the photoreceptor will result in poor print quality and may shorten the service life.
Printer Options B x i dneppA Introduction ...................................................................... B-2 Precautions ...................................................................... B-3 Memory and PostScript SIMMs ....................................... B-4 Serial/LocalTalk Card ...................................................... B-8 Paper Tray 2 ..................................................................
Introduction Introduction Your DocuPrint P1202 is a full-featured laser printer that has been optimized to meet most of your printing needs. Recognizing that each user may have different requirements, however, Xerox makes several options available to enhance the printer’s capabilities: • PostScript, which enables your printer to use the PostScript printing language for text and graphics. • Serial and LocalTalk ports, which enable your printer to interface with a Macintosh computer.
Precautions Precautions DISCONNECT THE POWER CORD: Never remove the printer control board while the printer is plugged in. To avoid the possibility of electrical shock, always disconnect the power cord when installing or removing ANY internal or external printer option. DISCHARGE STATIC ELECTRICITY: The control board and internal printer options (SIMMs, PostScript, Serial/LocalTalk interface) are sensitive to static electricity.
Memory and PostScript SIMMs Memory and PostScript SIMMs Additional printer memory and the PostScript option are provided on SIMMs (single inline memory modules). This procedure is applicable to either option. Since PostScript requires 12 MB of printer memory and the DocuPrint P1202 comes with 4 MB standard, installation of the PostScript SIMM requires installation of a memory SIMM as well. Review the precautions on page B-3 and then follow this procedure to install SIMMs in your computer.
Memory and PostScript SIMMs 3 Remove the metal plate in the direction of the arrow. 4 Locate the PostScript SIMM slot (the first slot on the left as shown) and the memory SIMM slot (the second slot on the right as shown) on the control board. They are not interchangeable. OP EN CL OS E • To install a memory SIMM, continue with Step 5. • To install the PostScript SIMM, go to Step 7 on page B-6.
Memory and PostScript SIMMs 7 Install the PostScript SIMM into the first slot labeled “DRAM” as shown, slightly angled, notch side up. 8 Push back on the SIMM until it clicks into place. 9 Make sure the SIMM is secured in place by the metal clips. 10 Reinsert the metal plate.
Memory and PostScript SIMMs 11 Replace the control board cover. 12 Reconnect the power cord and turn on the power. For PostScript driver installation and usage information, refer to the sections “Installing the PostScript PPD” (page 2-4) and “PostScript Driver Features” (page 4-9). To print documents from a Macintosh, you must install the Serial/LocalTalk option. See the section “Serial/LocalTalk Card” (page B-8).
Serial/LocalTalk Card Serial/LocalTalk Card The Serial/LocalTalk option lets you connect your DocuPrint P1202 to a PC or Macintosh serial interface, or to a Macintosh LocalTalk network. To use the serial connection, a standard 9-pin serial cable is required. One end has a 9-pin female connector and the other end has a 9-pin male connector. Do not use a null-modem cable, which is a twisted pair cable.
Serial/LocalTalk Card 3 Remove the metal plate in the direction of the arrow. 4 Unplug the two connectors from the control board. 5 Remove the three screws securing the board and pull the board out of the printer. OP EN CL OS E Unpack the Serial/LocalTalk card. Avoid touching its contact pins. 6 Align the connector on the Serial/LocalTalk card with the connector on the control board. Push the card firmly into the connector until it is completely inserted in place.
Serial/LocalTalk Card 7 Slide the control board back into the printer. 8 Insert the control board in place, and tighten the two screws. 9 Tighten the third screw as shown. Reconnect the two connectors that were removed in Step 4. 10 Reinsert the metal plate.
Serial/LocalTalk Card 11 Replace the control board cover. 12 Reconnect the power cord and turn on the power. To print documents from a Macintosh, you must also install the PostScript option and additional memory. See the section “Memory and PostScript SIMMs” (page B-4).
Paper Tray 2 You can increase the paper handling capacity of your DocuPrint P1202 by installing the optional Tray 2, which consists of two components, as shown in Figure 6.1. Figure 6.1 Tray 2 Components Support unit Paper tray Review the precautions on page B-3 and then follow this procedure to install Tray 2 in your computer. 1 B-12 Turn off the printer and disconnect the power cord.
Paper Tray 2 2 Observe the location of the support unit’s connector and tabs . 3 Align the printer with the support unit and lower it into place on the tabs and connector. 4 Load paper in the tray. See the User Guide. 5 Reconnect the power cord, then turn on the printer. To verify proper installation, print a configuration sheet. To print from Tray 2, configure the printer driver from your application prior to printing. See “Configuring the PCL Drivers” (page 4-3).
B-14 DocuPrint P1202 Reference Guide
Macintosh Setup and Printing C x i dneppA Requirements for Printing ................................................ C-2 Printing a Document ........................................................
Requirements for Printing Requirements for Printing Minimum system requirements for Macintosh • Mac OS 7.0 or later • LaserWriter8 • Macintosh system with LocalTalk port DocuPrint P1202 options required C-2 • PostScript Level 2 option, including installation of the PPD file. See “Installing the PostScript PPD” (page 2-4). • Serial/LocalTalk option. See “Serial/LocalTalk Card” (page B-8).
Printing a Document Printing a Document The following procedure describes general steps required for printing from various Macintosh applications. The exact steps for printing a document may vary depending on the application program you are using. Refer to your software application’s documentation for the exact printing procedure. 1 Start the program you are using to create the document and open the document you want to print. 2 Select Print from the File menu.
C-4 DocuPrint P1202 Reference Guide
Language Codes Appendix D: Language Codes D x i dneppA D-1
Language Codes D-2 Code Language BG Bulgarian CS Czech DA Danish DE German EL Greek EN English ES Spanish ET Estonian FI Finnish FR French HU Hungarian IT Italian LT Lithuanian LV Latvian NL Dutch NO Norwegian PL Polish PT Portuguese RO Romanian RU Russian SH Croatian SK Slovak SL Slovenian SV Swedish TR Turkish ZH Chinese DocuPrint P1202 Reference Guide
Index XI A D Apple Macintosh See Macintosh Documentation • 1-6 Duplex printing • 4-7 B E Booklet printing • 4-8 C Envelopes See also Media Sizes and capacities • 3-3 Card stock Capacity • 3-3 Exhaust fan Location • 1-4 CD-ROM • 1-7 Cleaning the printer • 5-2 5-3 Cleaning cycle • 5-3 Inside surfaces • 5-3 Outside surfaces • 5-2 Control board cover Location • 1-3 Control panel Location • 1-3 Cooling vent Location • 1-4 F Face down output stacker Location • 1-3 Face-up output stacker Location
L L PCL 6 Driver features • 4-5 Labels Capacity • 3-3 See also Media Laser print cartridge Location • 1-3 LocalTalk interface • 2-2 LocalTalk option • B-2 Installing • B-8 B-11 M Macintosh Installing PostScript PPD • 2-6 Interface options • 2-2 Printing procedure • C-3 Required options • C-2 See also LocalTalk option System requirements • C-2 Media Selection guidelines • 3-4 Sizes and Capacities • 3-3 Memory Installing • B-4 B-7 MP Tray Location • 1-3 4-6 PostScript • 2-2 Driver features • 4-
S S Safety issues • A-1 X A-8 Serial interface • 2-2 Xerox Customer support • 6-11 Helpline • 6-11 Serial number Location • 1-3 Xerox Font Manager • 4-16 Serial option • B-2 Installing • B-8 B-11 Status Monitor • 4-16 T Technical support • 6-11 Top cover Location • 1-3 Top cover release button Location • 1-3 Transparencies Capacity • 3-3 See also Media Tray 1 Location • 1-3 Tray 2 Location • 1-3 Troubleshooting Operation problems • 6-2 6-6 PostScript problems • 6-10 Print quality problems • 6
DocuPrint P1202 Reference Guide