
User's Manual
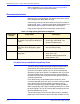


Table Of Contents
- Introduction
- 1. Selecting stock for your Xerox Nuvera System
- 2. Managing your paper supply
- 3. Tips by stock type
- Xerox Nuvera MX: Special considerations
- Stock types
- Tips that apply to all stocks
- Bond (56 to 158 gsm)
- Bristol (147 to 220 gsm)
- Carbonless
- Cover coated (140 to 220 gsm)
- Cover uncoated (106 to 220 gsm)
- Drilled paper
- Envelopes
- Heavyweight coated (140 to 220 gsm)
- Heavyweight uncoated (106 to 220 gsm)
- Index (130 to 220 gsm)
- Label stock
- Lightweight uncoated (56 to 84 gsm)
- Middleweight uncoated (91 to 105 gsm)
- Perforated paper
- Preprinted paper
- Recycled paper
- Scored paper
- Synthetic papers and plastics
- Tabs
- Transparencies
- Xerox DocuCard
- 4. About Xerox papers
- A. Converting paper weight from pounds to gsm
- B. Printing with tabs
- Obtaining additional tabs guide kits
- Installing the tabs guide
- Tab Optimization Mode
- 1. On the DocuSP Controller, select [Printer: Tab Optimization Mode]. A dialog window appears.
- 2. Select the [On] checkbox.
- 3. Close the window. The Tab Optimization Mode is enabled.
- 1. On the DocuSP Controller, select [Printer: Tab Optimization Mode]. A dialog window appears.
- 2. Select the [Off] checkbox.
- 3. Close the window. The Tab Optimization Mode is enabled
- Define stocks, program, and load feeder trays
- 1. At the system interface, add the tab stock to the Stock Library.
- 2. Assign the tab stock to a feeder tray.
- 3. Load the tab stock as shown on the label in the tray.
- 4. Adjust the paper tray guides and adjust any tabs that are misaligned.
- 5. Open the Feed Module front door and remove the tab guide (A4/11 or A5/5.5).
- 6. Install the tab guide making sure it is positioned below the actuator arm of the paper guide.
- 7. Assign the 8.5 x 11 inch (A4) or 8.5 x 5.5 inch (A5) stock for the body sheets to another paper tray and load the stock.
- Printing on tabbed stock
- C. Managing the feed modules
- Feeder procedures
- Add stock to a tray directly from the Stock Library window
- Copy stock attributes from one tray to another
- 1. Open the Paper Trays tab.
- 2. Select the stock you wish to copy.
- 3. Select [Save Settings] from the Tray pull-down menu.
- 4. Enter the information in the Save Tray Setting window.
- 5. Select [OK].
- 6. Select the tray into which you want to place the saved stock.
- 7. Select [Load Settings] from the Tray pull-down menu.
- 8. Select the stock from the list of saved stocks.
- 9. Select [OK].
- 10. Load the stock in paper tray.
- Load non-tab stock in a paper tray
- 1. Wait for the LED on the tray to turn off before opening the tray.
- 2. When the LED is off, pull the feeder tray out from the feeder until it stops.
- 3. Move the side and rear guides away from the stack.
- 4. Load the required stock in the tray. Load the stock with the curl side down. Load Xerox stock with the package seam side face up.
- 5. Position one ream of the stock against the leading (left) edge and roughly centered in the tray.
- 6. Move the side and trail edge guides until they touch the stack. Continue loading the stock to the recommended amount.
- 7. Close the tray slowly, but firmly, until it latches.
- Load tab stock in a paper tray
- 1. Wait for the LED on the tray to turn off before opening the tray.
- 2. When the LED is off, pull the feeder tray out from the feeder until it stops.
- 3. Move the side and trail edge guides away from the stack.
- 4. Load the required stock in the tray.
- 5. Position the stock against the leading (left) edge of the tray.
- 6. Move the rear and side guides until they touch the stack.
- 7. Close the tray slowly, but firmly, until it latches.
- Prevent a tray from feeding
- View a list of paper trays and their settings
- Inserter procedures
- Feeder procedures
- D. Managing the Finishing Transport Module and Stacker
- Finisher procedures
- Stacker Limitations
- Unload stacker cart
- 1. If an Unload condition exists, go to step 5.
- 2. Open the Stacking Tab.
- 3. Select the stacker to be unloaded. The row is highlighted.
- 4. Press the right mouse button and select [Unload].
- 5. To unload a stacker cart, open the stacker front door.
- 6. Pull the cart from the stacker.
- 7. Remove the stack from the cart (or use the alternate cart).
- 8. Push the cart into the stacker.
- 9. Firmly close the stacker door.
- View stacker settings
- Unload stacker cart
- E. Managing the Stock Library
- Define a new stock
- 1. Select the Stock Library tab in Printer Manager.
- 2. On the Stock Library tab, select the source stock. The table row is highlighted.
- 3. Select [Stock: Duplicate]. A settings window opens.
- 4. The Stock Name field is empty; type new value in the field.
- 5. Select the attribute to be modified.
- 6. Select the desired value for the attribute from the menu or type a new value in the field.
- 7. Repeat steps 5 and 6 for each attribute to be modified.
- 8. To add or modify comments, type the desired text in the Comments field. These comments will be displayed on the settings window for this stock only.
- 9. To make the changes without closing the settings window, select [Apply]. Otherwise, select [Save] to apply the changes and close the window.
- Delete a stock
- Edit stock attributes
- 1. Select the Stock Library tab.
- 2. Select the stock to be edited. The table row is highlighted.
- 3. Double click the row to open a settings window.
- 4. Select the attribute to be modified.
- 5. Select the desired value for the attribute from the menu or type a new value in the field.
- 6. Repeat steps 4 and 5 for each attribute to be modified.
- 7. To add or modify comments, type the desired text in the Comments field. These comments will be displayed on the settings window for this stock only.
- 8. To make the changes without closing the settings window, select [Apply]. Otherwise, select [Save] to apply the changes and close the window.
- Define a new stock
- Glossary of paper terms
Xerox Nuvera Paper Guide
1-2
Selecting stock for your Xerox Nuvera System
Refer to Appendix A, Converting paper weight from pounds to
gsm, for paper weight conversion information.
Recommended stocks
Stocks that are recommended for use with the Xerox Nuvera have
been categorized as Best, Better or Good.
A broad range of stocks has been tested on the Xerox Nuvera for
image quality. Table 1-3. defines image quality as Best, Better, and
Good and lists general types of stock within each category.
Image quality is greatly influenced by paper surface texture.
The Stock Library and Media Compatibility Guide
The Stock Library contains the paper-related information that is
maintained by the system operator at the system interface.
Each stock in the Stock Library has a set of stock settings that
describe the paper to the system. The attributes allow you to print
a job with multiple stocks. The Xerox Nuvera uses the attribute
information to make internal adjustments throughout the printer on
a sheet-by-sheet basis.
In the Stock Library, the preloaded stocks contain the Xerox
recommended settings for each stock. If custom stocks are added
to the Stock Library, the stock attribute information must be
accurate to prevent image quality and paper handling problems.
When image quality and/or paper handling problems occur, check
the stock settings. You can check the paper packaging to be sure
the stock attributes are correct.
The operator assigns stocks from the Stock Library to individual
paper trays, which makes the stock information available to each
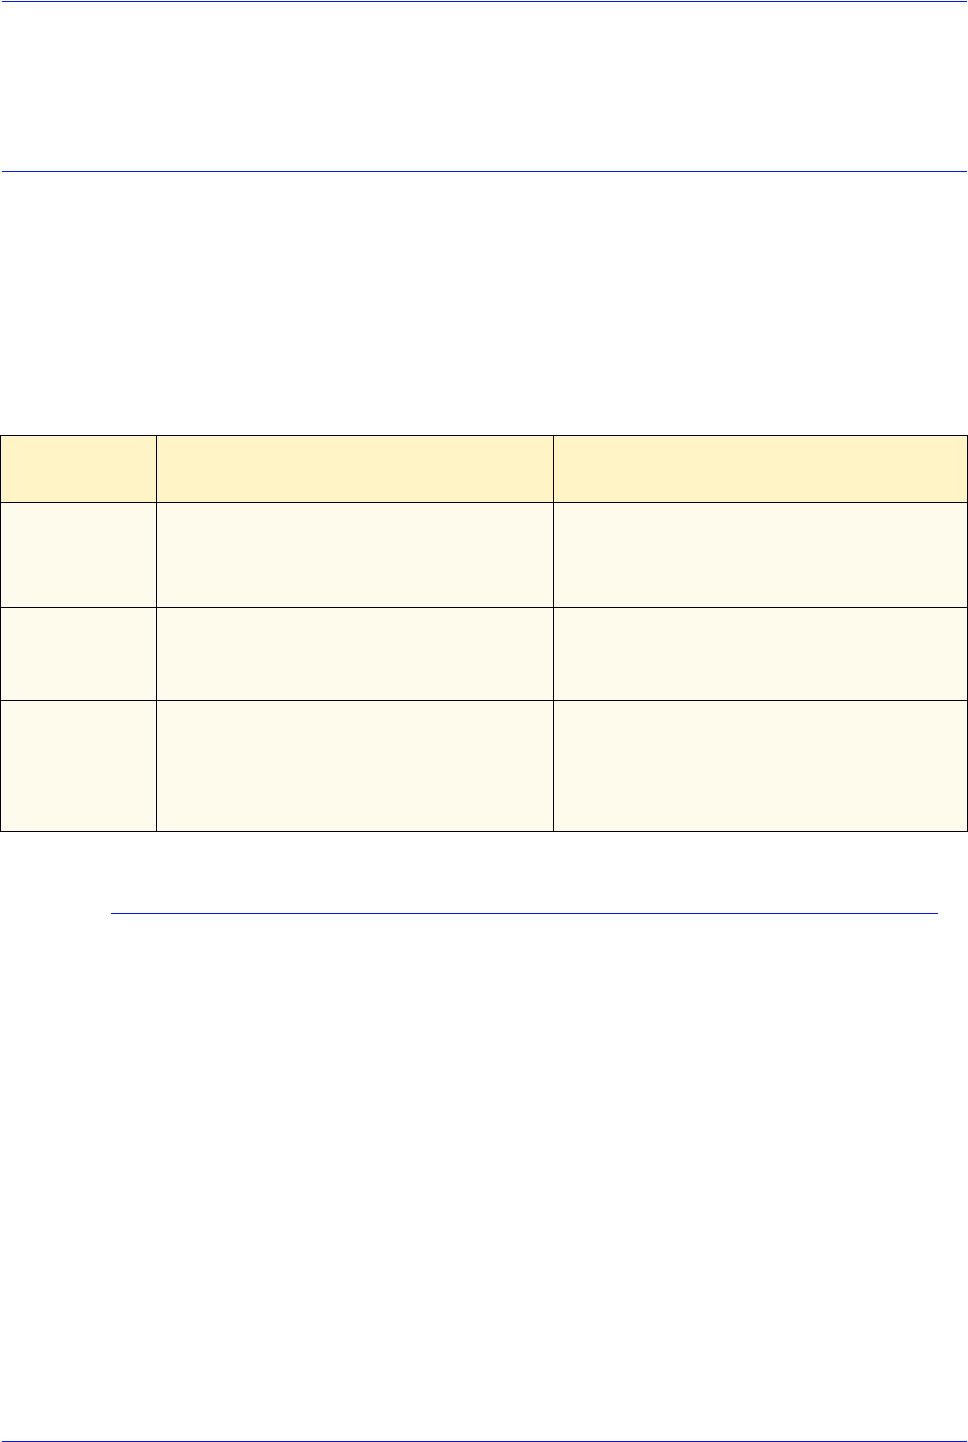
Table 1-3. Image quality performance categories
Performance
Category
Image Quality Stock Types
Best The best possible image quality for
this system. Very similar to offset print
quality.
• Cast coated / coated stocks
• Some highly calendared / very
smooth uncoated stocks
Better Image quality is slightly lower than
Best due to sheet topography (paper
finish).
• Most uncoated stocks designed for
laser and offset printing
Good Adequate image quality due to sheet
topography.
• Uncoated stocks with rough finishes
(linen, wove, etc.)
• Specialty medias (paper backed
transparencies, etc.)