r e t pahC 2 r e t pahC Xerox Document Centre Setup Guide for FlowPort This document is intended for use by FlowPort System Administrators when configuring the following Xerox Document Centres to scan to a FlowPort server: • • Document Centre 240/255/265/460/470/480/490 Document Centre 220/230/332/340/432/420/425/432/440 There are two basic things you must do on the Document Centre: • • Designating a “repository” on the document centre. This is the IP address of the FlowPort server.
Configuring a Document Centre 240/255/265/460/470/480/490 with Centreware Internet Services Configuring a Document Centre 240/255/265/460/470/480/490 with Centreware Internet Services Verify that the Scan-to-File feature is installed on the Document Centre. Print a Configuration sheet and check the installed options list for Scan-to-File. If the Scan-to-File is not listed, contact your Xerox service representative to obtain and install the Scan-to-File kit.
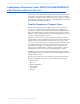
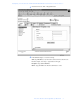
Configuring a Document Centre 240/255/265/460/470/480/490 with Centreware Internet Services FlowPort Repository Setup The following settings for the Default Repository and Template Pool Setup are recommended. 1 In your Web browser’s Address (or Location) box, enter the TCP/IP address of your Document Centre. 2 Click on Properties. 3 In the Properties column (left side of screen), click on the plus (+) sign for the Services folder. The properties for the Document Centre will display as shown below.
Configuring a Document Centre 240/255/265/460/470/480/490 with Centreware Internet Services 4 Click on the plus (+) sign for the Distribution Templates. 5 Click the Repository Setup link. 6 Under Repository Setup, perform the following: Repository List: Select Document Repository 0. Check with your Xerox Document Centre System Administrator to make sure the Repository is not in use. NOTE: Depending on the printer software model, there may only be 1 repository.
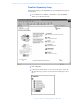
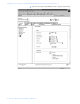
Configuring a Document Centre 240/255/265/460/470/480/490 with Centreware Internet Services 7 Click on Apply New Settings. 8 A Login window may display. Enter admin for the user name followed by your password. If you do not know your password, contact your printer system administrator. Note: The user name and password are case sensitive. FlowPort Template Setup 1 Click on the Services tab. The Job Submission page displays as shown below.
Configuring a Document Centre 240/255/265/460/470/480/490 with Centreware Internet Services 2 6 Click on the Distribution Templates button.
Configuring a Document Centre 240/255/265/460/470/480/490 with Centreware Internet Services 3 Under the Services tab, click on the [+] new button. 4 In the General settings box, enter the following: Name: Type FlowPort (or any name that would let users know that this is the FlowPort template. It can be up to eight characters in length). Description: Type Scan to FlowPort. Owner: Type your name or the FlowPort administrator’s name.
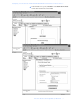
Configuring a Document Centre 240/255/265/460/470/480/490 with Centreware Internet Services 5 Review the Scan Settings. Click on Edit if you need to change the default settings.
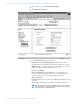
Configuring a Document Centre 240/255/265/460/470/480/490 with Centreware Internet Services 6 In the Distribution area, specify a Destination. Select Public Internet Folder from the New Destination list, and click add.
Configuring a Document Centre 240/255/265/460/470/480/490 with Centreware Internet Services 7 In the list of Select from Repository Servers, select repository that points to the FlowPort server. 8 Type the Path to Document / 9 Check the Filing Policy New Auto Generate. 10 Document name is DOC. 11 Select the Output Image Format Multi-Page TIFF. 12 Click on Apply New Settings. The Document Centre is ready to use FlowPort. Note: This setup provides users Guest access (Trusted/Shared) to FlowPort.
Configuring a Document Centre 220/230/332/340/432/420/425/432/440 with Centreware Internet Services Configuring a Document Centre 220/230/332/340/432/420/425/ 432/440 with Centreware Internet Services Verify that the Scan-to-File feature is installed on the Document Centre. Print a Configuration sheet and check the installed options list for Scan-to-File. If the Scan-to-File is not listed, contact your Xerox service representative to obtain and install the Scan-to-File kit.
Configuring a Document Centre 220/230/332/340/432/420/425/432/440 with Centreware Internet Services FlowPort Repository Setup The following settings for the FlowPort Repository setup are recommended. 12 1 In your Web browser’s Address (or Location) box, enter the TCP/IP address of your Document Centre. 2 Click on Properties. 3 Click on [+] Services.
Configuring a Document Centre 220/230/332/340/432/420/425/432/440 with Centreware Internet Services 5 Click on Repository Setup. / 6 Select an unused repository from the Repository List (Default is recommneded). 7 Verify that the protocol is TCP/IP. 8 Type the File Server IP address (the IP address of your FlowPort server). 9 Type the Directory Path / 10 Type the login name NSA, and the password nsa. 11 Click on Apply New Settings.
Configuring a Document Centre 220/230/332/340/432/420/425/432/440 with Centreware Internet Services 14 Xerox Document Centre Setup Guide for FlowPort
Configuring a Document Centre 220/230/332/340/432/420/425/432/440 with Centreware Internet Services FlowPort Template Setup 1 Next, you need to set up the scan template that you will use when scanning to FlowPort server. Select Device Index.
Configuring a Document Centre 220/230/332/340/432/420/425/432/440 with Centreware Internet Services 2 16 Select Stored Templates.
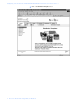
Configuring a Document Centre 220/230/332/340/432/420/425/432/440 with Centreware Internet Services 3 Select [+] new. 4 In the Template fields, enter a name for the template in the Name field. Leave the Description and Owner fields blank. 5 Under Services, select File. 6 Click apply. 7 If you see the following dialog box, click Yes.
Configuring a Document Centre 220/230/332/340/432/420/425/432/440 with Centreware Internet Services 8 Click the browser’s Refresh button. You should see the name of the new template in the list of Device Templates. 9 Click on [+] next to the name of the new template in the list of Device Templates.
Configuring a Document Centre 220/230/332/340/432/420/425/432/440 with Centreware Internet Services 10 Click Scan and verify the scan settings. Typically, the default settings are used, however click Edit if you want to change them.
Configuring a Document Centre 220/230/332/340/432/420/425/432/440 with Centreware Internet Services 20 11 Click File. 12 Under Stored templates, select the following: TCP/IP, Public, Default (or the repository designated for FlowPort), New Auto Generate, and TIFF (Multi-Page) . Then, click Apply New Settings. 13 The Document Center is now configured to scan to the FlowPort server.
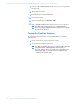
Configuring a Document Centre 220/230/332/340/432/420/425/432/440 with Centreware Internet Services Testing the FlowPort Template To check that the Document Centre is ready for FlowPort use, perform the following test: 1 At the Document Centre, place a document in the scanner. 2 Select the FlowPort template and select Scan.