User Addendum Fiery EXP250 Color Server, version 1.0SP1 for DocuColor 240/250 This addendum describes how to upgrade the Fiery EXP250 Color Server system software to include features that were not covered in the version 1.0 release. The document also supplements information in the user documentation about installable options and Fiery EXP250 user software. Before using the Fiery EXP250, read this User Addendum and distribute copies to all users.
Page 2 • Tray 5 Media Protection Copier damage is prevented with Tray 5 Media Protection if jobs printed from Tray 5 (Bypass) do not specify a media type. For more information, see “Tray 5 Media Protection option” on page 15. • Clarification of requirements for printing a duplex job in manual or semi-manual mode Manual and semi-manual duplex printing is supported using either Tray 5 (Bypass) or Tray 6 (Oversized) as the paper source.
Page 3 TO CHECK FOR AND INSTALL UPDATES MANUALLY FROM THE CONTROL PANEL 1 Turn off the copier before installing updates. 2 Press the Menu button to access the Functions menu, and press System Updates. System Updates checks the server for new updates and displays a message indicating whether or not updates are available. 3 Press OK. If updates are available, the message “Install now?” appears. 4 Select Yes and press OK. 5 Enter the administrator password, and press OK.
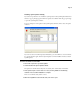
Page 4 TO CONFIGURE SYSTEM UPDATES TO CHECK FOR UPDATES FROM THE FACI 1 Click Start and choose Programs>Fiery>System Updates. Select the check box for Check for Important System Updates. 2 Select the option that describes how you want System Updates to respond when new updates are available. 3 If you select Automatically download and install updates, choose a time of day and a day of the week or Every Day from the menus. 4 Click OK.
Page 5 Installing system updates manually If you selected a preference to be notified of system updates in the System Updates Preferences window, a pop-up message appears when new updates are available. Click the pop-up message to open the System Updates window. To view a description of an update in the System Updates window, click to select the update in the list. If you do not want to install new updates immediately, you can click Exit to close the window.
Page 6 Updating system software through WebTools You can also check for system software updates from a secure site on the Internet. Updates to user software may also be available. TO CHECK FOR SOFTWARE UPDATES 1 Start WebTools. 2 Type the Administrator password and click OK. 3 Click Software Updates. If Software Updates does not appear as one of the WebTools, click Configure and enable it. 4 If an update is available, click the update. The update is downloaded to the Fiery EXP250.
Page 7 9 After the Fiery EXP250 reaches idle, reboot the Fiery EXP250. Using the Fiery EXP250 Control Panel, choose Shut Down from the Functions menu, and then choose Reboot System. The Control Panel should display the version as version 1.0SP1. Wait until the Fiery EXP250 has come to idle after the second reboot to print the Configuration page. 10 Print a Configuration page and verify that the Update Information section includes the name of the update file (the file name appears without the .
Page 8 Uninstalling Fiery EXP250 printer drivers To uninstall Windows printer drivers, refer to the section “Using Fiery Printer Delete Utility” in the Printing Utilities chapter of Printing from Windows on the User Documentation CD. To uninstall Mac OS X printer drivers, use the following procedure. TO REMOVE THE MAC OS X PRINTER DRIVER 1 Delete the Fiery EXP250 printer from the desktop. 2 Delete the following files: • /Library/Frameworks/h10.framework • /Library/Frameworks/hcore.
Page 9 6 Delete the fierycupsfilter with the Terminal utility (requires root administrator password). • Open the Terminal utility by browsing to /Applications/Utilities/Terminal. Double-click Terminal to launch the utility. • Change to the fierycupsfilter directory by entering cd /usr/libexec/cups/filter The command prompt reflects the new directory. • Enter sudo rm –r fierycupsfilter • Enter the root password. By default this password is blank. Press Enter to proceed.
Page 10 Mac OS X printer drivers Two versions of Mac OS X printer driver When you install the updated Mac OS X printer driver, you can install a Fast version, which does not check for incompatible print option settings but runs faster, or a Comprehensive version, which prevents you from choosing incompatible print option settings at the expense of some processing time. A dialog box in the OS X installer lets you choose the version.
Page 11 Cancel on Mismatch Cancel on Mismatch option The Cancel on Mismatch option causes a job to be cancelled if the media specified for the job (size and weight) is not available. The job is cancelled with an error and moved to the Printed queue, allowing the Fiery EXP250 to continue printing other jobs. The Cancel on Mismatch Timeout option specifies the number of minutes that the Fiery EXP250 waits before cancelling a mismatched job.
Page 12 5 Click the Accessories tab. 6 To manually set the Tray 6 (Oversized) option, select the option in the Available Options list, and click Add to move the option to the Installed Options list. 7 Alternatively, to configure installed options automatically by retrieving the settings from the Fiery EXP250, select Two-Way Communication, type the Fiery EXP250 IP address or DNS name, and click Update. If the Tray 6 (Oversized) option is configured at the server, it appears under Installed Options.
Page 13 TO INSTALL AND CONFIGURE THE UPDATED VERSION 1.0 PRINTER DRIVER ON MAC OS X 1 If the version 1.0 printer driver is installed, remove it. For instructions, see page 8. 2 Install the updated version 1.0 printer driver either from the CD or using WebTools. You can install a Fast version or a Comprehensive version. For more information, see “Two versions of Mac OS X printer driver” on page 10.
Page 14 TO INSTALL AND CONFIGURE THE UPDATED VERSION 1.0 PRINTER DRIVER ON MAC OS 9 1 If the version 1.0 printer driver is installed, remove it. 2 Install the updated version 1.0 printer driver either from the CD or using WebTools. For more information on installing and configuring the printer driver, see the Setting Up Printing on Mac OS 9 chapter of Printing from Mac OS. 3 Select Chooser from the Apple menu. 4 Make sure AppleTalk is set to Active. 5 Click the Adobe PS icon.
Page 15 Tray 5 Media Protection Tray 5 Media Protection option By default, a job prints with the copier’s default media type, which is Plain, because the default setting for the Media Type print option is Use Machine Settings. However, Tray 5 (Bypass) does not detect the media type actually loaded in the tray. If users load heavyweight media in Tray 5, the copier still prints for plain media, which can damage the fuser.
Page 16 Manual duplex printing using Tray 5 (Bypass) or Tray 6 (Oversized) Manual duplex printing is supported using either Tray 5 (Bypass) or Tray 6 (Oversized) as the paper source. You can print duplex output in a fully manual mode, determining the required paper manipulation yourself, or you can print in a semi-manual mode, in which the Fiery EXP250 prompts you to perform the manual steps required.
Page 17 N OTE : The illustrations below show pages with Portrait orientation printed LEF (Long Edge First). Top-Top printing Output Tray Input Tray For Top-Bottom printing, rotate the pages 180 degrees and turn them face down. Top-Bottom printing Output Tray Input Tray N OTE : For jobs imposed using Impose, always flip the pages along the long edge of the page.
Page 18 TO PRINT IN SEMI-MANUAL MODE 1 Choose Print in your application. 2 Set the print options as follows: • Manual Duplex = Manual • Face-Down Printing = Face Up • Paper Source = Tray 5 (Bypass) or Tray 6 (Oversized) 3 Print the job. The even-numbered pages are printed. 4 If you are printing from Tray 5 (Bypass), remove any unused paper from the tray. 5 Notice how the pages are oriented in the output tray before removing them.
Page 19 N OTE : The illustrations below show pages with Portrait orientation printed LEF (Long Edge First). Top-Top printing Output Tray Input Tray For Top-Bottom printing, rotate the pages 180 degrees and turn them face down. Top-Bottom printing Output Tray Input Tray 7 For Tray 6 (Oversized), press the Start button on the copier control panel. Tray 5 (Bypass) will detect that the pages have been loaded, so you do not need to press Start. The odd-numbered pages are printed.
Page 20 Production Printing Package Production Printing Package features The Production Printing Package (available as an option) offers Fiery EXP250 operators (or users with Operator or Administrator privileges) various additional features to monitor and manage the print workflow of jobs on the Fiery EXP250. All the features are accessible from Command WorkStation, Windows Edition. Schedule Printing is also accessible from Command WorkStation, Macintosh Edition.
Page 21 Compose The Compose application allows you to define the chapter divisions of a job, print ranges of pages on varying types of media, insert blank media between pages, and insert tab media containing text labels. You can also preview the job as thumbnails and full screen previews, and edit documents using Acrobat and PitStop. A special dongle must be installed on each workstation that runs Compose.
Page 22 TO ACCESS PAPER CATALOG FROM COMMAND WORKSTATION • To open Paper Catalog from Command WorkStation, select a spooled/held job in the Active Jobs window and choose Paper Catalog from the Server menu. For information about using Paper Catalog, access Paper Catalog Help from the Paper Catalog Help menu or press the F1 key on your keyboard. Only administrators can configure and edit Paper Catalog entries and settings.
Page 23 Reorder Jobs The Fiery EXP250 processes and prints batches of selected jobs in order of each job’s place in the queue. The Reorder Jobs feature allows you to control the processing or printing priority by reordering the job queue. When you promote jobs in the queue, these jobs take priority over the rest of the jobs on the Fiery EXP250. For example, you can reorder the queue to group together jobs with similar print options, such as media or tray selections.
Page 24 Suspend on Mismatch Suspend on Mismatch puts a job on hold when the Fiery EXP250 cannot start printing due to missing resources or a color profile mismatch. Other jobs in the queue continue to print on the Fiery EXP250. The reasons for a job being suspended are: • Specified paper type or size are not available. • Finishing option is not available. Checking for missing resources is done before a job is printed, not during printing.
Page 25 Schedule Printing The Schedule Printing feature allows you to set a specific date and time for printing a job. Assign Schedule Printing settings to a job from the following areas: • Job Properties window in Command WorkStation, Windows Edition, and Command WorkStation, Macintosh Edition (see Command WorkStation Help and the following procedure) • Active Jobs window in Command WorkStation, Windows Edition, and Command WorkStation, Macintosh Edition (see the following procedures).
Page 26 Print Next The Print Next feature moves a selected job immediately to the printing queue. If another job is currently printing, the selected job for Print Next is printed immediately after. Process Next The Process Next feature moves the selected job immediately to the processing queue. If another job is currently processing, the selected job for Process Next is processed immediately after.
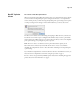
Page 27 The Insert Tab dialog box appears. 3 To load a previously saved tab setting, click Load Setting, highlight the desired tab setting, and then click Select. 4 Enter the number of tab pages that you want to insert into the document in the Total number of tabs field. 5 Enter the number of tab positions included in a complete tab set in the Number of tabs in a set field. This specification ensures that tab text is printed in the correct tab positions.
11 After you finish specifying the tabs, click OK to close the Insert Tab dialog box. The Tabs Text dialog box appears. Use the following procedure to define the tab text. TO SPECIFY TAB TEXT 1 In the Tabs Text dialog box, select the “Apply same text attributes for all tabs” option to assign the same text attributes to all tabs. 2 Click Text Attributes. Specify the rotation, alignment, font, and size attributes of the tab text, and then click OK.
Page 29 5 To modify media settings for the tabs, click Change Tab Settings. For more information, see “To insert tab pages” on page 26. 6 After you finish specifying tab text, click OK to close the Tabs Text dialog box. The Mixed Media dialog box displays the current tab settings in the Mixed Media Definition list. 7 To apply your Insert Tab settings to the document, click OK to close the Mixed Media dialog box, and then click OK again to close the Job Properties dialog box.
Page 30 Specifying filter settings for a Hot Folder After specifying the filter settings and options for your Hot Folder, drag and drop the proper file formats onto your Hot Folder to begin the conversion process. Open the Filter Settings dialog box from the Folder Properties dialog box. TO SELECT A FILTER SETTING 1 From the Hot Folders Control Panel, select the Hot Folder and click Properties. 2 Select Filter Settings and click Define.