FaxCentre F116 / F116L User manual Worldwide Partner 1 Guide d'utilisation 1xx Manual del usuario 2xx Data subject to change without notice Document non contractuel Documento no contractual *251523984B* User manual Manuel d'utilisation Manual del usuario
MFL 251 523 984_ FAXCENTRE F116_F116 L US.book Page 1 Mercredi, 11. août 2004 4:48 16 WELCOME Congratulations for purchasing this new generation multifunction machine. This machine is capable of faxing, printing and scanning and furthermore, can be used for Internet communications. Your machine will meet all your professional requirements. It combines power, user-friendliness and simplicity thanks to its navigator, its multitask access and its direct access directory.
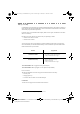
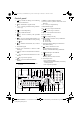
MFL 251 523 984_ FAXCENTRE F116_F116 L US.book Page 1 Mercredi, 11. août 2004 4:48 16 Control panel 1. key: manual line taking, tone monitoring during fax transmission. 2. key: attachment to a typed-in mail. 3. key: scanning resolution during transmission or copy. 4. key: contrast adjustment. 5. key: SMS transmission key: access to directory and quick-dial numbers. 7. key: access to the last dialed numbers, or to the last entered e-mail addresses after pressing the key. 8.
MFL 251 523 984_ FAXCENTRE F116_F116 L US.book Page 2 Mercredi, 11. août 2004 4:48 16 Date en cours : 11 août 2004 \\Sct01002\BE31-DOC\DOC 31 - En cours\Travaux en cours\Fax\MFL V 2\LU 251 523 984B MFL_V2 FAXCENTRE F116_F116L XEROX FR_GB_ESP\Anglais\Légende.
Installing the paper tray Installing the copy output tray Installing the document feed tray Installing the document output tray Loading paper Loading paper manually Installing the second paper cassette unit (option) Connections Telephone and LAN connection Power line connection and switch-on 2 GETTING STARTED 25 25 25 25 27 27 27 28 28 Navigation methods Presentation The navigator The display screen Access to functions Menu-driven access Direct access by number Functions list 3 SETTING UP YOUR M
MFL 251 523 984_ FAXCENTRE F116_F116 L US.book Page 2 Mercredi, 11.
Dialing From the directory From the redial key To multiple numbers Transmission over the Telephone Network Immediate transmission Delayed transmission Transmission with auto redial Rerouting Tx forwarding Transmission over the Internet Sending a black and white document to an E-Mail address Sending a color document to an E-mail address Sending a typed message to an E-Mail address Scan to FTP Transmission waiting queue Consult or modify the waiting queue Immediately perform transmission from the waitin
MFL 251 523 984_ FAXCENTRE F116_F116 L US.book Page 4 Mercredi, 11.
Scanner documents jams Document feeder document jam Misc problems Machine packing and transportation Machine specifications 7 SAFETY Warning Markings Electrical Supply Operator Accessible Areas Maintenance Cleaning Your Product WARNING - Electrical Safety Information Laser Safety Information Operational Safety Information Maintenance Information Ozone safety Information For consumables Radio frequency emissions Product safety certification Regulatory Information For fax function USA CANADA EUROPE En
MFL 251 523 984_ FAXCENTRE F116_F116 L US.book Page 6 Mercredi, 11. août 2004 4:48 16 -6- Date en cours : 11 août 2004 \\Sct01002\BE31-DOC\DOC 31 - En cours\Travaux en cours\Fax\MFL V 2\LU 251 523 984B MFL_V2 FAXCENTRE F116_F116L XEROX FR_GB_ESP\Anglais\MFL 251 523 984_ FAXCENTRE F116_F116 L USTDM.
MFL 251 523 984_ FAXCENTRE F116_F116 L US.book Page 7 Mercredi, 11. août 2004 4:48 16 1 INSTALLATION INSTALLING YOUR MACHINE INSTALLATION REQUIREMENTS A proper location helps to ensure that your machine provides you with the long service life for which it is designed. Double-check to make sure that the location you select has the following characteristics. • Choose a location that is well ventilated.
MFL 251 523 984_ FAXCENTRE F116_F116 L US.book Page 8 Mercredi, 11. août 2004 4:48 16 Installation • The machine has been designed to be used indoors only. • Do not use your machine near water. • Make sure there is no chance of ammonia or other organic gasses being generated in the area. • The grounded power outlet (refer to the safety instructions in the Safety section) you plan to connect to for power should be nearby and not obstructed. • Make sure that the machine is not exposed to direct sunlight.
MFL 251 523 984_ FAXCENTRE F116_F116 L US.book Page 9 Mercredi, 11. août 2004 4:48 16 • Whenever the machine emits unusually high amounts of heat, smoke, an unusual odor, or noise, immediately turn it off, unplug it, and contact your dealer. Failure to take this immediate action creates the danger of fire or electrical shock.
MFL 251 523 984_ FAXCENTRE F116_F116 L US.book Page 10 Mercredi, 11. août 2004 4:48 16 Installation UNPACKING THE SHIPPING BOX Take the packing material and the machine out of the shipping box. Packing material Machine Shipping box - 10 - Date en cours : 11 août 2004 \\Sct01002\BE31-DOC\DOC 31 - En cours\Travaux en cours\Fax\MFL V 2\LU 251 523 984B MFL_V2 FAXCENTRE F116_F116L XEROX FR_GB_ESP\Anglais\Installation.
MFL 251 523 984_ FAXCENTRE F116_F116 L US.book Page 11 Mercredi, 11. août 2004 4:48 16 Contents Installation UNPACKING THE MACHINE PARTS 12 13 1 8 2 Directory 7 Getting started 11 10 Setting up your machine 9 Installation Remove the plastic bags and check for the parts depicted below.
MFL 251 523 984_ FAXCENTRE F116_F116 L US.book Page 12 Mercredi, 11. août 2004 4:48 16 Installation Peel off the three strips of shipping tape from the front of the machine. Pull out the two pads from the paper feed inlet. - 12 - Date en cours : 11 août 2004 \\Sct01002\BE31-DOC\DOC 31 - En cours\Travaux en cours\Fax\MFL V 2\LU 251 523 984B MFL_V2 FAXCENTRE F116_F116L XEROX FR_GB_ESP\Anglais\Installation.
MFL 251 523 984_ FAXCENTRE F116_F116 L US.book Page 13 Mercredi, 11. août 2004 4:48 16 Press the paper size guide on the right, in order to push both paper size guides to the left or to the right. Pull out the plastic tab and the shipping tape from the paper feed inlet. Peel off the shipping tape from the paper tray.
MFL 251 523 984_ FAXCENTRE F116_F116 L US.book Page 14 Mercredi, 11.
MFL 251 523 984_ FAXCENTRE F116_F116 L US.book Page 15 Mercredi, 11. août 2004 4:48 16 INSTALLING THE REMOVABLE PARTS Contents Installation Using the machine's left and right notches, gently push the tray in until it stops (as illustrated below). Install the tray cover. Safety Maintenance Operation Directory Setting up your machine Getting started INSTALLING THE PAPER TRAY Installation This section details the installation of the machine's removable parts.
MFL 251 523 984_ FAXCENTRE F116_F116 L US.book Page 16 Mercredi, 11. août 2004 4:48 16 Installation INSTALLING THE COPY OUTPUT TRAY With both hands, slightly bend the centre part of the tray upwards in order to insert its clips into the notches located on the upper part of the machine. Release the tray so that it recovers its initial shape. If necessary, push at the base and at the centre of the tray from underneath so that is snaps into place behind notch A.
MFL 251 523 984_ FAXCENTRE F116_F116 L US.book Page 17 Mercredi, 11. août 2004 4:48 16 Install the output tray on the upper front part of the machine by inserting its two guides into the notches provided. Press the paper size guide on the right in order to push both paper size guides lightly to the left or to the right. Place a tray of paper into the tray. In case of letterhead paper, be sure to place the paper printed side up.
MFL 251 523 984_ FAXCENTRE F116_F116 L US.book Page 18 Mercredi, 11. août 2004 4:48 16 Installation Supported types of paper: Auto-feed cassette 16 lb. to 24 lb. (60 to 90 g/m²) Manual feed tray 16 lb. to 40 lb. (60 to 160 g/m²) Install the paper tray cover into place. Caution - Do not add paper in the paper tray while the machine is printing. LOADING PAPER MANUALLY When printing on special paper, such as 16 lb. to 40 lb. max.
MFL 251 523 984_ FAXCENTRE F116_F116 L US.book Page 19 Mercredi, 11. août 2004 4:48 16 Adjust the sheet or film width as appropriate by means of feed pawls 1 or 2. Installation Contents Installation Safety Maintenance Operation Directory Setting up your machine 2 Getting started 1 - 19 - Date en cours : 11 août 2004 \\Sct01002\BE31-DOC\DOC 31 - En cours\Travaux en cours\Fax\MFL V 2\LU 251 523 984B MFL_V2 FAXCENTRE F116_F116L XEROX FR_GB_ESP\Anglais\Installation.
MFL 251 523 984_ FAXCENTRE F116_F116 L US.book Page 20 Mercredi, 11. août 2004 4:48 16 Installation INSTALLING THE SECOND PAPER CASSETTE UNIT (OPTION) NOTE : Remove the second paper cassette unit and tray 2 from their packaging, including the protective tape used to hold the various components in place. Place the machine on top of the base unit. Make sure to align the coupling pins of the base unit with the holes located underneath the machine. Remove the cover from tray.
MFL 251 523 984_ FAXCENTRE F116_F116 L US.book Page 21 Mercredi, 11. août 2004 4:48 16 Getting started Installation Contents Installation CONNECTIONS B C D Directory A Setting up your machine Caution - Use the cable(s) delivered with the machine. H F Safety G Maintenance Operation E - 21 - Date en cours : 11 août 2004 \\Sct01002\BE31-DOC\DOC 31 - En cours\Travaux en cours\Fax\MFL V 2\LU 251 523 984B MFL_V2 FAXCENTRE F116_F116L XEROX FR_GB_ESP\Anglais\Installation.
MFL 251 523 984_ FAXCENTRE F116_F116 L US.book Page 22 Mercredi, 11. août 2004 4:48 16 Installation Make sure the On/Off switch is set to 0 (Off). Key to the diagram: A : L1 telephone line socket B : L2 telephone line socket (model F116L) C : LAN socket D : USB port E : Main Power Receptacle F : Power cord G : Line cord L1 H : Line cord L2 (model F116L) TELEPHONE AND LAN CONNECTION It is best that you use direct lines which are reserved for the machine only.
MFL 251 523 984_ FAXCENTRE F116_F116 L US.book Page 23 Mercredi, 11. août 2004 4:48 16 Caution - Refer to safety procedure in the Safety chapter. Connect the end of power cord F to socket E on the machine and the other end to the wall mains socket. Set the On/Off switch to position 1 (On).
MFL 251 523 984_ FAXCENTRE F116_F116 L US.book Page 24 Mercredi, 11. août 2004 4:48 16 Installation - 24 - Date en cours : 11 août 2004 \\Sct01002\BE31-DOC\DOC 31 - En cours\Travaux en cours\Fax\MFL V 2\LU 251 523 984B MFL_V2 FAXCENTRE F116_F116L XEROX FR_GB_ESP\Anglais\Installation.
MFL 251 523 984_ FAXCENTRE F116_F116 L US.book Page 25 Mercredi, 11. août 2004 4:48 16 2 GETTING STARTED NAVIGATION METHODS PRESENTATION The navigator gives you access to the menus visible on screen. The navigator This navigator has 5 keys and allows you to move within the menus available on your machine. - 25 - Date en cours : 11 août 2004 \\Sct01002\BE31-DOC\DOC 31 - En cours\Travaux en cours\Fax\MFL V 2\LU 251 523 984B MFL_V2 FAXCENTRE F116_F116L XEROX FR_GB_ESP\Anglais\PriseEnMains.
MFL 251 523 984_ FAXCENTRE F116_F116 L US.book Page 26 Mercredi, 11. août 2004 4:48 16 Getting Started Moving within the menus To Use key Symbol used M Enter the main menu. Select the next line in a menu. Select the previous line in a menu. Confirm entry and go to the following menu. OK C Return to the previous menu. Confirm and exist from the current menu. Exit without confirming from the current menu.
MFL 251 523 984_ FAXCENTRE F116_F116 L US.book Page 27 Mercredi, 11. août 2004 4:48 16 Use key Symbol used Delete a character by moving the cursor to the left. Getting started C Confirm your entry and return to the initial screen. The display screen The screen has two lines of 16 characters. shows the line you selected. 1 DIRECTORY 2 SETUP For menus with more than two choices, use the arrows next (hidden) lines of the menu (3, 4, etc.).
MFL 251 523 984_ FAXCENTRE F116_F116 L US.book Page 28 Mercredi, 11. août 2004 4:48 16 Getting Started When in the selected menu, use the or navigator arrows to move the cursor in front of the required sub-function. 51 FUNCTIONS LIST 52 LOGS Validate your choice by pressing OK. Direct access by number You may print the functions list (M 51 OK) to know the number of a function.
MFL 251 523 984_ FAXCENTRE F116_F116 L US.book Page 29 Mercredi, 11. août 2004 4:48 16 MAIN MENU 2 : SETUP - 42 42 43 43 43 43 43 39 35 35 35 36 MAIN MENU 3 : FAX Functions - TRANSMISSION ECO TRANS. POLLING RX POLLING TX MBX SENDING MBX POLLING BROADCAST FAX ANSW. FAX FORWARD. REROUTING ACTIVATION DESTINATION COPY TX FORWARD.
MFL 251 523 984_ FAXCENTRE F116_F116 L US.book Page 30 Mercredi, 11.
MFL 251 523 984_ FAXCENTRE F116_F116 L US.book Page 31 Mercredi, 11. août 2004 4:48 16 - 86 72 86 87 88 89 110 MAIN MENU 9 : INTERNET Functions Function description Page M 91 OK M 92 OK M 921 OK M 9211 OK M 9212 OK M 9213 OK M 922 OK M 9221 OK M 9222 OK M 9223 OK M 923 OK M 9231 OK M 9232 OK M 9233 OK M 9234 OK M 924 OK M 9241 OK - M 93 OK - SUPPLIER INIT PROVIDER CONNECTION CALL NUMB. IDENTIFIER PASSWORD MESS. SERV IDENTIFIER PASSWORD E-MAIL ADR SERVERS SMTP POP3 DNS 1 DNS 2 SMTP AUTHENT.
MFL 251 523 984_ FAXCENTRE F116_F116 L US.book Page 32 Mercredi, 11. août 2004 4:48 16 Getting Started MAIN MENU 9 : INTERNET Functions M 97 OK M 972 OK M 973 OK M 974 OK - MAINTENANCE CALL NUMB. IDENTIFIER PASSWORD Function description Page Supplier’s dial-up number Supplier’s identifier Supplier’s password A.
MFL 251 523 984_ FAXCENTRE F116_F116 L US.book Page 33 Mercredi, 11. août 2004 4:48 16 3 SETTING UP YOUR MACHINE MAIN SETTINGS After machine power on, the screen displays : month day hours minutes FRI 31 DEC 23:59 PLEASE WAIT FineSFinePhoto You have to set the date and time, telephone network, language parameter and verify the other parameters listed bellow.
MFL 251 523 984_ FAXCENTRE F116_F116 L US.book Page 34 Mercredi, 11. août 2004 4:48 16 Setting Up Your Machine REMOTE CONFIGURATION EMBEDDED WEB SERVER You may configure the same parameters by remote as you would locally. Conditions required To be able to configure your machine by remote, you must: • Have a Web browser (Internet Explorer version 4 or above for optimal operation). • Define your machine’s Local Network setting parameters (IP address, subnet mask, etc.
MFL 251 523 984_ FAXCENTRE F116_F116 L US.book Page 35 Mercredi, 11. août 2004 4:48 16 Your machine number/your name Contents Setting Up Your Machine Enter your fax machine number (20 digits max.) and press OK to confirm. Enter your name (20 characters max) then press OK to confirm. Type of network You may connect your machine to either a PSTN (Public exchange) or private network such as private automatic branch exchange (PABX Private exchange).
MFL 251 523 984_ FAXCENTRE F116_F116 L US.book Page 36 Mercredi, 11. août 2004 4:48 16 Setting Up Your Machine Language This setting enables you to choose a language other than that imposed by the COUNTRY setting. To select the language: M 203 OK - SETUP / GEOGRAPHICAL / LANGUAGE Select the required option and press the OK key to confirm. Confirmation report You may print a confirmation report for all communications over the telephone network (STN).
MFL 251 523 984_ FAXCENTRE F116_F116 L US.book Page 37 Mercredi, 11. août 2004 4:48 16 Modifying the off peak time: M 233 OK - SETUP / SEND / ECO PER. Contents Setting Up Your Machine Enter the hours of the new off peak time and confirm your selection with the key OK. M 32 OK - FAX / ECO TRANS. Enter the call number and confirm with OK.
MFL 251 523 984_ FAXCENTRE F116_F116 L US.book Page 38 Mercredi, 11. août 2004 4:48 16 Setting Up Your Machine Reception without paper Your fax function offers you the possibility to either accept or refuse document reception if your machine is unavailable (no paper...).
MFL 251 523 984_ FAXCENTRE F116_F116 L US.book Page 39 Mercredi, 11. août 2004 4:48 16 The document in the feeder will be relayed either immediately or at a later time (according to your choice) to the remote machine which will relay the document. Contents Setting Up Your Machine M 243 OK - SETUP / RECEPTION / PC RECEPT.
MFL 251 523 984_ FAXCENTRE F116_F116 L US.book Page 40 Mercredi, 11. août 2004 4:48 16 Setting Up Your Machine Parameter Setting Signification 8 - ECO ENERGY 1 - WITHOUT 2 - DELAY 5 MIN 3 - DELAY 15 MIN 4 - DELAY 30 MIN 5 - STDBY PERIOD Choosing the machine standby delay: the machine will switch to standby after a delay (in minutes) of NON-operation or during the period of time of your choice.
MFL 251 523 984_ FAXCENTRE F116_F116 L US.book Page 41 Mercredi, 11. août 2004 4:48 16 74 - ERASE MAILBOX 1 - WITH When the machine receives an e-mail with an attachment and cannot open it, it erases the message from the ISP MBX, prints and transmits with a notice of uncomprehension to the message sender. 2 - WITHOUT At E-mail reception, the machine does not destroy the MBX message, it prints a notice of uncomprehension asking you to recuperate this message with your computer equipment.
MFL 251 523 984_ FAXCENTRE F116_F116 L US.book Page 42 Mercredi, 11. août 2004 4:48 16 Setting Up Your Machine LOCAL AREA NETWORK (LAN) SETTINGS Your machine is a new generation machine that will be part of your local network just like a PC. Its built-in local network access card will enable you to send documents through an SMTP/POP3 local message server (internally or externally, depending on the settings of your message server).
MFL 251 523 984_ FAXCENTRE F116_F116 L US.book Page 43 Mercredi, 11. août 2004 4:48 16 Sub-network mask M 2533 OK - SETUP / LOCAL NETWORK / SUBNET MASK Enter the sub-network mask of your machine and press OK to confirm. Gateway address M 2534 OK - SETUP / LOCAL NETWORK / GATEWAY Enter the IP address of the network gateway and press OK to confirm.
MFL 251 523 984_ FAXCENTRE F116_F116 L US.book Page 44 Mercredi, 11. août 2004 4:48 16 Setting Up Your Machine L1 AND L2 LINE NETWORK CONFIGURATION (MODEL F116L) You can define different characteristics for each telephone line in relation to the network type: public or private. NETWORK TYPE The telephone lines to which your machine is connected may be connected either to the public network or to a private network (behind a private company exchange).
MFL 251 523 984_ FAXCENTRE F116_F116 L US.book Page 45 Mercredi, 11. août 2004 4:48 16 You can record the fax machine number that corresponds to line 2 (L2) on you machine. This number is send to the people you call and may also appear at the header on each page of any documents you send them. To record the number of line 2 (L2) on your machine, press the keys M 2 6 2, then enter or modify the number. If line 2’s number (L2) is not defined, by default it takes the value of line 1.
MFL 251 523 984_ FAXCENTRE F116_F116 L US.book Page 46 Mercredi, 11. août 2004 4:48 16 Setting Up Your Machine DIALING PREFIX Before each automatic call, your machine may add a prefix to the numbers you dial if they have a minimum length. This function is especially useful when your machine is installed behind a company telephone exchange: - The internal numbers, for which the prefix is not necessary, are short numbers (between 4 and 6 digits).
MFL 251 523 984_ FAXCENTRE F116_F116 L US.book Page 47 Mercredi, 11. août 2004 4:48 16 : When a line is idle, you can pick up a line on it manually (L1 or L2) by pressing the (loudspeaker) key: Press the Select the line in question (L1 or L2) using the Press the key. and keys. again to confirm your selection. If a call is in progress on line L2 (model F116L), only line L1 may be picked up manually. In this case, the operation requested is performed without using the menu described above.
MFL 251 523 984_ FAXCENTRE F116_F116 L US.book Page 48 Mercredi, 11. août 2004 4:48 16 Setting Up Your Machine CALL REPORTS AND LOGS In the transmission and reception reports, the number of the call line used is always indicated by Line 1 or Line 2. In the call logs, the Note heading always contains the number of the line used: L1 for line 1 and L2 for line 2.
MFL 251 523 984_ FAXCENTRE F116_F116 L US.book Page 49 Mercredi, 11. août 2004 4:48 16 Before sending e-mail transmission, you must: • take out an Internet subscription from an Internet Service Provider (ISP), • check that all initialization parameters correspond to those provided by your ISP, • perform the proper settings, if needed, for the Internet connection. You may then connect yourself to the Internet via your ISP to send and receive fax-Internet or E-mails.
MFL 251 523 984_ FAXCENTRE F116_F116 L US.book Page 50 Mercredi, 11. août 2004 4:48 16 Setting Up Your Machine Enter connection IDENTIFIER1, press OK. Enter connection PASSWORD, press OK. M 922 OK - INTERNET / INIT PROVIDER / MESS. SERV Enter Email IDENTIFIER, press OK. Enter Email PASSWORD, press OK. Enter E-MAIL ADR, press OK. Access to servers parameters M 923 OK - INTERNET / INIT PROVIDER / SERVERS Enter SMTP, press OK. Enter POP3, press OK.
MFL 251 523 984_ FAXCENTRE F116_F116 L US.book Page 51 Mercredi, 11. août 2004 4:48 16 SERVER: SMTP mail.gofornet.com POP mail.gofornet.com DNS 1 103.195.014.001 DNS 2 103.195.014.002 Non-functional data given by way of example. Installation Contents Setting Up Your Machine 9211 CALL NUMB. 0860001000 9212 IDENTIFIER sg048944@wn.net 9213 PASSWORD ***** MESSAGE SERVICE 9221 EMAIL ID demo jt 12 9222 EMAIL PASSWORD ***** 9223 E-MAIL ADR demo2@gofornet.com SERVERS 9231 SMTP mail.
MFL 251 523 984_ FAXCENTRE F116_F116 L US.book Page 52 Mercredi, 11. août 2004 4:48 16 Setting Up Your Machine SETTINGS The settings are divided into several categories: • the standard settings define the connection type and frequency to the Internet as well as the transmission type for your documents, • the E-mail sorting defines treatment for all stored E-mail messages received.
MFL 251 523 984_ FAXCENTRE F116_F116 L US.book Page 53 Mercredi, 11. août 2004 4:48 16 M 943 OK - INTERNET / SETTINGS / HOURS With the SET TIMES mode selected, use the or key to place the cursor under the numeral you want to change. Enter the new connection time(s) by means of the numerical keypad (between 00:01 am and 11:59 pm) and press OK to confirm.
MFL 251 523 984_ FAXCENTRE F116_F116 L US.book Page 54 Mercredi, 11. août 2004 4:48 16 Setting Up Your Machine Share PC mode Select option SHARE PC and press OK to confirm. You may choose to transfer your E-mails to a PC or use the machine as an E-mail machine. To transfer the E-Mails to a PC: Select option WITH PC TRANS. and press OK to confirm. Enter the E-Mail address of the computer you wish to transfer your E-Mail and press OK to confirm.
MFL 251 523 984_ FAXCENTRE F116_F116 L US.book Page 55 Mercredi, 11. août 2004 4:48 16 Immediate connection to the Internet Contents Setting Up Your Machine There are two methods to immediately connect to the Internet: M 93 OK - INTERNET / IMMED ACCES Direct access: Press the key twice. Installation Access through the menu: DEACTIVATING THE INTERNET FUNCTION If you do not wish to use the Internet functions: M 91 OK - INTERNET / SUPPLIER Select NO ACCESS in the ISP list and confirm with OK.
MFL 251 523 984_ FAXCENTRE F116_F116 L US.book Page 56 Mercredi, 11. août 2004 4:48 16 Setting Up Your Machine - 56 - Date en cours : 11 août 2004 \\Sct01002\BE31-DOC\DOC 31 - En cours\Travaux en cours\Fax\MFL V 2\LU 251 523 984B MFL_V2 FAXCENTRE F116_F116L XEROX FR_GB_ESP\Anglais\Configuration.
MFL 251 523 984_ FAXCENTRE F116_F116 L US.book Page 57 Mercredi, 11. août 2004 4:48 16 4 DIRECTORY Your machine lets you create a directory by memorising speed dials and group dials. • Your machine can store up to 500 speed dials with names and phone numbers. • You may also group several names to build a group dial list with up to 32 group dials. A group dial list is made from the speed dials already stored.
MFL 251 523 984_ FAXCENTRE F116_F116 L US.book Page 58 Mercredi, 11. août 2004 4:48 16 Directory • RATE for each group dial you may choose your fax transmission speed. The available rates are 2400, 4800, 7200, 9600, 12000, 14400 and 33600 bits per second. With a good telephone connection, well adapted and without echo, the appropriate rate is the highest one.
MFL 251 523 984_ FAXCENTRE F116_F116 L US.book Page 59 Mercredi, 11. août 2004 4:48 16 Contents Directory ADDING A LIST M 12 OK - DIRECTORY / NEW LIST . Also, you do not have to complete all the list characteristics as you create it; you can save the list as it is by pressing . The empty field ENTER ABR.NUM. appears, you must fill in the ID numbers assigned to the speed dials included in this list.
MFL 251 523 984_ FAXCENTRE F116_F116 L US.book Page 60 Mercredi, 11. août 2004 4:48 16 Directory MODIFYING A RECORD OR A LIST M 13 OK - DIRECTORY / MODIFY The directory appears in alphabetical order. NOTE : Use the Modify the line or lines in the speed dial or group dial and confirm each modification with OK. or keys to select the group dial (L) you wish to modify and press OK to confirm. You may confirm your modification by pressing to modify the following lines.
MFL 251 523 984_ FAXCENTRE F116_F116 L US.book Page 61 Mercredi, 11. août 2004 4:48 16 Name A unique identifier in your directory, up to 20 characters long. This field is mandatory; the name should not include the field separator character. fax machine number Your contacts’ fax machine number, without spaces or dots, can be up to 30 characters long (including any * and # characters). This field may be left empty, for instance, in the case of contacts to whom you only send e-mails.
MFL 251 523 984_ FAXCENTRE F116_F116 L US.book Page 62 Mercredi, 11. août 2004 4:48 16 Directory The rate is coded on a number, see the following table: Rate Code number 600 7 1200 6 2400 5 4800 4 7200 3 9600 2 12000 1 14400 0 33600 8 Caution - You must always enter the field separator character, even if one or more of the fields are left blank. In the example above, which uses a semi-colon as a separator, the entry for « Jones » lacks both E-mail address and shortcut key.
MFL 251 523 984_ FAXCENTRE F116_F116 L US.book Page 63 Mercredi, 11. août 2004 4:48 16 You may also export a directory from a machine as a text file, and send it to any mail client (be it PC or fax based), in the form of an e-mail attachment entitled directoryxxx.csv. To export the directory: M 18 OK - DIRECTORY / EXPORT Key in the e-mail address of the PC or other machine to which you want to export the directory. Confirm by pressing OK.
MFL 251 523 984_ FAXCENTRE F116_F116 L US.book Page 64 Mercredi, 11. août 2004 4:48 16 Directory - 64 - Date en cours : 11 août 2004 \\Sct01002\BE31-DOC\DOC 31 - En cours\Travaux en cours\Fax\MFL V 2\LU 251 523 984B MFL_V2 FAXCENTRE F116_F116L XEROX FR_GB_ESP\Anglais\Répertoire.
MFL 251 523 984_ FAXCENTRE F116_F116 L US.book Page 65 Mercredi, 11. août 2004 4:48 16 5 OPERATION SENDING Faxes sent over the telephone network are sent from the document feeder or the memory. Documents sent over the Internet are first stored in memory and sent at the time of Internet connection. Over the telephone network: all fax transmissions are in black and white. Over the Internet: you can send black and white documents (TIFF format) or color documents (JPEG format).
MFL 251 523 984_ FAXCENTRE F116_F116 L US.book Page 66 Mercredi, 11. août 2004 4:48 16 Operation Caution - If you forget to position the document to be transmitted, the addressee could receive a blank pages. NOTE : Since the addressee’s number is generally on the document to be transmitted, you may also dial before positioning the document. CHOOSING THE RESOLUTION/CONTRAST Resolution You have 4 modes for document transmission.
MFL 251 523 984_ FAXCENTRE F116_F116 L US.book Page 67 Mercredi, 11. août 2004 4:48 16 Contents Operation Assigned number dialing Press key . Your machine lists the group dials and lists in the directory in alphabetical order. or Enter the group dial or subscriber list assigned number. The screen displays the name of the group dial or subscriber list assigned to this number. From the redial key You can redial one number among the ten last numbers you just dialed before.
MFL 251 523 984_ FAXCENTRE F116_F116 L US.book Page 68 Mercredi, 11. août 2004 4:48 16 Operation TRANSMISSION OVER THE TELEPHONE NETWORK Immediate transmission Position the document (refer to paragraph Document positioning, page 65). Enter the fax machine number or choose your dialing mode (refer to paragraph Dialing, page 66) then press . The "Line" icon flashes during the call phase, it stays lit when both machines are in communication.
MFL 251 523 984_ FAXCENTRE F116_F116 L US.book Page 69 Mercredi, 11. août 2004 4:48 16 Contents Operation To use the manual dial mode: Place the document in the machine input tray. Press If necessary, set the sound level with navigator If not already done, enter the group dial number (ou refer to paragraph From the redial key, page 67 to call back the last group dial). or keys. As soon as you hear the remote machine tone, the line is clear and you can start the transmission.
MFL 251 523 984_ FAXCENTRE F116_F116 L US.book Page 70 Mercredi, 11. août 2004 4:48 16 Operation • Set the re-direction contact M 3912 OK - FAX / REROUTING / CALL NUMBER NOTE : Using the keys or within the navigator select the group dial from the directory (If the directory is empty the display will show DIRECTORY EMPTY). Enter the number of the group dial manually or store the name and related number in the directory (refer to paragraph Adding a record, page 58).
MFL 251 523 984_ FAXCENTRE F116_F116 L US.book Page 71 Mercredi, 11. août 2004 4:48 16 Press the and enter the recipient’s E-mail address, or choose your dialing mode (refer to paragraph Dialing, page 66). Adjust the contrast and the resolution if necessary (refer to paragraph Choosing the resolution/contrast, page 66). Press the key The document is scanned and placed in memory, it will be sent at the time of Internet connection.
MFL 251 523 984_ FAXCENTRE F116_F116 L US.book Page 72 Mercredi, 11. août 2004 4:48 16 Operation Then, to send to E-mail address: Enter the addressee’s E-mail address or choose your dialing mode (refer to paragraph Dialing, page 66). Enter the address of who you want to receive a copy of the document (CC:), and press OK to confirm. Enter the object for mail (80 characters max.
MFL 251 523 984_ FAXCENTRE F116_F116 L US.book Page 73 Mercredi, 11. août 2004 4:48 16 Select B&W SCAN to send a document in black and white or COLOR SCAN to send a document in color. Validate with OK key (this setting may be changed at any time during the send procedure with the color key). Enter the name of the attachment and validate with OK key. If necessary, change the attachment format: PDF or IMAGE et validate with OK key.
MFL 251 523 984_ FAXCENTRE F116_F116 L US.book Page 74 Mercredi, 11. août 2004 4:48 16 Operation Consult or modify the waiting queue M 62 OK - COMMANDS / MODIFY In the waiting queue select the required document and confirm your choice with OK. You may now modify the parameters of the given document then confirm your modifications by pressing key .
MFL 251 523 984_ FAXCENTRE F116_F116 L US.book Page 75 Mercredi, 11. août 2004 4:48 16 Document reception over the Internet is automatic at each Internet connection. Reception of all documents over the telephone network is done one at a time at fax reception.
MFL 251 523 984_ FAXCENTRE F116_F116 L US.book Page 76 Mercredi, 11. août 2004 4:48 16 Operation Enhanced copy Position the document face down (refer to paragraph Document positioning, page 65). Press key Enter the desired number of copies and press OK to confirm. Choose FAST, QUALITY or PHOTO resolution with the keys confirm. Set the desired zoom value 25% TO 400% with keys press OK to confirm.
MFL 251 523 984_ FAXCENTRE F116_F116 L US.book Page 77 Mercredi, 11. août 2004 4:48 16 Caution - All the settings performed through this menu will become the machine's default settings. Contents Operation To access to the settings: Select the SCANNER or the MACHINE to be set and press OK to confirm. Use the keys to modify. or of the navigator to scroll the described hereafter settings you want Installation M 84 OK - ADVANCED FCT / SCAN.
MFL 251 523 984_ FAXCENTRE F116_F116 L US.book Page 78 Mercredi, 11. août 2004 4:48 16 Operation Contrast Set the desired contrast with keys Confirm your setting by pressing key OK. or . Lumination Set the desired lumination with keys Confirm your setting by pressing key OK. or . Margins If you want to shift the side margins of your document to the left or to the right: Adjust the left / right margins shift (in steps of 0.5 mm) with keys Confirm your setting by pressing key OK.
MFL 251 523 984_ FAXCENTRE F116_F116 L US.book Page 79 Mercredi, 11. août 2004 4:48 16 Contents Operation Selecting Paper Formats M 84241 OK - (A4) M 84242 OK - (LETTER) M 84243 OK - (LEGAL) Installation You can select paper formats by choosing the following menus: M 2441 OK - AUTOMATIC This function automatically resizes received faxes: a fax received in Legal format will be printed on Letter paper via the previously installed paper tray.
MFL 251 523 984_ FAXCENTRE F116_F116 L US.book Page 80 Mercredi, 11. août 2004 4:48 16 Operation Machine settings Paper NOTE : Select the type of paper NORMAL or THICK with keys Confirm your setting by pressing key OK. or . 1) When the THICK type of paper is selected, the printing speed is slowed down. 2) Use the manual feeder for paper substances over 24 lb. (90 g/m²).
MFL 251 523 984_ FAXCENTRE F116_F116 L US.book Page 81 Mercredi, 11. août 2004 4:48 16 To print the logs: M 52 OK - PRINT / LOGS Contents Operation PRINTING THE FUNCTIONS LIST Installation The incoming and outgoing logs are printed on the same page. You may print the functions list of your machine at any time. At any moment, you may print the list of your parameter settings to control any changes possibly made to the default parameters.
MFL 251 523 984_ FAXCENTRE F116_F116 L US.book Page 82 Mercredi, 11. août 2004 4:48 16 Operation Repeat this last step for all group dials. Press key F1: the sequence is memorized. To send a fax directly to your group dial (key F1 preset) Press F1. Position the document (refer to paragraph Document positioning, page 65). Press the key . FONT PRINTING You can print the list of fonts installed on your machine at any time.
MFL 251 523 984_ FAXCENTRE F116_F116 L US.book Page 83 Mercredi, 11. août 2004 4:48 16 DEPOSIT AND POLLING You may deposit a document in your machine and keep it available to one or more group dial who can obtain a fax of this document by calling your machine with the POLL function. Your group dial can then get (if they request it) the fax of a document that you have previously deposited in your machine.
MFL 251 523 984_ FAXCENTRE F116_F116 L US.book Page 84 Mercredi, 11. août 2004 4:48 16 Operation Depending on the type of poll you should: Choice Procedure Immediate poll Press Delayed poll Press OK. Next to the current time, enter the time you wish to poll the . document and press .
MFL 251 523 984_ FAXCENTRE F116_F116 L US.book Page 85 Mercredi, 11. août 2004 4:48 16 With keys Press key OK to confirm. of the navigator, select the option WITH. After each operation, the machine keyboard locks automatically. Locking the numbers This function locks dialing and the numerical keypad is disabled. Transmissions are only possible from numbers included in the directory. You can still send mails by typing in the addressee’s address (if this has no numbers in it).
MFL 251 523 984_ FAXCENTRE F116_F116 L US.book Page 86 Mercredi, 11. août 2004 4:48 16 Operation Remark : Press key OK to confirm. When a code is already saved, the unit first asks you for the old code before allowing you to change it. SCAN TO PC This function allows to send an opening notice of a scan function of a PC connected to your machine (with the Companion Suite Pro kit). For more information, refer to the User Manual provided with your PC Kit (Companion Suite Pro).
MFL 251 523 984_ FAXCENTRE F116_F116 L US.book Page 87 Mercredi, 11. août 2004 4:48 16 Deactivating the department code Contents Operation M 881 OK - ADVANCED FCT / DEPT. CODES / ACTIVATION Using the browser’s Press OK to confirm; the function is deactivated.
MFL 251 523 984_ FAXCENTRE F116_F116 L US.book Page 88 Mercredi, 11. août 2004 4:48 16 Operation Creating a department code Only the administrator, using the Mastercode is able to attribute other department codes. Enter your Mastercode and confirm by OK. M 882 OK - ADVANCED FCT / DEPT. CODES / NEW DEPT. Enter a number between 01 and 98 or select a free number using the the machine’s display. Confirm your selection by pressing OK. or keys, as shown on The screen displays: 8821>DEPT.
MFL 251 523 984_ FAXCENTRE F116_F116 L US.book Page 89 Mercredi, 11. août 2004 4:48 16 Contents Operation Printing a department code Enter the number of the department you want to print and confirm by pressing OK. ** DEPARTMENT CODES ** SID : Smith Number : 0987654321 Department 01 Departement Name FAX LASER Departement Code 3178 Pages sent 1589 Pages copied 2890 Date : 12-12-04 14:20 Printing the department report The administrator may print reports for all the departments created.
MFL 251 523 984_ FAXCENTRE F116_F116 L US.book Page 90 Mercredi, 11. août 2004 4:48 16 Operation USE OF THE DEPARTMENT CODES BY A DEPARTMENT To access the different machine functions, each department must enter its own access code as delivered by the administrator. When the "DEPARTMENT CODE" function is activated M 881 OK the screen displays: THU 20 FEB 10:15 ENTER DEPT. CODE Press on the numerical keypad only (pressing any other keys will sound beeps).
MFL 251 523 984_ FAXCENTRE F116_F116 L US.book Page 91 Mercredi, 11. août 2004 4:48 16 MBX 00 is public. It is handled directly by the machine to record the messages of the machine TAD as soon as this is put into service. MBX’s 01 to 31 are private. Each is password-protected. They can be used to receive documents confidentially. The use and access to MBX 01 - 31 are conditioned by the initialization, defined by a MBX code (if needed) and a mnenonic (its S.I.D.).
MFL 251 523 984_ FAXCENTRE F116_F116 L US.book Page 92 Mercredi, 11. août 2004 4:48 16 Operation The MBX is initialized. If you wish to initialize another, press C and repeat the same procedure. To exit the MBX, press . Modifying the features of a MBX M 72 OK - MAILBOXES / DEPOSIT MBX Select a free MBX out of the 31 MBX, or enter the number of a free MBX directly (1-31) and confirm by pressing OK. Enter the code of this MBX, if there is one, and confirm with OK.
MFL 251 523 984_ FAXCENTRE F116_F116 L US.book Page 93 Mercredi, 11. août 2004 4:48 16 MBX deposit in your machine Insert the document in the machine’s document feeder. Select M 72 OK - MAILBOXES / DEPOSIT MBX and confirm with OK. Select a free MBX out of the 31 MBX, or enter the number of a free MBX directly (1-31) and confirm by pressing OK. The document is scanned by the machine and saved in the selected MBX.
MFL 251 523 984_ FAXCENTRE F116_F116 L US.book Page 94 Mercredi, 11. août 2004 4:48 16 Operation - 94 - Date en cours : 11 août 2004 \\Sct01002\BE31-DOC\DOC 31 - En cours\Travaux en cours\Fax\MFL V 2\LU 251 523 984B MFL_V2 FAXCENTRE F116_F116L XEROX FR_GB_ESP\Anglais\Utilisation.
MFL 251 523 984_ FAXCENTRE F116_F116 L US.book Page 95 Mercredi, 11. août 2004 4:48 16 6 MAINTENANCE MAINTENANCE GENERAL To ensure the best operating conditions for your machine, it is recommended that you regularly clean the inside. For normal usage, please respect the following rules: • Never leave the cover open unless required. • Protect the machine from direct sunlight. • Do not attempt to oil the machine. • Always gently close the cover and avoid vibrations. • Do not open the cover while printing.
MFL 251 523 984_ FAXCENTRE F116_F116 L US.book Page 96 Mercredi, 11. août 2004 4:48 16 Maintenance REPLACING THE CONSUMABLES (TONER AND DRUM CARTRIDGES) To check the remaining capacities of the consumables: M 85 OK - ADVANCED FCT / CONSUMABLES The toner cartridge and the drum cartridge come with a chip card. After replacing a consumable item in the machine, you need to inform the machine about its features.
MFL 251 523 984_ FAXCENTRE F116_F116 L US.book Page 97 Mercredi, 11. août 2004 4:48 16 2 - Remove the old toner cartridge. Caution - In order to protect the environment, Operation Directory do not throw away the used toner cartridge. Used cartridges should be disposed of in accordance with local regulations concerning waste materials. Setting up your machine Getting started Installation Caution - The Fuser Assy located inside the machine may become very hot during operation.
MFL 251 523 984_ FAXCENTRE F116_F116 L US.book Page 98 Mercredi, 11. août 2004 4:48 16 Maintenance 3 - Remove the new toner cartridge from its box. Hold it firmly with both hands and shake it in the directions shown by the arrows in the diagram below. - 98 - Date en cours : 11 août 2004 \\Sct01002\BE31-DOC\DOC 31 - En cours\Travaux en cours\Fax\MFL V 2\LU 251 523 984B MFL_V2 FAXCENTRE F116_F116L XEROX FR_GB_ESP\Anglais\Maintenance.
MFL 251 523 984_ FAXCENTRE F116_F116 L US.book Page 99 Mercredi, 11. août 2004 4:48 16 : Use the color-coded stickers marked "2", which are located both on the toner cartridge and the inside of the machine, for proper positioning. These two stickers should line up while installing the toner cartridge. Setting up your machine Getting started NOTE 4 - Holding the cartridge by its handle, slide it into the machine.
MFL 251 523 984_ FAXCENTRE F116_F116 L US.book Page 100 Mercredi, 11. août 2004 4:48 16 Maintenance The cartridge will click into position once it is correctly installed. 5 - Shut the upper cover by pressing it down gently but firmly until it locks into position. Press OK on the scanner keypad.
MFL 251 523 984_ FAXCENTRE F116_F116 L US.book Page 101 Mercredi, 11. août 2004 4:48 16 Insert chip card (supplied with the toner cartridge) into the card reader ensuring that the chip is entered as shown in the drawing below. Contents Maintenance The following is displayed on the scanner control panel screen: CHANGE TONER ? Setting up your machine Getting started Installation Green arrow Press OK.
MFL 251 523 984_ FAXCENTRE F116_F116 L US.book Page 102 Mercredi, 11. août 2004 4:48 16 Maintenance Replacing the drum cartridge To replace the drum cartridge, proceed as shown below: When the display shows: CHANGEDRUM TO CONFIRM 1 - Press the release button of the upper cover to open it. 2 1 Caution - The fusing assembly located inside the machine may become very hot during operation. To avoid injury - do not touch 2 - The drum cartridge is under the toner cartridge.
MFL 251 523 984_ FAXCENTRE F116_F116 L US.book Page 103 Mercredi, 11. août 2004 4:48 16 Caution - Safety Maintenance Operation Directory Setting up your machine Getting started Installation In order to protect the environment, do not throw away the used drum cartridge. Used cartridges should be disposed of in accordance with local regulations concerning waste materials.
MFL 251 523 984_ FAXCENTRE F116_F116 L US.book Page 104 Mercredi, 11. août 2004 4:48 16 Maintenance NOTE : 4 - Install the drum cartridge into the machine, ensuring that the pins on the cartridge are aligned with the grooves in the machine. Use the color-coded stickers marked "1" which are located both on the drum cartridge and the inside of the machine for proper positioning (the stickers should line up). Ensure that you insert the drum cartridge as far as possible into the machine.
MFL 251 523 984_ FAXCENTRE F116_F116 L US.book Page 105 Mercredi, 11. août 2004 4:48 16 5 - Holding the toner cartridge by its handle, slide it into the machine Ensure that the four pins (two on either side of the cartridge) are properly aligned with the grooves in the machine. NOTE : Use the color-coded stickers marked "2" which are located both on the toner cartridge and the inside of the machine for proper positioning. These two stickers should be aligned while installing the toner cartridge.
MFL 251 523 984_ FAXCENTRE F116_F116 L US.book Page 106 Mercredi, 11. août 2004 4:48 16 Maintenance The toner cartridge will click into position once it is correctly installed. 6 - Shut the upper cover by pressing it down gently but firmly until it locks into position. Press the OK key on the scanner control panel.
MFL 251 523 984_ FAXCENTRE F116_F116 L US.book Page 107 Mercredi, 11. août 2004 4:48 16 Insert the chip card (supplied with the drum cartridge) into the card reader ensuring that the chip is entered as shown in the drawing below. The following is displayed on the scanner control panel screen: CHANGE DRUM ? Setting up your machine Getting started Green arrow Installation Contents Maintenance Press OK.
MFL 251 523 984_ FAXCENTRE F116_F116 L US.book Page 108 Mercredi, 11. août 2004 4:48 16 Maintenance CLEANING Cleaning the scanner’s glass When one or more vertical lines appear on transmitted copies or faxes, follow these steps: A B Open the scanner cover by pressing the release button (A). Clean the transparent scanning glass (B) with a soft lint-free cloth slightly dampened with water. Close the scanning cover. Make a copy in order to ensure that the symptoms are gone.
MFL 251 523 984_ FAXCENTRE F116_F116 L US.book Page 109 Mercredi, 11. août 2004 4:48 16 1 - Turn OFF the machine and unplug the power cord. 2 - Press the upper cover release button and open the upper cover. 3 - Remove the toner cartridge and the drum cartridge. fusing assembly 4 - Use a soft cloth to clean the paper feed roller located under the fusing assembly. 5 - Reinstall the drum cartridge and the toner cartridge. refer to paragraph Replacing cartridges, page 96.
MFL 251 523 984_ FAXCENTRE F116_F116 L US.book Page 110 Mercredi, 11. août 2004 4:48 16 Maintenance SERVICING For guaranteed performance of your machine, some maintenance work (replacing the fusing assembly and the transfer roll) has to be done on the machine approximatly every 50,000 printed pages. Please contact your service provider for this operation. SCANNER CALIBRATION You can perform this operation when the quality of photocopied documents is no longer satisfactory.
MFL 251 523 984_ FAXCENTRE F116_F116 L US.book Page 111 Mercredi, 11. août 2004 4:48 16 Contents Maintenance Transmission from the feeder You have the choice between: again. Transmission from memory You have the choice between: • waiting until the transmission takes place at the given time, • restarting the transmission using the transmission queue. (refer to paragraph Immediately perform transmission from the waiting queue, page 74).
MFL 251 523 984_ FAXCENTRE F116_F116 L US.book Page 112 Mercredi, 11. août 2004 4:48 16 Maintenance Code 08 - Quality The document you sent was not well received. Contact your group dial to see if you need to send again. Code 0A - No document to be polled You tried to poll a document from a group dial who had not prepared his document (no deposit) or the password entered was incorrect.
MFL 251 523 984_ FAXCENTRE F116_F116 L US.book Page 113 Mercredi, 11. août 2004 4:48 16 Contents Maintenance Internet codes Codes 40 and 41 - No reply from supplier Code 43 - Xmission server unavailable Cannot connect to the SMTP server for sending mail, the service is temporarily unavailable. If the error always occurs, check the Internet e-mail and server parameters. Code 44 - Reception server unavailable Cannot connect to the POP3 server for mail reception, the service is temporarily unavailable.
MFL 251 523 984_ FAXCENTRE F116_F116 L US.book Page 114 Mercredi, 11. août 2004 4:48 16 Maintenance Message Action CHANGE DRUM TO CONFIRM Replace the drum cartridge. CANNOT READ CHANGE DIRECTION Insert your chip card the right way up, according to the color of arrows on the card and and on the machine. CLOSE COVER Close the front cover of the machine. DRUM NEAR END The drum is nearing its the end of life. TONER NEAR END The toner cartridge is nearing it’s end of life.
MFL 251 523 984_ FAXCENTRE F116_F116 L US.book Page 115 Mercredi, 11. août 2004 4:48 16 NOTE : Do not touch the image transfer roller (black roller at the bottom of the machine). Reinstall the drum cartridge and the toner cartridge (refer to paragraph Replacing cartridges, page 96).
MFL 251 523 984_ FAXCENTRE F116_F116 L US.book Page 116 Mercredi, 11. août 2004 4:48 16 Maintenance Close the upper cover and press it down gently but firmly until it locks into place. - 116 - Date en cours : 11 août 2004 \\Sct01002\BE31-DOC\DOC 31 - En cours\Travaux en cours\Fax\MFL V 2\LU 251 523 984B MFL_V2 FAXCENTRE F116_F116L XEROX FR_GB_ESP\Anglais\Maintenance.
MFL 251 523 984_ FAXCENTRE F116_F116 L US.book Page 117 Mercredi, 11. août 2004 4:48 16 Paper jam at the feeders and trays Contents Maintenance Remove any stuck sheets as shown by the arrow depending on where the paper jam occurs. Safety Maintenance Operation Directory Setting up your machine Getting started At the machine output tray Installation The figures below show different type of paper jam you might experience when using your machine.
MFL 251 523 984_ FAXCENTRE F116_F116 L US.book Page 118 Mercredi, 11. août 2004 4:48 16 Maintenance At the paper tray At the manual feed tray Second cassette unit and paper tray (option) SCANNER DOCUMENTS JAMS Document feeder document jam When a document jam occurs, the following message appears on the control panel screen REMOVE DOCUMENT. If jams often occur in a specific part of the unit, the latter needs to be checked, cleaned or repaired.
MFL 251 523 984_ FAXCENTRE F116_F116 L US.book Page 119 Mercredi, 11. août 2004 4:48 16 Open the scanner cover by pressing key (A). Installation Contents Maintenance Getting started A Remove the jammed document (B) without tearing it. Setting up your machine Then, close the scanner cover. MISC PROBLEMS At switch-on nothing appears on screen Check that the power cord is plugged in to the machine and power outlet.
MFL 251 523 984_ FAXCENTRE F116_F116 L US.book Page 120 Mercredi, 11. août 2004 4:48 16 Maintenance Flatten documents if needed. Help the sheets along. The machine does not receive any faxes Check that the telephone line cable is correctly plugged in and that there is a tone signal on the key. telephone line by means of the You receive a blank page Make a copy of a document ; if it is correct then your machine is functioning normally. Call back the group dial and have him resend the document.
MFL 251 523 984_ FAXCENTRE F116_F116 L US.book Page 121 Mercredi, 11. août 2004 4:48 16 4-4 - Put the machine in the plastic bag and then in the original package, with all the original packing material. Put all the documentation (User's Manual and printed documents) in the shipping box. Close the shipping box with adhesive tape.
MFL 251 523 984_ FAXCENTRE F116_F116 L US.book Page 122 Mercredi, 11. août 2004 4:48 16 Maintenance MACHINE SPECIFICATIONS Device type: Office color machine, fast operation with all Group 3 devices according to ITU-T recommendations. Dimensions: Width: 15.30 inches (389 mm) Depth: 18.10 inches (460 mm) Height: 15.30 inches (390 mm) (not including tray) Weight: 24 to 25 lbs. (11 kg) Electric power supply: 110-127 V - 50/60 Hz - 4 A Power consumption (max.
MFL 251 523 984_ FAXCENTRE F116_F116 L US.book Page 123 Mercredi, 11. août 2004 4:48 16 7 SAFETY Read these safety notes carefully before using this product to ensure you operate the equipment safely. Your Xerox product and recommended supplies have been designed and tested to meet strict safety requirements.These include safety agency approval, and compliance to established environmental standards.
MFL 251 523 984_ FAXCENTRE F116_F116 L US.book Page 124 Mercredi, 11. août 2004 4:48 16 Safety Electrical Supply This product shall be operated from the type of electrical supply indicated on the product 's data plate label. If you are not sure that your electrical supply meets the requirements, please consult your local power company for advice. WARNING This product must be connected to a protective ground circuit. This product is supplied with a plug that has a protective ground pin.
MFL 251 523 984_ FAXCENTRE F116_F116 L US.book Page 125 Mercredi, 11. août 2004 4:48 16 • Plug the power cord directly into a grounded electrical outlet. Do not use an extension cord. If you do not know whether or not an outlet is grounded, consult a qualified electrician. • This equipment is to be used on an appropriate branch circuit. If this machine needs to be moved to a different location, contact a Xerox service representative or your authorized local representative or service support organization.
MFL 251 523 984_ FAXCENTRE F116_F116 L US.book Page 126 Mercredi, 11. août 2004 4:48 16 Safety LASER SAFETY INFORMATION CAUTION: Use of controls, adjustments or performance of procedure other than those specified herein may result in hazardous light exposure. With specific regard to laser safety, the equipment complies with performance standards for laser product set by government, national and international agencies as a Class 1 laser product.
MFL 251 523 984_ FAXCENTRE F116_F116 L US.book Page 127 Mercredi, 11. août 2004 4:48 16 - Use supplies and cleaning materials only as directed in this manual. Keep all of these materials out of the reach of children. - Do not remove covers or guards that are fastened with screws. There are no parts behind these covers that you can maintain or service.
MFL 251 523 984_ FAXCENTRE F116_F116 L US.book Page 128 Mercredi, 11. août 2004 4:48 16 Safety RADIO FREQUENCY EMISSIONS United States, Canada, Note: This equipment has been tested and found to comply with the limits for a Class B digital device, pursuant to part 15 of the FCC Rules. These limits are designed to provide reasonable protection against harmful interference in a residential installation.
MFL 251 523 984_ FAXCENTRE F116_F116 L US.book Page 129 Mercredi, 11. août 2004 4:48 16 January 1, 1996: Council directive 89/336/EEC, approximation of the laws of the member states related to electromagnetic compatibility.
MFL 251 523 984_ FAXCENTRE F116_F116 L US.book Page 130 Mercredi, 11. août 2004 4:48 16 Safety You may safely connect the machine to the following standard modular jack: USOC RJ-11C using the compliant telephone line cord (with modular plugs) provided with the installation kit. See installation instructions for details. The Ringer Equivalence Number (or REN) is used to determine the number of devices that may be connected to a telephone line.
MFL 251 523 984_ FAXCENTRE F116_F116 L US.book Page 131 Mercredi, 11. août 2004 4:48 16 Contents Safety CANADA Users should ensure for their own protection that the electrical ground connections of the power utility, telephone lines and internal metallic water pipe systems, if present, are connected together. This precaution may be particularly important in rural areas.
MFL 251 523 984_ FAXCENTRE F116_F116 L US.book Page 132 Mercredi, 11. août 2004 4:48 16 Safety Regulations Certification to 1999/5/EC Radio Equipment & Telecommunications Terminal Equipment Directive This Xerox product has been self-certified by Xerox for pan-European single terminal connection to the analogue public switched telephone network (PSTN) in accordance with Directive 1999/5/EC.
MFL 251 523 984_ FAXCENTRE F116_F116 L US.book Page 133 Mercredi, 11. août 2004 4:48 16 As a participant in the Environmental Choice program, Xerox Corporation has determined that this product meets the Environmental Choice guidelines for energy efficiency. Environment Canada established the Environmental Choice program in 1988 to help consumers identify environmentally responsible products and services.
MFL 251 523 984_ FAXCENTRE F116_F116 L US.book Page 134 Mercredi, 11. août 2004 4:48 16 Safety Stamps and other representatives of value, of whatever denomination, which have been or may be issued under any Act of Congress. 2. Adjusted Compensation Certificates for Veterans of the World Wars. 3. Obligations or Securities of any Foreign Government, Bank, or Corporation. 4.
MFL 251 523 984_ FAXCENTRE F116_F116 L US.book Page 135 Mercredi, 11. août 2004 4:48 16 7. Impressed or adhesive stamps used for the purpose of revenue by the Government of Canada or of a province or by the government of a state other than Canada. Contents Safety Other countries Copying certain documents may be illegal in your country. Penalties of fine or imprisonment may be imposed on those found guilty of making such reproductions.
MFL 251 523 984_ FAXCENTRE F116_F116 L US.book Page 136 Mercredi, 11. août 2004 4:48 16 Safety PRODUCT RECYCLING AND DISPOSAL Xerox operates a worldwide equipment takeback and reuse/recycle program. Contact your Xerox sales representative (1-800-ASK-XEROX) to determine whether this Xerox product is part of the program. For more information about Xerox environmental programs, visit www.xerox.com/environment.
MFL 251 523 984_ FAXCENTRE F116_F116 L US.book Page 137 Mercredi, 11. août 2004 4:48 16 CONSUMABLE REFERENCES Toner cartridge : 006R01218 Drum cartridge : 113R00655 CONSUMABLE Toner cartridge: CHARACTERISTICS The standard toner cartridge can produce up to 6000 pages (when printing on Letter paper with a 5% Area Coverage) or 10000 pages ITU No. 1 in normal mode. The initial toner cartridge can produce up to 2000 pages (when printing on Letter paper with a 5% Area Coverage).