DP 820 projector user's guide
Xerox DP 820 projector user’s guide
Copyright © 2004 Visioneer, Inc. Reproduction, adaptation, or translation without prior written permission is prohibited, except as allowed under the copyright laws. Xerox ® is a registered trademark of Xerox Corporation in the United States and/or other countries and is used under license. All other Xerox product names and product numbers mentioned in this publication are trademarks of Xerox Corporation. Apple, the Apple logo, and Macintosh are trademarks of Apple Computer, Inc., registered in the U.S.
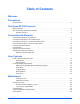
Table of Contents Welcome Precautions Do’s and Don’ts . . . . . . . . . . . . . . . . . . . . . . . . . . . . . . . . . . . . . . . . . . . . . . . . . . . . . . . . . . . . . . . . . . 3 The Xerox DP 820 Projector What’s in the Box . . . . . . . . . . . . . . . . . . . . . . . . . . . . . . . . . . . . . . . . . . . . . . . . . . . . . . . . . . . . . . . . . 4 The Xerox DP 820 Features and Controls . . . . . . . . . . . . . . . . . . . . . . . . . . . . . . . . . . . . . . . . . . . . . .
Notices . . . . . . . . . . . . . . . . . . . . . . . . . . . . . . . . . . . . . . . . . . . . . . . . . . . . . . . . . . . . . . . . . . . . . . . . . . 37 Federal Communications Commission (FCC) for USA . . . . . . . . . . . . . . . . . . . . . . . . . . . . . . . . . . . . 37 Product Recycling and Disposal for USA . . . . . . . . . . . . . . . . . . . . . . . . . . . . . . . . . . . . . . . . . . . . . .
Welcome Your new Xerox DP 820 projector is a high-performance, optical projector with these outstanding features: Xerox DP 820 User’s Guide • Single chip 0.55” Texas Instruments DLP™ (Digital Light Processing) technology • SVGA (800 x 600 pixels) • 4.5 lbs (2.0 kgs) compact design, lightweight for portability • 1.
Precautions Precautions Follow all warnings, precautions and maintenance as recommended in this user’s guide to avoid injury, fire, electric shock, and to maximize the life of your projector. Warning—Do not look into the projector’s lens when the lamp is on. The bright light may hurt your eyes. Never let children look directly into the lens when the light is on. Warning—Do not look into the laser beam or shine it into others’ eyes when using the remote control as a laser pointer.
Precautions Do’s and Don’ts Do: • Operate the projector in a well-ventilated room to avoid a buildup of ozone from the projector’s high-performance lamp. • Turn off the projector before cleaning. • Use a dampened soft cloth to clean the display housing. • Disconnect the power plug from AC outlet if the projector is not being used for a long period of time.To disconnect the cord, pull it out by the plug. Do not pull on the cord. • Use lint-free gloves or finger cots when changing the lamp.
The Xerox DP 820 Projector The Xerox DP 820 Projector What’s in the Box Before proceeding, check the contents of the box. If items are missing or damaged, contact the dealer where you purchased the projector.
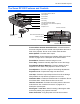
The Xerox DP 820 Projector The Xerox DP 820 Features and Controls Front Infrared Remote Sensor Audio Speaker Control Panel Zoom Wheel Focus Ring Foot Adjustor Release Button (on either side, next to both foot adjustors) Foot Adjustor Projection Lens Ventilation Slots (exhaust) Interface Connector Rear Infrared Remote Sensor Power Connector Lens Cap Kensington™ Lock Slot Ventilation Slots (intake) Front and Rear Infrared Remote Sensors—Infrared receivers that receive signals from the remote control poi
The Xerox DP 820 Projector Interface Connector USB Port—Provides a connection for engineering purposes. Not used for connecting video devices. Audio Input Port—Plug an audio output from the video device into this port. Computer In (VGA) Port—Plug the VGA cable into this port, then plug the other end into the video port on your computer. Also use this port to connect an HDTV device to your projector.
Connecting the Projector Connecting the Projector Connecting the Projector to a Computer In this configuration, the projector displays the images from your computer’s screen. This is the configuration to use to project a presentation from your computer. VGA Connector VGA Cable Computer In Connector 1. Make sure the projector and computer are turned off. 2. Connect one end of the VGA connector to the VGA port on the computer. 3.
Connecting the Projector Connecting the Projector to an S-Video Source The typical connection for an S-Video source is a professionalquality DVD, Video Disc, or Videotape player with an S-Video output port. S-Video Cable Audio Cable 1. Make sure the projector and video source device are turned off. 2. Plug the S-Video cable into the S-Video port on the video source device, and then into the S-Video port on the projector. 3.
Connecting the Projector Connecting the Projector to a Composite Video Source The typical connection for a Composite Video source is a DVD player or VCR. Composite Video Cable Audio Cable 1. Make sure the projector and video source device are turned off. 2. Plug the yellow Composite Video cable into the yellow video port on the video source device. 3. Plug the other end of the yellow video cable into the yellow Video port on the back of the projector. 4.
Connecting the Projector Connecting the Projector to an HDTV Video Source The typical connection for an HDTV Video source is an HDTV digital tuner. NOTE: Connecting to an HDTV Video Source requires the optional VGA to HDTV Cable. Please see your retailer where you purchased the projector for the optional cable. Computer In Port VGA to HDTV Cable Audio Cable 1. Make sure the projector and video source device are turned off. 2.
Connecting the Projector Powering On/Off the Projector To turn on the projector’s power 1. Remove the lens cap. 2. Make sure that the power cord and the cables from the video and audio sources are securely connected to the projector. When you plug in the power cord, the Power LED flashes green. 3. Turn on the lamp by pressing the Power button on the remote control or the Power button on the control panel.
Connecting the Projector To turn off the projector power 1. Press the Power button on the remote control or the Power button on the control panel to turn off the projector lamp. An on-screen message appears asking if you’re sure you want to turn off the power. 2. Press the Power button again to turn off the power. NOTE: If you don’t press the button within a few seconds, the message disappears and the lamp remains lit.
Connecting the Projector LED Indicators Power LED Lamp LED LED Power Lamp Color Status Description Green Flashing Normal operation. The projector is powered and ready. Amber Solid The fan has problems or has malfunctioned. The projector will not start. Green Solid Normal operation. The lamp is in good condition and is projecting at maximum brightness. Flashing Normal operation. The lamp is shutting down. Do not turn off or unplug the power until the LED turns off.
Connecting the Projector Adjusting the Projected Image NOTE: The projector is equipped with two “foot adjustors” for adjusting the projector height. To raise the projector 1. Lift the projector up and press the two foot adjustor release buttons on each side of the projector. Foot Adjustor Release Button Foot Adjustor The foot adjustors pop out. 2.
Connecting the Projector Adjusting the Projector Zoom/Focus You adjust the focus and zoom in/out with the focus ring and zoom wheel. Rotate the focus ring and zoom wheel. Adjusting Projection Image Size Use the following figure and table to select the best projection distance and screen size. Maximum and minimum screen sizes are diagonal measurements. The table is for reference only. Maximum Screen Size Minimum Screen Size 1.2m 4.0m 6.0m 10.
User Controls User Controls Panel Control and Remote Control Panel Control Control Description Power (LED) Lamp (LED) Indicates status of projector power and lamp. See “LED Indicators” on page 13 for details. Turns projector power on and off. See “Powering On/Off the Projector” on page 11 for the specific power on/off sequences. Power Menu/Enter Keystone ( Auto ( Press to display and activate the OSD menu. If the menus are displayed, confirms your selection of items on the menus.
User Controls Remote Control Laser Beam Pointer Button Description Power Turns projector power on and off. (Enter) When the OSD menus are displayed, selects OSD option. Directional Selection When the OSD menus are displayed, scrolls Buttons through menus and selects items or adjusts settings. ( ) Menu Press to display the OSD menus. Press again to exit the OSD menus. Laser Press to activate a laser beam for use as a pointer.
User Controls Remote Control Operation The infrared emitter is at the top of the remote control next to the laser pointer. The infrared emitter has a range of about 3m (about 10 feet) at an angle of about 20° from the center of the sensors (both front and back). Do not block the infrared emitter. If the projector does not pick up the signals from the remote control, make sure the emitter and sensors on the projector are not blocked and that the emitter is within range.
User Controls On-Screen Display (OSD) Menus The On-Screen Display (OSD) menus provide the options to make image adjustments and change a variety of settings. The menus can be displayed only when an input source is connected to the projector. If the source is a computer, you can make changes to the Display settings, and if the source is a video device you can make changes to the Video settings. The projector automatically detects the type of input source.
User Controls Image Menu Contrast—Controls the degree of difference between the lightest and darkest parts of the image. Adjusting the contrast changes the amount of black and white in the image. The higher the number the greater the contrast. • Press the button to decrease the contrast. • Press the button to increase the contrast. Brightness—Lightens or darkens the image. The higher the number, the lighter the image. • Press the button to darken the image.
User Controls The correct aspect ratio to select is based on the type of video source you are using. If the image seems to be distorted or stretched, change the setting. • Press the buttons to select one of the aspect ratios. 1:1—The image is displayed without scaling. 16:9—The input source is displayed in wide screen mode without scaling. The source is scaled to fit the width of the screen. 4:3—The input source is scaled to fit the screen.
User Controls Video Menu [ Saturation—Adjusts the image from black and white to fully saturated color. The higher the number, the greater the color saturation. • Press the image. button to decrease the amount of color in the • Press the image. button to increase the amount of color in the Tint—Adjusts the balance between the red and green colors in the image. Increasing the Tint increases the amount of red in the image. Decreasing the Tint increases the amount of green in the image.
User Controls Display Menu Phase—Synchronizes the signal timing of the display with the timing of your computer’s graphics card. If the image flickers or is unstable, adjust the phase until the image is stable. • Press the button to decrease the phase. • Press the button to increase the phase. Tracking—Changes the display data frequency to match the frequency of your computer’s graphics card. If vertical flickering lines appear on the image, adjust the frequency until they disappear.
User Controls Language Menu Selects the language for the menus and messages displayed on the screen. 1. Use the keys to select the language you want. 2. Press the Menu/Enter button on the projector control panel or the button on the remote control. The menus will be displayed in the selected language.
User Controls Advanced Menu Auto Source Select—The projector automatically scans the connected input sources and selects the type that is connected. • To activate this option, select it, then press the Menu/Enter button on the projector control panel or the button on the remote control. Rear—Projects a reversed image so you can project from behind a translucent screen.
User Controls Auto Shutdown—Sets the projector lamp to automatically shut down if it doesn’t receive an input signal within 30 minutes. • Press the buttons to select this option. ON—The lamp will automatically shut down in 30 minutes if it doesn’t receive a signal OFF—The lamp will remain lit, even if no signal is received OSD Timeout—Sets the duration the OSD menus remain on the screen before automatically closing if you don’t make a selection.
Maintenance Maintenance The projector needs proper maintenance. Keep the lens clean because dust, dirt, or spots will project on the screen and diminish image quality. Keep the projector housing clean to maintain its appearance. Before cleaning the lens or housing, always turn off the power first and unplug the power cord. Note that only the lamp is replaceable. If any other parts need replacing, contact your dealer or qualified service personnel.
Maintenance Changing the Lamp The projector automatically monitors the lamp life. As the lamp reaches the end of its life, the image becomes darker and the color hues weaker. The projector’s Lamp LED turns red to let you know that the lamp must be changed soon before it fails completely. When you see the red Lamp LED, please change the lamp as soon as possible. Note that lamp lifetimes vary according to the operating environment and type of use.
Maintenance To Change the Lamp Module 1. Turn off the projector’s power. 2. Disconnect the power cord. 3. Let the projector lamp cool completely, at least 45 minutes. 4. Place a protective cloth beneath the projector and turn it over so you can access the lamp cover. NOTE: Wear lint-free gloves or finger cots when changing the lamp. 5. Remove the lamp cover screws and lift it off. 6.
Maintenance Troubleshooting If you try the troubleshooting procedures described in this section and the problem persists, you may have a malfunctioning projector. Refer to the technical support card that you received with your projector or contact the retailer where you purchased your projector. Also visit our web site at www.xeroxprojectors.com for additional technical information. Problem: No image appears on the screen.
Maintenance Problem: The image is flickering or otherwise unstable Try one of these possible solutions: • Change the Phase setting on the OSD Display menu. See “Display Menu” on page 23. • Change the number of colors that your computer displays on its monitor. See the documentation that you received with your computer for the steps to change the number of colors its monitor can display. Problem: Image has vertical flickering stripes.
Maintenance Problem: Image is reversed or inverted. Use the OSD Advanced Menu to change the Rear or Ceiling option to display the image properly. Problem: No sound. Make sure the audio cables and other cables are connected properly. Problem: Remote control does not work. Check for one of these possible problems: • Are you too far from the projector? The remote control has a range of about 10ft (3m) and needs to be within 20° of the sensor. Move closer to the projector and try again.
Maintenance Xerox DP 820 Projector Specifications Projection System Native Resolution Image Brightness Uniformity Lens Focal Length Contrast Ratio Aspect Ratio Screen Size Lamp Projection Type Video Input Input Source Scanning Frequency Horizontal Frequency Vertical Frequency Pixel Rate Digital Keystone Correction Analog RGB (input signal) HDTV Display Integrated Speaker Audio Noise Remote Control OSD Language Operational Ambient Certification Power Supply Power Consumption Dimensions (W x D x H) Weight S
Maintenance Preset Signals The following tables describe the projector’s preset signals. Preset Signal 640 X 480 800 X 600 1024 X 768 1152 X 864 1280 X 960 1280 X 1024 34 fH (kHz) fV (Hz) Sync Size VGA MODE 3 31.469 59.940 H(-), V(-) 800 VGA VESA 72 HZ 37.861 72.809 H(-), V(-) 832 VGA VESA 75 HZ 37.500 75.500 H(-), V(-) 840 VGA VESA 85 HZ 43.269 85.008 H(-), V(-) 832 SVGA VESA 56 HZ 35.156 56.250 H(+), V(+) 1024 SVGA VESA 60 HZ 37.879 60.
Maintenance HDTV Preset Signals Xerox DP 820 User’s Guide Preset Signals Horizontal Frequency (kHz) Vertical Frequency (Hz) 480I 15.8 kHz 60 Hz 480P 31.5 kHz 60 Hz 576I 15.6 kHz 50 Hz 576P 31.3 kHz 50 Hz 720P 45.0 kHz 60 Hz 720P 37.5 kHz 50 Hz 1080I 33.8 kHz 60 Hz 1080I 28.
Maintenance 36 Xerox DP 820 User’s Guide
Appendix A Notices Federal Communications Commission (FCC) for USA This equipment has been tested and found to comply with the limits for the class B digital device, pursuant to part 15 of the FCC Rules. These limits are designed to provide reasonable protection against interference in a residential installation. This equipment generates, uses and can radiate radio frequency energy and if not installed, and used in accordance with the instructions, may cause harmful interference to radio communications.
If your product is not part of the Xerox program and you are managing its disposal, please note that the product contains lead and mercury whose disposal may be regulated due to environmental considerations. For recycling and disposal information, contact your local authorities.
05-0661-200