
Laser Printing Systems System Generation Guide


SYSGEN AND SYSGEN-RELATED PROCEDURES
4-28 XEROX DOCUPRINT 180 LPS SYSTEM GENERATION GUIDE
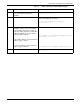
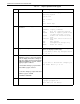
Table 4-6. Steps to perform a mini sysgen
Step Action System response
1. Press the Boot button. :The Boot menu window displays:
Operating System
System Disk
Reel to Reel
QIC
18/36 Track Tape
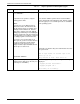
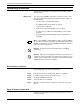
2. Select your choice of sysgen media with
the mouse.
The command menu displays:
COMMANDS Display Commands
BOOT Boot the operating system
SYSGEN Build or update system files
on disk from tape or host
FORMAT Format and initialize disk
pack
HOSTCOPY Copy user files from host to
disk
AUTO Auto Sysgen
MINI Configuration change only
ERASE Erase all files.
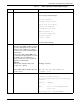
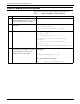
3. Key in MINI and press <ENTER>. The base configuration and the system configuration
options are displayed followed by:
Do you wish to make any changes? Enter
’y’ or ’n’ >
4. Enter Y or N and <ENTER>. A Y and
<ENTER> response causes the change
menu to display. Each time a change is
made, the change question is asked until
an N and <ENTER> is entered, and the
sysgen program continues.
To discard the changes you just made
and continue sysgen, enter Y.
To save the changes you just made and
continue sysgen, enter N.
Enter N and <ENTER>.
Do you want to discard the changes you
just made? Enter ’y’ or ’n’
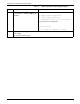
5. Creating file DISPCF.SYS on drive 0.
* Sysgen program off *
Enter Cmd (’C’ for Menu)>