XEROX DOCUPRINT N4525 NETWORK LASER PRINTER ADVANCED FEATURES AND TROUBLESHOOTING MANUAL
Xerox DocuPrint® N4525 Network Laser Printer Advanced Features and Troubleshooting Manual December 2000
Copyright protection claimed includes all forms of matters of copyrightable materials and information now allowed by statutory or judicial law or hereinafter granted, including without limitation, material generated from the software programs which are displayed on the screen such as styles, templates, icons, screen displays, looks, etc. Printed in the United States of America.
Warranty Printer Warranty Xerox warrants that the DocuPrint N4525 Network Laser Printer will be free from defects in materials and workmanship for a period of one (1) year from the date of shipment.
CONSUMABLES WARRANTY Xerox warrants that toner cartridges will be free from defects in materials and workmanship for a period of one (1) year from date of installation. All other Customer Replaceable Consumables (CRCs) will be covered for a period of ninety (90) days (six (6) months where longer periods are required by law) from the date of installation, but not more than one (1) year from date of shipment.
User safety summary Your printer and the recommended consumable supplies have been designed and tested to meet strict safety requirements. Attention to the following notes will ensure the continued safe operation of your printer. Electrical Safety ■ Use the power cord supplied with your printer. ■ Do not use a ground adapter plug to connect the printer to a power source receptacle that lacks a ground connection terminal. ■ Plug the power cord directly into a properly grounded electrical outlet.
■ Place the printer in an area where there is adequate space for ventilation, operation and servicing. The recommended minimal spacing is 92.5 cm (36.5 in.) in front of and above the printer, 20.3 cm (8 in.) behind the printer, and 30.5 cm (12.0 in.) on each side of the printer. Do not block or cover the slots and openings on the printer. Without adequate ventilation, the printer may overheat. ■ For optimum performance, use the printer at elevations below 2,500 meters (8,200 ft.).
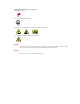
Symbols that may be marked on your product: DANGER high voltage: 4525-101 Protective ground (earth) terminal: 4525-102 Hot surface on or in the printer. Use caution to avoid personal injury: 4525-103 4525-104 4525-105 Use caution. Refer to the manual(s) for information: 4525-106 Warning If the product loses the ground connection, usage of knobs and controls (and other conductive parts) can cause an electrical shock. Electrical product may be hazardous if misused.
Contents Control Panel. . . . . . . . . . . . . . . . . . . . . . . . . . . . . . . . . . . . . . . . . . . . . . . . . . . . . 1 Control Panel with Icons and Text . . . . . . . . . . . . . . . . . . . . . . . . . . . . . . . . . . . . . . . . . . . . . . . . .1 Control Panel with Icons . . . . . . . . . . . . . . . . . . . . . . . . . . . . . . . . . . . . . . . . . . . . . . . . . . . . . . . . .1 Indicator lights . . . . . . . . . . . . . . . . . . . . . . . . . . . . . . . . . . . . . . . . . . . . . .
Advanced Features . . . . . . . . . . . . . . . . . . . . . . . . . . . . . . . . . . . . . . . . . . . . . . . 37 Cover Sheets . . . . . . . . . . . . . . . . . . . . . . . . . . . . . . . . . . . . . . . . . . . . . . . . . . . . . . . . . . . . . . . . . 38 Edge-to-Edge . . . . . . . . . . . . . . . . . . . . . . . . . . . . . . . . . . . . . . . . . . . . . . . . . . . . . . . . . . . . . . . . . 38 N-Up . . . . . . . . . . . . . . . . . . . . . . . . . . . . . . . . . . . . . . . . . . . . . . . . . .
Networking . . . . . . . . . . . . . . . . . . . . . . . . . . . . . . . . . . . . . . . . . . . . . . . . . . . . . 61 Connecting to Your Network . . . . . . . . . . . . . . . . . . . . . . . . . . . . . . . . . . . . . . . . . . . . . . . . . . . .61 Setting a TCP/IP Address . . . . . . . . . . . . . . . . . . . . . . . . . . . . . . . . . . . . . . . . . . . . . . . . . . . .61 Setting a Sub Net Mask at the Control Panel . . . . . . . . . . . . . . . . . . . . . . . . . . . . . . . . . . . .
Troubleshooting . . . . . . . . . . . . . . . . . . . . . . . . . . . . . . . . . . . . . . . . . . . . . . . . . 79 Maintaining and Cleaning Your Printer. . . . . . . . . . . . . . . . . . . . . . . . . . . . . . . . . . . . . . . . . . . . 80 Exterior Cleaning . . . . . . . . . . . . . . . . . . . . . . . . . . . . . . . . . . . . . . . . . . . . . . . . . . . . . . . . . . 80 Interior Cleaning. . . . . . . . . . . . . . . . . . . . . . . . . . . . . . . . . . . . . . . . . . . . . . . . . . . . . . . . .
Appendix C - Unique Printer Commands . . . . . . . . . . . . . . . . . . . . . . . . . . . .109 Paper Size Selection . . . . . . . . . . . . . . . . . . . . . . . . . . . . . . . . . . . . . . . . . . . . . . . . . . . . . . . . . Paper Type Selection . . . . . . . . . . . . . . . . . . . . . . . . . . . . . . . . . . . . . . . . . . . . . . . . . . . . . . . . . Input Tray Selection . . . . . . . . . . . . . . . . . . . . . . . . . . . . . . . . . . . . . . . . . . . . . . . . . . . . . . . . . .
xiv DocuPrint N4525 Network Laser Printer
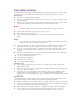
Control Panel Control Panel The Xerox DocuPrint N4525 control panel: ■ Displays information about the status of the printer (or job in process). ■ Provides the means for changing printer settings and printer defaults to control how it operates. As shown in the following figure, your printer’s control panel will either have icons and text, or icons only. Control Panel with Icons and Text 1 3 2 1. Four indicator lights 2. A two-line display screen (16 characters per line) 3.
Control Panel Indicator lights Indicator light Meaning On Line ■ Light is on (green) — The printer is online. ■ Light is off — The printer is offline. Before printing a job, bring the printer online by pressing the On Line key (labeled 0). Form Feed indicator ■ Light is off — Normal operation.
Control Panel Display screen The control panel’s display screen: ■ Provides access to a hierarchy of menus to configure and control the printer. Access the menus by pressing the Menu keys (labeled 1 or 5). For more information on the menu structure, refer to page 7. ■ Displays information about the status of the printer (or the job in process): Examples: ■ The printer is online and ready to accept print jobs: Ready ■ The printer is processing data: Processing...
Control Panel Control panel keys The control panel keypad consists of eight keys, identified with international symbols and/or labeled in English. The keys are also numbered 0 through 7. On Line 0 Menu Up 1 Item Up 2 Value Up 3 Enter 4 Menu Down 5 Item Down 6 Value Down 7 Using the keys to bring the printer online/take the printer offline ■ When the printer is online (and not in the menu system), press the On Line key (labeled 0) to take the printer offline.
Control Panel Using the keys when a paper mismatch condition exists 1. Press the Value keys (labeled 3 or 7) to scroll through the trays to see what alternate paper is available that may be used instead of the requested paper. 2. Press the Enter key (labeled 4) to use the tray shown on the display screen to be used for printing (Print Anyway). Note Other keys are ignored.
Control Panel 6 DocuPrint N4525 Network Laser Printer
Control Panel Menus Control Panel Menus The control panel’s menu system is a hierarchy of menus, menu items, and menu item values. The menus are used to configure the printer for your environment.
Control Panel Menus The following sample control panel screen shows the Language menu item of the System Menu. System Menu Language For some menus, the menu item indicates the action to be taken. Other menu items require a value. 3. If the menu item doesn’t need a value, press the Enter key (labeled 4) to select that menu item. 4. If a value is needed for the menu item, press the Value key (labeled 3 or 7) to select the appropriate value for the menu item.
Control Panel Menus Control panel menu indicators Two menu indicators (= and *) are used to furnish information about menu item values. ■ The = indicator only appears after options which take a specific setting — it indicates that a value or setting follows the option. In the following sample control panel screen, Language is a menu item (on the System Menu) that takes a specific value; the value currently shown is Italiano. Another value is English.
Control Panel Menus Job Menu Cancels the job currently printing, forces a form feed on a partially formatted job in PCL, or restarts the printer. Job Menu Items Menu items Description Cancel Job Cancels the PostScript or PCL job currently printing. Form Feed Use when the Form Feed LED is on to force a form feed on a partially formatted PCL page. Restart Printer Reboots the printer as if the power was cycled, but bypasses power on diagnostics.
Control Panel Menus Password Menu Prints or deletes proof jobs or secure jobs. (This menu is only available when the optional hard disk drive is installed in the printer.) When you see Password Menu and press either Item key (labeled 2 or 6), you are prompted to enter the password: Enter Password _xxx After you type the four-digit password for the job(s) (using the control panel keys), press the Item key (labeled 2 or 6) to select one of the menu items.
Control Panel Menus Tray Menu Specifies the type and/or size of the paper in a specific tray and specifies the sequence that the trays are used when tray switching is required. Tray Menu Items Menu Items Description Envelope Size Defines the envelope size that is loaded in the optional envelope feeder (since the feeder doesn’t have paper size sensing). (This menu item only appears when the envelope feeder is installed.) Values: Com10 (4.1x9.5)* DL (110x220) * C5 (162x229) Monarc (3.8x7.
Control Panel Menus Tray Menu Items (cont'd.) MBF Type Defines the paper type that is loaded in the Multi Bypass Feeder. (This menu item doesn’t appear when the envelope feeder is installed, since it replaces the MBF.) Values: Plain (default) Preprinted Letterhead Transparency Prepunched Labels Bond Recycled Tray 1 Type Color Cardstock User Type User Type User Type User Type User Type 1 2 3 4 5 (if (if (if (if (if loaded) loaded) loaded) loaded) loaded) Defines the type of paper installed in Tray 1.
Control Panel Menus Tray Menu Items (cont'd.) Tray 5 Type Defines the type of paper installed in Tray 5. (This menu item only appears when the optional 2,500 sheet feeder is installed.
Control Panel Menus Tray Menu Items (cont'd.) Special Media Printing The fusing system of the DocuPrint N4525 printer can be adjusted in two ways to accommodate various types of special print media: ■ The fusing temperature can be varied to match the requirements of the media. ■ Brief printing delays can be set to occur at pre-defined points to allow the fuser temperature to recover properly for heavier weight media.
Control Panel Menus PCL Menu Sets the default configuration for the printer when printing PCL emulation jobs. PCL Menu Items Menu Items Font Number Description Sets the default font in PCL. Values: 0 - 999 (default is 0) Notes: These value numbers are assigned by the printer and should not be confused with the user-defined ID numbers associated with font downloading (creation); refer to the Fonts section starting on page 51.
Control Panel Menus PCL Menu Items (cont'd.) Orientation Sets the default orientation used in PCL. Values: Portrait (default) Landscape Form Length Sets the default number of lines per page used in PCL. This value is linked to paper size. Whenever the paper size is changed, the Form Length is recalculated using the formula: Form Length = ((logical page length in inches - 1 inch) * 6) Values: 005 - 128 (default is 60 when inches is set and 64 when millimeters is set as the System Menu’s Defaults value.
Control Panel Menus System Menu Sets general printer features. System Menu Items Menu Items Description Language Sets the language used for control panel display messages and generated reports (Configuration Sheets, PCL Font Lists, etc.).
Control Panel Menus System Menu Items (cont'd.) Policy Timeout Specifies how many seconds the printer should wait before taking the action defined by the setting of the Page Policy item. Values: (in seconds) 300 180 120 60 30 (default) 0 Print Quantity Specifies number of copies of each page. Values: 1 - 999 (default is 1) Note: The number changes incrementally by 1 each time you press either the Value key (labeled 3 or 7). To scroll quickly through the numbers, hold down either key.
Control Panel Menus System Menu Items (cont'd.) Output Timeout Specifies whether the printer waits after a bin is filled or directs output to an alternate bin. Values: Off (printer waits after a bin is filled) On (default - printer directs output to an alternate bin) Output Offset Specifies whether output from jobs is offset in the Face-down Bin and Finisher Output Bin (if installed). Values: Off (default - output not offset) On (output offset) Note: Output cannot be offset in the optional Face-up Bin.
Control Panel Menus System Menu Items (cont'd.) Config Legal/B4 Specifies which size will be recognized by the tray size switches. Values: Legal B4-JIS Notes: For these changes to take place, you must either power the machine Off and then power it back On, or restart the printer from the Print or Job Menus. The default is Legal when Inches is set and B4-JIS when Millimeters is set as the System Menu’s Defaults value. Config Exec/B5 Specifies which size will be recognized by the tray size switches.
Control Panel Menus Parallel Menu Sets options for the parallel port connection. Note For these changes to take place, you must either power the machine Off and then power it back On, or restart the printer from the Print or Job Menus. Parallel Menu Items Menu Items Port Enable Description Sets the parallel port. Values: On (default) Off Port Timeout Sets the time for determining when to end an incomplete print job and poll the next port in the polling sequence.
Control Panel Menus Serial Menu Sets options for the serial port connection. This menu only appears if the printer has the optional RS-232 serial interface card installed. Note For these changes to take place, you must either power the machine Off and then power it back On, or restart the printer from the Print or Job Menus. Serial Menu Items Menu Items Description Port Enable Sets the serial port.
Control Panel Menus USB Menu Sets options for the USB port connection. Note For these changes to take place, you must either power the machine Off and then power it back On, or restart the printer from the Print or Job Menus. . USB Menu Items Menu Items Port Enable Description Sets the USB port. Values: On (default) Off Port Timeout Sets the time for determining when to end an incomplete print job and poll the next port in the polling sequence.
Control Panel Menus Ethernet Menu Sets options for the Ethernet port connection. This menu disappears if the Token Ring is installed. Note For these changes to take place, you must either power the machine Off and then power it back On, or restart the printer from the Print or Job Menus. Ethernet Menu Items Menu Items Description LPR Enable Sets the Ethernet LPR protocol. Values: On (default) Off LPR Banner Sets the LPR banner sheet.
Control Panel Menus Ethernet Menu Items (cont'd.) AppSocket Enabl Sets the Ethernet AppSocket protocol. The AppSocket in the printer supports ports 2000, 9100, and 2501. Values: On (default) Off AppSocket PDL Sets the default Print Description Language emulation for the Ethernet AppSocket interface. Values: Auto (default) PCL PostScript AppSocket Bin PS Sets the AppSocket binary mode of PostScript. Values: On Off (default) ETalk Enable Sets the Ethernet EtherTalk protocol.
Control Panel Menus Ethernet Menu Items (cont'd.) Sub Net Mask Sets the four byte Sub Net Mask address. (This menu item only appears if IP Address Res is set to static.) Values: xxx.xxx.xxx.xxx where xxx = 000 to 255 Note: Once the control panel shows Sub Net Mask on the top line, use the Value keys (labeled 3 or 7) to scroll to the desired value at the cursor location. To move the cursor, use the Item keys (labeled 2 or 6).
Control Panel Menus Token Ring Menu Sets options for the Token Ring port connection. (This menu only appears if the optional Token Ring interface is installed.) Note For these changes to take place, you must either power the machine Off and then power it back On, or restart the printer from the Print or Job Menus. Token Ring Menu Items Menu Items Description LPR Enable Sets the Token Ring LPR protocol. Values: On (default) Off LPR Banner Sets the LPR banner sheet.
Control Panel Menus Token Ring Menu Items (cont'd.) AppSocket PDL Sets the default Print Description Language emulation for the Token Ring AppSocket interface. Values: Auto (default) PCL PostScript AppSocket Bin PS Sets the AppSocket binary mode of PostScript. Values: On Off (default) TTalk Enable Sets the Token Ring TokenTalk protocol. Values: On (default) Off HTTP Enable Sets the Token Ring HTTP Server protocol.
Control Panel Menus Token Ring Menu Items (cont'd.) Default Gateway Sets the four byte Default Gateway address. (This menu item only appears if IP Address Res is set to static.) Values: xxx.xxx.xxx.xxx where xxx = 000 to 255 Note: Once the control panel shows Default Gateway on the top line, use the Value keys (labeled 3 or 7) to scroll to the desired value at the cursor location. To move the cursor, use the Item keys (labeled 2 or 6).
Control Panel Menus Novell Menu Sets Novell parameters. Note For these changes to take place, you must either power the machine Off and then power it back On, or restart the printer from the Print or Job Menus. Novell Menu Items Menu Items Novell Enable Description Sets the Novell protocol. Values: On (default) Off Novell PDL Sets the default Print Description Language emulation for the Novell protocol. Values: Auto (default) PCL PostScript Novell Binary PS Sets the Novell binary mode of PostScript.
Control Panel Menus Novell Menu Items (cont'd.) PServer Name Sets the name of the PServer in this printer (a name of 2 to 47 characters in length). Values: XRX_ (default) A - Z, 0 - 9, hyphen (-), and underscore (_) Notes: Once the control panel shows NDS Tree on the top line, use the Value keys (labeled 2 or 6) to scroll to the desired value at the cursor location. To move the cursor, use the Item keys (labeled 3 or 7).
Control Panel Menus Print Menu Generates printer reports. Print Menu Items Menu Items Description Config Sheet Prints the Configuration Sheet showing the printer's current information and menu settings. It lists the printer name, software revision level, communication parameter settings, options installed, current option settings in the control panel’s menu system, and print counts. It is printed using the PCL default paper size, regardless of the actual paper size.
Control Panel Menus Print Menu Items (cont'd.) Fault History Prints a copy of the fault history log, which lists the last 100 faults that occurred in the printer. One copy is printed regardless of the Print Quantity value in the System Menu. Note: The Fault History is intended mainly for use by service technicians. Display Faults Displays on the control panel screen the last 100 fault conditions logged by the printer (one-by-one). Log entries 1-100 can be selected.
Control Panel Menus Reset Menu Accesses printer reset functions. This menu only appears when the printer is powered on while holding down the On Line and Enter keys (labeled 0 and 4). Reset Menu Items Menu Items Description Factory Defaults Resets menus to factory defaults — with the exception of Language in the Reset Menu, Defaults in the System Menu, and network parameters (in the Ethernet, Token Ring, and Novell menus).
Control Panel Menus Reset Menu Items (cont'd.) Flash Format Formats the flash memory. (This menu item only appears if the optional flash memory is installed.
Advanced Features Advanced Features After you install the print driver, you specify the configuration of the printer, which controls the advanced features available. To review the options installed on the printer, you can print the Configuration Sheet from the printer’s control panel: 1. Press the Menu keys (labeled 1 or 5) to scroll to the Print Menu. 2. Press the Item keys (labeled 2 or 6) to scroll to Config Sheet. 3. Press the Enter key (labeled 4). The Configuration Sheet should print.
Advanced Features Advanced features that are supported by the printer: ■ Automatic tray switching – see page 40. ■ Using custom paper sizes – see page 43. ■ Offsetting of output sent to the Face-down bin or Finisher – see page 45. Cover Sheets This feature allows you to have the first page of your document printed on different paper stock. In this way, you can specify the paper size or media type used for the front cover of the document.
Advanced Features Booklet Printing This feature, accessible through the printer driver, makes it possible to print a document in the form of a small booklet. ■ The printed images are reduced to one-half a page; with two page images on each side of each sheet of paper. The page images are arranged as Pages 1 and N on Sheet 1/Side 1; Pages 2 and N-1 on Sheet 1/Side 2; Pages 3 and N-2 on Sheet 2/Side 1; and so on. The output sheets are then folded and stapled following printing.
Advanced Features Automatic Tray Switching With automatic tray switching (available for both PCL and PostScript jobs), you can group two or more input trays together into one logical tray. You specify the order in which the trays will be searched to satisfy a print request. Tray switching is useful for: ■ Increasing paper capacity.
Advanced Features Tray sequence rules When automatic tray switching is enabled, the printer searches the input trays for the correct size and type of paper for each job that is submitted. ■ If you do not specify an input tray in the print driver when sending a job to the printer (no paper source is specified or the paper source is set to “Auto”), the printer searches the trays in the tray sequence first (in the sequence order) before it searches other trays not in the sequence.
Advanced Features Paper Type Paper Size Paper Source Size/Type Used Specified Not specified Specified (manual feed) Manual feed request; specified type; default size; Specified Specified Not specified Specified type; specified size Specified Specified Specified (not manual feed) Specified type; specified size Specified Specified Specified (manual feed) Manual feed request; specified type; specified size Note Specifying a paper source (a specific tray) does not guarantee that paper will
Advanced Features Paper Size/Type Mismatch Paper size/type mismatch occurs when the requested size is not available in the printer. This can be caused by running out of paper in a tray that is configured for the requested paper, or by requesting a paper that is not configured in the printer. The printer goes off line under paper mismatch conditions. It automatically returns on-line and continues printing once you resolve the paper mismatch condition.
Advanced Features Note If the leading edge width of the non-standard size being used differs from that of the standard size selected in the Custom Size setting by more than 1/4 inch, you cannot use the duplex or stapler options. For example, to use 8 x 10 in. paper in the MBF: a. Set the Tray menu’s MBF Size menu item to Custom, set the Custom Size to Letter (8.5 x 11”), and set the Tray Sequence menu item to a sequence that does not include MBF, or to Off. b.
Advanced Features When using the Custom Paper Tray, certain requirements and limitations need to be observed: a. The dimensions of the paper used must be within certain ranges, depending on which tray position (1, 2, 3) is used for the Custom Tray. Tray Location Minimum Width Maximum Width Minimum Length Maximum Length Tray 1 8.5 in. (216 mm) 11.69 in. (297 mm) 5.5 in. (140 mm) 17 in. (431 mm) Tray 2 8.5 in. (216 mm) 11.69 in. (297 mm) 7.17 in. (182 mm) 17 in. (431 mm) Tray 3 8.5 in.
Advanced Features 46 DocuPrint N4525 Network Laser Printer
Managing Printer Usage Managing Printer Usage Using CentreWare DP CentreWare DP is easy-to-use printer management software. Through point-and-click navigation, you can install, connect, and configure the printer on a network quickly and easily. It provides network administrators with setup procedures and management of networked printers. CentreWare DP also provides Help information. The following table lists CentreWare DP key features and benefits.
Managing Printer Usage Setup To set up your printer for Internet/Intranet access: ■ Configure an IP address for the printer on your network. Refer to page 24 for Ethernet or page 27 for Token Ring. ■ Enable the embedded HTTP server at the control panel. Refer to page 24 for Ethernet or page 27 for Token Ring. ■ Configure a static IP Address on the printer. Refer to page 24 for Ethernet or page 27 for Token Ring.
Managing Printer Usage PCL Emulation Printer Driver The printer supports the PCL printer drivers listed in the following table. To take full advantage of all the printer's features when printing PCL jobs, install the appropriate PCL emulation printer driver(s). Environment PCL 5e emulation printer driver PCL 6 emulation printer driver Windows Windows 95/98/Me Windows 95/98/Me Windows 2000 Windows NT 4.0 Windows NT 4.
Managing Printer Usage The following table lists a general overview of additional features supported by the printer drivers. Actual driver capabilities can be determined by invoking specific drivers. Feature Driver Secure Printing Proof Printing Cover Sheets Edgeto-Edge N-Up Watermark Overlay Duplex Booklet Printing Windows 95/98/Me C C C C C C C C C Windows 2000 U U U U U N N U U Windows NT 4.
Fonts Fonts Use the ATM (Adobe Type Manager) software and Xerox Font Manager to display these fonts on your computer screen as they should appear on your prints. These software products are provided on the printer’s CD-ROM.
Fonts To print a list of PCL fonts currently loaded: 1. On the control panel, press the Menu keys (labeled 1 or 5) to scroll to the Print Menu. 2. Press the Item keys (labeled 2 or 6) to scroll to the PCL Font List. 3. Press the Enter key (labeled 4).
Hard Disk Drive and Memory (DRAM and Flash ROM) Hard Disk Drive and Memory (DRAM and Flash ROM) The optional hard drive in the printer significantly increases the amount of memory available for processing jobs and storing downloaded information, including fonts, forms, overlays (macros), secure jobs, and proof jobs. The hard disk is used for: ■ Receiving raw, unprocessed data for secure jobs, proof jobs, and collated copy jobs. ■ Downloading fonts, forms, and overlays.
Hard Disk Drive and Memory (DRAM and Flash ROM) Flash initialization You must format the Flash Memory before its first use: 1. On the printer’s control panel, press the Menu keys (labeled 1 or 5) to scroll to the Reset Menu. 2. Press the Item keys (labeled 2 or 6) to scroll to Flash Format. 3. Press the Value keys (labeled 3 or 7) to scroll to Yes. 4. Press the Enter key (labeled 4). 5. Press the On Line key (labeled 0) to exit the menus.
Hard Disk Drive and Memory (DRAM and Flash ROM) ■ Fonts downloaded to the hard drive or flash memory are stored in the PCL Fonts directory. Macros downloaded to the hard drive or flash memory are stored in the PCL Macros directory. PCL fonts, forms, and macros stored on the hard disk remain there until you delete them; they are not cleared from the hard disk or flash memory when the printer is powered off. You can only delete a macro from the hard disk if you know the name of the macro.
Hard Disk Drive and Memory (DRAM and Flash ROM) The following example shows a sequence of commands that can be sent to the printer to download a macro named “a_macro” to the disk. %-12345X @PJL @PJL FSDOWNLOAD FORMAT:BINARY NAME =”0:\pcl\macros\a_macro” SIZE=29 *p900x1500YThis is the macro %-12345X In this example: ■ %-12345X is the PJL UEL command which starts this sequence. ■ @PJL is the mandatory PJL command following the UEL command. ■ @PJL FSDOWNLOAD..
Hard Disk Drive and Memory (DRAM and Flash ROM) In this example, note that: ■ The case of the string ID must be the same as the case of the font name in the FSDOWNLOAD command. ■ The number of characters in the macro name (“6” in the above example) must equal the string ID byte count plus 1. Using the FSDELETE command The FSDELETE command is used to delete files from the printer’s file system.
Hard Disk Drive and Memory (DRAM and Flash ROM) Creating secure jobs without the driver When not using a driver, you can create secure jobs by preceding the job with the following PJL commands: @PJL XSECUREJOB @PJL XJOBPASSWORD = "number" These commands must be immediately followed by a standard PJL “JOB” command that includes the “jobname.” The job name can be up to 16 alphanumeric characters. The password must contain four numeric characters (0-7).
Hard Disk Drive and Memory (DRAM and Flash ROM) The following example creates a PCL proof job with the name “Sample” associated with password 7777 requesting five collated sets in addition to the proof copy. %-12345X@PJL XPROOFJOB @PJL XJOBPASSWORD = 7777 @PJL JOB NAME = "Sample" @PJL ENTER LANGUAGE = PCL @PJL SET QTY = 5 ...PCL file... %-012345X@PJL EOJ %-012345X. The printer continues processing all data after the @PJL SET QTY = 5 command as part of the proof job named “Sample.
Hard Disk Drive and Memory (DRAM and Flash ROM) 60 DocuPrint N4525 Network Laser Printer
Networking Networking Connecting to Your Network Setting a TCP/IP Address Your DocuPrint N4525 printer can be set up on a variety of TCP/ IP networks. There are several ways in which your printer can be assigned a TCP/IP address depending on your network. ■ Static Addressing TCP/IP address is assigned manually by the System Administrator. ■ Dynamic Addressing RARP/BOOTP TCP/IP address is assigned automatically by the Server.
Networking 4. Press the Value keys to change the value of the character above the cursor. The value is incremented or decremented by 1 each time the key is pressed. Holding down the Value keys causes continuous scrolling through the values. 5. To change other characters in the Sub Net Mask, press the Item keys to scroll right or left respectively through the character string, then press the Values keys to change the value of the character above the cursor (as in Step 4). 6.
Networking Setting up AppSocket To enable or disable the AppSocket protocol, perform the following steps: 1. Press the Menu keys (labeled 1 or 5) until you see: Menus Ethernet Menu 2. Press the Item keys (labeled 2 or 6) until you see: Ethernet Menu AppSocket Enabl 3. Press the Value keys (labeled 3 or 7) until you see: AppSocket Enabl = On or Off 4. Press the Enter key (labeled 4). You should see: Ethernet Menu AppSocket Enabl 5. Press the On Line key (labeled 0).
Networking Resetting the Printer To Reset your printer from the Control Panel: 1. Press the Menu keys (labeled 1 or 5) until you see: Menus Job Menu 2. Press the Item keys (labeled 2 or 6) until you see: Job Menu Restart Printer 3. Press the Value keys (labeled 3 or 7) until you see: Restart Printer = Yes 4. Press the Enter key (labeled 4). You should see: Restart Printer Please Wait... Power On Initializing...
Networking Novell NetWare Setup NetWare 3.1X Print Server Setup, NetWare 4.X/5.0 Print Server Setup The DocuPrint N4525 printer defaults, in most cases, enable connection to Novell NetWare without adjustment. Review the Configuration Sheet and verify the following settings: ■ Netware is enabled. ■ Frame Type matches the frame type of the desired file server. ■ PDL is set to your desired PDL (PostScript or PCL) or to Auto. You may wish to set PDL to the desired type if only one PDL is used.
Networking Novell NetWare Troubleshooting Troubleshooting for the Windows-based PC consists of both hardware and software procedures. The steps in each of these procedures should eliminate cabling, communication, and connection problems associated with direct-connected ports. Complete one of these procedures (based on the type of port being used), then run a test print from your software application. If the job prints, no further system troubleshooting is necessary.
Networking Novell NetWare Troubleshooting Step-by-Step The steps in this procedure should eliminate cabling, communication, and connection problems associated with network connected printers. The steps are divided into two groups: ■ Hardware Step-by-Step ■ Software Step-by-Step Software Step-by-Step assumes that you are connected to a Novell NetWare network with a Windows OS loaded on the client workstation. Complete both of these procedures, then run a test print from your software application.
Networking Novell NetWare Software Step-by-Step 1. Verify that CentreWare DP and a DocuPrint N4525 printer driver have been loaded on the workstation. ■ 2. In Windows 95/98/Me, Windows NT 4.0, or Windows 2000, double-click on My Computer (you may have changed this name). Open the Printers folder to verify that there is an entry for the type of printer you installed. Launch the CentreWare DP software. ■ In Windows 95/98/Me, Windows NT 4.
Networking Windows Troubleshooting Troubleshooting for the Windows-based PC is comprised of a set of procedures for each Windows version. The steps in these procedures should eliminate cabling, communication, and connection problems. Complete one set of procedures (based on your version of Windows), then run a test print from your software application. If the job prints, no further system troubleshooting is necessary.
Networking Windows 95/98/Me Troubleshooting for Network Printers This troubleshooting section assumes: ■ You have loaded a DocuPrint N4525 printer PCL or PostScript print driver. ■ You have printed and retained a current copy of the Configuration Sheet. 1. From a workstation desktop, use the right-mouse button and select Network Neighborhood. With the left-mouse button, select Properties from the cascade menu. 2. The Network dialog should appear. Select the Configuration tab. 3.
Networking Windows NT 4.x Troubleshooting (TCP/IP) This troubleshooting section assumes: ■ You have loaded a DocuPrint N4525 printer PCL or PostScript print driver. ■ You have printed and retained a current copy of the Configuration Sheet. 1. Verify these items in the Ethernet Menu area of the Configuration Sheet: ■ IP Address Resolution is set to DHCP, Control Panel, or RARP/BOOTP (depending on your network configuration). ■ Current IP Address is set correctly.
Networking Windows NT 4.x Troubleshooting (AppleTalk) This troubleshooting section assumes: ■ You have loaded a DocuPrint N4525 printer PCL or PostScript print driver. ■ You have printed and retained a current copy of the Configuration Sheet. 1. Verify this item in the upper left corner of the Configuration Sheet: ■ 2. EtherTalk Name is correct. Verify these items in the EtherTalk and Ethernet Menu areas of the Configuration Sheet: ■ Enabled is set to Yes.
Networking Macintosh Network Setup Macintosh Driver Installation Note Installing a Macintosh driver can also be accomplished in CentreWare DP CentreWare MC, or CentreWare IS. Refer to page 47 for more information. Requirements ■ A working knowledge of the Macintosh 7.0+ or higher operating system ■ DocuPrint N4525 Network Laser Printer Software CD-ROM Driver Installation for Macintosh System 7.0+ 1. Insert the CD-ROM in your computer’s CD-ROM drive. 2. Double-click on the disk icon. 3.
Networking Step-by-Step Setup (AppleTalk) Configuring EtherTalk at the Control Panel To enable the EtherTalk protocol at your printer’s Control Panel, follow these steps: 1. Press the Menu keys (labeled 1 or 5) until you see: Menus Ethernet Menu 2. Press the Item keys (labeled 2 or 6) until you see: Ethernet Menu EtherTalk Enable 3. Press the Value keys (labeled 3 or 7). You should see: EtherTalk Enable On 4. Press the Enter key (labeled 4). You should see: Ethernet Menu EtherTalk Enable 5.
Networking 6. When you select a zone, printer names appear in a box to the right. 7. Select the EtherTalk Name from the window to the right. 8. Click Setup. Note If you do not use the DocuPrint N4525 printer driver, you may not be able to take advantage of all of the printer’s features. Before continuing, make sure that the software included with your customer documentation set has been loaded into each Macintosh computer that is sending jobs to the DocuPrint N4525 printer.
Networking Macintosh Troubleshooting The steps in this procedure should eliminate cabling, communication, and connection problems. Complete these steps, then run a test print from your software application. If the job prints, no further system troubleshooting is necessary. For problems with the appearance of your document once it has printed, consult the Troubleshooting chapter on page 79. Requirements ■ A workstation with the appropriate DocuPrint N4525 printer driver installed.
Networking UNIX Network Setup Introduction For information about the connection and configuration of your printer in UNIX environments, refer to the following documentation also included on your Printer Management Software CD-ROM in the \doc\unix\ folder.
Networking 78 DocuPrint N4525 Network Laser Printer
Troubleshooting Troubleshooting If your printer is not operating properly, check: ■ Whether the printer is plugged in and switched on. ■ Whether the cable is correctly connected to the printer. ■ Whether the media trays are inserted correctly and the doors are securely closed. ■ The control panel for an error message about the problem. ■ Whether your computer has the correct driver installed and configured for your printer.
Troubleshooting Maintaining and Cleaning Your Printer Cleaning the exterior and interior of the printer as described in this section will help keep your printer in optimum working condition. Exterior Cleaning Clean the exterior of the printer about once a month, using a soft, slightly damp cloth. For stubborn stains, soak the cloth in a mild detergent solution and squeeze out the excess water before cleaning.
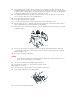
Troubleshooting Interior Cleaning Caution Be sure to power off the printer and disconnect the power cord before cleaning the interior of the printer. The Fuser area becomes very hot in operation. It is best to wait at least 15 minutes for the printer to cool off before attempting to clean the interior of the printer. After removing a paper jam or replacing the Laser Print Cartridge, remove any paper scraps and wipe off paper dust with a dry, clean cloth, as shown in the following figure.
Troubleshooting Printing Problems Problem: The printer won’t print at all, or a file sent from the client/server won’t print Actions: ■ Check with your network administrator to see that the printer is powered up, connected to the network and that the network is operational. ■ Check the control panel display screen for paper jam, door open, or other messages. ■ If the port (parallel, network, USB, or serial) the printer is connected to is disabled, enable it.
Troubleshooting Problem: The requested font for the job does not print Actions: ■ Print a PCL Font List or PostScript Font List (if the job is PostScript). See page 33. ■ If fonts print on the Font List, your print job may need correcting. ■ If fonts do not print on the Font List, reload the fonts and print another PCL or PostScript Font List.
Troubleshooting Problem: You experience frequent media jams Actions: ■ For best reliability and image quality, use Xerox media. Refer to the User Guide for supported types, sizes, and weights. ■ Make sure that the media is dust-free. Dust and dirt can result in poor print quality. ■ Handle media with both hands at the edges to avoid creases and fingerprints. ■ Store media in the original, dust-free package in the same environmental conditions as the printer.
Troubleshooting Paper Handling Problems Problem: You experience frequent paper jams in the paper transport between the printer and the finisher Action: ■ Refer to the 3,000 Sheet Finisher Installation Guide and 3,000 Sheet Finisher Installation Video (located on the Finisher Installation CD-ROM) for the procedure on how to level and align the Finisher.
Troubleshooting Diagnostic LED Flash Sequences When the printer is powered ON, it runs a sequence of self test diagnostics. Some failures are detected in these tests and are identified by a flashing sequence indicated on the system controller diagnostic LED located on the controller board at the rear of the printer. Flash sequence 1 flash —1 second — 1 flash…etc. Description and corrective action A System controller CPU fault has occurred. ■ 2 flashes — 1 second — 2 flashes…etc.
Control Panel Messages Control Panel Messages When the printer’s control panel displays a message, find the message in the following table listed in alphabetical order. If there is a problem, perform the corrective action for resolving the problem. If the problem persists, check the Xerox troubleshooting knowledge database on the web at: www.xerox.com/officeprinting/infoSMART or contact your Customer Support Center. See Appendix D - Xerox Customer Support Centers on page 115.
Control Panel Messages Error Description and corrective action 0010 -DISK A fault condition has occurred. 0101 -DIMM1 ■ Power OFF and Power ON the printer. ■ If this code appears again at Power ON, contact your Customer Support Center. A fault condition has occurred in DIMM1. ■ Power OFF the printer, remove and reinstall DIMM1, and Power ON the printer. ■ If this code reappears at Power ON, replace DIMM1. Refer to page 11 for location of the memory board.
Control Panel Messages Error Description and corrective action 3000 -Enet A fault condition has occurred in the Ethernet interface. 5000 -MEMORY All Jobs Delete All Jobs Print ■ Power OFF the printer, reseat the interface card, and then power ON the printer. ■ If this code appears again at Power ON, contact your Customer Support Center. A fault condition has occurred. ■ Power OFF and Power ON the printer. ■ If this code appears again at Power ON, contact your Customer Support Center.
Control Panel Messages Error Description and corrective action Close Door G ■ Close Door G (the front door of the finisher). Close Duplx Unit ■ Close the Duplex Module. Close Staple Door ■ Close the front door of the finisher. CRUM Failure Power Off/On A Laser Print Cartridge memory failure has occurred. Delete Jobs Deleting... ■ Power OFF and ON the printer. ■ If the problem returns, printing cannot resume. Power OFF the printer and replace the Laser Print Cartridge.
Control Panel Messages Error Description and corrective action Enter Password _xxx Appears when using the Password Menu to print or delete secure and proof jobs. Jobs Print or Jobs Delete. ■ Enter a valid 4-digit password using the control panel’s keys, then proceed to print or delete the secure and proof jobs that have that password. ■ If you want to exit the Password menu, press the Menu keys (labeled 1 or 5). To exit the menu system, press the On Line key (labeled 0). Env.
Control Panel Messages Error Description and corrective action Insert Tray 1 The printer cannot feed from Tray 1. ■ Insert Tray 2 The printer cannot feed from Tray 2. ■ Insert Tray 3 Make sure Tray 4 is properly inserted in the printer. The printer cannot feed from Tray 5. ■ Install Print Cartridge Make sure Tray 3 is properly inserted in the printer. The printer cannot feed from Tray 4. ■ Insert Tray 5 Make sure Tray 2 is properly inserted in the printer. The printer cannot feed from Tray 3.
Control Panel Messages Error Description and corrective action Load The specified tray may be out of the requested paper, or the printer is not configured for the requested paper. (The Page Policy setting in the System Menu determines whether to wait or ignore a mismatch condition.) Maintenance Kit Replace ■ If the specified tray is out of the requested paper, load paper of the requested size and type in that tray. Printing continues.
Control Panel Messages Error Description and corrective action NV Memory Failure Power Off/On Nonvolatile memory on the printer controller has failed and printing cannot resume. OEM ID Mismatch ■ Power OFF and ON the printer. ■ If the problem persists, contact your Customer Support Center. The Laser Print Cartridge in the printer is not manufactured specifically for this printer. ■ Offline Out of Memory Out of Toner Install the correct Laser Print Cartridge for this printer.
Control Panel Messages Error Description and corrective action Paper Jam Clear Tray 5 ■ Please Wait An operation that takes time is proceeding. ■ Power Saver On Print Using Please wait until the operation finishes. No print jobs have been received for the set period of time for the Power Saver, so the printer has set itself to lower power mode. ■ Press Menu Clear the paper jam in Tray 5 of the 2,500 Sheet Feeder (see the Paper Jams section of the User Guide).
Control Panel Messages Error Description and corrective action Ready The printer is online and waiting for data to print. Remove Output Face-down Bin The Face-down Bin is full and printing cannot continue. ■ Remove the output from the Face-down Bin. Remove Output from Finisher ■ Remove the output from the Finisher bin. Depending on the Output Timeout setting (in the System Menu), the printer either stops printing or directs the output to the face-down bin.
Control Panel Messages Error Description and corrective action V x.x xx/xx/xx The printer is in Power ON diagnostics. The first line contains the printer software version number. The second line contains the creation date of this printer software version. None, if there is no failure during Power ON diagnostics. After other diagnostic messages, the final message will be that the printers is online and waiting for data. Waiting...
Control Panel Messages 98 DocuPrint N4525 Network Laser Printer
Appendix A - DocuPrint N4525 Network Laser Printer Specifications Appendix A - DocuPrint N4525 Network Laser Printer Specifications Imaging Method Electro-Photography Exposure System Semiconduction laser beam (laser diode) scanning Image Resolution 600 x 600 dpi 1200 x 1200 dpi image quality 300 x 300 dpi (PCL 5e only) Warm Up Time Less then 60 seconds after power ON Continuous Print Speed 45 ppm Printable Area Full size of the paper Processor Motorola Power PC 740 (233 MHz) Maximum Monthly Duty Cycle Up t
Appendix A - DocuPrint N4525 Network Laser Printer Specifications Factory Provided Features Available Options 100 ■ 2 adjustable trays (500 sheets each) standard (desktop configuration) ■ 50 Sheet Bypass Feeder ■ Face-down Bin (500 sheets) ■ 32 Mbyte DRAM Memory ■ PCL 5e emulation ■ PCL 6 emulation ■ PostScript 3 ■ Ethernet 10/100BaseT ■ SNMP ■ IEEE 1284 Parallel Interface ■ USB Interface ■ Internet Printing Protocol (IPP) software ■ HTTP Web Server ■ E-Mail Received by Printe
Appendix B - Notices and Certifications Appendix B - Notices and Certifications FCC Notices...USA Radio frequency Note: This equipment has been tested and found to comply with the limits for a Class B digital device, pursuant to Part 15 of the FCC Rules. These limits are designed to provide reasonable protection against harmful interference in a residential installation.
Appendix B - Notices and Certifications Base Printer with Token Ring Card This printer has been tested and found to comply with the limits for a Class A digital device, pursuant to Part 15 of the FCC Rules. Base Printer with 3,000-Sheet Finisher/Stapler/Hole Puncher Option This printer has been tested and found to comply with the limits for a Class A digital device, pursuant to Part 15 of the FCC Rules.
Appendix B - Notices and Certifications Declaration of Conformity Type Of Equipment: Information Technology Equipment - Network Printer Manufacturers Name: Xerox Corporation Manufacturers Address: 701 South Aviation Boulevard El Segundo, CA 90245 Product Name: Xerox DocuPrint N4525 Model Number(s): N4525 Product Options: ■ Hard Disk Drive ■ 16, 32, and 64 Mbyte EDO DRAM DIMMs ■ 8 Mbyte Flash ROM DIMMs ■ 2,500 Sheet Feeder with one 500 sheet tray (adjustable) and two 1,000 sheet trays (Letter, Execu
Appendix B - Notices and Certifications Certifications...Canada 60 HZ, 115V The equipment is listed by the Underwriters Laboratories, (UL 1950), and approved by Underwriters Laboratories to meet Canadian Standards Association Certification requirements (CSA22.2, No. 950).
Appendix B - Notices and Certifications European Markets CE Class A The CE marking applied to this product symbolizes Xerox’s declaration of conformity with the following applicable directives of the European Union as of the dates indicated. January 1, 1995 - Council Directive 73/23/EEC amended by Council Directive 93/68/EEC, Approximation of the laws of the member states related to low voltage equipment.
Appendix B - Notices and Certifications Base Printer with 3,000-Sheet Finisher/Stapler/Hole Puncher Option This becomes a Class A product with this option installed.
Appendix B - Notices and Certifications Safety Extra Low Voltage Approval The printer’s printing system is in compliance with various governmental agencies and national safety regulations. All system ports meet the requirements for Safety Extra Low Voltage (SELV) circuits for connection to customer-owned devices and networks. Additions of customer-owned or third-party accessories attached to the system must meet or exceed the requirements listed above.
Appendix B - Notices and Certifications 108 DocuPrint N4525 Network Laser Printer
Appendix C - Unique Printer Commands Appendix C - Unique Printer Commands In addition to the standard PCL and PJL printer commands, Xerox has added unique settings for the printer regarding: ■ Paper size selection – see page 109. ■ Paper type selection – see page 110. ■ Input tray selection – see page 111. ■ Output selection – see page 112. Additional PJL commands are also listed on page 112.
Appendix C - Unique Printer Commands Paper size selection and support (cont'd.) Paper Size Feed Direction PCL 5e Command1 PCL 6 Enumeration for Media Size Supported Devices COM-10 4.1x9.5” LEF Ec&l81A eCOM10Envelope (6) Envelope Feeder, MBF LEF Ec&l80A eMonarchEnvelope (7) Envelope Feeder, MBF C5 162x229mm LEF Ec&l91A eC5Envelope (8) Envelope Feeder, MBF 110x220mm LEF Ec&l90A eDLEnvelope (9) Envelope Feeder, MBF Monarch DL 3.8x7.5” 1.
Appendix C - Unique Printer Commands Note The first 10 types listed in the table are permanently available on the Control Panel. The last five types are user-defined (User Type x) and are only available if loaded from Network Administration software with a maximum of 24 characters each. Input Tray Selection The following table lists the input sources supported by the printer along with the PCL commands to select them and the source used if a selected option is not installed.
Appendix C - Unique Printer Commands Output Selection The following table lists the output destinations supported by the printer along with the PCL commands and PJL values to select them. (The values listed in the PJL column are the settings associated with the PJL “OUTBIN” variable.
Appendix C - Unique Printer Commands Printer specific PJL commands (cont'd.
Appendix C - Unique Printer Commands 114 DocuPrint N4525 Network Laser Printer
Appendix D - Xerox Customer Support Centers Appendix D - Xerox Customer Support Centers To view the current phone number list, check the Xerox Printer web site at: www.xerox.
Appendix D - Xerox Customer Support Centers 116 DocuPrint N3925 Network Laser Printer
Index A automatic tray switching 40 customer support phone numbers 115 B D booklet printing 39 C CentreWare DP features 47 usage offsetting output 45 CentreWare Internet Services 47 certification Canada 104 European markets 105 cleaning your printer exterior 80 interior 81 configuration sheet 37 connecting Default Gateway 62 Macintosh 73 driver installation 73 selecting from the Chooser 74 step-by-step AppleTalk 74 Novell NetWare 65 advanced setup 65 NDPS/NEPS 65 resetting the printer 64 setting a TCP/
Index fonts base printer 51 downloading 54 PostScript 52 TrueType 52 forms downloading 54 G getting help support phone numbers 115 H hard disk drive description 53 initializing 53 usage downloading fonts 55 downloading forms 55 downloading macros 55 printing secure/proof jobs 57 - 59 I indicator lights 2 Internet see CentreWare Internet Services J job menu 10 L LEDs diagnostics 86 low voltage approval 107 M Macintosh driver installation 73 first time install 75 reconfigure existing printer 75 step-by
Index PCL commands input tray 111 output destination 112 paper size 109 paper type 110 PCL emulation drivers description 49 PCL menu 16 - 17 PJL commands 112 PostScript drivers description 49 fonts 52 power saver setting 20 print menu 33 - 34 printer drivers see drivers specifications 99 - 100 unique printer commands see PCL commands, PJL commands printer drivers see drivers printing a configuration sheet 37 printing problems 82 proof jobs creating 58 - 59 R tray sequence also see tray switching usage ex
Index 120 DocuPrint N4525 Network Laser Printer
http://www.xerox.com KEEP THE CONVERSATION GOING. SHARE THE KNOWLEDGE.