DocuMate 765 scanner user’s guide
DocuMate 765 scanner user’s guide
Copyright © 2009 Visioneer, Inc. Reproduction, adaptation, or translation without prior written permission is prohibited, except as allowed under the copyright laws. XEROX ® is a trademark of Xerox Corporation in the United States and/or other countries and is used under license. DocuMate is a trademark of Xerox Corporation used under license. All other Xerox product names and product numbers mentioned in this publication are trademarks of Xerox Corporation.
Table of Contents Table of Contents Welcome What’s in the Box . . . . . . . . . . . . . . . . . . . . . . . . . . . . . . . . . . . . . . . . . . . . . . . . . . . . . . . . . . . . . . . . . 1 The Xerox DocuMate 765 Scanner . . . . . . . . . . . . . . . . . . . . . . . . . . . . . . . . . . . . . . . . . . . . . . . . . . . 2 What You Need . . . . . . . . . . . . . . . . . . . . . . . . . . . . . . . . . . . . . . . . . . . . . . . . . . . . . . . . . . . . . . . . . . 3 Documentation . . . . . . . . . .
Table of Contents Document Settings Tab . . . . . . . . . . . . . . . . . . . . . . . . . . . . . . . . . . . . . . . . . . . . . . . . . . . . . . . 61 Image Enhancements Tab . . . . . . . . . . . . . . . . . . . . . . . . . . . . . . . . . . . . . . . . . . . . . . . . . . . . . 62 About Tab . . . . . . . . . . . . . . . . . . . . . . . . . . . . . . . . . . . . . . . . . . . . . . . . . . . . . . . . . . . . . . . . . . 65 Scanning from ISIS Opening QuickScan and Selecting the Scanner . . . . . . . . .
Table of Contents Section 3: Operational Safety Information . . . . . . . . . . . . . . . . . . . . . . . . . . . . . . . . . . . . . . . . . . . . 138 Section 4: Electrical Information . . . . . . . . . . . . . . . . . . . . . . . . . . . . . . . . . . . . . . . . . . . . . . . . . . . . 139 Section 5: Emergency Power Off . . . . . . . . . . . . . . . . . . . . . . . . . . . . . . . . . . . . . . . . . . . . . . . . . . . 140 Section 6: Maintenance Information . . . . . . . . . . . . . . . . . . . . . . .
Table of Contents vi DocuMate 765 Scanner User’s Guide
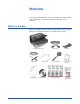
Welcome Your new Xerox DocuMate 765 scanner can quickly scan single-sided or double-sided stacks of documents and place their images on your computer. What’s in the Box Before proceeding, check the contents of the box. If items are missing or damaged, contact the dealer where you purchased the scanner.
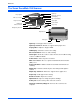
Welcome The Xerox DocuMate 765 Scanner Input tray Paper guides Input tray extension LCD display ADF cover release One Touch buttons Status light Paper feed switch Power switch Output tray Paper stop Exit door release Output tray extension Imprinter door Power jack USB port Input tray—Holds paper in the scanner. Input tray extension—Extends to support various paper sizes. Paper guides—Adjusts to fit paper width. LCD display—Shows the current scan setting.
Welcome What You Need IBM-compatible Intel Pentium™ 4 PC, or AMD equivalent with: • A DVD-ROM drive • An available Universal Serial Bus 2.
Installation Installation Installation is a quick, three-step process: 1. Unpack and assemble the scanner 2. Install the software 3. Connect the scanner Before You Begin Please make sure of the following before you begin installation: 4 • The information in this guide may cover software not provided with the scanner you purchased. Disregard any information about the software not applicable to your chosen product. Please visit our web site at www.xeroxscanners.
Installation Step 1: Unpack and Assemble the Scanner Use care when unpacking, moving and assembling the scanner. Follow these instructions to prevent injury and damage to the scanner. • Always have at least two people carry the scanner, lifting the scanner up from underneath. • Keep at least 15 inches of space on every side of the scanner for the input and exit tray extensions, performing maintenance, and to have sufficient air flow for ventilation.
Installation Step 2: Install the Software 1. Start Microsoft Windows and make sure no other applications are running. 2. Insert the installation disc into your computer's DVD-ROM drive. The disc automatically starts and the Select Language window opens. 3. Select a language from the list of available languages. The disc’s main menu opens in the language you selected. NOTE: If the disc does not start, check the following: • Make sure the DVD drive’s door is completely shut.
Installation 4. On the Installation menu, select Install Products. 5. Make sure the box for Scanner Driver is checked then click Install Now. 6. The next window shows the scanner driver options available for you to install.
Installation Options Description One Touch The One Touch software is installed, which is the necessary software for the buttons on your scanner to work. TWAIN The TWAIN driver is installed. This option is always selected and disabled, the TWAIN driver must be installed with your scanner. You can scan from TWAIN scanning applications such as OmniPage®. Selecting only the TWAIN driver to install means that you will not be able to use the scanner’s buttons. ISIS The ISIS driver is installed.
Installation 2. The next screen lets you choose where the installation files are going to be on your computer. Click on Browse... to change the location where the files are installed. You can also choose to install the scanner just for your Windows profile or, for every profile on your computer to be able to use the scanner. We recommend that you keep the default options on this window and just click on Next to proceed with the installation. 3. The TWAIN driver will now be installed on your computer. 4.
Installation User Utility Installation The User Utility installation will automatically start after you close the TWAIN installation. The User Utility is a software diagnostic and maintenance software that you can use for monitoring your scanner hardware. 1. On the Xerox User Utility License Agreement window, read the license agreement. If you accept the terms, select Yes to accept the agreement and continue with the installation.
Installation 3. The next screen lets you change the Program Files folder name and where the program appears in your Windows Start Programs list. The default options on this window will install put the shortcut icon in your Windows All Programs list in the Xerox folder. We recommend that you keep the default options on this window and just click on Next to proceed with the installation. 4. Click on Finish on the Installation Complete window to close the installation window. 5.
Installation One Touch Installation The One Touch installation will automatically launch after the User Utility is finished. 1. Click Next on the Welcome window to start the installation. 2. The next screen lets you choose where the installation files are going to be on your computer. Click on Browse... to change the location where the files are installed. You can also choose to install One Touch just for your Windows profile or, for every profile on your computer to be able to use the scanner.
Installation 3. The One Touch software will now be installed on your computer. 4. Click Close on the Installation Complete window.
Installation ISIS Driver Installation If you selected the ISIS driver to install, the installation will launch after the other programs have finished. For instance, if you only selected TWAIN and ISIS, after the User Utility finishes installing the ISIS driver will install. If you selected One Touch to install, the ISIS installation will start after One Touch is complete. 1. You will first be prompted to select a language for the ISIS driver.
Installation 3. Click on Install to begin the ISIS driver installation. 4. Click on Finish to close the ISIS installation complete window. NOTE: After the scanner driver installation is complete, any other software you chose to install will automatically begin installing after the driver is complete. If you did not plug in the scanner after the TWAIN driver was installed, you can plug it in now or after you finish installing the other software.
Installation Step 3: Connect the Scanner NOTE: Only use the power cord included with your scanner. Connecting any other type of power cord may damage your scanner, and will void its warranty. 1. Plug the power supply into the power port on the scanner and to a wall outlet. 2. Remove any protective tape from the USB cable. 3. Plug the USB cable into the USB port on the scanner then into a USB 2.0 port on the computer. The DocuMate 765 scanner connects to any available USB port.
Installation Additional Applications Available with Your Scanner Your scanner includes free, additional applications on the installation disc. 1. Return to the Main Menu on the installation disc and click on Install Products. The free Adobe® Reader® software is located on the DVD with the User Guides. 2. Click Install Products. You will see the screen that shows the applications. Applications already installed have Installed! next to them. 3.
Installation Software About the Software Adobe® Reader® Adobe Reader is a stand-alone application that you use to open, view, search, and print PDF files. The User Guides on your scanner’s installation disc are in PDF format and require Adobe Reader for you to view and save them.
Installation View the User Guides 1. To get the documentation for each of the products, return to the installation disc’s Main Menu window and click User Guides. 2. Click the links of the Guides you want to view. The User Guides are in Adobe® PDF format. The Scanner Readme file is in HTML format and will open in any standard browser. If you need to, click Adobe Reader to install it now. Follow the instructions on the installation windows.
Installation Register Your Scanner and Check for Updates Registering your scanner is important as it provides you with access to free telephone support service and software updates for your scanner. To register your scanner: You will need an active internet connection to register your scanner. If you do not have internet access you can contact our customer service department to register the scanner.
Installation Loading Documents to Scan NOTE: Always remove any staples or paper clips from documents before inserting them into the scanner’s Automatic Document Feeder. Staples and paper clips can jam the feed mechanism and scratch the internal components. Also remove any labels, stickers, or Post-It™ notes that may come off during the scanning process and get stuck in the scanner. Misuse as described here will void your scanner’s warranty. 1.
Installation Avoid scanning the following: The following types of documents can cause multiple-page feeding, paper jams, or damage to the scanner. • Plastic items such as credit cards, identification cards, overhead projector sheets, film, and cloth or metallic sheets. • Photographs or other coated paper as the coating can flake off during the scan process. • Documents with wet ink, correction fluid, or carbon paper that can leave residue inside the scanner.
Scanning from One Touch Scanning from One Touch One Touch is your main set of controls for the scanner. When the One Touch software is installed you can scan by pressing either the Simplex or Duplex button on the scanner. The pages are scanned and sent to the location, with the scan settings, displayed on the LCD screen. Scanning with the One Touch Buttons 1. Load the documents face up in the ADF. 2. On the scanner, tap the up or down arrow until you see a profile appropriate for your scanning job.
Scanning from One Touch Using the One Touch Button Panel The One Touch Button Panel is also your on-screen set of controls for the scanner. The One Touch Button Panel shows information about the scanner and its settings. The One Touch Icon. 1. To open the One Touch Button Panel, click the One Touch icon. It is located in the Windows Notification Area at the bottom right corner of the screen. Click these arrows to navigate through the panel’s three views.
Scanning from One Touch 4. The scanner begins scanning. When the process finishes, the scanned images appear in the Destination Application, just as if you scanned with the Simplex or Duplex scanner buttons. The Default One Touch Settings on Your Scanner Based on the recommended full install of the scanner driver, your scanner is pre-configured to scan items for various basic tasks, such as email or fax, then send the scanned image to an appropriate, pre-selected Destination Application.
Scanning from One Touch Configuring the One Touch Buttons Each One Touch button configuration consists of a Destination Application, a Scan Configuration, and a Document Format. The One Touch Properties window is where you select these three elements for a button. To open the One Touch Properties window: 1. Click the One Touch icon. It is located in the Windows Notification Area at the bottom right corner of the screen. 2. Right-click a button on the One Touch Button Panel. 3.
Scanning from One Touch The settings on the Properties window are: Select Destination—The list of applications that can open to display the scanned image for the selected button. NOTE: Later on, If you install new software that can be used as a Destination Application, click the Refresh button to link the new software to One Touch 4.0. Select Configuration—The list of available scan configurations for the selected button.
Scanning from One Touch Selecting New Settings for a Button For each of the nine One Touch buttons, you can select a new Destination Application, Scan Configuration, and Document Format. Click these arrows to see the properties for the button whose settings you want to change. Select a format for the scanned image. Select a software application as the destination to send scanned documents. Select a configuration for scanning the item. To select new settings for a Scanner Button: 1.
Scanning from One Touch 5. Click OK to accept any changes and close the window. To accept changes but keep the window open to work with other features, click Apply. Note that while the One Touch Properties window is open, you cannot scan yet by clicking a button on the One Touch Panel. You must click OK or close the One Touch Properties window first. However, you can scan at any time by pressing the Simplex or Duplex button on the scanner. 6.
Scanning from One Touch The Scan Settings Tab 1. On the Scan Configuration Properties dialog box, type a name. TIP: If you’re going to set up the new configuration to scan duplex (two-sided), include that in the name, such as “Scan for Dark Print (Duplex),” to remind you that it is a duplex scan. Type a new name for the configuration. Select the scan mode and drag the slider to set the resolution. Drag the sliders to set the Brightness and Contrast. 2.
Scanning from One Touch The Page Settings Tab Click the Page Settings tab to select page settings. Click to toggle between inches and millimeters. Size—Click Standard, click the menu arrow and choose a page size from the list, or click Custom and enter the horizontal and vertical page dimensions in the boxes. The maximum size is 11.7" x 38". The units of measurement can be inches or millimeters. Click the name of the units, inches or millimeters, to toggle between them.
Scanning from One Touch • Duplex—Scan both sides of the page. If this option is not selected, the scanner will scan the front side of the page only. NOTE: The Simplex and Duplex buttons on the scanner take precedence over the One Touch settings. In other words, if the LED number on the scanner is configured to scan as Duplex, but you press the Simplex button, the scanner scans in Simplex, and vice versa. • Skip Blank Originals—Skips pages that are completely blank.
Scanning from One Touch The Advanced Settings Tab Click the Advanced Settings tab. The options of the Advanced Settings tab are for the Color or Grayscale scanning mode. 1. Drag the sliders to the left and right to change the color settings. As you do, the image changes to show the effects of the new settings. Saturation—Saturation is the strength or purity of a color. Hue—Hue is the color your eyes see as reflected from the image. Gamma—Gamma controls the brightness of the midtones of the color. 2.
Scanning from One Touch The Device Settings Tab A Device Settings tab appears on the Scan Configurations dialog box when your selected Destination Application sends the scanned image to a printer, fax application, or other device. You use the options on the Device Settings tab to select settings for the device. 1. Click on the Device Settings tab.
Scanning from One Touch The Storage Options Tab (Archive) A Storage Options tab is on the Scan Configurations dialog box when the selected Destination Application is set as Transfer to Storage. You use the options on this tab to select where you want to save your scanned items for storage when scanning with that particular Scan Configuration. 1. Click on the Storage Options tab. 2. Click the Storage Layout options you want.
Scanning from One Touch 1. Open the One Touch Properties window. 2. Select the scan configuration you want to edit or delete. Select the scan configuration to edit or delete. It must be unlocked, as indicated by not having a lock displayed here. 3. To delete the configuration, click the Delete button. 4. To edit the configuration, click the Edit button. The Scan Configuration Properties dialog box opens for that configuration.
Scanning from One Touch Setting Destination Application Properties The different types of Destination Applications have various properties that you can select. 1. On the One Touch Properties window, click a Destination Application. 2. Click the Properties button. Click a Destination Application. Click the Properties button. A One Touch 4.0 Link Properties dialog box opens for the type of Destination Application you selected, and the available options are for that type of application.
Scanning from One Touch 1. Click in the OCR settings boxes for the options you want. The options will apply to all the applications in the group. Always send a file, even when no text was found—The scanned file is sent to the OCR reader even if the image does not appear to contain text. This could occur if you scanned a photograph with a One Touch button set for text applications. Show message if text recognition failed—A message will open on the screen if the OCR reader does not detect text in the image.
Scanning from One Touch Image Documents Properties These properties apply to OmniPage Pro that you received with your scanner, plus Microsoft Paint and other image processing applications. 1. Click in the Color document handling settings boxes for the options you want. The options will apply to all the applications in the group. Convert Bitmaps using Screen Resolution—Use this option to ensure that an image will fit on the computer’s screen.
Scanning from One Touch Storage Properties These properties apply to the Destination Application named Transfer to Storage. 1. Click the Storage Layout options you want. All documents are in the root—The scanned documents are saved in the root of the folder specified in the Storage Location. Documents are put into folders by month, week, or type—Folders are created based on your selection (month, week, or type) and the scanned documents are saved in those folders.
Scanning from One Touch eMail Properties These properties apply to email applications so you can specify the folder for documents that you will attach to an email message. Microsoft Outlook® will accept direct attachment of documents to a blank email message as soon as scanning is finished, but other email applications may not.
Scanning from One Touch 5. Click OK. 6. Click OK or Apply on the One Touch Properties window. Selecting Page Format Options The Page Format options that you select determines the file format of the scanned document. Appropriate page format options and file types are available for the type of Destination Application selected for the button. The available options are for images and text. Image Formats. Text Formats; sPDF is only one of several text formats available.
Scanning from One Touch The PDF format is often used to create images of text pages. You may want to select PDF as the page format when scanning text pages that do not require OCR processing or other processing. The PDF format is also used to put multi-page documents on web sites as pdf-readable files. As with the JPEG option, the PDF format can be reduced in size or quality. To select a JPEG or PDF file size: 1. Select JPG or PDF as the page format. 2. Right-click on the JPG or PDF icon. A menu opens. 3.
Scanning from One Touch To select a file type for the text format: 1. Select the Destination Application. 2. Right-click on the text format icon. A menu opens. The following figure shows samples for different Destination Applications. Example menu for the text format when the Destination Application is Microsoft Word. Example menu for the text format when the Destination Application is a Storage location. 3. Choose the file type that you want for the text format.
Scanning from One Touch HTML Document—The .htm file format used to create web pages. Searchable PDF—The .sPDF file format used by Adobe Acrobat and OmniPage Pro. This format converts scanned text into PDF with text search and OCR capabilities. Normal PDF—The .nPDF file format used by Adobe Acrobat and OmniPage Pro. This format converts scanned text into PDF with text search and OCR capabilities, you can edit the text in an nPDF image if a PDF editing program is installed. 4.
Scanning from One Touch Selecting Options for a Button The One Touch Options determine the types of Destination Applications available for a button, as well global settings for choosing the location of the files for your scanned items. 1. Open the One Touch Properties window and click the Options tab. Options tab. 2. Click the Select Button menu arrow and select the button for new options. 3. Select button options as described below.
Scanning from One Touch • Storage and CD-R/W is for either storing scanned documents in a folder, or sending them to a CD burner to create a CD containing the scanned documents. See “Transferring Scanned Documents to Storage” on page 52 and “Scan and Burn to a CD” on page 49 for details. • Fax and Print is for sending your scanned documents directly to your printer or fax software for faxing. • Sti event forwarding is for using another application’s interface for scanning.
Scanning from One Touch Special Features and Scanning Destinations The One Touch software has unique scanning options available. You can scan directly to word processing programs, to your computer’s CD burner, HTML files and so on. Scanning with Optical Character Recognition (OCR) Please see the One Touch OmniPage MiniGuide, on the installation disc, for complete instructions on scanning with Optical Character Recognition. Optical Character Recognition (OCR) is like a printer in reverse.
Scanning from One Touch Scan and Burn to a CD If you have a CD burner attached to your computer, you can scan directly from your Xerox DocuMate 765 scanner onto a CD. This feature is available only on computers running Windows XP or Windows Vista. To scan and burn to a CD 1. Open the One Touch Properties window. 2. Using the arrows, choose a button to use for scanning and burning to a CD. 3. Select Burn to CD as the Destination Application. 4. Choose a Page Format and a Scan Configuration. 5. Click OK.
Scanning from One Touch Scanning with Event Forwarding If you want to specify an application to use for scanning at the start of the process, you can use event forwarding. The scanner will feed in the first page, but will then stop until you select the application to use. To scan with event forwarding: 1. Open the One Touch Properties window. 2. Using the arrows, choose a button to use for the event forwarding. 3. Select Still Image Client as the Destination Application. 4. Click OK. 5.
Scanning from One Touch Creating an HTML Web Page from Your Scanned Documents If you scan a document, whether a single page or multiple pages, you can have the pages converted directly to HTML formatted pages for posting directly to your web site. To scan and create an HTML web page: 1. Open the One Touch Properties window. 2. Using the arrows, choose Button 8, or any other button that has Microsoft Explorer as one of its Destination Applications. 3.
Scanning from One Touch Transferring Scanned Documents to Storage With the Transfer to Storage scanning process, you can scan documents and save them in a folder in one step. The process is ideal for archiving documents without having to manually save or process them in any other way. If you choose a text format for the file format, the documents are also automatically converted by the OCR process into editable text and numbers before being stored. 1.
Scanning from One Touch Scanning to Multiple Folders When archiving documents with the Transfer to Storage option, you can scan them to multiple folders. For example, one folder might be for “Business Receipts,” a second folder might be for “Personal Receipts,” and a third folder might be for “Annual Receipts.” To scan to multiple folders, you create multiple scan configurations with Transfer to Storage as the Destination Application, and assign each scan configuration to one of the scanner buttons.
Scanning from One Touch 7. Click the Storage Options tab. 8. Click the Browse button. 9. Select the folder you created for storing the scanned documents. If you haven’t created the folder yet, you can click the Make New Folder button and type the name for the new folder. 10. Click OK. The selected folder will now be set as the Storage Location, such as “Business Receipts.
Scanning from One Touch 11. Click Apply. The new configuration is now listed as a Transfer to Storage configuration. 12. Repeat the process to create additional new configurations, such as one named “Storage for Personal Receipts.” 13. Make sure to designate separate folders as the Storage Locations for the new configurations. You will now have multiple configurations set up for the Transfer to Storage destination, and each configuration scans documents to separate folders.
Scanning from One Touch Scan to multiple storage folders: 1. Insert the documents you want to scan to storage. 2. Press the Destination Selector buttons on the scanner to get to one of the buttons set up for scanning to storage. 3. Press the Simplex or Duplex button to scan the documents. 4. When scanning is finished, insert the next set of documents and press the Destination Selector buttons to get to the next button you have set up for scanning. 5.
Scanning from TWAIN Scanning from TWAIN One Touch sends scanned images to applications or folders on your computer. You can also scan from within scanning applications using the TWAIN interface. You then use that application’s options to modify and save the file. A Note About Your Scanner and the TWAIN standard: TWAIN is a widely recognized standard that software applications use to receive images from scanners, digital cameras, and other digital devices.
Scanning from TWAIN TWAIN Interface Options When Xerox DocuMate 765 TWAIN interface first opens the initial view of the Configurations tab, shows the Current Settings profile and basic information about the scanning selections in the Summary field. The other tabs, Scan Settings, Document Settings, and Image Enhancement, are where you set these scanning options for a profile. The status field and buttons at the bottom of the TWAIN interface are always available.
Scanning from TWAIN • Import—if you have exported profiles from TWAIN previously, click on import to add those profiles to your current profile list. Browse to the location on your computer where the profiles are saved, select the profile then click on Import. If you import a profile that has the same name as a profile you already have in the list, you will be prompted to either overwrite the current profile or cancel the import of that profile.
Scanning from TWAIN Resolution—move the slider left or right to change the resolution for the scanned image. Resolution is the clarity of the image measured in dotsper-inch (dpi). The higher the resolution the clearer the image. However, high resolution scans can result in a large file size. When making copies of black and white documents, 100-150 dpi will create an image of similar quality to the original.
Scanning from TWAIN Document Settings Tab Crop image to guide width—this option tells the scanner to look at the input tray’s paper guides and crop the final image to that size. For instance, if the selected paper size is for an U.S. Letter but you place an A4 page in the scanner, adjust the paper guides to the edge of the paper, and the scanner automatically crops the sides from the final image.
Scanning from TWAIN Skew detection is the scanner’s ability to detect when a page has been fed through at an angle (skewed). Click on the drop arrow to select one of the options from the list. You can set the scanner to Detect and stop scanning so you can rescan the page, or turn off the feature. When scanning, make sure the paper guides are to the sides of the paper to hold them in the ADF properly.
Scanning from TWAIN Color Dropout tells the scanner and software to remove a specific color from the image. You can choose either Red, Blue or Green to be dropped out of an image. This option is only available when scanning in grayscale or black and white. Brightness is the overall lightness of the image. Move the slider to the left to decrease (darken) the image, move the slide to the right to increase (lighten) the image.
Scanning from TWAIN Threshold—move the slider to the left or right to set the level of lightness or darkness for the scanner to leverage from. This option is only enabled if you have selected Text or Mixed Content as the threshold technique to use. For example, if you are scanning a document with gray text, such as hand written pencil notes, move the slider towards Light. This tells the scanner that the level to look for is light, and gray pixels are converted to black pixels instead of white.
Scanning from TWAIN document is dark, such as a colored background that may interfere with detecting black, move the slider towards Dark. This tells the scanner that the level to look for is dark, only very dark areas such as text are converted to black pixels. The threshold option in this section individually looks at each page and applies the threshold if the software determines that it is needed. About Tab TWAIN Driver Information—this area shows the current driver version and scanner name.
Scanning from TWAIN 66 DocuMate 765 Scanner User’s Guide
Scanning from ISIS Scanning from ISIS The ISIS interface is another driver option that you can use for scanning with your Xerox DocuMate 765 scanner. The ISIS interface can only be accessed from ISIS scanning applications. The QuickScan Demo and Kofax VRS Pro applications, provided with your scanner, are scanning applications that use the ISIS driver. Each ISIS-compliant software application has its own specific steps to open the ISIS interface.
Scanning from ISIS Scanning from QuickScan QuickScan has several preset configurations you can use for scanning. You can also create new scanning configurations to use the advanced features available with your Xerox DocuMate 765 scanner. 1. Place your documents face up with their tops in the scanner. 2. In the QuickScan main window, click on the Scan button on the toolbar then select New Batch from the list. 3. Select one of the predefined options in the New Batch window. 4. Click on the Scan button.
Scanning from ISIS To create a new scanning preset: This section briefly describes how to choose new settings and the basic options for file saving. Detailed information about the options on each of the tabs are in the QuickScan user guide. If you do not want to use the preset configurations in QuickScan, you can create new ones. 1. In the QuickScan main window, click on the Scan button on the toolbar then select New Batch from the list. 2. Click on Use Preview Settings then click on Add. 3.
Scanning from ISIS 4. Click on the Scan tab to set the configuration properties. 5. Click on the Scan Settings button to open the Preview Settings window where you set the options you want for scanning. 6. Click on the Preset Name you want to use for this scanning batch then click on OK to close the window. The next section “ISIS Preview Settings” provides full details of the features in this interface and how to create new preset configurations for scanning.
Scanning from ISIS 7. Click on the Image Format and Naming tab. Select the file type you want the image saved as and the color mode of the image (color, grayscale or black and white). 8. Click on OK in the new batch window to accept the changes and close the window. 9. Place your documents face up with their tops in the scanner. 10. Click on your configuration name then click on the Scan button to begin scanning. The scanner starts scanning, when finished the images will be in the Quick Scan application.
Scanning from ISIS ISIS Preview Settings The QuickScan user guide, on the installation disc, contains complete instructions on using the QuickScan software. The instructions in this section detail the features of the Xerox DocuMate 765 ISIS interface and how to scan with the default settings only. 1. From the QuickScan main window, click on Scan on the menu bar at the top of the window. 2. Click on Preview Settings... 3. The Preview Settings window opens.
Scanning from ISIS Main Options The Main tab has the basic settings you need for scanning. This includes color type, resolution (dpi), brightness, contrast, and so forth. Mode—select the color mode for your scanning batch. • Black and White—select this option to scan in black and white. This option is mostly used for letters or spreadsheets that do not contain pictures. Every item on the page will be in binary black or white, which results in a smaller file size that other scanning modes.
Scanning from ISIS • Binary&Gray—select this option to have the final image retain the binary black and white on the page with grayscale graphics. This option might be used to scan marketing brochures or business letters where the text on the page is black while the image or logo are in gray or color. The resulting file size is larger than binary (black and white) scanning, but the images are clear and the file size is smaller than a grayscale, color, or binary and color scan.
Scanning from ISIS Three preset options, of the most commonly used brightness levels, have been provided. Clicking on one of the buttons below the Brightness level will change the level as follows: • Darken—the brightness level will be set to 51. • Normal—the brightness level will be set to 128, this is the default setting. • Lighten—the brightness level will be set to 205. Contrast—contrast refers to the difference between the light and dark portions of the image.
Scanning from ISIS Area—in this section you can select the measurement method that you want your page size units to display. You can select Pixels, Inches or Centimeters. When you select one of these options, the numbers in the Page Size section will change to reflect your choice. • Click on Snap to have the measurements round to the nearest 1/8 inch or 1/2 centimeter. • The X and Y coordinates tells the scanner where to start capturing the image as the page passes across the scanner glass.
Scanning from ISIS Page Layout Sub Area The Sub Area is a special feature in the Page Layout tab. The Sub Area option allows for separate scanning conditions to be set for one part of the image capture area. For example, if there is an area on your documents that contain a color graphic, you can get better scanning results by setting the whole page in Black and White mode and then specifying the color image area as a Halftone (dither).
Scanning from ISIS Configuring the Sub Area Window 1. On the Page Layout tab, click the SubArea(W) button. The Sub Area window opens. If the button is disabled, please check through the above requirements list to verify that none of the options listed are enabled. 2. Select the side of the page you want the Sub Area created for. You can set the Sub Area independently for both sides of the page. Your scanner is a duplex scanner, this means that both sides of the page can be scanned at the same time.
Scanning from ISIS 7. You can now either click on one of the black boundary squares and drag your mouse to resize the boundary box. Click in the middle of the boundary box then drag your mouse to move the boundary box around the preview area. You can also manually enter the coordinates where the sub area should be located on the page in the Area section. First, select the units of measurement you want to use. The available options are Pixels, Inches and Centimeters.
Scanning from ISIS Paper Handling Options The Paper Handling tab is where you select feeding options for the scanner. This tells the scanner how fast to feed the paper, detect double page feed, and several other options where you specify how the scanner should handle paper. Feeding Features—this option tells the scanner how to handle the paper as it is feeding through the scanner.
Scanning from ISIS • Feeding Speed—you can slow the scanning speed of the ADF to scan items that may be too fragile to scan at normal feeding speeds. You can choose either Normal or Slow feeding, slow feeding is about 1/3 the speed of normal scanning. Even when using the slow feeding option you should only scan items that will not tear in the scanner. Paper that already has tears it should not be fed through the scanner.
Scanning from ISIS 5. Click on Scan in the batch scanning mode. The rollers in the scanner will immediately start. 6. Place your page(s) in the scanner’s input tray. The page will feed through the scanner, if you put in multiple pages all pages will be scanned. 7. After the last page has scanned through, the scanner’s rollers will continue running until you place another page in the scanner or until the time-out period has been reached.
Scanning from ISIS Image Processing Options The Main tab has the basic features you need for image capture when scanning. The basic settings include color mode, resolution (dpi), brightness, contrast, and dither options. The options on the Image Processing tab are advanced image capture options for improving the quality of the scanned image, or just modifications such as removing watermarks. Extra Features—the options in this section will be enabled if the scanning software supports the feature.
Scanning from ISIS • Binary Dynamic Threshold—this option enables the scanner to automatically adjust the brightness according to the background color. Dynamic Threshold is only available when scanning in Black and White color mode. Click on the drop menu and select a threshold value to use when scanning. The values range from 1 (light) to 5 (dark).
Scanning from ISIS If you have selected more than one filter, click on a filter on the right side of the screen then click on the up or down arrow to move the filter in the list. This tells the software which filter to use first, second, and so on. For instance, if you choose the Barcode Detection and Noise Removal filters, you may want the Noise Removal filter to occur first so that the software gets a clear picture of the barcode. The image processing filters are briefly described below.
Scanning from ISIS Noise Removal—this option reduces the black spots that may appear when scanning some documents. For instance, if you scan in a document that has tables with shading on them, the resulting scanned image will have black dots (pixilation or noise) in the areas where the shading occurs. The noise removal will attempt to reduce this pixilation on the page. In the configuration options for this filter you can specify the size of the pixilation for the filter to look for.
Scanning from ISIS • Chroma—this option allows you to specify the amount of gray or white used to dilute the colors in the scanned image. Move the slider left or right to change the chroma level between 1 to 255. Low saturation colors will appear washed out and highly saturated colors will be pure and vivid. JPEG Quality—JPG files have different levels of compression. When used with high compression, images are small enough in file size to email or put on a web page.
Scanning from ISIS 3. Click on Selection 1 to set the first option color. When you first click on Enable there will be a default red color. 4. Click on Choose... to open the Windows color palette. 5. You can select a predefined color, input the color code in the input fields on the lower right, or click anywhere in preview area to jump to a color range. 6. Click on OK to close the color palette window. 7. Your first color selection will now be in the multi-color dropout window.
Scanning from ISIS 9. Click on Choose... to open the Windows color palette. 10. Follow the same steps to create another dropout color. 11. Click on OK to close the window. 12. Your second color will now be in the multi-color dropout window. You can select up to 6 colors for the scanner to drop from the image. 13. Click on OK after you are done setting colors for dropout. You can place a test page in the scanner and click on the Preview button in the ISIS interface to test the color dropout results.
Scanning from ISIS Imprinter Options The Imprinter tab is where you set the options for the pre-scan imprinter. The imprinter pre-prints data on a page just before the paper is pulled through the scanner, the printed data is then captured in the final image. The the options for the imprinter are only available if you have an imprinter unit installed in your scanner. The imprinter unit is an optional accessory that you can purchase from our website, in the Parts & Accessories page for your scanner, at www.
Scanning from ISIS Step Number—type in the step number of the counter specified by the imprinter string. Start Numbering Automatic Increment—select this option to use the default increment function. When used, the starting number is incriminated to the number at the start of scanning + (number of pages scanned x step number) upon completion of scanning. 3. Click on OK to save the changes and close the imprinter settings dialogue window. Clicking on the Help...
Scanning from ISIS 92 DocuMate 765 Scanner User’s Guide
Scanning from WIA Scanning from WIA Microsoft Windows XP and Windows Vista include their own scanning interface—known as Windows Image Acquisition (WIA)—for acquiring images from scanners, digital cameras, and other digital devices. This section shows how to use Microsoft Paint to scan using the WIA interface, but you can use other Windows applications as well. To scan using WIA from Microsoft Paint: 1. On the Windows taskbar, click Start, point to Programs, point to Accessories, and then click Paint.
Scanning from WIA The Scan using Xerox DocuMate 765 window opens. Use this window to select scanning options and start the scan process. 3. Click the button most appropriate for the item you’re scanning. 4. Select a paper size from the Page Size list. 5. Click Preview to preview the image before scanning. The image is displayed on the right side of the window. NOTE: If you preview when scanning a stack of documents, the first page of the stack feeds through the ADF for the preview.
Scanning from WIA 8. The scanned images will appear in Microsoft Paint (or other WIA application you’re using). Fine Tuning Your Scans You can select new settings before you scan an item to fine tune exactly how you want to scan it. To select the scanner settings before you scan: 1. On the scan window, click Adjust the quality of the scanned picture.
Scanning from WIA The Advanced Properties dialog box opens. 2. Select the options for scanning. Brightness and Contrast—Drag the sliders to the right or left to adjust the brightness and contrast of the scanned image. The Contrast setting does not apply to the setting Black and White picture or text. Resolution (DPI)—Click the menu arrow and choose the dots per inch (dpi) of the resolution. The maximum resolution is 600 dpi; the minimum is 100 dpi.
Scanner Options, Maintenance and Troubleshooting This section contains information on hardware options available for your scanner, the scanner User Utility, maintenance instructions, troubleshooting, uninstalling, scanner specifications, and spare parts. Scanner Hardware Options Your Xerox DocuMate 765 scanner has several hardware options that you can install or change to meet your needs.
Scanner Options, Maintenance and Troubleshooting 2. Locate the exit door release and hook the wire frame in the slot of the exit door release. 3. Gently pull the wire frame until it clicks into place. 4. Close the scanner by carefully lowering the door to the scanner base until it is securely locked. Do not slam down the door.
Scanner Options, Maintenance and Troubleshooting Changing the Background Color You can change the scanner’s background plate color between black and white. The background color is important as it may affect the cropping quality of the scanned document. Each scanning application is different so you should choose the color (black or white) based on the best results you see in the final scanned document file. The default background plate is black.
Scanner Options, Maintenance and Troubleshooting 4. Place your left index finger on the outside of the bar top background and push inward against the spring. Keeping the bar pushed in, use your right hand and rotate the bar forward to flip the background plate to the opposite color. 5. Remove your left hand to release the bar and lock the background plate in position. Verify that the bar is locked in place before continuing.
Scanner Options, Maintenance and Troubleshooting 6. Place your right index finger on the outside of the bar for bottom background plate and push inward against the spring. Keeping the bar pushed in, use your left hand and rotate the bar forward to flip the background plate to the opposite color. 7. Remove your right hand to release the bar and lock the background plate in position. Verify that the bar is locked in place before continuing. 8.
Scanner Options, Maintenance and Troubleshooting Manual Feed You can set the scanner to Manual Feed mode to scan a single page at a time. This setting allows you to scan pages that are too thick to scan through as a batch of paper. Do not attempt to scan paper in the scanner that exceeds the maximum thickness as listed in the scanner specification table on page 134. Do not use the manual feed mode to scan a batch of thick pages, the manual feed mode is for scanning one sheet at a time.
Scanner Options, Maintenance and Troubleshooting 2. Place one page face up into the input tray. 3. Adjust the paper guides on the input tray so that they are slightly wider than the page. 4. Your scanner is now ready to scan in Manual Feed mode. 5. When finished scanning, move the mode selector switch back to AUTO to return the scanner to normal batch scan feeding mode.
Scanner Options, Maintenance and Troubleshooting User Utility The User Utility is a software program designed to help maintain and troubleshoot the Xerox DocuMate 765 scanner. To open the user utility: On installation you were prompted to place an icon on your Windows desktop. If you selected yes, simply double-click on the user utility icon to open the software. If you do not have the User Utility icon on your desktop, follow these instructions for opening the utility from the Windows programs list: 1.
Scanner Options, Maintenance and Troubleshooting Main Screen Options This section briefly describes the options on the main interface of the User Utility. The following sections contain detailed instructions on using some of the options in this utility. Scanner Status—this area displays the status of the scanner connected as well as error code details. Error Code—this field displays an error code number to help you diagnosis and resolve hardware errors.
Scanner Options, Maintenance and Troubleshooting Pre-Imprinter: shows either Enable or Disable if the pre-scan imprinter is installed. The pre-scan imprinter is an optional accessory that you can purchase for the scanner. Please refer to our website www.xeroxscanners.com for spare part options available for your scanner. Scanner Condition—the options in this section relate to software settings and maintenance for the scanner.
Scanner Options, Maintenance and Troubleshooting Scanner Error Codes If an error occurs during scanning the LCD will display an error code and you can use the User Utility to troubleshoot and resolve the issue. The User Utility displays an error code and message in the Scanner Status field. The following table lists the codes, messages, possible causes and common resolutions.
Scanner Options, Maintenance and Troubleshooting Error Code 108 Message Cause Resolution — **Warning** The rollers need to be cleaned. The number next to After Clean Roller:, in the User Utility main screen, has exceeded the maximum number between cleaning. The rollers should be cleaned every 20,000 scans, or as needed if your scanner is experiencing frequent paper feed issues. After cleaning the rollers click on Clear Counter to reset the cleaning roller count back to 0.
Scanner Options, Maintenance and Troubleshooting Setting Sleep Mode Your scanner has a built-in power saving feature that sets the scanner into low power when the scanner has been sitting idle for 15 minutes. This default setting conserves power and complies with the ENERGY STAR requirements. Power saving extends the life of the lamps by turning them off when not in use. You can change the number of minutes of idle time before power saving, or turn off the Sleep Mode entirely. 1.
Scanner Options, Maintenance and Troubleshooting Paper Mode and Buzzer Setting You can set the default page size for the scanner turn on or off the scanner notification sounds. 1. Open the scanner User Utility application. 2. On the main window click on the Paper Mode / Buzzer Setting... button. 3. When the Paper Mode / Buzzer Setting window opens, select the options you want. Paper Mode—click on either A4 or Letter to set the default paper size for your scanner.
Scanner Options, Maintenance and Troubleshooting Shading Adjustment The shading adjustment is used to improve the image quality of the scanned documents. If your final scanned files are of poor quality, such as perpendicular lines or the image clarity is uneven across the page, you may need to perform a shading adjustment on the scanner.
Scanner Options, Maintenance and Troubleshooting 4. When prompted to clean the scanner click on OK to proceed only if you have already cleaned the scanner during preparation. Otherwise, follow the instructions on screen and clean the scanner. 5. Change the background plates to white then click on OK to proceed. If you have already changed the plates to white you will not see the above message. Proceed to the next step. 6.
Scanner Options, Maintenance and Troubleshooting 8. After the white background shading adjustment is complete, you will be prompted to change the background plate to black to continue with the black background shading adjustment. Change both the front and back scanning background reference plates to black then click on OK. NOTE: Do not place the Shading Paper in the scanner. The Shading Paper is not used for the black background shading adjustment. 9.
Scanner Options, Maintenance and Troubleshooting Cleaning the Outside of the Scanner Excessive dust accumulation around and on the scanner will pull into the scanner during the scanning process and clog the ventilation openings. You should clean the outside of the scanner at least once a month to help limit the amount of dust build up in the scanner. NOTE: You will need the blower brush provided with your scanner and a soft dusting cloth to clean the scanner. 1. Turn off the scanner power. 2.
Scanner Options, Maintenance and Troubleshooting Cleaning the Inside of the Scanner Cleaning the inside of the scanner helps to keep your scanner operating at optimum performance. You should clean the inside of the scanner at least once a week or after 20,000 pages have been scanned. If you are getting frequent paper jams, multiple pages feeding at the same time, or you’re seeing lines in the scanned image, it is time to clean the scanner.
Scanner Options, Maintenance and Troubleshooting Cleaning the ADF Rollers 1. Open the ADF door so you can clean all of the ADF rollers as described in this section. NOTE: Be careful when cleaning the rollers. All of the rollers, except the free rollers, are designed to rotate in one direction only. Do NOT force the roller to rotate in the opposite direction. Forcing the roller to rotate will damage it, and cause the scanner to feed pages incorrectly. 2.
Scanner Options, Maintenance and Troubleshooting 4. Locate the white Free rollers in the underside of the ADF door. 5. Wipe the Free rollers from side to side. Rotate the rollers downward to clean the entire surface of each roller. 6. Locate the retard roller in the body of the ADF. The Retard roller is under the Retard cover. 7. Wipe the Retard roller from side to side, rotating the roller, cleaning the entire surface of the roller.
Scanner Options, Maintenance and Troubleshooting 8. Locate the black Drive rollers in the body of the ADF. There are two pairs of drive rollers, make sure to clean both sets. 9. Wipe the Drive rollers from side to side. Rotate the rollers downward to clean the entire surface of each roller. The Drive rollers are held tightly in place and they are hard to rotate. Rotate gently by pressing firmly on the roller and rotating the roller in a downward direction. 10.
Scanner Options, Maintenance and Troubleshooting Cleaning the Exit Path Rollers 1. Open the Exit door by lifting up on the Exit door release on the underside of the input tray. NOTE: Be careful when cleaning the rollers. All of the rollers, except the free rollers, are designed to rotate in one direction only. Do NOT force the roller to rotate in the opposite direction. Forcing the roller to rotate will damage it, and cause the scanner to feed pages incorrectly. 2.
Scanner Options, Maintenance and Troubleshooting 3. Wipe the Exit and Drive rollers from side to side. Rotate the rollers upward to clean the entire surface of each roller. 4. Locate the white Free rollers in the body of the scanner. 5. Wipe the Free rollers from side to side. Rotate the rollers to clean the entire surface of each roller. 6. Leave the scanner open so you can proceed to the next section “Cleaning the Scanner Glass and Background Plates”.
Scanner Options, Maintenance and Troubleshooting Cleaning the Scanner Glass and Background Plates Use a soft cloth to wipe off the scanner glass and background plates. If there is sticky residue on either surface you can use the roller cleaning paper to remove it. 1. Locate the glass and background plate in the top and bottom of the scanner. Scan glass back side Background plate back side Scan glass front side Background plate back side 2.
Scanner Options, Maintenance and Troubleshooting Reset the Roller Count in the User Utility After cleaning the scanner you need to reset the roller count in the User Utility. 1. Open the User Utility application. 2. From the main screen click on Clear Counter next to the field After Clean Roller. 3. The clean roller count will now be reset to 0. 4. Close the User Utility.
Scanner Options, Maintenance and Troubleshooting Cleaning the Paper Sensors The scanner has several sensors to detect the status of the paper when it is in the scanner. You should clean these sensors as part of your standard weekly maintenance of the scanner. NOTE: Do not clean the sensors with the roller cleaning paper. Preparation • Turn off the scanner prior to cleaning the sensors.
Scanner Options, Maintenance and Troubleshooting 2. Locate the 5 sensors in the ADF. 3. Point the tip of the blower at the sensor and squeeze the blower to direct a puff of air at the sensor head to remove dust. Do this for each sensor in the ADF 4. Close the ADF door after you have cleaned each of the sensors in the ADF.
Scanner Options, Maintenance and Troubleshooting Cleaning the Exit Sensors 1. Open the Exit door by lifting up on the Exit door release on the underside of the input tray. 2. Locate the 8 sensors in the scanner body. There are 4 in the scanner body and 4 in the underside of the scanner lid. Each sensor is a black square indented in the scanner, the sensors in the underside of the lid mirror the sensors in the scanner body.
Scanner Options, Maintenance and Troubleshooting 3. Point the tip of the blower at the sensor and squeeze the blower to direct a puff of air at the sensor head to remove dust. Do this for each sensor in the ADF 4. Close the Exit door after you have cleaned each of the sensors in the scanner’s exit path. 5. Close the scanner by gently lowering the lid to the scanner body until it is securely locked in place. Do not slam down the exit door. 6. Turn the scanner power back on.
Scanner Options, Maintenance and Troubleshooting Clearing Paper Jams If your scanner stops scanning due to a paper jam in the Automatic Document Feeder, use the following procedure to remove the paper from the scanner. To clear a paper jam in the ADF: 1. Press the ADF door release to open the top of the scanner Do not attempt to remove a jammed page with the ADF door closed. 2. Remove the jammed page from the scanner.
Scanner Options, Maintenance and Troubleshooting 3. Close the ADF door and continue scanning. NOTE: If only the bottom of the page is visible, leave the ADF door open and follow the instructions below for removing the page from the exit path. To clear a paper jam in the exit path: 1. Open the Exit door by lifting up on the Exit door release on the underside of the input tray.
Scanner Options, Maintenance and Troubleshooting 2. Remove the jammed page from the back of the scanner. 3. Close the scanner by gently lowering the lid to the scanner body until it is securely locked in place. Do not slam down the exit door. To reduce the number of paper jams, smooth and straighten the paper before scanning and the paper guides to the paper size.
Scanner Options, Maintenance and Troubleshooting Troubleshooting In addition to the troubleshooting information contained in this section, please see the Readme file on your installation DVD. The Readme file contains additional information that may help you diagnose problems with the scanner. If you try the troubleshooting procedures described in this section and in the Readme file, and the scanner still has problems, you may have a malfunctioning scanner.
Scanner Options, Maintenance and Troubleshooting • Try cleaning the scanner. The scanner glass is where the image is captured as the page is pulled through the scanner. Lift up on the exit release, under the input tray, to open the scanner. There is glass in the body of the scanner and underneath the lid. Take a soft cloth and wipe across both pieces of glass. The section “Cleaning the Scanner Glass and Background Plates” on page 121 contains thorough instructions for cleaning this part of the scanner.
Scanner Options, Maintenance and Troubleshooting This may occur after Windows goes into power saving mode to “hibernate” the computer into a low power state. When you move your mouse or type on the keyboard it “wakes” the computer back up and restores full power to the system. This power fluctuation during the computer’s hibernating period may sometimes cause the scanner to lose communication to the computer. Problem: The USB cable was unplugged while scanning, now the scanner won’t work.
Scanner Options, Maintenance and Troubleshooting Uninstalling Your Scanner To uninstall the Xerox DocuMate 765 scanner, remove the scanner software, and any other scanning software provided with the scanner. Uninstalling the Scanner and One Touch Software 1. On the Windows taskbar, click Start, point to Settings, then click Control Panel. 2. Windows 2000 and Windows XP: Double-click the Add/Remove Programs icon. Windows Vista: Double-click the Programs and Features icon. 3.
Scanner Options, Maintenance and Troubleshooting Xerox DocuMate 765 Scanner Specifications Optical resolution Bit depth Maximum page size Minimum page size Scan method ADF specifications Scanning Speed Capacity Paper Thickness Paper Weight Light source Interface Scanner dimensions Width Depth Length Weight Operating temperature Relative humidity Power requirements Power consumption Power cord USB cable Safety and agency certifications Supported Operating Systems Scanner Drivers Bundled Software 134 6
Scanner Options, Maintenance and Troubleshooting Xerox DocuMate 765 Scanner Parts List Please use the following part names and numbers when ordering replacements for your scanner.
Scanner Options, Maintenance and Troubleshooting 136 DocuMate 765 Scanner User’s Guide
Appendix A Notices Section 1: Safety Introduction Notices and Safety Please read the following instructions carefully before operating the machine and refer to them as needed to ensure the continued safe operation of your machine. Your Xerox product and supplies have been designed and tested to meet strict safety requirements. These include safety agency evaluation and certification, and compliance with electromagnetic regulations and established environmental standards.
Section 3: Operational Safety Information Your Xerox equipment and supplies have been designed and tested to meet strict safety requirements. These include safety agency examination, approval, and compliance with established environmental standards. To ensure the continued safe operation of your Xerox equipment, follow these safety guidelines at all times: Do These • Always follow all warnings and instructions that are marked on or supplied with the equipment.
Section 4: Electrical Information Warning - Electrical Safety Information 1. The power receptacle for the machine must meet the requirements stated on the data plate on the rear of the machine. If you are not sure that your electrical supply meets the requirements, please consult your local power company or an electrician for advice. 2. The socket outlet shall be installed near the equipment and shall be easily accessible. 3. Use the power cable that is supplied with your machine.
Section 5: Emergency Power Off If any of the following conditions occur, turn off the machine immediately and disconnect the power cable(s) from the electrical outlet(s). Contact an authorized Xerox Service Representative to correct the problem: • The equipment emits unusual odors or makes unusual noises. • The power cable is damaged or frayed. • A wall panel circuit breaker, fuse, or other safety device has been tripped. • Liquid is spilled into the machine. • The machine is exposed to water.
Section 8: Regulatory Information Certifications in Europe The CE mark applied to this product, symbolizes XEROX’s declaration of conformity with the following applicable European Union Directives, as of the dates indicated: December 12, 2006: Council Directive 2006/95/EC as amended. Approximation of the laws of the member states related to low voltage equipment. December 31, 2004: Council Directive 2004/108/EC as amended.
European Union RoHS and WEEE Compliance This product is compliant with RoHS Regulations of the European Parliament and Council Directive on the Restrictions of the Use of Certain Hazardous Substances in Electrical and Electronic Equipment (2002/95/ EC), and with the Waste Electrical and Electronic Equipment (WEEE) Directive (2002/96/EC). Some equipment may be used in both a domestic/household and a professional/business application.
Section 10: Illegal Copies USA Congress, by statute, has forbidden the reproduction of the following subjects under certain circumstances. Penalties of fine or imprisonment may be imposed on those guilty of making such reproductions. 1.
7. Immigration Papers. 8. Draft Registration Cards. 9. Selective Service Induction Papers that bear any of the following Registrant’s information: Earnings or Income Dependency Status Court Record Previous military service Physical or mental condition Exception: U. S. Army and Navy discharge certificates may be photographed. 10. Badges, Identification Cards, Passes, or Insignia carried by military personnel, or by members of the various Federal Departments, such as FBI, Treasury, etc.
The above list is provided for your convenience and assistance, but it is not all inclusive, and no liability is assumed for its completeness or accuracy. In case of doubt, consult your solicitor. Other Countries Copying certain documents may be illegal in your country. Penalties of fine or imprisonment may be imposed on those found guilty of making such reproductions.
146 DocuMate 765 Scanner User’s Guide
Index Numerics C 24-bit Color ISIS Interface 73 256-Level Gray ISIS Interface 73 Chroma 87 Clean Imprinter 106 Clear Counter 106 Color 30, 59, 73 Color Dropout 63 Color Filter 32 Color Matching 84 Comma Delimited 44 Contrast 30, 63, 75, 96 Create copies 47 Create Single Image Files 42 Crop image to guide width 61 Crop image to paper length 61 CSV 44 Custom 60 Custom Page Dimensions ISIS Interface 75 A Advanced Properties 96 Advanced Settings Tab 33 After Clean Roller 106 After Replace Roller 106 Applica
Index E eMail Applications 46 America Online® (AOL) 41 Microsoft Outlook 41 Properties 41 Erosion 85 Error Code 105 Error Codes 107 error diffusion 63, 64 Excel Spreadsheet 44 Export 58 Extra Features 83 F Fax and Print 47 Feed ISIS Interface 76 Feeding Features 80 Feeding Speed 81 Fit to Page 81 For CRT 89 Front 78 Front and Back background color 65 G Gamma 33, 89 GrayScale 30 Grayscale 59, 73 H halftone 63, 64 Halftone Removal 85 Hole Removal 85 HTML 45, 51 HTML Document 45 Hue 33 I Image Application
Index Default settings 25 Icon 26 OmniPage 48 Properties 27, 29, 37 One Touch Button Panel 52 One Touch icon 24 Online help 3 Optical Character Recognition OCR 43, 48, 56 Options tab 27, 46 Orientation 90 P Page Layout ISIS Interface 76 Page Orientation 60 Page Settings Tab 31 Page Size 60 ISIS Interface 75 Page size 31 Page Type 60 Paper clips 21 Paper Mode 106, 110 Paper Source ISIS Interface 74 PaperPort 46 Patchcode Detection 86 PDF File size 43 nPDF 45 sPDF 45 PDF Applications 46 Photo (dither / halft
Index Step Number 91 Sti event forwarding 47 Scanning 50 Still Image Client 50 Storage and CD-R/W 47 Scan & Burn to CD 49 Transfer to Storage scanning 52 Storage Options Tab 35 Straighten Image 31 SubArea(W) 78 Summary 59 System 106 System requirements 3 Word Document 44 X XLS 44 T Text (threshold) 63 Text Applications Properties 37 Text Editors 46 HTML Scanning 51 Text File Formats 43 Threshold 64 Threshold technique 63 TIFF 42 Time Out 81 Total number of pages scanned 65 Transfer to Storage 52 File loc
05-0756-300