One Touch 4.
Design © 2009 Xerox Corporation. All rights reserved. Xerox®, and the sphere of connectivity design are trademarks of Xerox Corporation in the United States and/or other countries. Content © 2009 Visioneer, Inc. All rights reserved. The Visioneer brand name and logo are registered trademarks of Visioneer, Inc. Reproduction, adaptation, or translation without prior written permission is prohibited, except as allowed under the copyright laws.
DocuMate 742 Table of Contents Table of Contents Welcome ...................................................................................................................v Before You Begin ....................................................................................................................................v Documentation ..................................................................................................................................... vi System Requirements ..............
Table of Contents 3 DocuMate 742 Scanning from TWAIN .......................................................................... 3-1 Accessing the TWAIN Interface ..................................................................................................3-2 Scanning with the TWAIN Interface ........................................................................................3-3 The options in the TWAIN interface ............................................................................
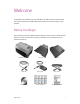
DocuMate 742 Welcome Welcome Congratulations on purchasing your Xerox DocuMate 742. With this scanner you can quickly scan stacks of single-sided or double-sided pages and place their electronic images on your computer. Before You Begin Before starting the software installation, please check the contents of the box to make sure that all parts are included. If any items are missing or damaged, contact the dealer where you purchased the scanner.
Welcome DocuMate 742 Documentation The following documentation is provided with your scanner: • Quick Install Guide—Abbreviated installation instructions. • Scanner User’s Guide—On the Installation Disc; contains detailed installation, scanning, configuration, and maintenance information. • Mini-Guides—On the Installation Disc; contains detailed instructions on using the One Touch OmniPage module, One Touch VRS module and SharePoint destination link.
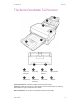
DocuMate 742 Welcome The Xerox DocuMate 742 Scanner 1 2 3 4 5 6 8 7 1 Input Tray Extension 5 Output Tray 2 Input Tray 6 Output Tray Extension 3 ADF Cover Release 7 Power Jack 4 Control Panel 8 USB port Input Tray Extension—Unfolds to support various document lengths. Input Tray—Holds the documents in the Automatic Document Feeder (ADF) for scanning. Guides adjust to support various document widths. ADF Cover Release—Lift to open the Automatic Document Feeder (ADF).
Welcome DocuMate 742 Control panel—One Touch scanning controls. LED Number—Shows the current scan setting for the Scan button. Function button—Selects the scan setting for the One Touch buttons. Press to cycle through the settings. Duplex button—Press to scan double-sided documents. Simplex button—Press to scan single-sided documents. Power switch—Press to turn the scanner power on or off Status light—Shows the scanner’s status. Refer to the Troubleshooting section for additional details.
DocuMate 742 Installation Installation 1 Installation is a quick, four-step process: 1. Assemble the scanner 2. Install the software 3. Connect the scanner 4. Register the scanner Please make sure of the following before you begin installation: • The information in this guide may cover software not provided with the scanner you purchased. Please disregard any information about the software not applicable to your scanner. Visit our web site at www.xeroxscanners.
Installation DocuMate 742 Step 1: Assemble the Scanner 1. Remove the scanner from its protective foam and plastic bag. 2. Remove any shipping tape from the scanner, input tray and output tray. 3. Open the ADF cover and carefully remove any foam particles that may have gotten inside it. Leave the cover open so you can attach the Input tray. 4. Insert the short pins on each side of the input tray into the holes on the scanner.
DocuMate 742 5. Installation Insert the short pins on each side of the output tray into the holes on the scanner.
Installation DocuMate 742 Step 2: Install the Software The installation disc contains the necessary driver, and scanning software, to use your DocuMate 742. To install the software: 1. Start Microsoft Windows and make sure that no other applications are running. 2. Insert the installation disc into your computer’s DVD-ROM drive. The disc automatically starts. 3. The Select Language window opens. Click the drop-down menu arrow and select the language to use. Click OK. 4.
DocuMate 742 5. On the Main Menu, select Install Products. 6. Make sure the box Scanner Driver is checked. Installation NOTE: The software provided with your scanner may differ slightly from the list shown in the window. 7. Click Install Now.
Installation DocuMate 742 The scanner driver installation will now start 1. The Welcome to the One Touch 4.0 Setup Wizard opens. 2. Click Next. 3. On the Xerox License Agreement window, read the license agreement. If you accept the terms, select I Agree then click Next. If you choose not to accept the license agreement, the installation will terminate and the scanner driver will not be installed. 4. The next window lists the choices of the drivers that you can install for your scanner. 5.
DocuMate 742 Installation • TWAIN Only—The TWAIN driver is installed and you can scan from TWAIN scanning applications only. You will not be able to use the buttons on the scanner. • ISIS Only—The ISIS driver is installed and you can scan from ISIS scanning applications only. You will not be able to use the buttons on the scanner. 6. A window opens with image quality samples asking you to select an image for your Color Space setting. Select the option that looks best to you and click Next. 7.
Installation DocuMate 742 Step 3: Connect the Scanner 1. Plug the power supply into the power port on the scanner. NOTE: Only use the power supply (HEG42-240200-7L made by HiTron) included with your scanner. Connecting any other type of power supply may damage your scanner, and will void its warranty. 2. Plug the power cord into the power supply and into a wall outlet. 3. Remove any tape from the USB cable. 4.
DocuMate 742 6. Installation Press the Power button, located on the top of the scanner. The status light comes on and flashes indicating that the scanner is receiving power. Your computer recognizes that a scanner has been plugged into the USB port and automatically loads the appropriate software to run the scanner. If your computer is running Windows XP or Windows Vista, you will see a message similar to the one below. 7.
Installation DocuMate 742 8. Click OK to complete the installation process. 9. Click Close on the Installation Complete window to close and exit the software installer. If you selected other software to install from the DVD, the installation for that software will automatically start after you click Close on the Installation Complete window.
DocuMate 742 Installation Step 4: Register Your Scanner Registering your scanner is important as it provides you with access to our free telephone support service. Registration also gives you free access to software updates for your scanner. To register your scanner: You will need an active internet connection to register your scanner. If you do not have internet access you can contact our customer service department to register the scanner.
Installation DocuMate 742 Additional Applications Available with Your Scanner Your scanner includes free, additional applications as described in the following table. 1. Return to the disc’s Main Menu and click Install Products. 2. Select the additional applications you want to install, then click Install Now. 3. Follow the instructions on the screen to install each of the additional products.
DocuMate 742 Installation Software About the Software EMC Captiva QuickScan™ QuickScan is a stand-alone, out-of-the-box imaging solution that provides all the necessary capabilities for high-speed scanning, image enhancement, viewing, annotation, printing and storing images. It uses an ISIS-certified driver for scanning and includes flexible job separation and barcode recognition. The Demo version lets you try the application first.
Installation 2. DocuMate 742 Click on View scanner documentation to access the scanner user guide and other documentation related to using the scanner’s One Touch features. Click on View software documentation to access the user guides for the software applications provided with the scanner. For instance, the Nuance OmniPage user guide is in this section.
DocuMate 742 Installation Scanning Interfaces If you selected the recommended installation options (see page 6), then you have several different options to scan with your Xerox DocuMate 742 scanner. Each method scans equally well, so use the one with appropriate options for the item you are scanning. • One Touch—When you press the Simplex or Duplex button, the item in the scanner is scanned using the scan settings indicated by the LED number.
Installation DocuMate 742 Loading Documents to Scan NOTE: Always remove any staples or paper clips from documents before inserting them into the scanner’s Automatic Document Feeder. Staples and paper clips can jam the feed mechanism and scratch the internal components. Also remove any labels, stickers, or Post-It™ notes that may come off during the scanning process and get stuck in the scanner. Misuse as described here will void your scanner’s warranty.
DocuMate 742 3. Load the documents face down with the top of the pages inserted into the Automatic Document Feeder. Example: U.S. Letter paper 4. Installation Example: A3 paper You can now scan the documents using the scanner buttons, One Touch, or one of the other scanning interfaces.
Installation 1-18 DocuMate 742 User’s Guide
DocuMate 742 Scanning From One Touch Scanning From One Touch 2 The scanner has 9 One Touch scanning functions. When you press the Simplex or Duplex button on the scanner, the scanner starts scanning using the settings for the current LED number. The One Touch button panel shows the 9 scanning functions on screen. Click these arrows to cycle through the 9 One Touch scanning options.
Scanning From One Touch DocuMate 742 Scan using the One Touch buttons Pressing the Simplex or Duplex button scans the item and sends the image to the Destination Application associated with the selected function LED number. 1. Load the documents face down with the top of the pages inserted into the Automatic Document Feeder. 2. Press the function button to select the scan setting you want. 3. To scan a one-sided document, press the Simplex button.
DocuMate 742 Scanning From One Touch Scan from the One Touch Button Panel Scanning from the button panel on your computer’s screen works like pressing a button on the scanner. The scanner scans the item, then sends the image to the Destination Application indicated by the button’s icon. To scan from the One Touch Button panel: 1. Load the documents face down with the top of the pages inserted into the Automatic Document Feeder. 2.
Scanning From One Touch DocuMate 742 Features of the One Touch Button Panel The One Touch panel is your on-screen set of controls for the scanner. From the panel you can access the hardware settings for your scanner and configure the Scan button. Click on the One Touch icon to open the panel. The Button View The Hardware View The Detail View The Title Bar • Green arrows—click to cycle through the panel’s 3 views. • Scanner icon—click to open the scanner’s hardware properties.
DocuMate 742 Scanning From One Touch Configuring the One Touch Buttons When you installed the scanner, the software configured each One Touch button with appropriate settings consisting of: a Destination Application, a Scan Configuration, and a File Format. 1. Click on the One Touch icon. 2. Right-click a button on the One Touch Button Panel. 3. The One Touch Properties window opens. One Touch Icon Right-click on a button (for example, button 2) and the Properties window opens for that button.
Scanning From One Touch DocuMate 742 Selecting New Settings Click the Options tab to select options. Select a file format for your scanned images. Select the Destination Application that will open when you are finished scanning. You use the destination application to view and work with your scanned images. Select a configuration for scanning the item.
DocuMate 742 Scanning From One Touch These icons next to each scan configuration indicate the scanning mode. Color Black and White Grayscale Configure Before Scan See the sections “Creating a New Scan Configuration” on page 8 and “Editing or Deleting Scan Configurations” on page 14. NOTE: Use Configure Before Scan if you want to set the scanning mode manually before scanning. See “Configure Before Scan” on page 14. Select Format—A set of file formats for the scanned image for the selected button.
Scanning From One Touch DocuMate 742 Creating a New Scan Configuration The scan configurations are where you select the scanning resolution, brightness, mode (color, black&white, or grayscale), and a number of other settings. To create a new configuration: 1. Scroll through the applications in the Select Destination list and click the application you want for the new scan configuration. 2. Click the New button.
DocuMate 742 Scanning From One Touch • Black&White to scan in black and white. For example, letters and memos are usually scanned in black and white. • Grayscale to scan items such as documents containing drawings or black and white photographs. • Color to scan color photographs and other color items. Color scans have the largest file size. Resolution—Drag the slider to the right or left to adjust the dots per inch (dpi) of the resolution.
Scanning From One Touch DocuMate 742 • Straighten Image—Select this option to let the scanner automatically determine if a page is skewed, then straighten its image. If the page is fed through at too great of an angle, the image may not straighten correctly. In that case, re-scan the page using the paper guides to feed the paper in straight. • Invert Image—Only available for Black&White Mode, this option reverses the black and whites of an image.
DocuMate 742 Scanning From One Touch The Advanced Settings tab 1. Click the Advanced Settings tab. The options of the Advanced Settings tab are for the Color or Grayscale scanning mode. 2. Drag the sliders to the left and right to change the color settings. As you do, the image changes to show the effects of the new settings. Saturation—the strength or purity of a color. Hue—the color your eyes see as reflected from the image Gamma—is the tone curve and the starting point for image enhancement.
Scanning From One Touch DocuMate 742 The Device Settings Tab A Device Settings tab is on the Scan Configurations dialog box when your selected Destination Application sends the scanned image to a printer, fax application, or other device. You use the options on the Device Settings tab to select settings for the device. 1. Click on the Device Settings tab.
DocuMate 742 Scanning From One Touch The Storage Options Tab (Archive) A Storage Options tab is on the Scan Configurations dialog box when the Destination Application is Transfer to Storage. You use the options on this tab to select where to save your scanned items for storage when scanning with that particular Scan Configuration. 1. Click on the Storage Options tab. 2. Click the Storage Layout options you want.
Scanning From One Touch DocuMate 742 Editing or Deleting Scan Configurations Editing and deleting is normally for the configurations you create, not for your scanner’s pre-set configurations. NOTE: Your scanner comes with a number of configurations pre-set at the factory. To ensure that your scanner will always have a set of correct scan configurations, do not delete the pre-set configurations. We also recommend that you keep those configurations locked so they are not inadvertently deleted.
DocuMate 742 Scanning From One Touch To set Configure Before Scan: 1. Open the One Touch Properties window. 2. Select the scan configuration Configure Before Scan. Select then right-click on Configure Before Scan to get the menu, and choose the interface to use for scanning. 3. Right-click on Configure Before Scan and choose an interface to use for configuring before scanning. TWAIN—The TWAIN Interface opens for you to make changes prior to scanning. See “Scanning from TWAIN” on page 1.
Scanning From One Touch 5. DocuMate 742 The item is scanned. When finished, click the Done button and the image will be sent to the Destination Application specified in the One Touch 4.0 Properties window. In the example shown on the previous page, the Destination Application is Paint. Canceling a Configure Before Scan 1. Click Cancel in the scanning progress window. 2. The following window will open asking if you want to cancel the entire job.
DocuMate 742 Scanning From One Touch Selecting Document and File Format Options The format option you select determines the file format of the scanned document. Appropriate format options and file types are available for the type of Destination Application selected for the button. The available options are for images and text. Text Formats; TEXT is only one of several text formats available. Image Formats The Text Formats are for text file types. The names of the formats indicate their file types.
Scanning From One Touch DocuMate 742 The PDF format is often used to create images of text pages. You may want to select PDF as the format when scanning text pages that do not require OCR processing or other processing. The PDF format is also used to put multi-page documents on web sites as pdf-readable files. As with the JPG option, the PDF format can be reduced in size or quality. To select a JPEG or PDF file size: 1. 2. Select JPG or PDF as the page format. Right-click on the JPG or PDF icon.
DocuMate 742 Scanning From One Touch To select a file type for the text format: 1. 2. Select the Destination Application. Right-click on the text format icon. The menu options depend on the type of Destination Application you select. Example menu for the Text format when the selected application is Microsoft’s Word. 3. Example menu for the Text format when the selected application is Transfer to Storage. Choose the file type that you want for the text format. Simple Text—The .txt file format.
Scanning From One Touch DocuMate 742 Detailed information about these text file formats, and instructions for setting up the OCR options, are in the One Touch OmniPage Mini-Guide located on the installation disc in the User Guides section. Selecting Options for One Touch The One Touch Options determine the types of Destination Applications available for scanning, as well as additional options for scanning. To select options: 1. Open the One Touch Properties window and click the Options tab. 2.
DocuMate 742 • 3. Scanning From One Touch Sti event forwarding is for using another application’s interface for scanning. The One Touch Event Forwarding dialog box opens so you can select which application to use to continue scanning. Click Apply, then click on the Multi Function tab to see the new settings. Global Options • Show Progress Window—Select this option to display the progress window of the document(s) during scanning.
Scanning From One Touch DocuMate 742 Text Documents Properties These properties apply to Microsoft Word, Microsoft Excel®, and the other applications indicated by their icons in the list. The properties apply to the Optical Character Recognition (OCR) settings for the applications. 1. Click in the OCR settings boxes for the options you want. The options will apply to all the applications in the group.
DocuMate 742 3. Scanning From One Touch Click Browse to find the application you want to add to the list. When you select the application using the Browse button, steps 1 and 2 on the dialog box are automatically filled in, and the application icon appears in step 3. 4. Select the icon in Step 3 of the dialog box. That is the icon that will appear in the One Touch Destination List. 5. In step 4 of the dialog box, select the file formats that the application will accept.
Scanning From One Touch DocuMate 742 Storage Properties These properties apply to the Destination Application named Transfer to Storage. If a CD burner is attached to your computer, and your computer is running Windows XP or Windows Vista, you also use this dialog box to start the Burn to CD process. See the section “Scan and Burn to a CD” on page 27. You can also set up multiple configurations to store scanned items in separate locations. See “Transferring Scanned Documents to Storage” on page 30. 1.
DocuMate 742 Scanning From One Touch eMail Properties These properties apply to email applications so you can specify the folder for documents that you will attach to an email message. Microsoft Outlook® will accept direct attachment of documents to a blank email message as soon as scanning is finished, but other email applications may not.
Scanning From One Touch DocuMate 742 Special Features and Scanning Destinations The One Touch software has unique scanning options available. You can scan directly to word processing programs, to your computer’s CD burner, HTML files and so on. Scanning with Optical Character Recognition (OCR) Optical Character Recognition (OCR) converts text and numbers on a scanned page into editable text and numbers.
DocuMate 742 4. Scanning From One Touch Press or click the One Touch button you set to scan with OCR. Your scanned pages appear in the Destination Application with the text ready for editing and other text processing. Scan and Burn to a CD If you have a CD burner attached to your computer, you can scan directly from your scanner onto a CD. This feature is available only on computers running Windows XP or Windows Vista. To scan and burn to a CD: 1. 2. Open the One Touch Properties window.
Scanning From One Touch DocuMate 742 Scanning with Event Forwarding (STI) If you want to specify an application to use for scanning at the start of the process, you can use event forwarding. To scan with event forwarding: 1. Open the One Touch Properties window. 2. Select Still Image Client as the Destination Application. You cannot choose a page format for this option because the actual Destination Application is not selected until after you press the scanner button. 3. Choose a Scan Configuration.
DocuMate 742 Scanning From One Touch Creating an HTML Web Page from Your Scanned Documents You can convert scanned pages to HTML format for posting directly to your web site. To scan and create an HTML web page: 1. Open the One Touch Properties window. 2. Select Microsoft Explorer as the Destination Application. 3. Choose HTML as the Format. Choose HTML 4. Choose a Scan Configuration that has the settings for the image on the HTML page. 5. Click OK. 6.
Scanning From One Touch DocuMate 742 Transferring Scanned Documents to Storage With Transfer to Storage scanning, you can scan documents and save them in a folder in one step. The process is ideal for archiving documents without having to manually save or process them. If you choose a text format for the file format, the images are automatically converted by the OCR process into editable text and numbers before being saved. To transfer documents to storage: 1. Open the One Touch properties window. 2.
DocuMate 742 Scanning From One Touch When selecting the storage location for scanned documents, you can select a local folder, or a folder on a server or mapped drive. Scanning to Multiple Archive Folders When archiving documents with Transfer to Storage option, you can scan the documents to different folders. For example, one folder might be for “Business Receipts,” a second folder might be for “Personal Receipts,” and a third folder might be for “Annual Receipts.
Scanning From One Touch 7. Click the Storage Options tab. 8. Click the Browse button. 9. Select the folder you created for storing the scanned documents. DocuMate 742 10. Click OK. The selected folder will now be set as the Storage Location, such as “Business Receipts.” 11. Click OK. The new configuration is now listed as a Transfer to Storage configuration.
DocuMate 742 Scanning From One Touch 12. Repeat the process to create additional new configurations, such as one named “Personal Receipts.” Make sure to designate separate folders as the Storage Locations for the new configurations. 13. You will now have multiple configurations set up for the Transfer to Storage destination, and each configuration scans documents to separate folders. The new configurations apply to the Transfer to Storage Destination Application. 14.
Scanning From One Touch DocuMate 742 Checking the Hardware and Setting the Lamp Power Saving 1. Right-click on the One Touch icon and choose Show Hardware from the pop-up menu. 2. The Hardware Properties dialog box opens and shows information about your DocuMate 742.
DocuMate 742 Scanning From One Touch 3. Click the Properties button. 4. Your scanner has a built-in power saving feature that is set to power down after 15 minutes of idle time. You can change the time before the scanner powers down, from 1 minute to a maximum of 3 hours. 5. Click the arrows for the Lamp time-out setting and choose a time setting. To turn the lamp on and off manually without turning off power to the scanner, click the Lamp On or Lamp Off buttons.
Scanning From One Touch 2-36 DocuMate 742 User’s Guide
DocuMate 742 Scanning from TWAIN Scanning from TWAIN 3 You can scan from any TWAIN scanning application instead of scanning from the One Touch buttons on your scanner or the One Touch button panel. A Note About Your Scanner and the TWAIN standard: TWAIN is a widely recognized standard that computers use to receive images from scanners, digital cameras, and other digital devices. The TWAIN scanning interface can be accessed from any TWAIN scanning application you have installed on the computer.
Scanning from TWAIN DocuMate 742 Accessing the TWAIN Interface Open the TWAIN interface from One Touch: If the One Touch configuration you’re using to scan is set to Configure Before Scan, and the selected option is TWAIN, the TWAIN interface opens right away without opening a TWAIN application first. For example, the following figure shows the options you would have selected to set up button 1 to open the TWAIN interface.
DocuMate 742 Scanning from TWAIN Scanning with the TWAIN Interface The TWAIN interface lists the scanning options available with your Xerox DocuMate 742 scanner. 1. Load the documents face down with the top of the pages inserted into the Automatic Document Feeder. 2. Adjust the settings in the TWAIN interface for the item you are scanning. 3. Click on the Scan button in the TWAIN interface. 4. When scanning is complete, click Done to close the TWAIN interface. 5.
Scanning from TWAIN DocuMate 742 • Deskew—Select this option to let the scanner automatically determine if a page is skewed, then straighten its image. If the page is fed through at too great of an angle, the image may not straighten correctly. In that case, re-scan the page using the paper guides to feed the paper in straight. • Duplex—Scan both sides of the page. If this option is not selected, the scanner will scan the face-down side of the page only.
DocuMate 742 Scanning from WIA Scanning from WIA 4 Microsoft Windows XP and Windows Vista include their own scanning interface—known as Windows Image Acquisition (WIA)—for acquiring images from scanners, digital cameras, and other digital devices. This section shows how to use Microsoft Paint to scan using the WIA interface, but you can use other Windows applications as well. To scan using WIA from Microsoft Paint: 1.
Scanning from WIA 5. Place a document in the scanner. 6. Click on the Scan button in the WIA interface. DocuMate 742 The scanner starts scanning. 7. The scanned image will appear in Microsoft Paint (or other WIA application you’re using). NOTE: Windows Vista has advanced options available for scanning with the WIA interface. Scanning from Microsoft’s Paint application uses the interface described in this section. Other applications may access the advanced WIA interface available with Windows Vista.
DocuMate 742 1. On the scan window, click Adjust the quality of the scanned picture. 2. Select the options for scanning. Scanning from WIA Brightness and Contrast—Drag the sliders to the right or left to adjust the brightness and contrast of the scanned image. Resolution (DPI)—Click the up or down arrow to scroll through the dots per inch (dpi) of the resolution. Higher dpi settings take longer to scan and produce larger files for the scanned images.
Scanning from WIA 4-4 DocuMate 742 User’s Guide
DocuMate 742 Scanning from ISIS Scanning from ISIS 5 You can use the ISIS interface from QuickScan or any other application that will access the ISIS driver. You received QuickScan with your scanner. Note that the ISIS interface for each application varies depending on the application. Please refer to that software application’s User Guide for instructions on scanning the ISIS interface. The QuickScan User’s Guide is available on the installation disc that you received with the scanner.
Scanning from ISIS 5-2 DocuMate 742 User’s Guide
DocuMate 742 Maintenance Maintenance 6 This section contains information about maintenance, troubleshooting, uninstalling, scanner specifications, and spare parts. Clearing Paper Jams If your scanner stops scanning due to a paper jam in the Automatic Document Feeder, a warning opens after a few moments. 1. Open the Automatic Document Feeder cover. 2. Remove the jammed paper and close the cover.
Maintenance DocuMate 742 Cleaning the Automatic Document Feeder You may need to clean the ADF feed mechanism if your documents do not feed easily into the ADF, or several feed in at the same time. 1. Wet a soft cloth with some Isopropyl rubbing alcohol (95%). 2. Open the Automatic Document Feeder cover. 3. Wipe the feed roller from side to side. Rotate the roller to clean its entire surface. 4. Close the cover when you’re finished. Please be careful when cleaning the rollers.
DocuMate 742 Maintenance Replacing the Roller Assembly To remove the roller from the scanner: 1. Lift the ADF cover release, on the top of the scanner, to open the Automatic Document Feeder cover. 2. The roller module and housing are located in the underside of the ADF cover. 3. Place one hand on the ADF cover to hold the ADF cover open while removing the roller from the scanner.
Maintenance DocuMate 742 4. Grab the top of the roller housing, just beneath the ADF cover release. 5. Firmly pull the roller housing towards you. You will hear it release from the scanner cover. 6. Leverage the roller housing out of the scanner. 7. Place the roller housing face down on a flat surface.
DocuMate 742 Maintenance 8. The roller is in a gray module attached to the housing. 9. Pinch the arms on either side of the roller module and pull the roller module out of the housing. 10. Place the new roller module in the housing a press down, on the back of the roller module, until the arms on the roller module snap into place.
Maintenance DocuMate 742 To place the roller in the scanner: 1. Place the arms on the housing on the ledge in the scanner lid. 2. Tilt the housing up and into the scanner. 3. Press on the roller housing until it snaps into place in the scanner lid. 4. Gently press down on the ADF cover to close the scanner. Do not let the scanner lid slam shut.
DocuMate 742 Maintenance Troubleshooting In addition to the troubleshooting information contained in this section, please see the Readme file on your installation disc. The Readme file contains additional information that may help you diagnose problems with the scanner. Also visit our web site at www.xeroxscanners.com for additional technical information. Problem: The scanner won’t scan.
Maintenance DocuMate 742 Error Light Troubleshooting Codes The status light indicates the current state of the scanner. Descriptions of the most common patterns are listed below. Contact Xerox Technical Support if you experience a different blinking pattern. Normal Operation • Blinking blue: indicates the scanner is waking up from power saving and preparing to scan. • Steady blue: indicates the scanner is ready to scan. • Steady red: indicates that the scanner is busy.
DocuMate 742 Maintenance Uninstalling Your Scanner To uninstall the Xerox DocuMate 742 scanner, remove the scanner software, or any other scanning software provided with the scanner. Uninstalling the Scanner and One Touch Software 1. On the Windows taskbar, click Start, point to Settings, then click Control Panel. 2. Windows 2000 and Windows XP: Double-click the Add/Remove Programs icon. Windows Vista: Double-click the Programs and Features icon. 3. From the list of programs, select One Touch 4.0.
Maintenance DocuMate 742 DocuMate 742 Scanner Specifications Scanning resolution Bit depth Maximum item size Minimum item size ADF specifications Scanning speed Capacity Paper thickness Light source Scan method Interface Scanner dimensions Width Depth Height Weight Operating temperature Relative humidity Power adaptor Power consumption Power cord 600 dpi 24-bit color, 8-bit grayscale, 1-bit bitonal (black and white) 11.
DocuMate 742 Maintenance Xerox DocuMate 742 Parts List Please use the following part names and numbers when ordering replacements for your DocuMate 742 scanner.
Maintenance 6-12 DocuMate 742 User’s Guide
DocuMate 742 Appendices Appendices 7 Appendix A: Safety Introduction Notices and Safety Please read the following instructions carefully before operating the machine and refer to them as needed to ensure the continued safe operation of your machine. Your Xerox product and supplies have been designed and tested to meet strict safety requirements. These include safety agency evaluation and certification, and compliance with electromagnetic regulations and established environmental standards.
Appendices DocuMate 742 Appendix C: Operational Safety Information Your Xerox equipment and supplies have been designed and tested to meet strict safety requirements. These include safety agency examination, approval, and compliance with established environmental standards. To ensure the continued safe operation of your Xerox equipment, follow these safety guidelines at all times: Do These • Always follow all warnings and instructions that are marked on or supplied with the equipment.
DocuMate 742 Appendices Appendix D: Electrical Information Warning - Electrical Safety Information 1. The power receptacle for the machine must meet the requirements stated on the data plate on the rear of the machine. If you are not sure that your electrical supply meets the requirements, please consult your local power company or an electrician for advice. 2. The socket outlet shall be installed near the equipment and shall be easily accessible. 3.
Appendices DocuMate 742 Appendix E: Emergency Power Off If any of the following conditions occur, turn off the machine immediately and disconnect the power cable(s) from the electrical outlet(s). Contact an authorized Xerox Service Representative to correct the problem: • The equipment emits unusual odors or makes unusual noises. • The power cable is damaged or frayed. • A wall panel circuit breaker, fuse, or other safety device has been tripped. • Liquid is spilled into the machine.
DocuMate 742 Appendices Appendix H: Regulatory Information Certifications in Europe The CE mark applied to this product, symbolizes Visioneer’s declaration of conformity with the following applicable European Union Directives, as of the dates indicated: December 12, 2006: Council Directive 2006/95/EC as amended. Approximation of the laws of the member states related to low voltage equipment. December 31, 2004: Council Directive 2004/108/EC as amended.
Appendices DocuMate 742 Some equipment may be used in both a domestic/household and a professional/business application. Professional/Business Environment Application of this symbol on your equipment is confirmation that you must dispose of this equipment in compliance with agreed national procedures. In accordance with European legislation, end of life electrical and electronic equipment subject to disposal must be managed within agreed procedures.
DocuMate 742 Appendices Postage Stamps, canceled or uncanceled. (For philatelic purposes, Postage Stamps may be photographed, provided the reproduction is in black and white and is less than 75% or more than 150% of the linear dimensions of the original.) Postal Money Orders. Bills, Checks, or Drafts of money drawn by or upon authorized officers of the United States. Stamps and other representatives of value, of whatever denomination, which have been or may be issued under any Act of Congress. 2.
Appendices DocuMate 742 7. Impressed or adhesive stamps used for the purpose of revenue by the Government of Canada or of a province or by the government of a state other than Canada. 8. Documents, registers or records kept by public officials charged with the duty of making or issuing certified copies thereof, where the reproduction falsely purports to be a certified copy thereof. 9. Copyrighted material or trademarks of any manner or kind without the consent of the copyright or trademark owner.
DocuMate 742 Index 8 Index A Actual size, 2-12 Add Application, 2-22, 2-23 Adobe® Reader®, 1-12 Advanced device settings, 2-12 Advanced Settings tab, 2-11 America Online® (AOL), 2-25 Apply button, 2-7 Aspect ratio, 2-12 Assemble the scanner, 1-2 AutoCrop to Original, 2-9 AutoCrop to original, 3-4 AutoRotate image, 2-12 AutoScan on document insertion, 3-4 B bit depth, 6-10 Black&White mode, 2-9, 2-10, 3-3 BMP file format, 2-17 Brightness, 2-9, 3-3, 4-3 Burn to CD, 2-24, 2-27 Destination application, 2-27
Index HTML Document, 2-19 HTML page, 2-29 Hue, 2-11 I Image Documents Properties, 2-23 Image Editors, 2-20 Image file formats, 2-17 Improvements and Settings, 2-9 Installation, 1-1 Internet Options, 2-25 Invert Image, 2-10 ISIS Interface, 5-1 ISIS only installation, 1-7 J JPG Image quality and file size, 2-18 JPG file format, 2-17 K Key icon, 2-9, 2-14 L Link Properties, 2-21 Lock icon, 2-9, 2-14 Logical Form Recognition, 1-13 M Maintain aspect ratio, 2-12 Maximize Quality, 2-18 Microsoft Internet Exp
DocuMate 742 connecting, 1-8 Device settings, 2-35 hardware, ii-vii parts, ii-v uninstall, 6-9 Scanner driver, 1-5 Scanning mode, 2-7, 2-8, 2-14, 3-3, 4-1 Screen Resolution, 2-23, 2-25 Searchable PDF (sPDF), 2-19 Select configuration, 2-6 Properties, 2-8 Select destination, 2-6, 2-20 Select format, 2-7 Serial number, 1-11 SharePoint, 1-14 Show all destinations, 2-20 Show Hardware, 2-34 Show Progress Window, 2-21 Simple Text, 2-19 Simplex, 2-33 Size, 2-9 Software, 1-5, 1-12 Software help, ii-vi, 1-4, 3-1 st
Index 8-4 DocuMate 742 User’s Guide