August 2010 05-0805-000 Xerox DocuMate 3920 User’s Guide
Design © 2010 Xerox Corporation. All rights reserved. XEROX®, XEROX and Design® and DocuMate® are trademarks of Xerox Corporation in the United States and/or other countries. Content © 2010 Visioneer, Inc. All rights reserved. The Visioneer brand name and OneTouch® logo are registered trademarks of Visioneer, Inc.
Table of Contents Welcome What’s in the Box . . . . . . . . . . . . . . . . . . . . . . . . . . . . . . . . . . . . . . . . . . . . . . . . . . . . . . . . . . . . . . . . . . . . . . . . .8 Setup Requirements . . . . . . . . . . . . . . . . . . . . . . . . . . . . . . . . . . . . . . . . . . . . . . . . . . . . . . . . . . . . . . . . . . . . . . .9 Network Requirements . . . . . . . . . . . . . . . . . . . . . . . . . . . . . . . . . . . . . . . . . . . . . . . . . . . . . . . . . . . . . . .
Scanning to a Folder . . . . . . . . . . . . . . . . . . . . . . . . . . . . . . . . . . . . . . . . . . . . . . . . . . . . . . . . . . . . . . . . . . . . Scan Options for Filing . . . . . . . . . . . . . . . . . . . . . . . . . . . . . . . . . . . . . . . . . . . . . . . . . . . . . . . . . . . . . . . . . . Setting the Folder Template . . . . . . . . . . . . . . . . . . . . . . . . . . . . . . . . . . . . . . . . . . . . . . . . . . . . . . . . . . . . . Creating a New Folder . . . . . . . . . . . . . .
Table of Contents Cleaning the Automatic Document Feeder . . . . . . . . . . . . . . . . . . . . . . . . . . . . . . . . . . . . . . . . . 114 Cleaning the Scanner Glass . . . . . . . . . . . . . . . . . . . . . . . . . . . . . . . . . . . . . . . . . . . . . . . . . . . . . . . . 115 Cleaning the LCD-display . . . . . . . . . . . . . . . . . . . . . . . . . . . . . . . . . . . . . . . . . . . . . . . . . . . . . . . . . . 116 Replacing the ADF Pad Assembly . . . . . . . . . . . . . . . . . . . . . . . . .
Table of Contents 6 Xerox DocuMate 3920 User’s Guide
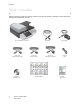
Welcome This chapter includes: • What’s in the Box on page 8 • Setup Requirements on page 9 • Internet Communication Features on page 10 • The Xerox DocuMate 3920 Scanner on page 11 Your new Xerox scanner can quickly scan single-sided or double-sided stacks of documents with the Automatic Document Feeder (ADF), or single items on the Flatbed glass.
Welcome What’s in the Box Before proceeding, check the contents of the box. If items are missing or damaged, contact the dealer where you purchased the scanner.
Welcome Setup Requirements Network Requirements To send emails from the scanner: • TCP/IP Network • An SMTP and an optional POP3 server To save documents to a folder on a server via the intranet: • FTP, HTTP, HTTPS, or CIFS protocol environment Computer Requirements These requirements are for installing the Network Management Tool on a local computer.
Welcome Internet Communication Features Scan to Folder—Through the intranet with FTP (File Transfer Protocol), HTTP (Hypertext Transfer Protocol), HTTPS (a secure way of using HTTP), or CIFS (Common Internet File System), the scanner allows you to save scanned document directly to a designated server or a personal computer on the network in a standard PDF, JPEG, TIFF, or MTIFF file format.
Welcome The Xerox DocuMate 3920 Scanner 3 2 4 1 8 9 6 5 11 13 7 10 1 Input Tray 6 2 Paper Guides 7 3 ADF Cover Release 8 12 14 15 5 4 Automatic Document Feeder (ADF) 9 LCD Touch Screen 10 Scanner Lid Control Panel Output Tray Paper Stop Power Switch 11 12 13 14 15 Power Jack Printer Connection Port Network Connection Port PC Connection Port Telephone Line Connection Port Input Tray—Holds documents in the Automatic Document Feeder (ADF) for scanning.
Welcome Output Tray—Holds documents after being scanned through the Automatic Document Feeder. Paper Stop—Holds documents in the output tray. Adjusts to support various document lengths. Power Switch—Turns the power on and off. Power Jack—Connects the power cord to the scanner. Printer Connection Port—Connect a USB cable to a printer and to the COPY port to use the Copy function and to receive faxes. Network Connection Port—Connect a network cable to the LAN port to use the Filing and Email functions.
Scanner Setup 1 This chapter includes: • Unpack and Assemble the Scanner on page 14 • Connecting the Cables on page 15 • Using the Scanner Control Panel on page 17 • Summary of the Menu Options on page 19 • Using the LCD Soft Keyboard on page 22 • Adding the Scanner to the Network on page 23 • Adding the Email Server Information on page 26 • Setting the Default Scan Function on page 29 Note that you do not need to setup network access if you are using the scanner for Faxing, Copying, and local computer sc
Unpack and Assemble the Scanner 1. 2. Remove all shipping tape from the top and bottom of the scanner. Open the ADF cover and carefully remove any foam particles that may have gotten inside the Automatic Document Feeder, then close the cover. 3. Lift the scanner lid and slide the locking tab to its unlocked position. The scanner will not scan when locked.
Connecting the Cables Connecting the Power Cable 1. Press the power switch to the “O” position to turn off the scanner. 2. Plug the power supply into the power jack on the scanner. NOTE: Only use the power supply (HEG75-S240320-7L made by HiTron) included with your scanner. Connecting any other type of power supply may damage your scanner, and will void its warranty. 3. Plug the power cord into the power supply and into a wall outlet. Connecting the Ethernet Cable 1.
2. Plug the other end of telephone line to the “RJ-11” telephone jack provided by the telephone company. Connecting the Printer Cable 1. Connect one end of the printer cable (USB cable) to the printer. 2. Connect the other end to the COPY port at the rear of the scanner. Turn on the Power Press the power switch to the “|” position to turn on the scanner. After showing the boot up message, the LCD screen displays the preset ready status.
Using the Scanner Control Panel Configure keys Numeric keys LCD touch screen Function keys Status LEDs Control keys Configure keys—Use these keys to set the scanner options and configure the function keys using the LCD touch screen. Menu—Press to access the options to configure the scanner. Please refer to Summary of the Menu Options on page 19. Clear—Press to clear the current function settings and return the function to the default settings.
Numeric keypad—Use this keypad to enter destination phone numbers for faxing or set the number of copies to be printed. Control keys—Press to start or stop scanning. B&W—Press to start copying, e-mailing, filing, or faxing in Black&White mode. Color—Press to start emailing or filing in Color mode. Stop—Press to stop scanning. Status LEDs—Indicates the hardware status. Power—Indicates that the power is on and ready for scanning. Alarm—Indicates hardware and transmission errors.
Summary of the Menu Options This section briefly describes each of the options in the menu. In the following table, it is indicated if detailed configuration information is available, and which section contains the instructions for configuring that feature. Press the Menu button on the scanner to show the Menu options on the LCD screen. Press this button to display information about the scanner. • Device Information—This is the scanner hardware information, serial number, and MAC address.
Press this button to create an administrator account for the scanner, and specify additional scanner defaults. You will be prompted to login when you press the Management button, simply press “Login” to continue. There is no default administrator password for the scanner. Administrator Profile tab—press the keyboard icon, next to each field, to open the LCD panel soft keyboard and fill in each field. • Login Name—Input a login name for accessing the scanner’s management options.
Press this button to select what type of authentication to use for the users accessing the scanner. Authentication type—Select the authentication type for account management. • None—No user authentication is used when scanning. The credentials you input when configuring the Mail Server and Filing Template are used when scanning. • Local—The scanner is the authentication type, and the user and password entered in the Account management are saved in the scanner memory.
Using the LCD Soft Keyboard Use the soft keyboard when you need to enter text into a field on the LCD screen. A soft keyboard icon next to a blank field indicates that you can access the keyboard to input text specific to the field. When entering numbers you can use the numeric keypad on the scanner or the soft keyboard. 1. Whenever there is a soft keyboard icon shown in a blank field, touch anywhere in the blank field to open the soft keyboard.
Adding the Scanner to the Network You will need the following information to configure the scanner on the network, please contact your network administrator for this information. You may want to print this page, fill in the table, and keep it for a reference as you will need this to proceed with the rest of the instructions in this section. 1 DHCP Enable: 2 IP Address: 3 Choose ON to obtain the IP / Subnet / Gateway addresses automatically from the DHCP server.
1. Press the Menu button on the scanner. The LCD touch screen displays the following menu. 2. Press the Network Settings button on the LCD touch screen. 3. In the Network Settings menu, either input your network parameters in each field, or press ON under “DHCP Enable”. To fill in the fields manually, press the keyboard icon next to each input field. This displays the soft-keyboard for you to enter the information.
Networking Error Messages Message The connection has failed. Please check network settings. The address is invalid. Please check network settings. Network is down. Please check network settings. Network is unreachable. Please check network settings. Connection aborted by the server. Please check network settings. Action Ping the IP address of the scanner from another PC in a DOS prompt. For example, type “Ping 10.1.20.144” in a DOS prompt. If the scanner has no response, then perform the following steps.
Adding the Email Server Information You will need the following information to configure the scanner to send emails, please contact your network administrator for this information. You may want to print this page, fill in the table, and keep it for a reference as you will need this to proceed with the rest of the instructions in this section. 1 E-mail Address: 2 E-mail Password: 3 SMTP Server: Note that this will be the default “From” address when sending emails from the device.
1. Press the Menu button on the scanner. The LCD touch screen displays the following menu. 2. Press the Mail Server button on the LCD touch screen. 3. Fill in each field with the appropriate information on the Device E-mail Account tab. Select SMTP or POP3 as the authentication method for the SMTP server, and fill in the appropriate information for that authentication.
4. If you want to access an LDAP server address book, press the External Address Book tab to fill in the information about your network LDAP server. • • 5. 28 The login name and password are case-sensitive and can be up to 28 characters. LDAP search specifications: The scanner supports two types of authentication, simple and anonymous login to the LDAP server.
Setting the Default Scan Function The initial default scanning function is e-mail. This means that each time the scanner is power cycled, when the scanner comes out of power saving mode, or when the scanner has been sitting idle without scanning, the LCD screen will switch back to the e-mail scanning function automatically. You might want to change the default scan mode if you are not using the email function, or if you use a different scanning function more often than email. 1.
4. Press the Device Management tab. 5. Press the down arrow in the Default Mode field to show the options list. 6. Press one of the function names in the list to select that option as the default scan mode. If you select the Shortcut option, the scanner LCD will display 6 shortcut buttons. These buttons are configured using the scanner’s embedded webpage. Note that the other scanning mode defaults can be configured using the scanner LCD options or through the embedded web page.
Loading Documents to Scan 2 This chapter includes: • Scanning from the Automatic Document Feeder (ADF) on page 32 • Scanning from the Flatbed Glass on page 34 NOTE: Always remove any staples or paper clips from documents before inserting them into the scanner. Staples and paper clips can jam the feed mechanism and scratch the internal components. Also remove any labels, stickers, or Post-It™ notes that may come off during the scanning process and get stuck in the scanner.
Scanning from the Automatic Document Feeder (ADF) 1. Prepare the pages before loading them into the scanner, this helps to prevent multiple-page feeding and paper jams. • If the edges of the paper are curled or folded, flatten them as much as possible. • Fan the edges of the paper to make sure none of the pages are stuck together. 2. Adjust the paper guides for the width of the paper being scanned. 3. Adjust the Paper Stop at the back of the scanner for the length of the paper.
4. Load the stack of documents face up, with their tops into the Automatic Document Feeder.
Scanning from the Flatbed Glass You can scan small paper, plastic cards, books, and other items that can not be scanned through the Automatic Document Feeder. 1. Remove any paper in the Automatic Document Feeder. The scanner automatically detects if paper is in the Automatic Document Feeder and will scan pages in it. You must remove these pages prior to scanning if you want to scan from the Flatbed. 2. Lift the scanner cover and place an item face down on the glass. 3.
Copying 3 This chapter includes: • Scanning to a Printer on page 36 • Scan Options for Copying on page 37 • Setting the Default Copy Options on page 41 • Information Messages When Copying on page 42 • Copy Specifications on page 43 To use the Copy function, you need to connect the scanner to a USB InkJet or Laser printer that supports PCL. Make sure the printer is connected and turned on before turning on the scanner. The scanner will detect a printer during the power-up cycle only.
Scanning to a Printer 1. Place your document face up in the ADF or face down on the flatbed glass. 2. 3. Press the Copy button on the scanner. The LCD touch screen displays the copying options. 4. Select the options you want to use for the documents you are scanning on the Basic, Image Edit, and Advanced Copy tabs. Note that any settings you change here are not permanently saved. The next time the copy function is used, the default copy options will be displayed in the LCD screen.
Scan Options for Copying Basic Settings Option Description Reduce/Enlarge Select the scaling percentage by touching the Switch button. Change this setting only (A default value cannot if the items you are scanning will not fit on the pages that are in the printer.
Image Edit Settings Option Description Erase Border Sets the width of the border you want removed from the image. Choices are: • 0 / 0.25 / 0.5 / 0.75 / 1.0 inches or • 0 / 6 / 13 / 19 / 25 mm Margin Adjustment The “Margin Adjustment” option will move the copy image to the right and/or to the bottom; depending on the “Right” and “Bottom” parameters. Choices are: • 0 / 0.25 / 0.5 / 0.75 / 1.0 inches or • 0 / 6 / 13 / 19 / 25 mm Unit Choose the unit of measurement you want to use.
Option Description Duplex Choose one of these types to use when printing duplex. First, verify that your printer includes a duplex option. 1 to 1 Sided 2 to 1 Sided Choices are: • 1 to 1 Sided—Copy single-sided originals onto one side of one sheet of paper. • 2 to 1 Sided—Copy double-sided originals onto one side of one sheet of paper. Example: 1 to 1 Sided Orientation 2 to 1 Sided Specify how you want to bind your duplex printing. First, verify that your printer includes a duplex option.
Option Description Orientation (Cont’d) Examples: Long Edge: Short Edge: N-Up (Paper Saving) 40 / Use this setting to print multiple pages of a document onto a single sheet of paper, and to set the sequence of the page images on each sheet of paper. • 1-in-1 means one page will be printed on a single sheet of paper. • 2-in-1 means two pages will be printed on a single sheet of paper as illustrated.
Setting the Default Copy Options You can set the default copy options for the scanner. This way, whenever you want to scan to the printer, the most commonly used settings are already configured. Please refer to the previous section for the list of options you can set as a default. Note that the list indicates when a feature cannot be assigned a default value. To access the Copier Default template from the scanner: 1. Press the Menu button on the scanner. 2.
Information Messages When Copying Message Action ADF paper empty Press the OK button. Reload your documents into the auto document feeder and try again. ADF cover open Close the ADF door and press the OK button. Flatbed cover open Close the scanner lid. Remove any paper from the ADF and press the OK button. Flatbed Light Check Power cycle the scanner. If the code still appears, contact your nearest dealer. Calibration Error Power cycle the scanner. If the code still appears, contact your nearest dealer.
Copy Specifications Copy Port Printer Language Multi-Copy Speed Speed mode Multiple Copies (Copy count) Copy Print Resolution Original Size Copy Size Density Control Variable Paper Supply Scaling Option Edge Erase Margin Shift (right, bottom) Paper saving (N-Up) Collate Duplex Orientation for Duplex USB 2.0 Host Rev 2.0 PCL5c. PCL5e 32 CPM(type B) (copies per minute) Up to 99 600 x 600 dpi ADF Scans—U.S. Legal size 8.5”x14” Flatbed Scans—Maximum 8.5”x11.
Xerox DocuMate 3920 User’s Guide
E-mail 4 This chapter includes: • Scanning to E-mail on page 46 • Scan Options for E-mailing on page 48 • Setting the Default E-mail Options on page 52 • Using the Address Book on page 53 • Information Messages When E-mailing on page 54 • E-mail Specifications on page 56 When connected to an ethernet network and an SMTP server, the scanner allows you to transmit documents to your e-mail as an attachment.
Scanning to E-mail 1. Place your document face up in the ADF or face down on the flatbed glass. 2. 3. Press the E-mail button on the scanner. The LCD screen displays the E-mail options. 4. Press anywhere in the To field to show the soft-keyboard on screen so you can input destination E-mail address(es). Press the Cc or Bcc buttons to input E-mail addresses for those fields. Press Return on the soft-keyboard to return to the main E-mail screen.
2. The following Address Book screen displays. 3. 6. 7. Touch an e-mail address to select it. The selected one will be highlighted. (You can touch another address for multiple selections.) 4. Touch OK to return to the E-mail main screen. Select the options you want to use for the documents you are scanning on the Basic, E-mail Options, and Scan Options tabs. Note that any settings you change here are not permanently saved.
Scan Options for E-mailing Basic Settings Option Description To / Cc / Bcc Select To, Cc, or Bcc, then press anywhere in the field to open the soft keyboard so you (A default value cannot can enter the destination email address. be assigned) Address Book Icon Press the address book icon to show the address book on the LCD screen. Select the (A default value cannot email address from the list that you want and then press OK. be assigned) Subject Press anywhere in the field to display the soft keyboard.
Option Description Paper Size Select the size of the paper you are scanning from the list. Choices are: • A4 / Letter / A5 / B5 / Legal Note that Legal size is available only when scanning from the ADF. Image Density The image density can be adjusted within a range of 7 levels using the control panel or from the scanner's Web Page. Increasing the value makes your scanned image darker and decreasing the value makes your scanned image lighter.
Option Description Add Text File Select this option to have a log file (*.log) attached to the email message. This log file (A default value cannot describes the scanned image attachment (resolution, color mode, file format, page be assigned) numbers, and so on.) Scan Options Option Description Color Color documents to be sent via E-mail from the scanner. Options: 1.
Option Description The following is an example of file size based on selected scanning options and file format.
Setting the Default E-mail Options You can set the default email options for the scanner. This way, whenever you want to scan and send an email, the most commonly used settings are already configured. Please refer to the previous section for the list of options you can set as a default. Note that the list indicates when a feature cannot be assigned a default value. To access the E-mail Default template from the scanner: 1. Press the Menu button on the scanner. 2.
Using the Address Book The scanner has an internal address book that can store up to 2000 email addresses and 100 email groups. Touch the Address Book icon on the E-mail main screen to display the Address Book screen. To select a group address: 1. On the Address Book screen, touch the Group tab to display the following Group screen. 2. Touch a group to select it and then touch OK to return to the E-mail main screen.
Information Messages When E-mailing Message Action Sequence error Reboot the machine, and try again later. If the error is still there, contact your nearest dealer. Reboot the machine, and try again. If the error is still there, contact your nearest dealer. Contact your network administrator for further help. Contact your network administrator or nearest dealer for further help. Device internal failure Failed to connect mail server Failed to get response from mail server. SMTP server is empty.
Message Action Mail server does not support SMTP service extension Exceeded storage allocation Contact your network administrator for further help. Mailbox name is not allowed Mail action has not been taken Connection error The transaction has failed POP3 server address is wrong Failed to connect POP3 server Failed to login POP3 server LDAP server login error LDAP server IP error LDAP port error LDAP user password error Check “To” address. Check mailbox storage allocation.
E-mail Specifications Protocol Mail Sever Authentication File format B/W (single bit) Gray (8 bit) Color (24 bit) Compression Method B/W Gray Color Compression Level Supported Resolution Default Resolution Address Book Capacity Max. Address Group No.
Filing 5 This chapter includes: • Scanning to a Folder on page 58 • Scan Options for Filing on page 60 • Setting the Folder Template on page 63 • Creating a New Folder on page 65 • Information Messages When Filing on page 66 • Filing Specifications on page 68 The scanner allows you to send the scanned documents to a server or a personal computer’s file folder over the intranet with FTP (File Transfer Protocol), HTTP (Hypertext Transfer Protocol), HTTPS (a secure way of using HTTP), or CIFS (Common Interne
Scanning to a Folder 1. Place your document face up in the ADF or face down on the flatbed glass. 2. 3. Press the Filing button on the scanner. The LCD screen displays the Filing options. 4. Choose a folder to save your scanned image. • Or you can use the Up-arrow or Down-arrow button to scroll through the list. • Or you can display the most frequently used folder list by touching the Show All button. The next section describes each feature in detail.
NOTE: • • If you make a mistake during the process, press the Stop button on the scanner to cancel the scan. If you want to scan multiple pages from the flatbed, or more than one set of 50 pages from the ADF, press the Bind button first. After the first flatbed or ADF scan finishes, you will be prompted to bind to the next scan. Place the next page on the flatbed, or document batch in the ADF, and press Bind to continue.
Scan Options for Filing Basic Settings Option Description Original Doc. Press the button, on the LCD panel, repeatedly to cycle through the three options. • Simplex: If your original is a single-sided document, choose Simplex to scan your documents only on one side. • Duplex(long): If your original is a double-sided document which is bound along the long edge of paper, choose Duplex(Long) to scan your document on the front and the back side.
Server Options Option Description Login Name If you are a registered user, and there is a different login name displayed on the Server Options screen, please enter your own login name here. Password Enter your password for the name you input in the Login Name field. Scan Options Option Description Color Color documents to be sent from the scanner. Options: 1.
Option Description Black&White Multi-Level (Gray): Choose “ON” if you wish to make gray copies or OFF to make a B&W (single-bit) scan. • If you choose ON from Multi-Level (Gray), the file formats include PDF, JPEG, TIFF, and MTIFF. If TIFF or MTIFF is selected as your file format, the compression Level is limited to Raw only. • If you choose OFF from Multi-Level (Gray), the file formats include PDF, TIFF, and MTIFF. The compression Level of MTIFF or TIFF includes G3, G4, and Raw. Options: 1.
Setting the Folder Template You can set the default folder options for the scanner. This way, whenever you want to scan and send a server, the most commonly used settings are already configured. Please refer to the previous section for the list of options you can set as a default. Note that the list indicates when a feature cannot be assigned a default value. To access the Folder Template from the scanner: 1. Press the Menu button on the scanner. 2. Press the Folder Template button on the LCD touch screen.
Option Description Target URL Choose the type of protocol of your filing server in the first field. Choices include FTP, HTTP, CIFS, HTTPS. Enter the target URL in the second field. You can enter either the domain name or the IP address with the directory path. Note that the directory will be varied due to different protocols. The route starts from the root directory in FTP, HTTP, HTTPS, and CIFS. For example, ftp://, http://, and file:\\, https://.
Creating a New Folder Before sending your document to a destination server, you should set up a few folders first to speed up the process. However, you can create new folders using the LCD touch screen when you are scanning. When you input the folder you want to create into the LCD screen, the folder is created on the server when scanning is complete.
Information Messages When Filing Message Can not create a subfolder Device internal failure Action Make sure you have privileges to create folders on the server. Reboot the machine, and try later. If the error is still there, contact your nearest dealer. Failed to connect FTP server Make sure the FTP server is not shut downing and the port number is correct. If the error is still there, contact your FTP server administrator. Unpredicted error Contact your network administrator for further help.
Message Action HTTP PUT method not allowed Contact the server administrator to change permissions for this privilege. HTTP internal server error Contact your server administrator for further help. HTTP PUT method not implemented The server does not use the HTTP PUT method. The scanner can’t save the file to this server, contact your system administrator for help. HTTP server unavailable Contact your server administrator for help.
Filing Specifications Protocol File format B/W (single bit) Gray (8 bit) Color (24 bit) Compression Method B/W Gray Color Compression Level Supported Resolution Default Resolution Most Used Folders No.
Faxing 6 This chapter includes: • Fax Settings on page 70 • Scanning to Fax on page 74 • Scan Options for Faxing on page 77 • Setting the Default Fax Options on page 79 • Using the Phone Book on page 80 • Information Messages When Faxing on page 85 • Fax Specifications on page 87 With the built-in fax modem and a telephone line, the scanner is able to transmit your scanned document to a remote fax machine just like a regular fax machine. With a printer attached, the scanner can also receive faxes.
Fax Settings Before you can send or receive faxes with this scanner, you have to configure the scanner’s fax settings. You can access these settings from the scanner’s LCD touch screen, or from the scanner’s embedded web page using the Network Management Tool or through a web browser. Configuring the Fax Settings from the Scanner Fax Settings Option Description ID Enter the ID of the scanner. Up to 32 characters can be entered. Normally, you can enter your company name in this field.
Option Description Redial Sets the number of redial attempts if the number dialed is busy. Choices are: 0, 1, 2, 3, 4, 5, 6, 7, 8, 9, 10 (The Redial value 0 indicates no redial.) Redial Interval The redial interval setting selects the number of minutes between each redial if the number dialed is busy. Choices are: 1, 2, 3, 4, 5, 6 minutes Ring Response Lets you set the number of times the phone rings before the fax answers.
Option Description Manual Receive Choose Enable to use the Manual Receive fax function or Disable to use the auto receive fax function. When Manual Receive is enabled, and there is an incoming fax, and the machine starts ringing you need to press the Start button, in the Fax working mode, to receive and print the fax. Choices are: Enable, Disable ECM Mode Choose Enable to use “ECM Mode”.
Configuring the Fax Settings Remotely Open your web browser and type in the scanner’s IP address in the URL field, then press enter on your keyboard. The web page will connect and display the scanner’s embedded web page in the browser window. Click on the Fax Settings link on the left side of the page to open the window for configuring the Fax options. • Click on the down arrow next to Add Phone # and select On or Off from the menu.
Scanning to Fax 1. Place your document face up in the ADF or face down on the flatbed glass. 2. 3. Press the Fax button on the scanner. The LCD touch screen displays the Fax options. 4. Enter the fax number with the numeric keypad on the control panel. 5. You can also select multiple fax numbers at one time. To enter the next fax number, press the Down-arrow key, at the right of the Phone Number field, after finishing entering the first fax number.
• Touch the Phone Book icon on the Fax main screen. • The following Phone Book screen displays. • 7. 8. Touch an option to select it. The selected one will be highlighted. (You can touch another number for multiple selections.) • Touch OK to return to the Fax main screen. Select the options you want to use for the documents you are scanning on the Basic and More Settings tabs. Note that any settings you change here are not permanently saved.
NOTE: • • • • • 76 If you make a mistake during the process, press the Stop button on the scanner to cancel the scan. Up to 20 characters can be entered in the Fax Number field and some characters such as “-” and “P” (a 2-second pause) are supported. When entering a phone number from the numeric keypad, include any PSTN access number (number to access the public telephone line, usually a 9 or 0), area codes, and the telephone number. The machine allows broadcast faxing.
Scan Options for Faxing Basic Settings Option Description Phone number field Use the numeric keypad on the control panel to input the phone number you want to (A default value cannot receive the fax. Press the up or down arrow button, next to the field, to input or view be assigned) additional numbers. Phone Book Icon Press the phone book icon to show the scanner’s phone book on the LCD screen. (A default value cannot Select the phone numbers from the list that you want and then press OK.
Option Description Image Density The image density can be adjusted within a range of 7 levels using the control panel or from the scanner's Web Page. Increasing the value makes your scanned image darker and decreasing the value makes your scanned image lighter. More Settings Option Description Enter the specific date and time you wish to send the fax via the soft keyboard. This Send Later (Date/ frees you from the need to manually start the transmission.
Setting the Default Fax Options You can set some default fax options for the scanner. This way, whenever you want to scan and send a fax, the most commonly used settings are already configured. Please refer to the previous section for the list of options you can set as a default. Note that the list indicates when a feature cannot be assigned a default value. To access the Fax Default template from the scanner: 1. Press the Menu button on the scanner. 2. Press the Fax Default button on the LCD touch screen.
Using the Phone Book The scanner has an internal phone book that can store up to 200 phone numbers. Touch the Phone Book icon on the Fax main screen to display the Phone Book screen. • • • Touch a name or a group shown in the screen. Touch another phone number or group to send the fax to multiple people or groups. If the receiving name of the phone number group does not appear on the screen, you can find the name by touching the Characters button for a quick search.
Manage the Phone Book from the Scanner Phone Numbers 1. Press the Menu button on the scanner to display the menu options on the LCD touch screen. 2. Press the Phone Book button on the LCD touch screen to view the phone book options on the LCD screen. 3. Press the Program button to open the screen to program the names and phone numbers. 4. Press anywhere in the Name field to show the soft keyboard to input the name you want to associate with the phone number you want to program.
Phone Groups 1. Press the Menu button on the scanner to display the menu options on the LCD touch screen. 2. 3. Press the Phone Book button on the LCD touch screen to view the phone book options on the LCD screen. Press the Group Dial tab. 4. Press the Program button to open the screen to program the group. 5. Press anywhere in the Group Name field to show the soft keyboard to input the name you want to associate with the phone number you want to program. Press Return when you are finished.
Manage the Phone Book Remotely Open your web browser and type in the scanner’s IP address in the URL field, then press enter on your keyboard. The web page will connect and display the scanner’s embedded web page in the browser window. Please refer to Managing the Scanner Remotely on page 89 for detailed information about accessing and navigating the scanner options remotely. Managing Phone Numbers 1. Click on the Phone Book Manager link on the left side of the window. 2. 3. 4.
Managing Phone Groups 1. From the Phone Book Manager screen, click on the Phone Group link to manage the phone groups. 2. Click a group number button to open the following Add a New Group Set screen. 3. Enter the name of the group, and select group members on the right sie of the screen, then add them to the group by clicking the <- button. Click Add to save your settings and return to the Phone Group List screen. Click the Update button to send the information to the scanner.
Information Messages When Faxing Message Action Please note that when a problem occurs during faxing, only the “Communication Error” will be shown in the LCD-display. The information codes which indicate possible causes will only be shown in the Fax Activity Report. To print the Fax Activity Report, simply select “Yes” or “Error only”, in the “Transmission Report” option, when you press the “Menu” button and choose Fax Settings and then Options in succession 0 Fax is done & OK.
Message Action 0230 0234 0237 0238 86 1. Your fax machine received an invalid fax message from the remote fax machine. Please try again or use another line. 2. The line quality is poor. Please try again or use another line. 3. If the error still occurs, please call service. Memory Full 1. Check if the printer is connected. If the printer is not connected, the scanned image will be stored in the scanner’s memory. 2. Your printer may have an error. Check and resolve the problems. 3.
Fax Specifications Compatibility Modem Speed Resolution Compression Transmission Speed Page Memory Speed Dial Error Correction Mode Contrast Control Monitor Speaker Busy Tone Detection Redial Immediate Transmission Memory Transmission ITU-T G3 (ECM) 33.6K Receive(dpi)—200x100, 200x200, 200x400 dpi Send(dpi)—200x100, 200x200 MH, MR, MMR Approximately 3 seconds (*1) 2.
Xerox DocuMate 3920 User’s Guide
Managing the Scanner Remotely 7 This chapter includes: • Accessing the Scanner on page 90 • Using the Embedded Web Page on page 95 • Account Management on page 97 • Configuring the Shortcut Buttons on page 101 • Managing the Scanner Address Book on page 104 • Filing Manager on page 108 Most of the scanner’s features can be configured locally at the scanner using the LCD touch screen.
Accessing the Scanner To access the scanner through a web browser, simply type the scanner’s IP address into the browser’s URL field. You can also use the Network Management Tool utility to access the scanner on the network. When you use this utility, you do not need to know the scanner’s IP address. The utility will search and display all Xerox DocuMate 3920 scanners on the network. The Network Management Tool is located on the installation disc you received with the scanner.
5. On the Main Menu, select Install Products. 6. Make sure the box for the Network Management Tool is selected. NOTE: The software provided with your scanner may differ slightly from the list shown in the window. 7. 8. Click Install Now. Follow the on-screen instructions to complete the software installation.
Using the Network Management Tool 1. Launch the DM3920 Network Management Tool from the Windows Programs menu. 2. The main window opens. When the utility is first installed, the window will be empty of devices. 3. Click on File to open the file menu. Select one of the following methods to add a scanner to the utility list. • New Device—Click on this option to open the following prompt to input the scanner’s IP address.
• Search All Devices—Select this option to search your network for any connected Xerox DocuMate 3920 scanners. Select the computer’s network card from the Network Adapter list then click on the Search button. When searching is complete, all Xerox DocuMate 3920 scanner’s on your network will be displayed in the list. Select the scanners you want to configure then click the Add button. The Xerox DocuMate 3920 scanners will now be in the Network Management Tool main window.
4. Double-click on the device icon to launch the scanner’s embedded web page. NOTE: the Sun Java Runtime Environment is needed to view the scanner’s web page. When you connect to the web page, you will see a status message at the top of the page Connecting... Please wait. Wait for the window to refresh and display the scanner’s web page. If this message does not disappear, you may need to install the Sun Java Runtime Environment.
Using the Embedded Web Page The options in the scanner’s embedded web page mirror the options you configure using the scanner’s LCD touch screen. This section refers to navigating through the web page options. Please refer to the chapter specific instructions for detailed information about configuring these options and how to use them. Important! • Changes you make in the scanner’s web page are not saved to the scanner until you click the Update button in the web interface.
• • Mail Server—Please refer to Adding the Email Server Information on page 26 for instructions on configuring scan to E-mail. Copier Default—Please refer to the section Copying on page 35 for detailed configuration instructions for these options. • E-Mail Default—Please refer to the section E-mail on page 45 for detailed configuration instructions for these options. • Filing Template—Please refer to the section Filing on page 57 for detailed configuration instructions for these options.
Account Management The access to the Account Management section is blocked by the administrator password. It is recommended that an administrator create a password before changing the default settings to the secure network environment of the workplace. This chapter is specifically targeted to the persons who are responsible for the administration of the scanner. 1. Click on the Account Management link. 2. Click on Login when you are prompted to input a user name and password.
Item Description Type Choose your preferred authentication type for account management. • None—no account management will be applied. • Local—uses the scanner as the authentication type, and the name and password entered in the Account Management are saved in the scanner memory. • HTTP / LDAP / SMTP—uses an HTTP, LDAP, or SMTP server as the authentication type. Server Information IP or URL Assign the URL of the authenticating SMTP, HTTP or LDAP server.
2. Click the New Account button to open the New Account dialog box. 3. 4. Set up your user name and password respectively in the Name and Password fields. The name and password are case-sensitive and up to 64 characters can be entered in the Name field and up to 16 characters can be entered in the Password field. Fill the Description field if necessary. Define the user’s privileges for using the scanner. Function—Click to select the name of the function the user is allowed to access.
Edit If you want to edit a current local user, choose the account from the account list and then click the Edit button to open the Edit Account screen. Modify the account options as needed and then click Update to save the settings, or Cancel to return to the Account Management screen without saving any changes. Delete If you want to delete a current local user, select the account from the account list and click the Delete button. A confirmation message appears to confirm your deletion.
Configuring the Shortcut Buttons By assigning your frequently used functions and settings as shortcut buttons, the scanner allows you to complete your task in three simple touches on the LCD-screen and the control panel. You can configure up to 6 shortcut buttons. You can only configure the shortcut buttons using the embedded web page. Use the instructions in the previous section, Accessing the Scanner on page 90, to access the web page through your web browser or using the Network Management Tool. 3.
6. Click on the down arrow, next to the shortcut number you want to configure, and select an option from the list. 7. Click on the number button next to the Mode field you selected. The following window shows the screen for configuring E-Mail as one of the Shortcut buttons. Fill in the Name and Memo fields. This is the information that will display in the Shortcut window, and on the LCD display. 9. Select the scanning options you want to set for this Shortcut button.
11. Power cycle the scanner. When the scanner is back on, the LCD will show the Shortcut buttons on the LCD panel. Scanning Using the Shortcut Buttons 1. Press the Shortcut button you want to use. 2. Press the B&W or Color button, on the scanner, to start scanning. NOTE: If you configured the Shortcut button with Multi-Level(gray) to ON, pressing the B&W button on the control panel will produce a grayscale scan.
Managing the Scanner Address Book The access to the Address Book section is blocked by the administrator password. It is recommended that an administrator create a password before changing the default settings to the secure network environment of the workplace. This chapter is specifically targeted to the persons who are responsible for the administration of the scanner. 1. Click on the Address Book Manager link. 2. Click on Login when you are prompted to input a user name and password.
Managing E-mail Addresses 1. Click the E-mail link at the top of the window, and choose New to display the following Add a New E-Mail Address dialog box. Select an email address in the list then click the Delete or Modify links to delete or update an email address entry. 2. Enter a name, e-mail address, and description, and then click Add to temporarily save the latest data or Cancel to return to the Address Book Manager screen without adding the e-mail address to the Address Book. 3.
Managing E-mail Groups 1. Click the Group link at the top of the window, and choose New to display the following Add a New Group Set dialog box. Select a group in the list then click the Delete or Modify links to delete or update an email group. 2. 3. Type a group name in the Name field. Select an e-mail address on the right side and then click <- to add a member to the group. 4.
5. Click Update to send the changes to the scanner, or Exit to leave without saving any changes.
Filing Manager The Filing Manager is where you create multiple default folder options for the filing function. Each folder you set up will show on the LCD touch screen for users to scan to. The options in the Filing Manager are the same as described in the section Scan Options for Filing on page 60. Click the Filing Manager link on the left side of the window. Input the user login name and password then click on Login. Use this screen to create, delete, or modify folders for the scanner to access.
Generally speaking a web server, such as IIS or other HTTP server, can use an anonymous account for authentication, so that the user can link directly to the web page without entering a user name and password first. Hence, if the HTTP Server allows anonymous account authentication, when you use the scanner to send and save the files, there is no need for specifying any text in the Login name and Password fields of the scanner.
CIFS—Setting the Server to Store Your Image CIFS (Windows Network Share) is a file saving protocol generally used for “resource sharing” of networks in Microsoft Windows systems. Please set up the “shared directory” per the network settings for sharing in MS Windows. Generally, in the shared directory Properties dialog box under the Windows XP, select the “Sharing” tab, and then select “Share this folder”. Click the “Permissions” button to open “Permissions for the shared directory” dialog box.
Maintenance 8 This chapter includes: • Safety Precautions on page 112 • Clearing Paper Jams on page 113 • Cleaning the Scanner on page 114 • Replacing the ADF Pad Assembly on page 117 • Replacing the Roller Assembly on page 121 • Xerox DocuMate 3920 Scanner Specifications on page 123 • Xerox DocuMate 3920 Parts List on page 124 This section contains information about maintenance, troubleshooting, scanner specifications, and spare parts.
Safety Precautions When servicing the scanner you should take the following precautions to ensure your safety and prevent damage to the scanner. Do These • Wear protective gloves when cleaning the scanner with rubbing alcohol. Rubbing alcohol may irritate sensitive skin. • Only perform scanner maintenance as described in this chapter. • Keep the scanner and cleaning supplies away from any open flame or heat source as any form of alcohol is flammable.
Clearing Paper Jams If your scanner stops scanning due to a paper jam in the Automatic Document Feeder, a warning dialog box opens after a few moments. 1. Open the Automatic Document Feeder cover. 2. Remove the jammed paper and close the cover. To reduce the number of paper jams, smooth and straighten paper before scanning, adjust the guides to the paper size, and insert the paper evenly into the ADF.
Cleaning the Scanner Regular maintenance of your scanner can help to ensure continual optimal performance. Cleaning the Automatic Document Feeder You may need to clean the ADF feed mechanism if documents do not feed easily into the ADF, or several feed in at the same time. To clean the ADF: 1. Wet a soft cloth with some Isopropyl alcohol (rubbing alcohol). 2. Open the ADF cover. 3. Wipe the feed roller from side to side. Rotate the roller to clean its entire surface.
4. Wipe clean the ADF pad, ADF pad housing, and traction pad. ADF Pad Housing Traction Pad ADF Pad 5. Close the cover when you’re finished. Cleaning the Scanner Glass Scanning items that have excessive amounts of dirt or dust may dirty the glass. To ensure the best quality scanned item, wipe the scanner glass with a soft, dry, clean cloth to rid the glass of dust or other debris.
Cleaning the LCD-display To clean the display surface, use a soft lint-free cloth, either dry or moistened with neutral detergent or ethanol. Do not use any organic solvents, acid, nor alkali solution.
Replacing the ADF Pad Assembly The ADF pad may wear out and is designed to be a user-replaceable part. Problems with documents feeding into the ADF is an indication that the pad is wearing out. You should first clean the ADF following the instructions in the previous section Cleaning the Automatic Document Feeder on page 114. You can order replacement ADF pad assemblies from the Parts & Accessories page for your scanner at www.xeroxscanners.com.
2. Press in the top of the ADF pad housing and lift up to release the housing from the scanner. Rotate the housing up and out of the scanner. 3. Squeeze the plastic clamps that hold the ADF pad in place and lift the pad up and out of the scanner. 4. Remove the tension spring.
5. Place your fingertip under the top edge of the traction pad and pull up. The traction pad is held in place by two tabs on the underside of the pad, you will hear a “click” when it releases from the scanner. 6. Place the new traction pad in the scanner. Align the tabs on the bottom of the traction pad with the slots in the scanner. Press down on the pad to snap the part into the scanner. Slots for the traction pad 7. Place the new tension spring in the slot in the scanner.
8. Place the new ADF pad in the scanner and press down on the pad to snap it in place. 9. Place the arms of the ADF pad housing in the housing slots in the scanner, then rotate the housing down into place. Press down on the end of the housing to snap the housing in place. Note that the end of the housing piece will be held up slightly by the tension spring. 10. Close the cover when you are finished.
Replacing the Roller Assembly The ADF Roller may wear out and is designed to be a user-replaceable part. Problems with documents feeding through the ADF is an indication that the roller may be wearing out. You should first clean the ADF following the instructions in the previous section Cleaning the Automatic Document Feeder on page 114. Excessive dust on the roller can make it appear worn and smooth to touch. You cannot determine if it is time to replace a roller if the roller hasn’t been cleaned first.
3. Carefully angle the roller out and away from the ADF cover. 4. 5. Discard the roller. It cannot be re-used nor repaired. Insert the left end of the new roller assembly into the hole in the ADF cover. Slot for the roller assembly 6. 7. Angle the roller into the scanner. Align the tab on the green lock flange with the slot in the ADF cover, then rotate the tab on the lock into the scanner. Slot for the lock flange Lock flange 8. 9.
Xerox DocuMate 3920 Scanner Specifications Optical resolution Light source Image sensor Bit depth Scan method ADF specifications Maximum Item Size Minimum Item Size Scanning Speed Capacity Paper Thickness Flatbed specifications Maximum Item Size Interface Dimensions (W x H x D) Weight Scanner rating Power consumption Power supply Power cord 600 dpi Cold Cathode Fluorescent Lamp CCD 24-bit color, 8-bit grayscale, 1-bit bitonal (black & white) Single-pass Flatbed with 3-pass Duplex ADF 8.
Xerox DocuMate 3920 Parts List Please use the following part names and numbers when ordering replacements for your Xerox DocuMate 3920 scanner. You can order the replacement parts from the Parts & Accessories page for your scanner at www.xeroxscanners.com, or contact the Customer Service department.
Appendix A This chapter includes: • Safety Introduction on page 126 • EMC on page 127 • Operational Safety Information on page 128 • Electrical Information on page 129 • Emergency Power Off on page 130 • Maintenance Information on page 131 • Product Safety Certification on page 132 • Regulatory Information on page 133 • Compliance Information on page 134 • Illegal Copies on page 135 • EH&S Contact Information on page 138 Xerox DocuMate 3920 User’s Guide 125
Safety Introduction Notices and Safety Please read the following instructions carefully before operating the machine and refer to them as needed to ensure the continued safe operation of your machine. Your Xerox product and supplies have been designed and tested to meet strict safety requirements. These include safety agency evaluation and certification, and compliance with electromagnetic regulations and established environmental standards.
EMC This equipment has been tested and found to comply with the limits for a Class B digital device, pursuant to Part 15 of the FCC Rules. These limits are designed to provide reasonable protection against harmful interference in a residential installation. This equipment generates, uses, and can radiate radio frequency energy and, if not installed and used in accordance with the instruction manual, may cause harmful interference to radio communications.
Operational Safety Information Your Xerox equipment and supplies have been designed and tested to meet strict safety requirements. These include safety agency examination, approval, and compliance with established environmental standards. To ensure the continued safe operation of your Xerox equipment, follow these safety guidelines at all times: Do These • Always follow all warnings and instructions that are marked on or supplied with the equipment.
Electrical Information Warning - Electrical Safety Information 1. 2. 3. 4. 5. 6. 7. 8. 9. The power receptacle for the machine must meet the requirements stated on the data plate on the rear of the machine. If you are not sure that your electrical supply meets the requirements, please consult your local power company or an electrician for advice. The socket outlet shall be installed near the equipment and shall be easily accessible. Use the power cable that is supplied with your machine.
Emergency Power Off If any of the following conditions occur, turn off the machine immediately and disconnect the power cable from the electrical outlet. Contact an authorized Xerox Service Representative to correct the problem: • The equipment emits unusual odors or makes unusual noises. • The power cable is damaged or frayed. • A wall panel circuit breaker, fuse, or other safety device has been tripped. • Liquid is spilled into the machine. • The machine is exposed to water.
Maintenance Information 1. 2. 3. 4. 5. 6. Any operator product maintenance procedures will be described in the user documentation supplied with the product. Do not carry out any maintenance on this product which is not described in the customer documentation. Do not use aerosol cleaners. The use of cleaners that are not approved may cause poor performance of the equipment, and could cause a dangerous condition. Use supplies and cleaning materials only as directed in this manual.
Product Safety Certification This product is certified by the following Agency using the Safety standards listed: Agency Standard Underwriters Laboratories Inc.
Regulatory Information Certifications in Europe The CE mark applied to this product, symbolizes Xerox’s declaration of conformity with the following applicable European Union Directives, as of the dates indicated: December 12, 2006: Council Directive 2006/95/EC as amended. Approximation of the laws of the member states related to low voltage equipment. December 31, 2004: Council Directive 2004/108/EC as amended. Approximation of the laws of the member states related to electromagnetic compatibility.
Compliance Information Product Recycling & Disposal: USA & Canada If you are managing the disposal of your Xerox product, please note that the product contains lamp(s) with mercury, and may contain lead, Perchlorate and other materials whose disposal may be regulated due to environmental considerations. The presence of these materials is fully consistent with global regulations applicable at the time that the product was placed on the market.
Illegal Copies USA Congress, by statute, has forbidden the reproduction of the following subjects under certain circumstances. Penalties of fine or imprisonment may be imposed on those guilty of making such reproductions. 1. Obligations or Securities of the United States Government, such as: 2. 3. 4. 5. 6. 7. 8.
9. Selective Service Induction Papers that bear any of the following Registrant’s information: Earnings or Income Dependency Status Court Record Previous military service Physical or mental condition Exception: U. S. Army and Navy discharge certificates may be photographed. 10. Badges, Identification Cards, Passes, or Insignia carried by military personnel, or by members of the various Federal Departments, such as FBI, Treasury, etc.
Other Countries Copying certain documents may be illegal in your country. Penalties of fine or imprisonment may be imposed on those found guilty of making such reproductions. Currency notes Bank notes and cheques Bank and government bonds and securities Passports and identification cards Copyright material or trademarks without the consent of the owner Postage stamps and other negotiable instruments Note: This list is not inclusive and no liability is assumed for either its completeness or accuracy.
EH&S Contact Information Contact Information For more information on Environment, Health, and Safety in relation to this Xerox product and supplies, please contact the following customer help lines: USA & Canada: 1-800-828-6571 Europe: +44 1707 353 434 138 Xerox DocuMate 3920 User’s Guide
Index A Account List, 98 Account Management, 97, 100 Add “To” Address After Sending, 20 Add Folder After Filing, 20 Add Phone #, 71 Add Text File, 50 Address Book, 46, 48, 53, 80 Address Book Capacity, 56 Address Book Manager, 89, 104, 106 ADF Cover, 11 ADF cover opens, 42 ADF pad assembly replace, 117 ADF paper empty, 42 ADF paper jam, 42 Administrator Profile, 20 Advanced Copy, 36, 38, 41 Alarm, 18 align item, 34 Authentication, 56 Authentication Method, 26 Authentication type, 21 Automatic Document Feede
Index E-mail Options, 47 embedded web page, 41, 52, 63, 70, 79, 94, 101 Energy Saver, 20 Energy Saving, 17 Erase Border, 38 Error_Flatbed Home Position, 42 Error_Pick Up Roller, 42 External Address Book, 28 Extra Fine, 77 F Failed to connect, 54 Failed to get response, 54 Fax, 75, 80 Fax Default, 21, 79 Fax Number, 76 Fax Options, 71 Fax Phone Book, 80 Fax Quality, 77 Fax Settings, 21, 70 Faxing Defaults, 77 File Format, 50, 61 File Formats, 50, 62 File Name, 64 File Name of Attachment, 49 File Separation
Index Modem Speed, 87 monitor, 9 Monitor Control, 70 More Fax Settings, 78 More Settings, 75 MTIFF, 10, 47, 50, 62 Multi-Level (Gray), 50, 62 Multi-Level(gray), 103 1 to 1 Sided, 2 to 1 Sided, 39 Printing Size, 72 PSTN Access #, 70 Q Quality, 77 R N Network Adapter, 93 Network Management Tool, 70, 90 Network Settings, 24 New Device, 92 N-Up, 40, 43 O Orientation, 39, 40 Orientation for Duplex, 43 Original Doc.
Index Station Number, 70 Subject, 48 Subnet Mask, 23 System Auto Reset, 20 system requirements, 9 T Target URL, 64 Port #, 64 Text, 37, 49 TIFF, 10, 50, 62 Time Zone, 19 Transmission Report, 71 Transmission Speed, 87 U Unit, 38 Usage Report, 19 User Account Management, 89 V Variable, 37 142 Xerox DocuMate 3920 User’s Guide