
Operation Manual

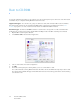


Table Of Contents
- Table of Contents
- Safety
- Welcome
- Scanner Setup
- Installation
- Loading Documents to Scan
- Scanning and Configuring One Touch
- Default One Touch Settings
- Scan from the One Touch Button Panel
- Changing the Button Settings
- Selecting Options for One Touch
- Scan Configurations
- File Formats
- Configure Before Scan
- Open Scanned Document(s)
- Transfer to Storage
- Burn to CD-ROM
- Printer or Fax
- PaperPort
- SharePoint
- FTP Transfer
- SMTP
- Email Applications
- Text Editors
- Still Image Client
- Image Editors
- PDF Applications
- Send to Application
- Scanning to Multiple Destinations
- Scanning with Job Separation
- Scanning with Optical Character Recognition (OCR)
- Selecting One Touch OmniPage OCR Options
- One Touch with Visioneer Acuity Technology
- Hardware Properties and Interface Behavior
- Scanning from TWAIN and WIA
- Scanning from ISIS
- Maintenance
- Regulatory Information
- Compliance Information
- Index

Xerox DocuMate 3125
User’s Guide
78
SharePoint
The SharePoint destination link allows scans to be sent directly to a SharePoint site from One Touch. Please contact
your SharePoint site administrator for the server information you need to configure this link. Alternatively, have your
site administrator or IT professional configure this link for you. Setup and configuration of the SharePoint sites and
user accounts are outside the scope of this document.
Supported file types—all image and text file formats, except HTML, are available when scanning to the SharePoint
site. Note that text file formats are only available if an OCR module or application is installed. Please refer to Te x t
Formats on page 62 to see a list of text file formats that are available when OCR is installed.
Destination type—the SharePoint destination is classified as a “Storage Link”. To make it available in the
destination list, you must select Storage and CD-R/W on the Options tab in the One Touch Properties window.
All configuration of the SharePoint server is done using the SharePoint settings tab in the Scan Configuration
Properties window.
1. Select SharePoint as the destination application.
2. Open the Scan Configuration you want to modify for scanning to a SharePoint site, or create a new Scan
Configuration.
Select an existing configuration in which you have already specified your SharePoint site information, and then
click on the Copy button to create a new configuration using the settings of the current configuration.
3. Click on the SharePoint tab and fill in the fields with the information for your SharePoint site.
• Protocol—select which protocol you want to use to transfer the scan to the server.
• SharePoint URL—input the full URL path of the SharePoint site without the http(s):// designation and actual
page. This path should include everything except the destination folder.
For example, if the web browser URL displays http://sharepoint.site.com/IT/common/shared documents/
default.aspx, then you would configure the SharePoint server path as follows:
• Select HTTP as the protocol
• The SharePoint URL would be sharepoint.site.com/IT/common
• The Destination folder would be shared documents