
Operation Manual
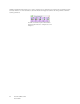


Table Of Contents
- Table of Contents
- Safety
- Welcome
- Scanner Setup
- Installation
- Loading Documents to Scan
- Scanning and Configuring One Touch
- Default One Touch Settings
- Scan from the One Touch Button Panel
- Changing the Button Settings
- Selecting Options for One Touch
- Scan Configurations
- File Formats
- Configure Before Scan
- Open Scanned Document(s)
- Transfer to Storage
- Burn to CD-ROM
- Printer or Fax
- PaperPort
- SharePoint
- FTP Transfer
- SMTP
- Email Applications
- Text Editors
- Still Image Client
- Image Editors
- PDF Applications
- Send to Application
- Scanning to Multiple Destinations
- Scanning with Job Separation
- Scanning with Optical Character Recognition (OCR)
- Selecting One Touch OmniPage OCR Options
- One Touch with Visioneer Acuity Technology
- Hardware Properties and Interface Behavior
- Scanning from TWAIN and WIA
- Scanning from ISIS
- Maintenance
- Regulatory Information
- Compliance Information
- Index
Xerox DocuMate 3125
User’s Guide
45
• Scanner icon—click to open the scanner’s hardware properties.
• Red “X”—click to close the One Touch panel.
The Button View
• Left-click on a Destination Application icon to start scanning.
• Right-click on a Destination Application icon to open the One Touch Properties.
• Left-click on the arrow buttons, on the right side of the panel, to view the rest of the One Touch buttons.
The Detail View
• Left-click on a Destination Application icon to start scanning.
• Right-click on a Destination Application icon to open the One Touch Properties.
• Single-click on the detailed information to open the One Touch Properties.
The Hardware View
• Left-click on the scanner icon to return to the Button view.
• Right-click on the scanner icon to open the scanner’s hardware properties.