
Operation Manual
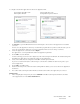


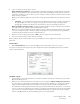

Table Of Contents
- Table of Contents
- Safety
- Welcome
- Scanner Setup
- Installation
- Loading Documents to Scan
- Scanning and Configuring One Touch
- Default One Touch Settings
- Scan from the One Touch Button Panel
- Changing the Button Settings
- Selecting Options for One Touch
- Scan Configurations
- File Formats
- Configure Before Scan
- Open Scanned Document(s)
- Transfer to Storage
- Burn to CD-ROM
- Printer or Fax
- PaperPort
- SharePoint
- FTP Transfer
- SMTP
- Email Applications
- Text Editors
- Still Image Client
- Image Editors
- PDF Applications
- Send to Application
- Scanning to Multiple Destinations
- Scanning with Job Separation
- Scanning with Optical Character Recognition (OCR)
- Selecting One Touch OmniPage OCR Options
- One Touch with Visioneer Acuity Technology
- Hardware Properties and Interface Behavior
- Scanning from TWAIN and WIA
- Scanning from ISIS
- Maintenance
- Regulatory Information
- Compliance Information
- Index

Xerox DocuMate 3125
User’s Guide
110
Text Formats
You select the text format option by clicking on the text icon on the One Touch Properties window.
Selecting the text format option also selects OCR processing as an automatic step for scanning. Therefore, when you
scan a document with the text format selected, the text portions of the document are automatically converted to
editable text.
As you select Destination Applications that are text applications, the text format icon changes to match the file type
of the application. In some cases, the Destination Application supports several file types, and you can right-click on
the icon to choose the particular file type for that application.
The specific file format is the file name extension on the text format icon.
To s ele ct a fi le ty pe for the text format:
1. Select the Destination Application.
This is the text format
icon. This example of
the text format icon is
sPDF.
The specific text format; this
example is for Rich Text
Format (.rtf).