Version 1.
© 2009 Xerox Corporation. All rights reserved. Xerox, Xerox Canada Ltd, Xerox Limited, and the sphere of connectivity design are trademarks of Xerox Corporation in the United States and/or other countries. Changes are periodically made to this document. Changes, technical inaccuracies, and typographic errors will be corrected in subsequent editions.
Table of Contents Table of Contents . . . . . . . . . . . . . . . . . . . . . . . . . . . . . . . . . . . . . . . . . . . . . . . i Preface. . . . . . . . . . . . . . . . . . . . . . . . . . . . . . . . . . . . . . . . . . . . . . . . . . . . . . . . 1 Welcome to the Quick Start Guide . . . . . . . . . . . . . . . . . . . . . . . . . . . . . . . . . . . . . . . . . . . . 1 Exercises . . . . . . . . . . . . . . . . . . . . . . . . . . . . . . . . . . . . . . . . . . . . . . . . . . . . . . 3 Exercise 1.
Table of Contents ii DocuColor 7002/8002 Quick Start Guide
Preface Welcome to the Quick Start Guide This guide is designed to help you quickly begin using your new DocuColor 7002/8002 Digital Press. The information in this guide will help you load paper, print a file from your print server and check the status of critical machine data. For additional details and information, refer to the DocuColor 7002/8002 Digital Press User Guide. This guide consists of the following exercises: • • • • • • • Exercise 1. Locating the major components of your system Exercise 2.
DocuColor 7002/8002 2 Quick Start Guide
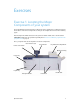
Exercises Exercise 1. Locating the Major Components of your system The diagram below identifies the major components of the digital press. You will need to know the locations of the various components so that you can complete the exercises in the following pages. Not all components will be discussed in this guide. For further details, refer to the DocuColor 7002/8002 Digital Press user guide that you will print in Exercise 3. Submitting a print file from your print server on page 8.
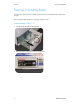
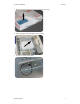
Exercises DocuColor 7002/8002 Exercise 2. Loading Paper The first step in getting a print is to make sure there is the correct paper loaded in the trays for your job. Go to your printer and load 8.5 X 11 inch paper in trays 1 and 2. Loading paper (Trays 1-4) 1. Lift the handle and pull out the paper tray. 2. Select the appropriate paper stock for your print job.
DocuColor 7002/8002 3. Open the ream of paper seam side up and place it in the tray. 4. Place the paper in the front right corner of the tray. 5. Do Not exceed the “Max” fill line.
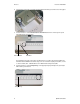
Exercises DocuColor 7002/8002 6. Squeeze the green levers, and slide the Paper Guides until they touch the side of the paper. 7. Press the button to select Non-Standard or Standard at the front of the tray. The green light will indicate your selection Non-standard Standard Non-standard size paper is any paper for which there is no paper guide setting within the minimum and maximum sizes for the trays: 7.16 to 12.6 inch Long Edge Feed (LEF) or 7.16 to 19.
DocuColor 7002/8002 9. Exercises Press the button to select Coated or Uncoated. The green light will indicate your selection. Coated Uncoated 10. Select the position of the Paper Tray Blowers to match the weight of the paper stock in the tray. 11. Slide the tray back into the machine until it locks into place.
Exercises DocuColor 7002/8002 Exercise 3. Submitting a print file from your print server The following exercises provide instructions on how to print the Loading Paper Chapter of your User Guide located on the Customer Documentation CD. You should have received the CD as part of the installation package. The three print server options are the Xerox FreeFlow Color Server, the Xerox CX Print Server, Powered by Creo, and the Xerox EX Print Server, Powered by EFI.
DocuColor 7002/8002 4. Select the Look In pull down menu and select CD-RW0. 5. Select and highlight Loading Paper.pdf from the file selection. 6. Select OK. 7. Select Print. Exercises Printing the Loading Paper.pdf file from the EX Print Server Follow these steps to print the Loading Paper.pdf document from the EX Print Server: 1. Insert the Customer Documentation CD in the DVD/CD Drive. 2. Select File>Import>Job. 3. Select Look In>DVD-RW Drive (F:). 4. Select to highlight Loading Paper.
Exercises 5. Select Add. 6. Select Import. 7. Right-click the file in the Active Jobs Window and select Print. DocuColor 7002/8002 Printing the Loading Paper.pdf file from the CX Print Server Follow these steps to print the Loading Paper.pdf document from the CX Print Server. 1. Insert the Customer Documentation CD in the DVD/CD-ROM Drive. 2. Select Job>Import>Job. 3. Select Look In>DVD-RW Drive (E:) 4. Select to highlight the Loading Paper.pdf file. 5.
DocuColor 7002/8002 6. Select the file and then select Import. The file appears in the Process Queue. 7. Right-click the file and select Run Immediately. Exercises Exercise 4. How to clear paper jams Printer jam clearance If a jam occurs, the digital press stops printing and a message is displayed on the User Interface (UI). Follow all instructions displayed completely and in sequence. Refer to this chapter for additional information to resolve the problem.
Exercises DocuColor 7002/8002 Upper Transport Area jam Jams occur in this area only when the Second Feeder Module containing Trays 3 and 4 is connected. 1. Pull out the Transport Area drawer above Tray 1. 2. Lift up the handle. 3. Remove all jammed paper. 4. Return the drawer to its original position. 5. Follow the instructions on the UI to clear other areas or to resume your print job.
DocuColor 7002/8002 Exercises Transport Module jams 3a 3b 7c 7b 7a Open the areas in the Transport Module indicated on the UI. Carefully remove all jammed paper. 1. Open the Transport Module door. 2. Grasp the green handles 3a, squeeze and move it to the right. 3. Carefully remove all jammed paper. 4. Reposition handles 3a. 5. Lift up green handles 3b. 6. Carefully remove all jammed paper and return handles 3b to the original position. 7.
Exercises DocuColor 7002/8002 Exit Module jams 8a 8b 8e 8c 8d 8f 8g Follow the instructions on the UI to clear jams from all the areas indicated in the Exit Module. Follow the instructions on the UI to restart your print job. Right/Left Door paper path jams WARNING Be careful when clearing jams in the Fuser area. The Fuser is extremely hot and will cause injury. Always follow the instructions on the UI to locate and clear jams.
DocuColor 7002/8002 5. Exercises Reposition green handle 4a. 4a 4b 6. The Fuser area is on the right hand side of the Paper Transport module. Lift handle 4c on the right hand side and pull to open. 7. Lift up handle 4d until it stops and clear any jammed paper. Rotate knob 4e in the direction of the arrow on the knob to clear any paper that is caught. Note Occasionally a sheet of paper wraps around the heat roll. (The heat roll is visible when handle 4d is up).
Exercises DocuColor 7002/8002 Jam clearance with 2-sided printing WARNING Be careful when clearing jams in the Fuser area. The Fuser is extremely hot and will cause injury. When printing 2-Sided output, the UI will direct you to clear the following areas if a jam occurs. 1. Open the Right and Left Front Doors when directed to by a UI message. 2. Lift handles 5 and 6 and clear any paper in the areas. 6 5 CAUTION Paper can rip if not pushed back before removing it from under the lip of this area. 3.
DocuColor 7002/8002 Exercises High Capacity Stacker 80 (HCS80) Perform the following steps to clear the HCS80 jam in the Bypass area and resume printing. 1. Remove any paper from the Top Tray. 2. Lift the HCS80 Top Cover. 3. Lift the green handle, or handles, indicated on the UI and remove all paper in the Bypass area. Remove paper only from the areas indicated. 4. Close each green handle. 5. Close the HCS80 Top Cover. 6.
Exercises 5. DocuColor 7002/8002 Follow any instructions on the Touch Screen to restart your print job. 1 3 2 Exercise 5. How to check the status of your job Monitoring job status is an important part of controlling printer workflow. One button located on the Control Panel puts the information at your fingertips. Job Status When you press the Job Status button on the Control Panel, the Job Status screen is displayed. Jobs are numbered in the order they are received for processing. 1.
DocuColor 7002/8002 Exercises Exercise 6. How to check the machine status When the Machine Status button on the Control Panel is pressed, the Paper Trays tab screen is displayed by default. The Machine Status screen can be set as the initial screen default by your System Administrator. 1. Go to your printer and select the Machine Status Button 2. Read the following Tab descriptions: Paper Trays - Shows the trays available, and the size, type, weight and level of the paper in the trays.
Exercises DocuColor 7002/8002 Error Log - Shows all error codes to assist your Xerox service representative in solving problems with the digital press. Maintenance - Touch the Customer Replaceable Unit button to display the status of the Dry Ink/Toner Cartridges, Dry Ink/Toner Waste Bottle, Charge Corotrons and Fuser Web Green check Status is Okay. Yellow check Indicates a Warning.
DocuColor 7002/8002 Exercises Exercise 7. How to call for service Refer to the UI when there is a problem with the digital press or an accessory. A status code and suggested solutions are displayed on the screen. Follow all steps in the suggested solutions until the problem is corrected. If the problem persists, call for assistance. Prior to your call, record the following information: 1. A complete description of the problem. 2. Fault Code(s) located at the top of the Control Panel. 3.
Exercises DocuColor 7002/8002 Exercise 8. Locating and Using the Information System Now that you have had a brief tour of the DocuColor 7002/8002 Digital Press, take a moment to review additional resources available to you. The following list identifies the various tools you can use to learn more about your system.