
Installation Guide


21 Setting up the Fiery XJ as a PostScript printer
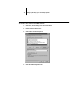
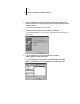
4. Connect the Fiery XJ to the same port as your network.
For parallel printing, select the port (LPT1, LPT2, or LPT3) connected to your
parallel cable.
To print to a file, select FILE. Printing to a file is useful if the Fiery XJ is elsewhere or
off-site. However, if you select the FILE port, you cannot print to a printer until you
select a network or printer port. (In some applications, you can select the FILE port
from the Print dialog box; this is preferable for temporary use since it doesn’t require
resetting the port in the Control Panel.)
5. Click OK.
The Printers window appears again, with the selected port next to the selected printer
name in the Installed Printers list box.
6. When you are finished, click Close.
Setting up IPX (Novell) printing with Windows 3.1x
TO SET UP IPX (NOVELL) PRINTING:
1. In the Main group of the Windows Program Manager, double-click the Windows
Setup icon.
2. From the Options menu, choose Change System Settings.
3. From the Network pop-up menu, choose Novell NetWare (shell versions 3.26 and
above).