
Installation Guide

7 Setting up the Fiery XJ as a PostScript printer
TO PREPARE THE FIERY XJ AND YOUR COMPUTER FOR PARALLEL
PORT PRINTING:
1. Connect the Fiery XJ to the parallel port on your computer.
For instructions, see the Configuration Guide.
2. In Network Setup>Port Setup>Parallel Port Setup, set Enable Parallel Port to Yes.
For more information about Fiery XJ Setup, see the Configuration Guide.
3. If you want to spool files to the Fiery XJ, set Port Timeout in Seconds to 10.
If you want to print directly to the Fiery XJ, set Port Timeout in Seconds to 5.
Setting this option to 10 seconds ensures that spooling is not interrupted due to
timeout.
4. In your computer’s BIOS settings, set Parallel Port Mode to Compatible.
To access the BIOS settings, restart the computer and press the key indicated on your
monitor as soon as the computer starts up. You may have to scroll through several
screens to reach the parallel port settings. After setting the Parallel Port Mode to
Compatible, save your changed setting and exit.
TO PREPARE THE PRINTER FOR PARALLEL PORT PRINTING:
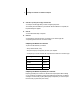
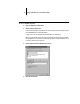
1. Click the Start button, point to Settings, and click Printers.
2. Click the Fiery XJ printer icon and choose Properties from the File menu.
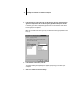
3. Click the Details tab, and in the “Print to the following port” menu, select
LPT1: (Printer Port).
N
OTE: Check this selection carefully. It may read LPT1: (ECP Printer Port), which is
not equivalent to LPT1: (Printer Port).
If this box does not read LPT1: (Printer Port), change the port setting now, as
described in “To prepare the port for parallel port printing:” on page 9, and then
return to this procedure. You may need your Windows 95 system CD.