TA B L E O F C O N T E N T S TABLE OF CONTENTS Table of Contents Getting to Know Your Copier 1 Control Panel 4 Touch Screen 7 Power Switch 8 Audio Tones 8 Duplex Automatic Document Feeder (DADF) 8 Document Glass 8 Paper Trays 9 Output Trays 9 Power Saver Mode 10 Exiting the Power Saver Mode 10 Quick Start Guide to Copying 11 Making Copies Using the Duplex Automatic Document Feeder 11 Making Copies from the Document Glass 12 Making Copies Using Features 13 Loading Paper 16 Trays 1, 2, 3, and 4 16 Tray 5 (
TA B L E O F C O N T E N T S Copier Features 24 Basic Copying Tab 24 Output Color 25 2 Sided 27 Reduce/Enlarge 30 Using Presets% 31 Using Variable% 31 Using Independent X-Y% 32 Paper Supply 33 Programming the Paper Supply for Tray 5 (Bypass) 34 Added Features Tab 35 2 Sided 36 Output 39 Stapling 41 Margin Shift 42 Using the Auto Center Feature 42 Using the Margin Shift/Variable Shift Feature 43 Border Erase 44 Image Quality Tab 45 Original Type 46 Auto Exposure 48 Lighter/Darker/Contrast 49 Sharpness/Satur
TA B L E O F C O N T E N T S TABLE OF CONTENTS Output Format Tab 54 Multiple Up 55 Transparency Separators 58 Selecting Blank Separators 59 Selecting Separators + N Sets 60 Covers 61 Repeat Image 63 Poster 65 Mirror Image/ Negative Image 67 Scan Options Tab 68 Original Size 69 Mixed Size Originals 70 Bound Originals 71 Image Rotation 73 Original Orientation 74 Book Duplex 75 Job Assembly Tab 76 Stored Jobs 77 Storing a Job 77 Deleting a Job 78 Retrieving a Job 78 Build Job 79 Booklet Creation 81 Duplex Au
TA B L E O F C O N T E N T S Finisher (Optional Accessory) 86 Using the Finisher 86 Stapling Options 87 Job Status 89 Checking Current Jobs 89 Changing the Print Priority 90 Checking Completed Jobs 91 Outputting/Deleting Secure Prints 92 Outputting Sample Prints 94 Delayed Print 96 Deleting Stored Documents 97 Machine Status 98 Machine Information 100 Maintenance 101 Cleaning the DADF and Document Glass 101 Changing Toner Cartridges 102 Machine Specifications 105 Speed by Media 105 Dimensions and Weight 10
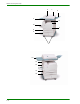
User Guide (Copier) Getting to Know Your Copier Your new Xerox DocuColor 2240/1632 works as a digital copier. This section will provide an introduction to your new product. For more information about copy features, refer to the section entitled Copier Features in this chapter. 1 1–1 USER GUIDE (COPIER) 1.
USER GUIDE (COPIER) 2 1 3 4 6 5 10 7 8 9 11 16 12 13 14 15 1–2
USER GUIDE (COPIER) Name Function 1 Duplex Automatic Document Feeder (DADF) Automatically feeds up to 50 documents. Also works as a Document Glass cover when making copies from the platen glass. 2 Original Input Area Location where originals are fed onto platen glass for copying. 3 Original Catch Tray Original return area. 4 Control Panel Used to program the copier for individual jobs. 5 Center Output Tray Output delivered here face down. 6 Power Switch Powers machine On/Off.
USER GUIDE (COPIER) Control Panel Contrast Dial Touch Screen Numeric Keypad The Control Panel is used to program individual jobs. 1–4 • The Numeric Keypad is used to enter copy quantity or other numeric information. • The Contrast Dial adjusts the brightness of the touch screen. • The Touch Screen is where you make selections for the jobs you are programming. Access Use this feature to change machine default settings, and to create or modify user access numbers.
Interrupt Stops the printer/copier during the current job. This allows another job to be run. There are two indications that the job has been interrupted: • The printer/copier displays a message indicating that Job Interrupt has been selected, and it is ready to copy. • The indicator light flashes to acknowledge that the Interrupt button has been selected. The light will continue to flash until the printer/copier has completed the activity in process.
USER GUIDE (COPIER) Job Memory Online Features 1–6 Indicator lights when data is stored in the machine's memory. Indicator lights when data is being received from a client. Allows you to alternate between scanning and copying feature screens. Job Status Allows you to check or cancel jobs currently executing, or to check or print saved documents. Machine Status Allows you to check the machine status, meters, the state of consumables, and output reports.
USER GUIDE (COPIER) Tab Unused Memory Message Area Quantity Selection Buttons The Touch Screen is used to select features on the User Interface. Press the buttons and tabs displayed in the Touch Screen to set features or to instruct operations on screens. The selected buttons are highlighted to indicate activation. Buttons that do not have three-dimensional shadows are not active, and cannot be selected.
USER GUIDE (COPIER) Power Switch The power switch is located on the right top corner of the machine. Press the switch to the ( | ) position to turn the power on. Ground Fault Protector Located at the rear of the machine where the power cord attaches. The Ground Fault Protector removes all power from the machine if a fault is detected in the power to the printer/copier. To reset the GFI, press the switch in. Audio Tones Tone volume may be adjusted or turned off in System Settings mode.
USER GUIDE (COPIER) Trays 1,2,3 and 4 are located at the lower front of the printer/ copier. Tray 5 (Bypass) is located on the left side of the printer/ copier. Trays 1 and 2 Adjustable from 5.5x8.5 in. through 11x17 in. (A5 through A3), and can accommodate up to 520 sheets based on paper weight. Trays 3 and 4 High capacity paper trays accommodating a total of 2000 sheets, 8.5x11 in. (A4 and B5) based on paper weight. Tray 5 (Bypass) Feeds specialty papers i.e.
USER GUIDE (COPIER) Power Saver Mode Power Saver Mode automatically cuts off the electricity to the machine if it is left unused for a certain duration. The Power Saver feature has two modes, a Low Power mode and Sleep mode. The machine enters the Low Power mode after the preset time has elapsed if the machine is left unused for a fixed period of time. The machine then enters the Sleep mode if a further preset time elapses.
USER GUIDE (COPIER) This section will lead you quickly through a number of features and steps used in making copies. For more information about copy features, refer to the section entitled Copier Features, in this chapter. Making Copies Using the Duplex Automatic Document Feeder 1 2 3 4 5 Place original in the Original Input Area face up. A stack of up to 50 originals may be place in the tray. Slide the documents forward until the green indicator lights, indicating the document is inserted correctly.
USER GUIDE (COPIER) Making Copies from the Document Glass 1 2 3 4 5 1–12 Open the Document Cover. Place the original face down on the Document Glass, aligning the left rear corner with the registration guide. Close the cover before making a copy. Press the Start button. Remove the copies from the output tray. Remove the original document from the Document Glass.
USER GUIDE (COPIER) The feature tabs on the Touch Screen enable you to configure the printer/copier to suit your copying needs. The procedure below leads you quickly through a number of features you may want to use in making copies. It assumes that the feature tabs are in the default configuration. For more information about copy features, refer to the section entitled Copier Features, in this chapter.
USER GUIDE (COPIER) 4 Select an option under 2 Sided if a setting other than the default, 1 to 1 Sided, is desired. If another option is desired, perform one of the following: • 1 to 1 Sided for default one-sided copies. • 1 to 2 Sided for two-sided copies from one-sided input. • • Press Head to Head for two-sided, head-to-head output, as for books. • Press Head to Toe for two-sided, head to toe output, as for calendars. 2 to 2 Sided for two-sided copies from two-sided input.
USER GUIDE (COPIER) On the Added Features tab, select Output to program the desired copy output option. • Press Collated for collated output. Collated will automatically be selected when the DADF is used. • Press Collated / Stapled to direct output to the Finisher (optional Accessory). Press Finisher Tray to set the Output Destination. Press Stapling on the Output screen to select the Original Orientation and Staple Position on the output.
USER GUIDE (COPIER) Loading Paper This section contains basic information about loading paper and transparencies, and about using paper trays. It also includes some paper usage guidelines for the DocuColor Series. For more information about the materials you can use, refer to the Recommended Materials for the DocuColor Series. Trays 1, 2, 3, and 4 Trays 1,2,3 and 4 hold the paper supply for the DocuColor printer/ copier. Trays 1 and 2 can accommodate an assortment of standard paper sizes, from 5.5x8.
USER GUIDE (COPIER) Certain standard paper sizes can be automatically detected in Tray 5 (Bypass) by selecting Auto Size Detect on the Tray 5 programming screen. The following paper sizes can be used with the Auto Size Detect feature: • US/Canada - 5.5x8.5 in. LEF/SEF, 8x10 in. LEF, 8.5x11 in. LEF/SEF, 8.5x13 in. SEF, 8.5x14 in. SEF, 11x17 in. SEF. • Europe - A5 LEF/SEF, A4 LEF/SEF, A3 LEF/SEF, B5 LEF/ SEF, B4, Postcard (100 x 148mm).
USER GUIDE (COPIER) Loading Stock Paper Load the paper into Trays 1, 2, 3, and 4 with the preferred printing side up. Load the paper into Tray 5 (Bypass) with the preferred printing side down. The capacity of the tray varies with the paper weight that is loaded in the tray. NOTE: For the best results, use only the recommended paper sizes, paper weights, or paper types. If you do not use recommended papers, you may experience copy quality problems, paper jams, or possible component failures.
USER GUIDE (COPIER) NOTE: Do not load paper above the fill line of the paper tray edge guides. Straighten the paper stack each time the paper tray is opened. Close the paper tray slowly to avoid shifting the paper stack. This ensures that the paper is in the correct position when the paper tray is in the operating position. If paper feeding or copy curl problems occur, flip the paper over in the tray and make the copies again. If the performance improves, continue to load the paper in this manner.
USER GUIDE (COPIER) Transparencies Transparencies can only be fed from Tray 5 (Bypass). Stripeless transparencies are recommended. Do not use white-border transparencies. NOTE: Use only the transparencies recommended in the Recommended Materials for the DocuColor Series. After loading the transparencies you can program the copier printer to insert a blank separator page between transparencies by using the Transparency Separators feature.
USER GUIDE (COPIER) 1 2 To load a paper tray, pull the tray out. Fan the paper and load the desired paper into the tray by aligning the edge of the paper against the left edge of the tray. The side to be copied should be facing up. Do not fill the paper tray above the fill line. 3 4 Adjust the paper guides if necessary, until they lightly touch the paper. Push the tray in gently until it comes to a stop.
USER GUIDE (COPIER) 3 4 Fan the paper and load paper with the side to be copied or printed on facing down. Insert the paper lightly along the paper guide on the front side of the machine until it comes to a stop. Adjust the back edge paper guide until it lightly touches the paper. NOTE: Do not load mixed size paper into the tray. Do not load materials above the fill line located on the paper guide 5 6 Select the appropriate size and type for the paper you have loaded.
USER GUIDE (COPIER) 1 2 3 4 Open Tray 5 (Bypass) by grasping the tray and gently pushing it away and down from the printer/copier. Adjust the front edge paper guide to the closest position forward beyond the 12x18 in. position. Load the SRA3 paper into Tray 5 (Bypass). Load the paper with the side to be printed on facing down. Adjust the back edge guide until it lightly touches the paper. NOTE: SRA3 paper is not recommended for copy jobs. Performance using this paper size may vary.
USER GUIDE (COPIER) Copier Features Basic Copying Tab Below is a brief description of each feature available on the Basic Copying tab. Each feature is explained in detail on the following pages. Output Color 2 Sided Reduce/Enlarge Paper Supply 1–24 Allows you to select the colors to be used for copying. Allows you to select one or two-sided originals, with options for one or two-sided output.
USER GUIDE (COPIER) The Output Color feature allows you to select the desired output color. The following options are available: Auto The Auto Color option enables the copier to determine if the document is black and white or color. If the document is black and white, the Black option is selected automatically. If the document is colored, the Full Color option is selected. The DADF must be closed for the Auto Color option to function.
USER GUIDE (COPIER) You can select several Output Color options from the Basic Copying tab or select the More… button to get a complete set of options. 1 2 3 On the Basic Copying tab select More… under Output Color to display the Output Color screen. Select the desired option: • Auto • Full Color • Black • Dual Color • Single Color Select Start to make copies or Save to select additional features. NOTE: Dual Color cannot be used with Negative Image.
USER GUIDE (COPIER) Use the 2-Sided feature to select one or two-sided originals, with options for one or two-sided output. The following options are available: 1 to 1 Sided Makes one-sided copies from one-sided input. This is the default setting. 1 to 2 Sided Makes two-sided copies from one-sided input. 2 to 2 Sided Makes two-sided copies from two-sided input. 2 to 1 Sided Makes one-sided copies from two-sided input.
USER GUIDE (COPIER) You can select several 2 Sided options from the Basic Copying tab or use the Added Features tab. 1 2 1–28 On the Basic Copying tab select More… under 2 Sided. Select the desired option: • 1 to 1 Sided • 1 to 2 Sided • Select Head to Head for two-sided, head-to-head output, as for books. • Select Head to Toe for two-sided, head-to-toe output, as for calendars.
USER GUIDE (COPIER) • 2 to 2 Sided • Head to Head if your originals are two-sided, head-tohead. • Head to Toe if your originals are two-sided, head-to-toe. Select the option for your Copies • 3 4 • Head to Head for two-sided, head-to-head output, as for books. • Head to Toe for two-sided, head-to-toe output, as for calendars. 2 to 1 Sided • Select Head to Head if your originals are two-sided, headto-head. • Select Head to Toe if your originals are two-sided, headto-toe.
USER GUIDE (COPIER) Reduce/Enlarge The Reduce/Enlarge feature allows you to copy the image at different magnifications. Copies may be reduced to 25% or enlarged to 400%, in 1% increments. The following options are available: 100% Auto% Copies are the same size as the original. This is the default setting. This option automatically reduces or enlarges the copy, based on the size and orientation of the document and the paper supply selected. This option is applied only to standard size documents.
USER GUIDE (COPIER) Using Presets% 1 2 3 4 On the Basic Copying tab select More… under Reduce/Enlarge. On the Reduce/Enlarge screen, select the Presets% option. Select 100%, Auto%, or the desired preset percentage. Select Start to make copies or Save to select additional features. Using Variable% 1 2 3 4 Under Reduce/Enlarge on the Basic Copying tab select More… On the Reduce/Enlarge screen, select the Variable% option.
USER GUIDE (COPIER) Using Independent X-Y% 1 2 3 4 1–32 Under Reduce/Enlarge on the Basic Copying tab select More… On the Reduce/Enlarge screen, select the Independent X-Y% option. Perform one of the following: • Press the up arrow to increase the percentage value for X, X&Y, or Y in increments of 1. • Press the down arrow to decrease the percentage value for X, X&Y or Y in decrements of 1. • Press Auto. Select Start to make copies or Save to select additional features.
USER GUIDE (COPIER) The Paper Supply option enables you to select output paper size and type. The Basic Copying tab displays the Auto Paper selection feature. This option enables the copier to automatically detect the original document size and select the same standard size paper from Trays 1,2, 3, or 4. The Basic Copying tab also displays the contents of three other trays enabling you to specify your selection for output size. The Paper Supply More… button enables you to access the Paper Supply screen.
USER GUIDE (COPIER) Programming the Paper Supply for Tray 5 (Bypass) You must select the paper size and paper type when loading paper into Tray 5 (Bypass). Auto Size Detect can be used with standard size paper. 1 2 3 On the Basic Copying tab select More… under Paper Supply. Select Tray 5 (Bypass) to display the Tray 5 (Bypass) screen. Perform one of the following to select Paper Size: • Select Auto Size Detect. • Select Standard Size. • • 4 5 6 Select the paper size from the list.
USER GUIDE (COPIER) USER GUIDE (COPIER) Added Features Tab Below is a brief description of each feature available on the Added Features tab. Each feature is explained in detail on the following pages. 2 Sided Allows you to select one or two-sided originals, with options for one or two-sided output. Output Enables you to select the desired output order and destination of the output.
USER GUIDE (COPIER) 2 Sided Use the 2 Sided feature to select one or two-sided originals, with options for one or two-sided output. The following options are available: 1–36 1 to 1 Sided Makes one-sided copies from one-sided input. This is the default setting. 1 to 2 Sided Makes two-sided copies from one-sided input. 2 to 2 Sided Makes two-sided copies from two-sided input. 2 to 1 Sided Makes one-sided copies from two-sided input.
USER GUIDE (COPIER) 1 2 USER GUIDE (COPIER) You can select several 2 Sided options from the Basic Copying tab or the Added Features tab. On the Added Features tab select 2 Sided. Select the desired option: • 1 to 1 Sided • 1 to 2 Sided • Select Head to Head for two-sided, head-to-head output, as for books. • Select Head to Toe for two-sided, head-to-toe output, as for calendars.
USER GUIDE (COPIER) • 2 to 2 Sided Select the option for your Originals • Head to Head if your originals are two-sided, head-tohead. • Head to Toe if your originals are two-sided, head-to-toe. Select the option for your Copies • 3 4 • Head to Head for two-sided, head-to-head output, as for books. • Head to Toe for two-sided, head-to-toe output, as for calendars. 2 to 1 Sided • Select Head to Head if your originals are two-sided, headto-head.
USER GUIDE (COPIER) The Output feature enables you to select the destination of the output and determine whether it will be collated or uncollated. The following options are available: Auto Collated Uncollated The copier automatically determines which output mode (collated or uncollated) for the job and delivers the copies to the output tray. Collated sets are delivered to the output tray. Uncollated sets are delivered to the output tray. Collated refers to copies that are delivered as sets.
USER GUIDE (COPIER) 1 2 3 4 1–40 On the Added Features tab select Output. Select the desired option: • Auto • Collated • Uncollated If you have a Finisher (optional accessory), select the desired Output Destination: • Center Output Tray • Finisher Tray Select Start to make copies or Save to select additional features.
USER GUIDE (COPIER) This section describes the procedure for programming the Output feature to staple output. You must have a Finisher (optional accessory) to staple output. 1 2 3 4 On the Added Features tab select Output. Select Collated/Stapling. Select Stapling. The Stapling screen is displayed. Select the desired stapling position. The Finisher Tray is automatically selected as the Output Destination. 5 Select the desired Original Orientation: • Head to Top • Head to Left Select Save.
USER GUIDE (COPIER) Margin Shift The Margin Shift feature allows you to shift the position of the image on the copy. The image can be centered on the copy or moved to the top, bottom, left or right. When copying both sides, different settings can be set for Side 1 and Side 2. The following types of Margin Shift are available: No Shift Copies are made without shifting the original. This is the default setting.
USER GUIDE (COPIER) 1 2 3 4 On the Added Features tab select Margin Shift. Select Margin Shift/Variable Shift. Select the desired option: • Side 1 • Side 2 Select the desired shift option: • No Shift • Auto Center • Corner Shift • • 5 6 USER GUIDE (COPIER) Using the Margin Shift/Variable Shift Feature Press the arrow icon that illustrates the desired location of the image on the output copy. Variable Shift • Press the left arrow to shift the image toward the left edge.
USER GUIDE (COPIER) Border Erase The Border Erase feature enables you to eliminate unwanted marks near the edges of the original from the output copy. The range for Border Erase is 0 through 50mm in 1mm increments. Border Erase offers the following options which can be used individually or combined together: Top & Bottom For Normal the default is 2mm. For Variable Erase the default is 5mm. Left & Right For Normal the default is 2mm. For Variable Erase the default is 5mm. Center The default is 0mm.
USER GUIDE (COPIER) Below is a brief description of each feature available on the Image Quality tab. Each feature is explained in detail on the following pages. Original Type Enables you to select the type of original document you wish to copy to ensure optimum copy quality. Auto Exposure Prevents the background color of an original from appearing on the output copies. Lighter/Darker/Contrast Allows you to adjust the lightness, darkness and contrast of the output copy.
USER GUIDE (COPIER) Original Type The Original Type feature enables you to define the kind of original document you wish to copy. The copier automatically makes adjustments to optimize the copy based on the original type. The following types are available: Text & Photo Use for original documents that contain pictures and printed text, as you often see in magazines or professional journals. NOTE:This is the default setting. Originals do not have to contain photographs and text.
1 2 On the Image Quality tab select Original Type.
USER GUIDE (COPIER) Auto Exposure This feature prevents the background color of an original from appearing on the output copy. A newspaper or colored paper are examples of this type of original. 1 2 3 1–48 On the Image Quality tab select Auto Exposure. Select On. Select Start to make copies or Save to select additional features.
USER GUIDE (COPIER) The Lighter/Darker feature enables you to adjust the overall lightness or darkness of the output copy. Contrast allows you to adjust the clearness of the image. If you increase the Contrast, the copy appears sharp & vivid and is composed of mainly high and low density elements. If you decrease the Contrast, the copy is softer and renders more uniformly using mid-tones. There are seven levels of adjustment for Lighter/Darker and five levels of adjustment for Contrast.
USER GUIDE (COPIER) Sharpness/Saturation The Sharpness feature allows you to adjust the amount of edge definition on the copies. The Color Saturation feature allows you to adjust the overall richness of color on the copy. There are five levels of adjustment for each feature. 1 2 3 4 On the Image Quality tab select Sharpness/Saturation. Press the up and down arrows to increase or decrease the Sharpness of the original. Press the up and down arrows to adjust the Color Saturation of the original.
USER GUIDE (COPIER) The Color Shift feature allows you to shift all of the copy colors toward the adjacent hue. If you select one of the Warm buttons, the red colors shift toward the yellow hue, the green colors shift toward the cyan hue, and the blue colors shift toward the magenta hue. All colors between these original colors also shift in the same direction.
USER GUIDE (COPIER) Color Balance The Color Balance feature allows you to adjust the balance between colors and the overall amount of color on the output copies. You can adjust the levels of all four process colors (Yellow, Magenta, Cyan, and Black) for their low, medium and high density ranges. 1 2 3 4 1–52 On the Image Quality tab select Color Balance. Select the button for the color you want to adjust.
USER GUIDE (COPIER) The Image Quality Presets feature automatically changes Image Quality settings to produce various predetermined effects. The following options are available: Normal Makes no changes to the image quality and produces copies with the same quality and density of the original. This is the default setting. Lively Uses the highest color saturation to produce rich, vivid output colors. Bright Produces a sharp, clear image on the copy.
USER GUIDE (COPIER) Output Format Tab Below is a brief description of each feature available on the Output Format tab. Each feature is explained in detail on the following pages. Multiple Up Allows you to copy 2 or 4 images from multiple originals onto a single page. Transparency Separators Allows you to insert blank paper separators between transparencies. Also copy sets can be made in conjunction with the transparencies.
USER GUIDE (COPIER) The Multiple Up feature enables you to copy 2 or 4 images from multiple originals onto a single page. NOTE:When using this feature place the originals in the DADF. NOTE:Depending on the size of the original, some image loss might occur along the edge of the image. The following options are available: 1 Up Copies one image on each output copy. 2 Up Copies two images on each output copy. 4 Up Copies four images on each output copy.
USER GUIDE (COPIER) 1 2 On the Output Format tab select Multiple Up.
USER GUIDE (COPIER) • 4 Up 3 4 • Horizontally from the upper left corner • Horizontally from the upper right corner • Vertically from the upper left corner • Vertically from the upper right corner USER GUIDE (COPIER) Select the desired Image Order: Select the icon that most closely resembles the Original Orientation for the loaded documents. Select Start to make copies or Save to select additional features.
USER GUIDE (COPIER) Transparency Separators When the Transparency Separators feature is used, the copier automatically inserts a blank sheet of paper between the transparency copies. In addition to the transparency set, you may also select copy sets. The following options are available: Off Blank Separators Copies are made without transparency separators. A blank sheet of paper is inserted between every transparency. Only one set can be made.
USER GUIDE (COPIER) 1 2 3 4 5 6 On the Output Format tab select Transparency Separators. Select Blank Separators. Select Paper Tray Settings. Select the size/orientation of the transparencies loaded in Tray 5 (Bypass). Select the paper tray to use for the Blank Separators. Select Start to make copies or Save to select additional features.
USER GUIDE (COPIER) Selecting Separators + N Sets 1 2 3 4 5 6 7 On the Output Format tab select Transparency Separators. Select Separators + N Sets. Select Paper Tray Settings. Select the size/orientation of the transparencies loaded in Paper Tray 5. Select the paper tray to use for the Separators and N sets. Select Save. Select Start to make copies or Save to select additional features.
USER GUIDE (COPIER) This feature allows you to add covers to your copied sets, using paper drawn from a different tray than your copies. You can have blank or printed covers. The following options are available: No Covers No Covers are added to the copy set. This is the default setting. Front Covers A Front Cover is added to the copy set with or without an image. Front & Back Covers A Front & Back Cover is added to the copy set with or without an image.
USER GUIDE (COPIER) 1 2 3 4 5 6 7 On the Output Format tab select Covers. Select the desired option: • No Covers • Front Covers • Front & Back Covers If you selected Front Covers or Front & Back Covers, select the desired Printed Covers option. Select Paper Tray Settings. Select the correct paper tray for the Body Pages and Covers. Select Save. Select Start to make copies or Save to select additional features.
USER GUIDE (COPIER) The Repeat Image feature enables you to copy a single image multiple times onto one page. The following options are available: Off Auto Repeat Variable Repeat This is the default setting, which produces only one image per output page. This option enables the copier to automatically determine the number of output images that will fit on a single page. With this option you can specify the number of images that will print on a single sheet by selecting the number of rows and columns.
USER GUIDE (COPIER) 1 2 3 4 On the Output Format tab select Repeat Image. Select the desired option: • Off • Auto Repeat • Variable Repeat • Press the up arrow to increase the number of images to print in a column, or press the down arrow to decrease the number. The range is from 1 through 33. • Press the up arrow to increase the number of images to print in a row, or press the down arrow to decrease the number. The range is from 1 through 23.
USER GUIDE (COPIER) This feature allows you to create a poster size reproduction of the original document by creating multiple images that can be trimmed and joined together after. There will be a 10mm image overlap on the copies to allow for the trimming and joining required to assemble the copies into a poster. When using this feature place the original on the Document Glass in the same orientation as the orientation of the paper loaded in the selected paper tray. The DADF cannot be used.
USER GUIDE (COPIER) 1 2 3 4 On the Output Format tab select Poster. Select the desired option: • 2x2 • 3x3 • 4x4 Select the desired Paper Tray. Select Start to make copies or Save to select additional features. NOTE:Poster cannot be used with the following features: Tray 5 (Bypass), Auto Paper Tray selection, 1 to 2 Sided, 2 to 2 Sided, Multiple Up, Collated, Repeat Image, Bound Originals, Covers, Book Duplex, Transparency Separators, Booklet Creation, and Build Job.
USER GUIDE (COPIER) When the Mirror Image feature is selected, the output copy appears as a mirror image reflection of the original document. The Negative Image feature reverses the colors of the whole document image. NOTE:Negative Image cannot be used with Dual Color. NOTE:When Negative Image is used with Border Erase, the Border Erase area becomes white. 1 2 3 On the Output Format tab select Mirror Image/ Negative Image. Select the desired options: • Select On or Off for Mirror Image.
USER GUIDE (COPIER) Scan Options Tab Below is a brief description of each feature available on the Scan Options tab. Each feature is explained in detail on the following pages. Original Size Mixed Size Originals Allows you to place documents of mixed sizes into the DADF for copying. Bound Originals Automatically scans two adjoining pages of a bound document and copies them onto two separate sheets of paper.
USER GUIDE (COPIER) Use the Original Size feature to specify the original document size. The following options are available: Auto Detect The copier automatically recognizes the size of standard documents in the DADF or on the Document Glass. This is the default setting. Standard Sizes Select the document size from one of the 11 preset sizes. These presets can be changed in System Settings mode. You must place the original on the Document Glass.
USER GUIDE (COPIER) Mixed Size Originals This option allows you to place documents of standard mixed sizes into the DADF for copying. When the Mixed Size Originals feature and Auto Paper selection are selected, the copier automatically identifies each document size and selects the appropriate paper tray. You can also specify a paper tray so that all copies are made on the same size paper. 1 2 3 4 5 On the Scan Options tab select Mixed Size Originals.
USER GUIDE (COPIER) The Bound Originals feature enables you to copy a bound document such as books, magazines, notebooks, or stapled sets. When this feature is selected, each page is copied onto a separate sheet of paper. You must place your bound document face down in the upper left corner of the Document Glass. The DADF cannot be used. The following options are available: Off This is the default. Left Page then Right Copies are made starting from the left page of a bound document.
USER GUIDE (COPIER) 1 2 3 4 5 On the Scan Options tab select Bound Originals. Select the desired format: • Left Page then Right • Right Page then Left • Top Page then Bottom Select which pages are to be copied: • Both Pages • Left Page Only • Right Page Only Press the left and right arrows to decrease or increase the Center Erase amount from 0 to 50mm. Select Start to make copies or Save to select additional features.
USER GUIDE (COPIER) This feature allows the machine to automatically rotate the image so that the orientation of the document matches the output paper. The following options are available: Off Always On On during Auto 1 2 3 The copier will not rotate the image even if the orientation differs from the output paper. The copier will automatically rotate the image if the orientation differs from the output paper.
USER GUIDE (COPIER) 4 Select Start to make copies or Save to select additional features. NOTE:Image Rotation cannot be used with the following features: Auto Size Detect for Paper Tray 5, Repeat Image and Poster. NOTE:When Booklet Creation is selected, Image Rotation occurs automatically regardless of the Image Rotation setting.
USER GUIDE (COPIER) The Book Duplex feature enables you to make 2 Sided copies of a bound document such as books, magazines, notebooks, or stapled sets. You must place your bound document face down in the upper left corner of the Document Glass. The DADF cannot be used. The following options are available: Left Page then Right Copies are made starting from the left page of a bound document. Right Page then Left Copies are made starting from the right page of a bound document.
USER GUIDE (COPIER) Job Assembly Tab Below is a brief description of each feature available on the Job Assembly tab. Each feature is explained in detail on the following pages. Stored Jobs Build Job Booklet Creation 1–76 Allows you to program various feature settings in the built-in copier memory as a single job. Allows you to build a job using different settings for each page or segment of a job. Automatically copies your originals such that the output set can be folded into a booklet.
USER GUIDE (COPIER) The Stored Jobs feature allows you to program various feature settings in the built-in copier memory as a single job. Up to 8 jobs can be stored and up to 18 characters can be entered for each job name. This feature is especially helpful for complex jobs that you run frequently. You can retrieve stored jobs and apply their programming features to a new copy job. Deleting stored jobs frees that memory position for storing different jobs.
USER GUIDE (COPIER) Deleting a Job 1 2 3 4 5 On the Job Assembly tab select Stored Jobs. Select Delete. Select the job number you want to delete. Select the desired option: • Yes: to confirm the deletion. • No: to cancel the deletion. Select Close. You can now store a new job in place of the job you deleted. Retrieving a Job 1 2 3 4 1–78 On the Job Assembly tab select Stored Jobs. Select the job number you want to retrieve. Select Close. Select Start to make copies.
USER GUIDE (COPIER) Build Job enables you to program, scan, and store individual job segments of a large or complex job, and then print all the segments as one complete job. 1 2 3 4 5 6 On the Job Assembly tab, select Build Job. Select On. To make a sample set of your originals, select On for Sample Set. Select Save. Load your originals for the first segment of the job. Set the desired features for the job and press Start. Check that Next Original is selected while the document is being copied.
USER GUIDE (COPIER) 7 8 9 Load the next segment of the job, and set the desired features. • Chapter Division - If you select Chapter Division, the next document will be copied onto Side 1, if 2 Sided is selected. • Change Settings - Select Change Settings to change job features for the next segment of the job. When you select Change Settings, the Basic Copying screen is displayed. Select the desired features. Select Start. Repeat steps 5 through 7 for each job segment.
USER GUIDE (COPIER) This feature copies your originals to make a booklet. Two images are copied on one page, side by side, on both sides of each page. When you fold the pages in half to make a booklet, the pages are in the correct order. The maximum number of originals that can be used is 100. If the number of originals is not a multiple of four, blank pages will be automatically added.
USER GUIDE (COPIER) Duplex Automatic Document Feeder (DADF) This section describes the Duplex Automatic Document Feeder (DADF) for the DocuColor Series printer/copier. The DADF automatically feeds up to 50 sheets of the same size documents or mixed size documents, one at a time, onto the Document Glass, feeding the top sheet first. Documents are delivered to the Original Catch Tray after they have been copied.
USER GUIDE (COPIER) Always use the recommended types of input documents so that the Duplex Automatic Document Feeder operates within the design specifications. Documents jams may occur if non-standard documents are used, resulting in damaged documents. Standard DADF document specifications Weight Size The document should be 16 lb. to 32 lb. (64 to 128 gsm) North and South America: 8.5x5.5 in., 8.5x11 in., 8.5x14 in., 11x17 in., A4 European market: A5, A4, A3, 8.5x13 in., 8.5x14 in., 8.5x11 in., 11x17 in.
USER GUIDE (COPIER) Documents Not Recommended The following document types cause document jams or malfunction of the printer/copier. Make copies of these documents by placing them directly onto the Document Glass.
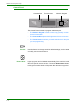
USER GUIDE (COPIER) You can load up to 50 documents from 16 lb. to 32 lb. (64 to 128 gsm) into the DADF. 1 2 Remove any paper clips or staples from the documents. Align the documents. Place the documents face up in the Original Input Area of the DADF. Slide the documents to the left until the green Document Feed Lamp lights. If the lamp does not light, readjust the alignment and or the placement of the documents until the lamp lights.
USER GUIDE (COPIER) Finisher (Optional Accessory) The DocuColor printer/copier may be equipped with an optional Finisher. The Finisher contains the following components: Finisher Cover Button Finisher Tray Finisher Front Door Staple Cartridge Finisher Stand Provides access to the Finisher paper path. Completed jobs are delivered to this tray. Provides access to the Stapler area. Load a new staple pack when needed. Supports the Finisher and may be used for storage.
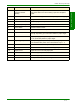
USER GUIDE (COPIER) Stapling options are selected from the UI or from your printer driver and depend on the paper selected. The table below shows the acceptable paper sizes and stapling options. Copying Paper Orientation Paper Size LEF B5, A4, 8.5x11 in. SEF A4, 8x10 in., 8.5x11 in., 8.5x13 in., 8.5x14 in. SEF B4, A3, 11x17 in.
USER GUIDE (COPIER) Printing Paper Orientation Paper Size LEF B5, A4, 8.5x11 in. SEF A4, 8x10 in., 8.5x11 in., 8.5x13 in., 8.5x14 in. SEF B4, A3, 11x17 in.
USER GUIDE (COPIER) This section describes how to check currently copying, printing, queued, or completed jobs. It also describes how to change print schedules to cancel print jobs, or to change the print priority of queued jobs. Checking Current Jobs This section describes the procedure for checking currently copying, printing or queued jobs. 1 2 Select the Job Status button on the Control Panel. The Job Status screen is displayed. Select Current and Pending Jobs.
USER GUIDE (COPIER) 4 Check the status of the selected job. • To cancel a job select Stop. This cancels processing of the currently printing, copying, or queued job. • You can change the print priority when there are two or more queued jobs. To change the print priority: • Select Promote Job. The print order will be changed so that the job you instructed higher print priority to will be printed after the current job.
USER GUIDE (COPIER) This section describes how to check completed jobs. A list displays whether jobs have been completed normally or not. This list also allows you to check details of completed jobs in more detail. 1 2 3 4 Select the Job Status button on the Control Panel. The Job Status screen is displayed. Select Completed Jobs. The Completed Jobs screen is displayed. A job list is displayed if there are completed jobs. Select the job you want to check using the up and down arrow buttons.
USER GUIDE (COPIER) Outputting/Deleting Secure Prints This section describes how to output and delete documents saved by the secure print feature. 1 2 3 4 Select the Job Status button on the Control Panel. The Job Status screen is displayed. Select Stored Documents. The Stored Documents screen is displayed. Select Secure Print. The Secure Print screen is displayed. Select the ID number of the user you want to check. • Enter a 3-digit number for the user ID using Numeric Keypad on the control panel.
USER GUIDE (COPIER) Select the document to print. All documents can be selected by selecting the Select All. • • 8 To print a secure document: • Select the secure document, and select Print. The Print Confirmation screen is displayed. • Select how the document is to be processed after it is printed. • To cancel printing, select Cancel. To delete secure documents: • Select the secure document, and select Delete. The Delete Confirmation screen is displayed. • Select Yes.
USER GUIDE (COPIER) Outputting Sample Prints This section describes how to output and delete documents stored by the sample print feature. You can instruct the machine to output sample prints when you are printing multiple copies of a job from a client. Selecting this feature will instruct the machine to print only one copy of the job. To print the remaining copies after confirming the print result, instruct the machine to output the sample print.
USER GUIDE (COPIER) Select the document to print. You can select all documents by selecting Select All. • • 7 To print a sample print document: • Select the sample print document, and select Print. The Print Confirmation screen is displayed. • Select Yes. Sample print documents are deleted from memory after the remaining number of copies is output. To delete sample print documents: • Select the sample print document, and select Delete. The Delete Confirmation screen is displayed. • Select Yes.
USER GUIDE (COPIER) Delayed Print You can specify the time to start outputting jobs from the client. When the specified time is reached, jobs stored to memory will begin printing. This section describes how to output documents stored to memory using the Delayed Print feature. It also describes how to delete jobs. NOTE:If the machine is turned Off/On with specified output time prints stored to memory, output of these prints will automatically begin regardless of the specified time setting.
USER GUIDE (COPIER) This section describes how to delete documents stored to mailboxes. 1 2 3 4 Select the Job Status button on the Control Panel. The Job Status screen is displayed. Select Stored Documents. The Stored Documents screen is displayed. Select Private Mailbox. The Mailbox screen is displayed. Select the mailbox to confirm. • 5 Enter a 3-digit number for the mailbox using Numeric Keypad on the control panel.
USER GUIDE (COPIER) Machine Status Machine status can be checked by selecting the Machine Status button on the Control Panel. The following items are on the Machine Status screen: • Serial Number • Machine Configuration • Software Version • Consumable Status • Paper Tray Information • Billing Meters • Error Reports Machine information, Consumable status, Paper Tray information, Billing Meters, and Error Reports can be checked by selecting the appropriate tab on the Machine Status screen.
USER GUIDE (COPIER) Checking Consumables Error History Report Select the Billing Meter/Print Report tab to check the current meter readings and to print reports. Select the Consumables tab to check the status of the machine consumables. Select the Faults tab to print the Error History Report.
USER GUIDE (COPIER) Machine Information 1 2 3 4 1–100 Press Machine Status. The Machine Status screen is displayed. Select Machine Information. The Machine Information screen is displayed. The Serial Number will be displayed. Select Close to return to the Machine Status screen.
USER GUIDE (COPIER) This section describes maintenance procedures that should be performed on your machine regularly. When replacing consumable items, such as Toner Cartridges, refer to the instructions included with the items for information on how to replace them. Cleaning the DADF and Document Glass Keep the DADF and Document Glass clean to ensure clean copies and acceptable copy quality. Clean the DADF and Document Glass as needed. 1 2 3 4 Open the DADF document cover.
USER GUIDE (COPIER) Changing Toner Cartridges When a message is displayed to replace a Toner Cartridge, follow the instructions provided here in addition to those on the labels surrounding the cartridges. NOTE: When a message appears indicating that a Toner Cartridge is low, the color that is low will be shown. If additional cartridges are low, a more generic message will be displayed and you will not know which cartridges require replacement.
USER GUIDE (COPIER) 5 6 7 8 Pull the cartridge completely out of the printer/copier. Dispose of the cartridge according to local regulations. USER GUIDE (COPIER) 4 Remove the new cartridge from the box. Shake the cartridge from side to side. With the arrow on the cartridge facing upward, slide the cartridge into the printer/copier. Rotate the cartridge clockwise until the arrow on the cartridge is aligned with the arrow and lock position on the printer/copier.
USER GUIDE (COPIER) 9 10 Close the Front Door of the printer/copier. Remove the sheets of paper on the floor under the Toner Cartridge, and dispose of them according to local regulations. CAUTION: Do not use warm or hot water, or cleaning solvents, to remove toner from your skin or clothing. This will set the toner and make it difficult to remove. If any toner gets on your skin or clothing, use a brush to remove the toner, blow it off, or wash it off with cold water and mild soap.
USER GUIDE (COPIER) USER GUIDE (COPIER) Machine Specifications Speed by Media DocuColor 2240 Plain Paper (8.5x11 in./216x279mm LEF): • Black and white: 40 ppm • Color: 22 ppm Transparency: • Black and white: 16 ppm • Color: 8 ppm Heavyweight 1 (28 lb. bond to 65 lb. cover/106 to 169 gsm): • Black and white: 16 ppm • Color: 11 ppm Heavyweight 2 (65 lb. cover to 110 lb. index/170 to 220 gsm): DocuColor 1632 • Black and white: 11 ppm • Color: 11 ppm Plain Paper (8.5x11 in.
USER GUIDE (COPIER) Dimensions and Weight DocuColor 2240/1632 Finisher (optional accessory) 1–106 The dimensions are: 666 x 780 x 1145mm. Each size +/- 5mm. The weight is: 174kg. The dimensions are: 300 x 590 x 945mm. Each size +/- 5mm. The weight is: 35kg.