Xerox Corporation Global Knowledge & Language Services 800 Phillip Road – Building 845 – 17S Webster, New York 14580 USA © 2000 Xerox Corporation. All rights reserved. Copyright protection claimed includes all forms and matters of copyrightable material and information now allowed by statutory or judicial law or hereinafter granted, including without limitation, material generated from the software programs that are displayed on the screen such as styles, templates, icons, screen displays, looks, etc.
Contents Safety notes . . . . . . . . . . . . . . . . . . . . . . . . . . . . . . . . . . . . . . . . . 1 Electrical safety. . . . . . . . . . . . . . . . . . . . . . . . . . . . . . . . . . . . . . . . . . . . . . . . . . . . . . 1 Maintenance safety. . . . . . . . . . . . . . . . . . . . . . . . . . . . . . . . . . . . . . . . . . . . . . . . . . . 2 Overview . . . . . . . . . . . . . . . . . . . . . . . . . . . . . . . . . . . . . . . . . . . . 3 Finisher/Mailbox configuration . . . . . . . . . . . . .
Problem solving . . . . . . . . . . . . . . . . . . . . . . . . . . . . . . . . . . . . . 22 Clearing paper jams . . . . . . . . . . . . . . . . . . . . . . . . . . . . . . . . . . . . . . . . . . . . . . . . . Interface Area jam . . . . . . . . . . . . . . . . . . . . . . . . . . . . . . . . . . . . . . . . Area 5 jam . . . . . . . . . . . . . . . . . . . . . . . . . . . . . . . . . . . . . . . . . . . . . . Area 7 jam . . . . . . . . . . . . . . . . . . . . . . . . . . . . . . . . . . . . . . . . . . . .
Safety notes The Xerox In-line Stapler Finisher and the recommended maintenance supplies have been designed and tested to meet strict safety requirements. Attention to the following notes will ensure the continued safe operation of your equipment. Electrical safety Do not attempt to override any electrical or mechanical interlock devices. WARNING: Never push objects of any kind into slots or openings on this equipment.
Maintenance safety Do not attempt any maintenance procedure that is not specifically described in the documentation that is supplied with your In-line Stapler Finisher. Do not use aerosol cleaners. The use of supplies that are not approved may cause poor performance of the In-line Stapler Finisher, and could create a dangerous condition. Use the supplies and cleaning materials only as directed in the DocuColor 12 System Administration Guide or Document Centre ColorSeries 50 System Administration Guide.
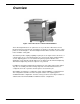
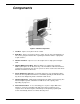
Overview Figure 1: Xerox DocuColor 12 with a Finisher/Mailbox The In-line Stapler Finisher is an optional accessory for the Xerox DocuColor 12 and Document Centre ColorSeries 50 copier/printers. It attaches to the right side of the copier/ printer, as shown in Figure 1. The In-line Stapler Finisher will be referred to as the Finisher in the remainder of this guide. The Finisher provides stapling capability for print jobs.
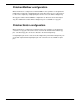
Finisher/Mailbox configuration When the Finisher is configured as a Finisher/Mailbox, the top 10 bins are designated as mailbox bins for print jobs. Unstapled print jobs can be directed to any one of these bins or to either of the output trays. Stapled print jobs must be sent to the Finisher Output Tray. All copy jobs from the Finisher/Mailbox configuration are directed to the Center Output Tray. The mailbox bins and the Finisher Output Tray are not available for copy jobs.
Components Figure 2: Finisher Components 1 Left Door - Open to clear jams in Areas 5 and 6. 2 Right Door - Open to clear jams in Areas 7 and 8. The top edge of the Right Door is also used to grasp the Finisher when separating the Finisher from the copier/printer for jam clearance. 3 Finisher Front Door - Open to access the stapler area for staple jams and staple refills.
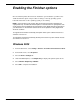
Enabling the Finisher options Once the Finisher printer driver has been installed on your workstation, you will need to enable the Finisher options. The procedure for doing so varies by operating system. Follow the instructions for the operating system you are running. NOTE: The procedures in this section apply to the Document Centre ColorSeries 50 copier/printer only.
Windows 95/98 1 From the Start menu, select Settings > Printers > Xerox Document Centre CS 50 PS. 2 From the File menu, select Properties. 3 Select the Device Options tab. 4 Under Installable options, select Output Tray. 5 In the Change setting for box, select Finisher Output Tray + Mailbox. 6 Select OK to complete the installation. Windows NT 4.0 1 From the Start menu, select Settings > Printers > Xerox Document Centre CS 50 PS. 2 From the File menu, select Properties.
Mac OS 7.6 and above 1 From the Apple menu, select Chooser. 2 In the Chooser, select AdobePS. 3 In the Select a PostScript Printer dialog box, highlight the name of the desired printer and select Setup. 4 • If a PostScript Printer Description file has not already been associated with the printer, the Select a PostScript Printer Description File window is displayed. • If a PostScript Printer Description file has already been associated with the printer, go to step 6.
Using the Finisher The Finisher can staple from 2 to 50 sheets (50-sheet maximum applies to up to 24 lb/90 gsm paper). You can staple both portrait and landscape documents with single or dual staples. Output to the Finisher Output Tray is delivered face down. • Jobs containing more than 50 sheets will not be stapled. • Paper Tray 5 cannot be selected as the paper source for a stapled job. Refer to the “Technical data” section of this guide for complete stapling specifications.
Resolving stapling conflicts If a staple option is not compatible with the print settings you have selected in the printer driver, a caution symbol will appear next to the staple option. If you select an item with a caution symbol next to it, a dialog box containing details about the conflict will open. You can either go back to the print settings and make the appropriate changes or you can ignore the conflict. If you ignore the conflict, your job may print without staples.
Stapling mixed size documents Documents containing different page sizes can be stapled if: • all of the sizes in the document are supported by the Finisher • the feed edge (front to rear) of each paper is the same length. The Finisher accepts the following mixed media sizes: A4 LEF with A3 SEF B5 LEF with B4 SEF 8.5 x 11 LEF with 11 x 17 SEF 8.5 x 11 SEF with 8.5 x 13 SEF and 8.5 x 14 SEF If a print job includes incompatible paper sizes, it will be delivered unstapled to the Center Output Tray.
Printing procedures When you are ready to print your job, follow the procedure for your operating system. The steps shown may vary depending on the application you are using. NOTE: The procedures in this section apply to the Document Centre ColorSeries 50 copier/printer. For the DocuColor 12 copier/printer, refer to the product manual supplied by the manufacturer of the Digital Front End connected to your DocuColor 12. From Windows 2000 1 Open your document. 2 From the File menu, select Print.
From Windows 95/98 1 Open your document. 2 From the File menu, select Print. 3 In the Print dialog box, select your printer name from the Name drop-down list box. 4 Click the Properties button. 5 In the Properties dialog box, select the desired print settings. 6 Click the Device Options tab. 7 In the Printer features box, select Staple. 8 In the Change setting for drop-down list box, select the desired staple option. 9 Click OK to return to the Print dialog box.
From Mac OS 7.6 and above 14 1 Open your document. 2 From the File menu, select Page Setup. 3 Select the desired paper size and orientation. 4 Click OK. 5 From the File menu, select Print. 6 From the drop-down list box immediately beneath the printer name, select Output Options. 7 From the Staple drop-down list box, select the desired staple option. 8 Click Print to print your job.
Using CentreWare Internet Services If you are using a Document Centre ColorSeries 50 copier/printer, you can use CentreWare Internet Services to print a print-ready PostScript file and to access Finisher information. The System Administrator can also use CentreWare Internet Services to change the default setting for the out-of-staple condition.
Checking the status of the Finisher output trays CentreWare Internet Services provides you with the status of each of the 10 mailbox bins, as well as the Center Output Tray and the Finisher Output Tray. To check the bin and tray status: 1 Access the Document Centre ColorSeries 50 CentreWare Internet Services Home Page. 2 Click Status. The status tab is displayed. It will contain Input Trays and Output Trays information.
Checking the Staple Cartridge status In addition to information about the other consumables for your Document Centre ColorSeries 50 copier/printer, CentreWare Internet Services provides the status of the Finisher Staple Cartridge. To check the Staple Cartridge status: 1 Access the Document Centre ColorSeries 50 CentreWare Internet Services Home Page. 2 Click Status. The status tab is displayed. 3 Click the consumables button. Consumables information is displayed.
Changing the out-of-staple default setting The Finisher has an out-of-staple default setting. This setting controls whether the copier/ printer will stop or continue processing when the Staple Cartridge is empty. Changing this default setting is a System Administrator function and requires a password. To change the out-of-staple default setting: 1 Access the Document Centre ColorSeries 50 CentreWare Internet Services Home Page. 2 Click Properties. The properties tab is displayed.
Adding staples Check the printer regularly and load a new Staple Pack when needed. Ensure that you have a new Finisher Staple Pack on hand before beginning this procedure. Do not use a Convenience Staple Cartridge. The staples are not interchangeable. NOTE: The Finisher Staple Cartridge is reusable and should not be thrown away. 1 Open the Finisher Front Door, located on the lower right front of the Finisher. 2 Squeeze the Gold Release Latch until the Staple Cartridge is released (Figure 3).
4 Grasp the exposed edge of the white Staple Pack and remove the Staple Pack from the Staple Cartridge (Figure 5). 5 Remove a new Finisher Staple Pack from its packaging. CAUTION: Do not remove the white paper strip that holds the staples in place until the Staple Pack has been loaded into the Staple Cartridge.
7 Remove the white paper strip from the Staple Pack (Figure 7). Figure 7: Removing the paper tape from the Staple Pack 8 Grasp the Staple Cartridge by the gold bar and insert the Staple Cartridge into the cartridge holder (Figure 8). 9 Push the Staple Cartridge into the cartridge holder until the Staple Cartridge snaps into place. • The Gold Release Latch will separate. 10 Close the Finisher Front Door. • Copying/printing will resume.
Problem solving Clearing paper jams When a paper jam occurs, a paper jam message and instructions for clearing the paper jam is displayed on the copier/printer Touch Screen. NOTE: Remove the jammed paper carefully and gradually so you do not tear it. If the jammed paper tears, be sure to remove all the torn pieces of paper. Interface Area jam 1 Slide the Finisher to the right (Figure 9).
2 Do one of the following: • If paper is visible in the Interface Area, remove the paper and proceed to step 5 (Figure 10). • If no paper is visible in the Interface Area, proceed to step 3. Figure 10: Removing paper from the Interface Area 3 Open the copier/printer Right Door and remove the jammed paper (Figure 11). 4 Close the copier/printer Right Door. 5 Slide the Finisher to the left.
Area 5 jam 1 Open the Left Door of the Finisher. 2 Move Handle 5 to the lower position (Figure 12). Figure 12: Lowering Handle 5 3 Rotate Knob 6 counterclockwise to release the jammed paper (Figure 13). 4 Remove the jammed paper (Figure 13). 5 Lift Handle 5 until it snaps into place. 6 Close the Left Door of the Finisher.
Area 7 jam 1 Open the Right Door of the Finisher. 2 Pull up on Handle 7 until it snaps into place (Figure 14). Figure 14: Pulling up on Handle 7 3 Remove the jammed paper (Figure 15). 4 Push down on Handle 7 until it snaps into place. 5 Close the Right Door of the Finisher. • If the door does not close, ensure that Handle 7 is all the way down.
Area 7 and 8 jam 1 Perform steps 1 to 4 of the “Area 7 jam” procedure. 2 Swing Handle 8 to the right until it snaps into place (Figure 16). Figure 16: Swinging Handle 8 to the right 3 Remove the jammed paper carefully (Figure 17). 4 Swing Handle 8 to the left until it snaps into place. 5 Close the Right Door of the Finisher.
Area 9 jam 1 Lift and hold the Finisher Exit Cover (Area 9), located above the Finisher Output Tray (Figure 18). 2 Remove the jammed sheet (Figure 18). 3 Lower the Finisher Exit Cover. 4 If the jam message continues to display, open and close the Finisher Exit Cover again.
Problem solving table Use the table below to identify and troubleshoot problems that may be related to the Finisher. 28 Problem Cause and solution Job is not printing • Finisher trays may be full. Check the trays and empty any that are full. • Finisher may be jammed. Check the copier/printer Touch Screen for any jam messages and clear the jam in the indicated area(s). See the “Clearing paper jams” section of this guide for more information. • Staple Cartridge may be empty.
Ordering supplies The Finisher holds one Staple Cartridge. The Staple Cartridge is reusable and holds one Staple Pack.
Technical data Mailbox/Sorter Bins 100 sheets maximum capacity per bin (1000 sheets total bin capacity) Center Output Tray 300 sheets maximum capacity Finisher Output Tray Same size media: 60 or 100 stapled sets (set by Xerox Service Representative) 1000 sheets of 8.5 x 11 in. or A4 500 sheets of paper larger than 8.5 x 13 in.
Prepared by: Xerox Corporation Global Knowledge & Language Services 780 Salt Road Webster, New York 14580 March 2000 701P34148