QUICK GUIDE DCC400/320/240 Online support: www.fujixerox.com.my/support Website : http://www.fujixerox.com.
INTRODUCTION The main objective of compiling this Quick Guide is to serve as an easy reference to customers. We understand customers are tight up with daily schedules and can only learn up limited machine feature in the training sessions. Thus, we hope this Quick Guide will provide you with all the essential feature should you encounter any operation problems with the machine.
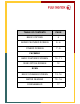
TABLE OF CONTENTS PAGE BASIC COPYING 4 ADDED FEATURES SCREEN 5-6 OTHERS SCREEN 7-9 FACSMILE BASIC FEATURES SCREEN 10 - 11 SEND OPTION SCREEN 12 SCAN BASIC SCANNING SCREEN 13 -14 METER READING 15 - 16 CONSUMABLES 17
DISPLAYING COPY, SCAN AND FAX SCREEN MENU SCREEN COPY SCREEN 1
SCAN SCREEN FAX SCREEN 2
DOCUMENT CENTER C400/320 To enter the copy screen when auditron is on 1. Press Password/System Setting 2. Enter the password 3.
COPIER BASIC COPYING SCREEN Single Side to Double Side Copying Steps 1. Load Document 2. Select 1->2(H to H) 3. Press Start Double Side to Double Side Copying Steps 1. Load Document 2. Select 2->2 (H to H) 3. Press Start Double Side to Single Side Copying Steps 1. Load Document 2. Select 2->1 (H to H) 3.
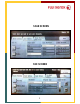
ADDED FEATURES SCREEN Margin Shift Steps 1. Load Original 2. Select Side 1 3. Highlight Variable Shift 4. Adjust the shift direction 5. Select Margin Shift 6.
Multiple up (Combine 2 or 4 onto 1 sheet paper) Steps • 1. Load Documents 2. Select Multiple Up 3. Select 2 Up or 4 Up 4. Select the required layout order 5. Confirm the setting and save 6. Press Start Separators (Printing with a blank sheet inserted) Steps 1. Load transparencies in Tray 5 (Bypass Tray) 2. Load Documents 3. Select Separators 4. Select Blank Separators 5. Select Paper Tray Settings 6. Confirm the settings and save 7.
OTHERS SCREEN Covers Steps : Load paper for the cover in one of the trays 1 to 4. Select covers Select front cover Highlight Printed covers to on Select Paper Tray Settings Select the paper to use for copying at Body Pages and the paper to use for cover 7. Confirm the setting and save 8. Press Start 1. 2. 3. 4 5. 6.
Booklet Creations Steps 1. 2. 3. 4. 5. Load Document Select Booklet Creation Choose left bind Select Paper Tray Settings Choose tray for Body Pages and Covers Choose ( landscape orientation only) 6. Confirm the setting and save 7. Press Start Poster Steps: 1. 2. 3. 4. 5. 6. Load document on the platen glass Select Poster Select the number of times that the document is to be divided Select Paper Tray Confirm the settings and save Press Start Build Job Steps: 1. Load document for the first job 2.
Book Duplex (Copy from Book) Steps: 1. Select Book Duplex 2. Choose Right Page then Left 3. Load the book on platen glass starting from the cover 3. Press Start 4. Flip to the next page starting from the last page 6. Press Start 7. Scan back the cover of the book (to complete the book duplex) 10.Press Start Repeat Image (Image repeated for the specified number of times) Steps: 1. Load Document 2. Select Repeat Image 3. Select Auto Repeat 4. Confirm the setting and save 5.
FACSIMILE BASIC FEATURES SCREEN Manual Dialing Steps: 1. Load Document 2. Dial the fax number using the keypad 3. Press Start Speed Dialing Steps: 1. Load Document 2. Press the Speed Dial number using the keypad 3. Press Start One Touch Dialing Steps: 1. Load Document 2. Select the Speed Dial number from the One Touch Keypad 3.
Group Dialing Steps: 1. 2. 3. 4. 5. Load Document Select Address Book Highlight Group Press the particular group Press Start Manual Broadcast Steps: 1. Load Document 2. Dial the fax number 3. Press Next Recipient on the fax screen 4. Dial the next number (maximum 20 recipient) 5. Press Next Recipient 6. Press Start after the last number Using iFax Dialing Steps: 1. Load Document 2. Press Fax/iFax 3. Select Keyboard 4. Enter E-mail address 5.
SEND OPTION SCREEN Delayed Start Steps: 1. 2. 3. 4. 5. 6. 7. Select Priority Send/Delayed Start On Delayed Start Press Start Time Select the Hour and Minute using the arrow Select Save Key-in fax number Press Start Transmission Report Steps: 1. 2. 3. 4. 5. 6.
SCAN Basic Features Screen Scan to Mailbox Steps: 1. 2. 3. 4. 5. 6. Load Document Press Mailbox Select desire number Key-in password Press Confirm Press Start Retrieve document using DocuWork Desk Steps: 1. Go to Start>.Program>FujiXerox DocuWorks>DocuWork Desk Press E-mail 2. Click Scanner icon 3. Select Xerox Scanner 4. Key-in password 5. Click Open Mailbox 6. Click Import 7.
Retrieved document using Fuji Xerox scanner Utility Steps: 1. 2. 3. 4. 5. 6. 7. 8. 9. Go Start > Program > Fuji Xerox > Utility > Mailbox Viewer 2 Select Scanner > Key-in mailbox number > Key-in password > Open Mailbox Highlight Scanned Image > Highlight Settings Tick Auto Import > Tick Import Setting Choose the options you require Save in > Browse > Save (create your own folder) Click OK 3x Click Import and Close Scan to E-mail Steps: 1. 2. 3. 4. 5. 6.
CHECKING BILLING METERS 1. Press Machine Status 2. Select Billing Meter .
3.
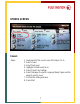
CONSUMABLES YELLOW / MAGENTA / CYAN TONER - LIFE SPAN 2,000 SHEETS BLACK TONER – LIFE SPAN 3,5OO SHEETS YELLOW /MAGENTA/ CYAN DRUM – LIFE SPAN 1,700 SHEETS BLACK DRUM – LIFE SPAN 35OO SHEETS WASTE TONER BOTTLE – REPLACE WHEN IT IS FULL Checking Consumables 1. Press Machine Status 2. Select Consumables 3. View the consumables status 4. Order Toner/Drum if remaining 25% stated on the consumables.
ADDITIONAL NOTE How to copy IC Steps 1. Load IC at the top left corner on the platen glass 2. Choose A4 portrait for Paper Supply 3. Choose 1 to 2 for 2 Sided Copying 4. Select Text & Photo for the Original Image 5. Press Start 6. Turn IC and place it at the A4 mark 7.
SAFETY NOTE ITEM DO DON’T 1.Sharing of Supply socket One socket for one plug Do not share socket with heavy load unit. Do not use cable extension/multiple socket extension. 2.Power cord length Proper length to allow certain loosening Do not allow cable pull to tension 3.Power cord routing Avoid obstruction. Keep away from combustable/water/ twisting around table& chair 4.Power cord surface condition Discard if surface found stripped /exposed/cracked/burnt 5.