
User's Manual

Note
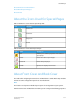
The buttons above the sliders each have three values that change to show the numerical
effect that changing the slider has on that particular color.
Note
To reset all of the sliding scales, click the Rest All To Zero button.
Note
If you make an adjustment using the C, M, Y, or K buttons, the All Colors button becomes
unavailable.
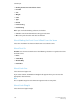
About Adjusted Preview
The check box enables you to toggle between a representation of the original color
balance settings and your adjusted color settings. The preview of your job images is only
available for PostScript
™
, PDF, and TIFF file types. For other file types, such as PCL or
VIPP, stock images are used for the preview.
If you select and then clear the Adjusted Preview check box, you can show or hide the
effect of the color balance adjustment to obtain before and after views of the displayed
image.
Note
To select a different stock image for the adjusted preview, use either method below:
• Click the Right-Arrow and Left-Arrow icons to move forwards or backwards through
the stock preview images sequentially.
• Click the White Circle, located at the bottom of the preview image, that represents
the position of the desired image within the set of stock images.
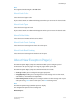
About Color Mode
Color Mode: Choose one of the following:
• Normal
• Normal with Enhanced Gloss
• Grayscale
• Fast Black
Related Topics:
About Grayscale Printing
About Grayscale Printing
Selecting a Grayscale option disables any Image Quality features that are incompatible
with grayscale printing.
3-43FreeFlow Print Server
Online Help
Job Manager