
User's Manual


4. To disable a tray, select the tray and click Disable Tray.
To make multiple selections, do either of the following:
• For individual items, press and hold down the <CTRL> (Control) key and select
each item by left-clicking the mouse.
• For multiple, sequential items, press and hold down the <SHIFT> key and select
the first and last items that you want from the list.
This action highlights the first and last selected items and all items in between.
The check mark in the Status field changes to an X.
5. To enable a tray, select the tray and click Enable Tray.
You may also select Enable, Disable, Select All, and Clear All from the More Actions
menu as an alternate method.
The check mark in the Status field changes to an X.
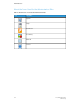
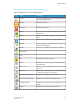
About the Icons Used in Printer
Table 14. Identification of Icons Used in Printer
DescriptionNameIcon
Indicates that no summary is available.Unspecified
Indicates a status of enabled.Enabled
Indicates a status of disabled.Disabled
Represents the action of disabling a feature or com-
ponent.
Disable
About the Consumables Tab
The Consumables tab enables you to monitor the remaining level of each dry ink used.
The Consumables table consists of 3 columns:
• Dry Ink: This column displays an icon for each color of dry ink. The height of the
colored area in the icon represents the level of dry ink remaining. The following colored
icons appear:
- Cyan
- Magenta
- Yellow
- Black
5-3FreeFlow Print Server
Online Help
Printer