
User's Guide Color Laser Printer C55/C55mp
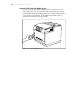


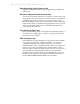
Table Of Contents
- Xerox DocuPrint C55/C55mp Color Laser Printer User’s Guide
- Table of Contents
- Chapter 1: Introduction
- Chapter 2: Introduction to Your C55 Printer
- Chapter 3: Print Media
- Chapter 4: The Control Panel
- Chapter 5: Special C55 Printer Driver Options
- Chapter 6: Troubleshooting
- Chapter 7: Printer Maintenance
- Chapter 8: Optional Equipment
- Chapter 9: Network Printer Services
- Appendix A: Safety Notes
- Appendix B: Special Notices
- Appendix C: Printer Technical Specifications
- Index
- Table of Contents
- CHAPTER1.PDF
- Introduction
- What Is In This Guide
- Chapter 1: Introduction
- Chapter 2: Introduction to Your C55 Printer
- Chapter 3: Print Media
- Chapter 4: The Control Panel
- Chapter 5: Xerox Printer Driver Options
- Chapter 6: Troubleshooting
- Chapter 7: Printer Maintenance
- Chapter 8: Optional Equipment
- Chapter 9: Network Printer Services
- Appendix A: Safety Notes
- Appendix B: Special Notices
- Appendix C: Printer Technical
- Index
- Conventions Used
- Where To Go For More Information
- What Is In This Guide
- Introduction
- CHAPTER2.PDF
- CHAPTER3.PDF
- CHAPTER4.PDF
- CHAPTER5.PDF
- Special C55 Printer Driver Options
- PostScript vs. PCL 5C Printer Driver Feature Comparison
- PCL 5C Printer Driver Features
- PostScript Printer Driver Features
- ImageFix (Windows 95 PostScript only)
- Special C55 Printer Driver Options
- CHAPTER6.PDF
- CHAPTER7.PDF
- CHAPTER8.PDF
- CHAPTER9.PDF
- CHAPTERA.PDF
- CHAPTERB.PDF
- CHAPTERC.PDF
- INDEX.PDF

4–22 T H E C O N T R O L P A N E L
To print your file using customized settings:
1. Insert the disk into the Media Server’s disk drive as shown in Figure
4–2.
2. Press the Media Server button. The Message Display Window will
display <SELECT FILE>. Press Next to display <SETUP MENU>.
Press Enter.
3. Press Next to move through the sub-level menu selections:
<MODE>
<QUANTITY>
<TRAY>
4. Press Enter when the sub-level menu displayed is the one you want to
make choices within.
5. Press Previous and Next in order to display choices for the sub-level
menu you selected.
6. Press Enter when the choice you want to apply to your file is displayed
between the < > symbols.
7. Press Next until <EXIT THIS MENU> is displayed, and press Enter.
8. Press Next until <SELECT FILE> is displayed, and Press Enter.
9. Use the Previous and Next buttons to scroll until the file you want to
apply your custom settings to is displayed and press Enter to print
your file with the custom settings applied.
NOTE: Any application-specific settings saved to your file will override
Media Server Menu options.