
User's Guide Color Laser Printer C55/C55mp
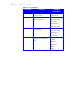


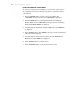
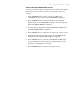
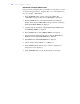
Table Of Contents
- Xerox DocuPrint C55/C55mp Color Laser Printer User’s Guide
- Table of Contents
- Chapter 1: Introduction
- Chapter 2: Introduction to Your C55 Printer
- Chapter 3: Print Media
- Chapter 4: The Control Panel
- Chapter 5: Special C55 Printer Driver Options
- Chapter 6: Troubleshooting
- Chapter 7: Printer Maintenance
- Chapter 8: Optional Equipment
- Chapter 9: Network Printer Services
- Appendix A: Safety Notes
- Appendix B: Special Notices
- Appendix C: Printer Technical Specifications
- Index
- Table of Contents
- CHAPTER1.PDF
- Introduction
- What Is In This Guide
- Chapter 1: Introduction
- Chapter 2: Introduction to Your C55 Printer
- Chapter 3: Print Media
- Chapter 4: The Control Panel
- Chapter 5: Xerox Printer Driver Options
- Chapter 6: Troubleshooting
- Chapter 7: Printer Maintenance
- Chapter 8: Optional Equipment
- Chapter 9: Network Printer Services
- Appendix A: Safety Notes
- Appendix B: Special Notices
- Appendix C: Printer Technical
- Index
- Conventions Used
- Where To Go For More Information
- What Is In This Guide
- Introduction
- CHAPTER2.PDF
- CHAPTER3.PDF
- CHAPTER4.PDF
- CHAPTER5.PDF
- Special C55 Printer Driver Options
- PostScript vs. PCL 5C Printer Driver Feature Comparison
- PCL 5C Printer Driver Features
- PostScript Printer Driver Features
- ImageFix (Windows 95 PostScript only)
- Special C55 Printer Driver Options
- CHAPTER6.PDF
- CHAPTER7.PDF
- CHAPTER8.PDF
- CHAPTER9.PDF
- CHAPTERA.PDF
- CHAPTERB.PDF
- CHAPTERC.PDF
- INDEX.PDF
4–16 T H E C O N T R O L P A N E L
DESIGNATE A TRANSPARENCY TRAY
If the optional Lower Feeder (Tray 2) is installed on your printer, you can
use the following procedures to designate Tray 1 or 2 as the transparency
tray. See “Chapter 3: Print Media.”
1. Press the On Line button located on the Control Panel. The
<ON LINE> message is cleared, and <OFF LINE> is displayed.
2. Press the Menu button, located immediately below the Message
Display Window. The <OFF LINE> message is cleared, and the Top
Menu <CONTROL MENU> is displayed.
3. Scroll through the Top Menus, using the Previous and Next buttons
until <MEDIA MENU> is displayed.
4. Press the Enter button when <MEDIA MENU> is displayed.
5. Scroll through the sub-level menu options, using the Previous and
Next buttons until <TRANSPARENCY> is displayed.
6. Press Enter when <TRANSPARENCY> is displayed.
7. Scroll to display either <TRAY 1> or <TRAY 2>.
8. Press the Enter button when the tray you want to designate as a
transparency tray is displayed.
9. Press the On Line button to put the printer back on line again.