
User's Guide Color Laser Printer C55/C55mp


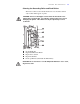
Table Of Contents
- Xerox DocuPrint C55/C55mp Color Laser Printer User’s Guide
- Table of Contents
- Chapter 1: Introduction
- Chapter 2: Introduction to Your C55 Printer
- Chapter 3: Print Media
- Chapter 4: The Control Panel
- Chapter 5: Special C55 Printer Driver Options
- Chapter 6: Troubleshooting
- Chapter 7: Printer Maintenance
- Chapter 8: Optional Equipment
- Chapter 9: Network Printer Services
- Appendix A: Safety Notes
- Appendix B: Special Notices
- Appendix C: Printer Technical Specifications
- Index
- Table of Contents
- CHAPTER1.PDF
- Introduction
- What Is In This Guide
- Chapter 1: Introduction
- Chapter 2: Introduction to Your C55 Printer
- Chapter 3: Print Media
- Chapter 4: The Control Panel
- Chapter 5: Xerox Printer Driver Options
- Chapter 6: Troubleshooting
- Chapter 7: Printer Maintenance
- Chapter 8: Optional Equipment
- Chapter 9: Network Printer Services
- Appendix A: Safety Notes
- Appendix B: Special Notices
- Appendix C: Printer Technical
- Index
- Conventions Used
- Where To Go For More Information
- What Is In This Guide
- Introduction
- CHAPTER2.PDF
- CHAPTER3.PDF
- CHAPTER4.PDF
- CHAPTER5.PDF
- Special C55 Printer Driver Options
- PostScript vs. PCL 5C Printer Driver Feature Comparison
- PCL 5C Printer Driver Features
- PostScript Printer Driver Features
- ImageFix (Windows 95 PostScript only)
- Special C55 Printer Driver Options
- CHAPTER6.PDF
- CHAPTER7.PDF
- CHAPTER8.PDF
- CHAPTER9.PDF
- CHAPTERA.PDF
- CHAPTERB.PDF
- CHAPTERC.PDF
- INDEX.PDF
P R I N T E R M A I N T E N A N C E
7–3
Density and Color Balance Adjustment Procedure
You may notice, over the course of using the printer, that colors may
change. For example, reds may begin to take on a purple cast, or blues
may take on a green cast. This happens during the normal use of a color
printer and can be easily remedied by using the Density/Color Balance
Adjustment procedure described below. This procedure, which should be
done monthly, will help correct any color shifts.
This Control Panel procedure involves printing a test page and adjusting
the densities and colors based on the appearance of the Test Page. You
may need to repeat this procedure and test your adjustments until you
achieve the desired effect.
NOTE:
If, during the adjustment process, you decide to return to your starting
point; you can do so by pressing the Enter button when <CANCEL
CHANGES> is displayed.
Printing a Test Page
1. Press the On Line button to take the printer off line.
2. Press the Menu button.
3. Press the Next button to scroll through the Top Menu selections.
4. Press Enter when the Top Menu <SETUP MENU> is displayed.
5. Press the Next button to scroll through the sub-menu selections.
6. Press Enter when <COLOR ADJUST> is displayed. The Printer
may go through a Print Quality adjustment and the Test Page (See
Figure 7–1) will print.