
User's Manual


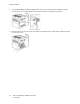
Table Of Contents
- User Guide
- 1 Safety
- 2 Getting Started
- Parts of the Printer
- Power Options
- Accessing the Printer
- Introduction to Apps
- Information Pages
- The Embedded Web Server
- Accessing the Embedded Web Server
- Finding the IP Address of Your Printer
- Viewing the IP Printer Address on the Control Panel
- Obtaining the Printer IP Address from the Configuration Report
- Certificates for the Embedded Web Server
- Downloading the Configuration Report from the Embedded Web Server
- Using the Remote Control Panel Feature
- Installation and Setup
- Connecting the Printer
- Selecting a Connection Method
- Connecting to a Computer Using USB
- Connecting to a Wired Network
- Connecting to a Wireless Network
- Configuring the Printer for a Wireless Network
- Installing the Wireless Network Adapter
- Removing the Wireless Network Adapter
- Connecting to a Wi-Fi Network at the Control Panel
- Configuring the Primary Network at the Control Panel
- Connecting to Wi-Fi Direct
- Initial Printer Setup
- Configuring AirPrint
- Configuring Google Cloud Print
- Installing the Software
- More Information
- 3 Customize and Personalize
- 4 Xerox® Apps
- 5 Printing
- Printing Overview
- Selecting Printing Options
- Printing Features
- Managing Jobs
- Printing Special Job Types
- Selecting Paper Options for Printing
- Scaling
- Printing on Both Sides of the Paper
- Print Quality
- Image Options
- Image Shift
- Color Adjustments
- Printing Mirror Images
- Printing Multiple Pages to a Single Sheet
- Printing Booklets
- Using Special Pages
- Printing Watermarks for Windows
- Orientation
- Printing Banner Pages
- Selecting Job Completion Notification for Windows
- Using Custom Paper Sizes
- 6 Paper and Media
- Supported Paper
- Recommended Media
- Ordering Paper
- General Paper Loading Guidelines
- Paper That Can Damage Your Printer
- Paper Storage Guidelines
- Supported Paper Types and Weights
- Supported Standard Paper Sizes
- Supported Standard Paper Sizes for Automatic 2-Sided Printing
- Supported Paper Types and Weights for Automatic 2-Sided Printing
- Supported Custom Paper Sizes
- Cardstock
- Loading Paper
- Printing on Special Paper
- Supported Paper
- 7 Maintenance
- 8 Troubleshooting
- A Specifications
- B Regulatory Information
- Basic Regulations
- Safety Certification
- Material Safety Data Sheets
- C Recycling and Disposal

Installation and Setup
For reference:
• Installation Guide packaged with your printer
• Online Support Assistant at www.xerox.com/office/VLC400docs
IInnssttaallllaattiioonn aanndd SSeettuupp OOvveerrvviieeww
Before you print, ensure that your computer and the printer are plugged in, powered on, and
connected. Configure the initial settings of the printer, then install the print driver software and
utilities on your computer.
You can connect to your printer directly from your computer using USB, or connect to a network using
an Ethernet cable or wireless connection. Hardware and cabling requirements vary for the different
connection methods. Routers, network hubs and switches, modems, Ethernet cables, and USB cables
are not included with your printer and must be purchased separately. Xerox recommends an Ethernet
connection because it is typically faster than a USB connection, and it provides access to the
Embedded Web Server.
For more information, refer to the System Administrator Guide at www.xerox.com/office/VLC400docs.
SSeelleeccttiinngg aa LLooccaattiioonn ffoorr tthhee PPrriinntteerr
1. Select a dust-free area with temperatures from 10–32°C (50–90°F), and relative humidity 10–
85%.
Note: Sudden temperature fluctuations can affect print quality. Rapid heating of a cold
room can cause condensation inside the printer, directly interfering with image transfer.
2. Place the printer on a level, solid, non-vibrating surface with adequate strength to hold the weight
of the printer. The printer must be horizontal with all four feet in solid contact with the surface.
To find the weight for your printer configuration, refer to Weights and Dimensions.
3. Select a location with adequate clearance to access supplies and to provide proper ventilation.
To find the clearance requirements for your printer, refer to Clearance Requirements.
4. After positioning the printer, you are ready to connect it to the power source and computer or
network.
34
Xerox
®
VersaLink
®
C400 Color Printer
User Guide
Getting Started